Table of Contents
Advertisement
Quick Links
™
Lila
Digital Baby Video Monitor
Moniteur vidéo bébé numérique
Video Monitor Digital para Bebé
Manual / Manuel / Manual
CAUTION: Keep small parts away from children.
ATTENTION: Gardez les petites pièces hors de la portée des enfants.
PRECAUCIÓN: Mantenga las piezas pequeñas fuera del alcance de los niños.
mylevana.com
30000_31000_32000_LILA E_F_S.indd 1
07/01/2013 4:37:33 PM
Advertisement
Table of Contents

Related Manuals for Levana Lila


Summary of Contents for Levana Lila
- Page 1 ™ Lila Digital Baby Video Monitor Moniteur vidéo bébé numérique Video Monitor Digital para Bebé Manual / Manuel / Manual CAUTION: Keep small parts away from children. ATTENTION: Gardez les petites pièces hors de la portée des enfants. PRECAUCIÓN: Mantenga las piezas pequeñas fuera del alcance de los niños.
-
Page 2: Safety Instructions
SAFETY INSTRUCTIONS CAUTION: Keep small parts away from children. Strangulation Hazard: Children can become entangled in cords. Power cords should be kept more than 3 feet away from the crib and baby’s reach at all times. Baby monitors and cameras with power cords should never be hung on or near the crib. -
Page 3: Fcc Statement
FCC STATEMENT FCC WARNING This device complies with part 15 of the FCC Rules. Operation is subject to the following two conditions: (1) This device may not cause harmful interference. (2) This device must accept any interference received, including interference that may cause undesired operation. Any Changes or modifications not expressly approved by the party responsible for compliance could void the users authority to operate the equipment IMPORTANT NOTE:... -
Page 4: Warranty
This warranty is limited to the repair, replacement or refund of the purchase price at LEVANA’s option. This warranty becomes void if the product shows evidence of having been misused, mishandled or tampered with contrary to the applicable instruction manual. -
Page 5: Table Of Contents
TABLE OF CONTENTS SAFETY INSTRUCTIONS .......................2 FCC STATEMENT ..........................3 WARRANTY .............................4 WHAT’S INCLUDED ........................6 BUTTONS AND CONNECTIONS - MONITOR ................7 BUTTONS AND CONNECTIONS - CAMERA ................8 SETUP ...............................9 Battery installation ......................9 Get the Most Out of Your Rechargeable Battery .............9 Connecting Power to the Monitor / Charging Battery .........10 Connecting Power to the Camera ................10 Screen Icons ......................... -
Page 6: What's Included
LEVANA ® does not endorse any LEVANA ® products for illegal activities. Levana is not responsible or liable in any way for any damage, vandalism, theft or any other action that may occur while a LEVANA ® product is in use by the purchaser. -
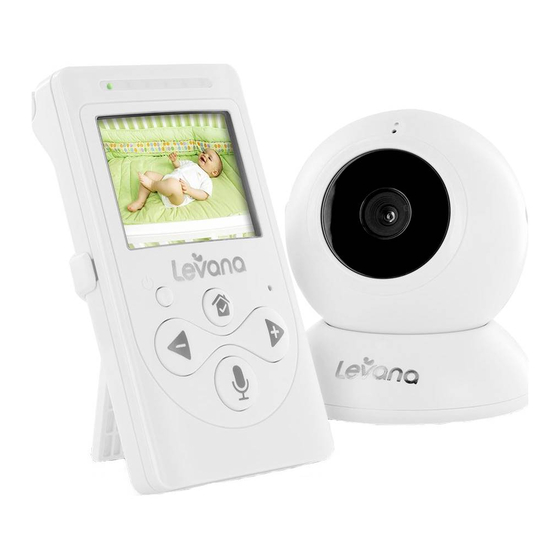
Page 7: Buttons And Connections - Monitor
MONITOR LED SOUND BAR MICROPHONE LED lights show different levels VOLUME UP / MOVE RIGHT of sound BUTTON LCD SCREEN ANTENNA POWER / VIDEO ON-OFF BUTTON Extend to improve signal VOLUME DOWN / MOVE LEFT 10. SPEAKER BUTTON 11. REMOVEABLE STAND CLIP TALK TO BABY™... -
Page 8: Buttons And Connections - Camera
CAMERA MICROPHONE LIGHT SENSOR POWER ON/OFF BUTTON POWER LED PAIRING BUTTON SPEAKER INVISIBLE NIGHT VISION LEDs POWER INPUT CAMERA mylevana.com 30000_31000_32000_LILA E_F_S.indd 8 07/01/2013 4:37:39 PM... -
Page 9: Setup
Avoid extreme heat or cold as this will affect the life of the battery. Turn LCD screen OFF; press POWER button on the front of the monitor ONCE. ™ Lila menu settings that increase battery life: Power Save Mode: After 1 minute of inactivity, monitor enters standby/sleep mode. -
Page 10: Connecting Power To The Monitor / Charging Battery
SETUP Connecting Power to the Monitor / Charging Battery Connect the small end of power adapter marked MONITOR into the DC input on the side of the monitor as shown in the diagram. DC Input Connect the other end of the adapter into an available wall outlet. -
Page 11: Screen Icons
SCREEN ICONS SIGNAL STRENGTH BRIGHTNESS STRONG DARK BRIGHT SIGNAL SIGNAL BATTERY STRENGTH POWER SAVE EMPTY CHARGING FULL CAMERA TALK TO BABY™ MODE PAIRING SUPPORT PAIRING VOLUME EXIT LOUD mylevana.com 30000_31000_32000_LILA E_F_S.indd 11 07/01/2013 4:37:44 PM... -
Page 12: Operation
OPERATION Turn on the MONITOR Press and hold the POWER button on the front of the monitor. Pairing the Camera(s) and Monitor The camera and monitor come paired (connected) to each other automatically. However, if upon opening this package the devices do not automatically connect and transmit, you may do so manually. -
Page 13: Placement Of The Monitor
OPERATION Placement of the Monitor This monitor can be placed on a tabletop. You can place the monitor on a tabletop by using the retractable table stand on the back of the monitor. When not in use, simply tuck the table stand away into the back of the monitor until you hear a "click". -
Page 14: Mounting The Camera On A Wall Safely
OPERATION Mounting the Camera on a Wall Safely: Before drilling the holes, it is important to check the reception and camera positioning in the intended location on the wall. Ensure you are hanging the camera no less than 3 feet away from baby’s crib. Note: Baby monitors and cameras with power cords should never be hung on or near the crib as it is a strangulation hazard. -
Page 15: Night Vision
OPERATION Night Vision INVISIBLE The camera is equipped with NEW Invisible IR (infrared) LEDs LEDs which keep the nursery dark. The LEDs are located on the front of the camera and allow you to see up to 12 feet in complete darkness so you can check on your baby at any time of night. -
Page 16: Monitor
MONITOR Volume – Use the navigational arrows to increase /decrease /mute the VOLUME. Press the button to INCREASE the volume in LIVE VIEW; the VOLUME icon will display the volume level in the top left corner of the screen. – Press the button to DECREASE the volume;... -
Page 17: Using Power Save
MONITOR Using Power Save When in Power Save Mode, the monitor enters standby/sleep mode after 1 minute of inactivity. When sound is detected, the screen changes to live view. To access live view manually when the screen is off, press the POWER button ONCE. -
Page 18: Setting The Brightness
MONITOR Setting the Brightness Brightness Mode sets the brightness of the screen. Reducing the brightness also extends the battery life. To set the Brightness Mode, press the MENU – button. Using the navigational arrows on the front of the monitor, highlight the BRIGHTNESS icon and press the MENU button once to select. -
Page 19: Troubleshooting
TROUBLESHOOTING ISSUE POSSIBLE SOLUTION Equipment does not function Confirm that the camera and monitor are ON The battery may be depleted; charge battery The power adapters may not be properly connected No reception Camera and monitor may not be properly paired; follow PAIRING instructions Camera may be too far away from the monitor Extend the antenna on the monitor... - Page 20 mylevana.com 30000_31000_32000_LILA E_F_S.indd 56 07/01/2013 4:38:36 PM...
Need help?
Do you have a question about the Lila and is the answer not in the manual?
Questions and answers