Advertisement
Quick Links
JBS-100-STB
Single Entry Power Connection With Junction Box
Installation Instructions
APPROVALS
Hazardous Locations
CLI, ZN1, AEx e II*
(1)
Ex e ll T*
-WS
(1)
Except VPL
*For system Temperature Code, see heating cable or design documentation.
Class I, Div. 2, Groups A, B, C, D
Class II, Div. 1 and 2, Groups E, F, G
Class III
Temp Code*
DESCRIPTION
The nVent RAYCHEM JBS-100-STB is a NEMA 4X rated power
connection kit. It is designed for use with BTV-CR, BTV-CT, QTVR-CT,
XTV-CT, KTV-CT and VPL-CT industrial parallel heating cables.
The JBS-100-STB utilizes screw terminal blocks to connect the
heating cable to power.
This kit may be installed at temperatures as low as –40°F (–40°C).
For easier installation store above freezing until just before
installation.
For technical support call your local nVent representative.
TOOLS REQUIRED
• Wire cutters
• Utility knife
• Large slotted screwdriver
• 1/4 in or smaller flat-blade screwdriver
• Wire stripper (for VPL-CT)
ADDITIONAL MATERIALS REQUIRED
• Pipe strap
OPTIONAL MATERIALS
• Recommended conduit drain:
JB-DRAIN-PLUG-3/4IN P/N 278621-000
• Small pipe adapter for 1 in (25 mm) and smaller pipes:
Catalog number JBS-SPA P/N E90515-000
• Pliers or adjustable wrench
• Needle nose pliers
• Marker
• GT-66 or GS-54 glass cloth tape
Advertisement

Related Manuals for nvent JBS-100-STB


Summary of Contents for nvent JBS-100-STB
- Page 1 Single Entry Power Connection With Junction Box Installation Instructions DESCRIPTION The nVent RAYCHEM JBS-100-STB is a NEMA 4X rated power connection kit. It is designed for use with BTV-CR, BTV-CT, QTVR-CT, XTV-CT, KTV-CT and VPL-CT industrial parallel heating cables. The JBS-100-STB utilizes screw terminal blocks to connect the heating cable to power.
-
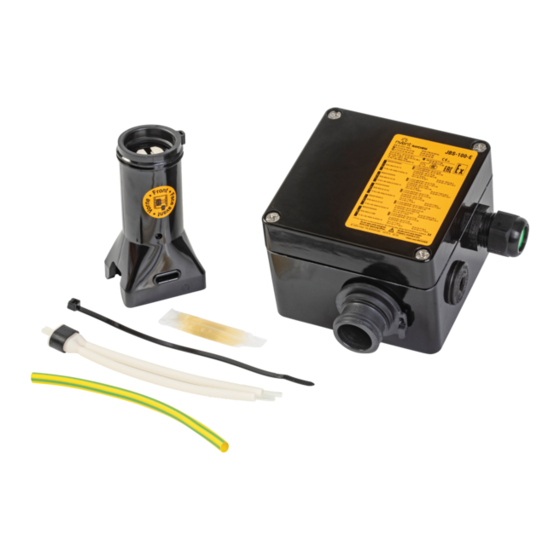
Page 2: Kit Contents
• Component approvals and performance HEALTH HAZARD: Prolonged or repeated must be installed correctly to ensure proper are based on the use of nVent-specified contact with the sealant in the core sealer operation and to prevent shock or fire. Read parts only. - Page 3 • Bend and snap core. • Peel core from bus wire. 7 1/2 in • Remove any remaining (190 mm) core material from bus wires. • Pull braid tight to make Go to Step 6 pigtail. nVent.com | 3...
- Page 4 • Bend heating cable and work it through opening in braid. • Remove insulation from ends of bus wires. • Pull braid tight to make pigtail. 1/2 in (13 mm) Go to Step 6 Go to Step 6 4 | nVent.com...
- Page 5 • Trim bus wires and braid. • Pull heating cable back into stand so 1 in (25 mm) is exposed as shown. Use cable lubricant if needed. 1/2 in (13 mm) 1/2 in (13 mm) 1 in (25 mm) nVent.com | 5...
- Page 6 • Lift box and rotate. Make sure tab on threaded piece fits into one of the four notches in box. • Tighten locknut. Notch • Insert cable tie through slots on stand and box, and tighten firmly to prevent box rotation. Trim 6 | nVent.com...
- Page 7 . Insert small flat-blade screwdriver through round opening and firmly tighten screw Bend conductors for easier insertion into terminal block. • Wire insertion • Use green terminal for braid and ground wire. • Tighten screws • Repeat remaining wires. nVent.com | 7...
- Page 8 ©2018 nVent. All nVent marks and logos are owned or licensed by nVent Services GmbH or its affiliates. All other trademarks are the property of their respective owners. nVent reserves the right to change specifications without notice. Raychem-IM-H57741-JBS100STB-EN-1805...
Need help?
Do you have a question about the JBS-100-STB and is the answer not in the manual?
Questions and answers