Table of Contents
Advertisement
Quick Links
AT240 Installation Guide (version 8.x hardware)
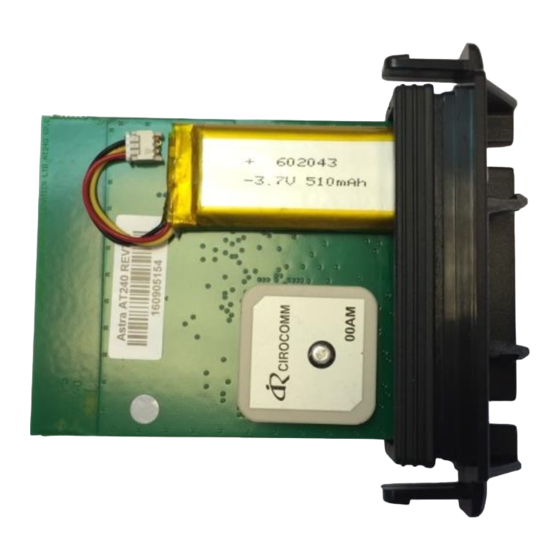
1. Check that the back-up battery is fitted and plugged-in:
Each AT240 is supplied with a 510mAh back-up battery, which should be fixed to the PCB and
connected as shown below:
Do not attempt to remove the battery from the cover, once it has been stuck down, as prising
or bending could lead to explosion/fire and smoke.
2. Slide the Micro SIM (3FF format) into the holder:
Note that the AT240 powers up when the SIM is fitted
note orientation
Advertisement
Table of Contents

Related Manuals for astra telematics AT240


Summary of Contents for astra telematics AT240
- Page 1 AT240 Installation Guide (version 8.x hardware) 1. Check that the back-up battery is fitted and plugged-in: Each AT240 is supplied with a 510mAh back-up battery, which should be fixed to the PCB and connected as shown below: Do not attempt to remove the battery from the cover, once it has been stuck down, as prising or bending could lead to explosion/fire and smoke.
- Page 2 3. Check GPS and GSM status LEDs Place the AT240 somewhere with clear view of the sky in correct orientation for a minute or two, and then check the status LEDs as below: GPS Status GSM Status GNSS Antenna (SKY-SIDE)
- Page 3 6. Connect the CB001 3-way power & ignition cable Plug the CB001 cable into the matching connector on the CB243 7. Hook up the power and ignition electrical connections Connect the RED and BLACK wires to a PERMANENT +12V/+24V vehicle power source. Connect the ignition sense input (Digital 1) to an ignition switched 12/24V signal (i.e.
- Page 4 There must be no conductive objects between the AT240 and the windscreen (i.e. nothing metallic, foil or carbon based) Secure the AT240 to a flat surface with double sided foam adhesive tape, being sure to degrease the vehicle side with an alcohol wipe. If practical, the AT240 can be screwed in place using the two mounting lugs or secured with a cable tie.
-
Page 5: Troubleshooting
BAT:100% GPS:OK (95%) GPRS:OK (98%) APN:OK SKT:OK ACK:OK IGN:OK (OFF) CAN:OK IMOB:OFF 14. Troubleshooting If you have any problems, questions or if you suspect a product failure / malfunction, please contact Astra Telematics technical support: support@gps-telematics.co.uk +44 161 826 8800...
Need help?
Do you have a question about the AT240 and is the answer not in the manual?
Questions and answers