Advertisement
Quick Links
IMPORTANT: READ THESE INSTRUCTIONS CAREFULLY BEFORE
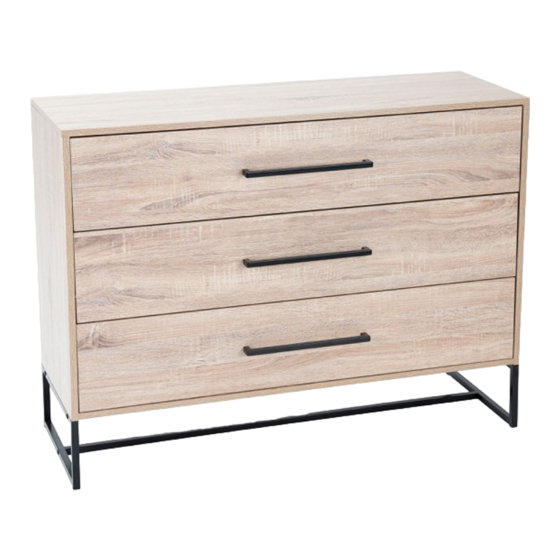
3 DRAWER CHEST SILVER OAK
PLEASE KEEP THESE INSTRUCTIONS FOR FUTURE REFERENCE.
HEALTH & SAFETY:
DO NOT use this chest if any parts are missing , damaged or worn.
DO NOT use this chest unless all fixings are secured.
Always use on a level, even surface.
WARNING: If this item is placed on a non-carpeted floor you must place some protection under all legs to stop
the chest from moving. If this is not adhered to there is no guarantee if the wardrobe collapses.
CARE & MAINTENANCE:
Periodically check all screws & fixings to ensure they are secure.
DO NOT push the chest as this will damage the legs.
Always lift the chest with two people to reposition.
Keep any sharp objects away from the chest.
ASSEMBLY INSTRUCTIONS
CONRAD 3 DRAWER CHEST SILVER OAK
www.birlea.com
ASSEMBLING OR USING YOUR CONRAD
Vendor: S000369
Page 1 of 11
Advertisement

Related Manuals for Birlea CONRAD


Summary of Contents for Birlea CONRAD
- Page 1 Vendor: S000369 ASSEMBLY INSTRUCTIONS CONRAD 3 DRAWER CHEST SILVER OAK ASSEMBLING OR USING YOUR CONRAD IMPORTANT: READ THESE INSTRUCTIONS CAREFULLY BEFORE 3 DRAWER CHEST SILVER OAK PLEASE KEEP THESE INSTRUCTIONS FOR FUTURE REFERENCE. HEALTH & SAFETY: DO NOT use this chest if any parts are missing , damaged or worn.
- Page 2 Vendor: S000369 Hardware 29 x A 29 x B 22 x C 8 x D 3 x E 6 x F Wedge Cam Lock Quickfit Screw Screw Handle Bolt 4x30mm 6x30mm 42 x G 3 x H 15 x I 5 x J 1 x K 1 x L...
- Page 3 Vendor: S000369 Step 1 DRAWERS Fix panels 9, 11 and 13 to panel 10 using screws C. C x 6 Fit base panel 14 into grooves between panels 9 and 11. A x 5 Fit quickfit screws B and wooden dowel I to front panel 12.
- Page 4 Vendor: S000369 Step 2 Fix outer drawer runners Q to panel 2 using screws G. G x 12 Q x 3 Step 3 Fix outer drawer runners R to panel 3 using screws G. G x 12 R x 3 Page 4 of 11...
- Page 5 Vendor: S000369 Step 4 Insert quickfit screws B and wooden dowels I to panel 2. Insert cam locks A to panels 6, 7, 8 and 18. A x 4 B x 4 I x 4 Fit panels 6, 7, 8 and 18 to panel 2. Turn cam locks clockwise to tighten.
- Page 6 Vendor: S000369 Step 6 Insert quickfit screws B and wooden dowels I to panel 3. Insert cam locks A to panels 6, 7, 8 and 18. A x 4 B x 4 I x 4 Fit panel 3 to panels 6, 7, 8 and 18. Turn cam locks clockwise to tighten.
- Page 7 Vendor: S000369 Step 7 Fit quickfit screws B and wooden dowels I to panel 1. Fix bracket K to panel 1 using screw L. B x 6 I x 4 L x 1 K x 1 Step 8 Slide back panel 4 into slots between panels 2 and 3.
- Page 8 Vendor: S000369 Step 9 Insert cam locks A to panels 2, 3 and 18. Fit panel 1 to assembled unit. Turn cam locks clockwise to tighten. A x 6 D x 8 Step 10 M x 8 Fit wedges D to back of unit to secure back panels.
- Page 9 Vendor: S000369 Step 11 Fix parts 15, 16 and 17 together using bolts O, as shown. O x 6 C x 4 Step 12 Fix joined leg parts (Step 11) to J x 4 base of assembled unit using screws C and J, as shown. Page 9 of 11...
- Page 10 Vendor: S000369 Step 13 For extra stability, it is recommended that you fix your chest of drawers to the wall using the additional hardware J & N, as shown. Screws J are fixed from inside the unit, through the bracket and into the wall plug N. Should you choose not to affix the product to the wall, serious injury may be caused if the product tips over.
-
Page 11: Additional Information
If you have any issues with your item please contact the retailer directly you purchased it from who will be able to resolve any issues with Birlea. • Why don’t you send us photos of your assembled furniture to info@birlea.com to be shared in our #birleahome feature on Instagram. Page 11of 11...
Need help?
Do you have a question about the CONRAD and is the answer not in the manual?
Questions and answers