Table of Contents
Advertisement
Advertisement
Table of Contents

Related Manuals for Jetson Quest


Summary of Contents for Jetson Quest
- Page 1 QUEST ELECTRIC FOLDING SCOOTER...
-
Page 2: Table Of Contents
TABLE OF CONTENTS What’s in the Box Features & Specs Assembling the Handlebar Assembling the Handles Charging the Battery Unfolding the Quest Operating the Quest Battery Indicator Speed Settings Riding the Quest Using the Thumb Throttle Using the Handbrake Adjusting the Handbrake... -
Page 3: What's In The Box
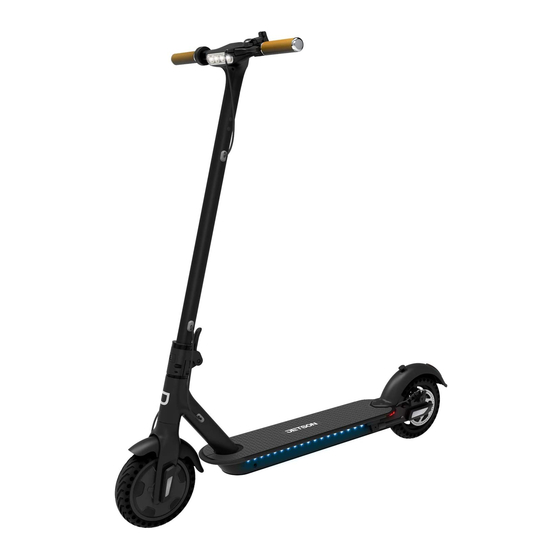
1. WHAT’S IN THE BOX 1. FRONT TIRE 7. REAR TIRE 2. HANDBRAKE 8. KICKSTAND 3. HANDLEBAR 9. SMALL SCREW (X4) 4. RELEASE LEVER 10. CHARGER 5. DECK 11. CHARGING CABLE 6. REAR FENDER Please Note: Illustrations may not reflect exact appearance of actual product. -
Page 4: Features & Specs
2. FEATURES & SPECS QUEST • Product Dimensions: 47.24” (L) x 21.65” (W) x 46.45” (H) • Weight Limit: 220 lbs. • Product Weight: 28.4 lbs. • Recommended Age: +13 • Tire Size: 8.5” • Max Speed: Up To 15 mph •... -
Page 5: Assembling The Handlebar
3. ASSEMBLING THE HANDLEBAR Slide Handlebar into Stem Tube Tighten using the 4 small screws Make sure the screws are tight and the Handlebar is secure. -
Page 6: Assembling The Handles
4. ASSEMBLING THE HANDLES Connecting the Handles: • Starting on the rider left side, take one handle and twist it towards the rider 3-4 times until it catches. If it does not catch, try the other handle on the same side. Tighten until the handle no longer turns. -
Page 7: Charging The Battery
Only use the included charger • Plug the charger into the wall before the Charging Port • Don’t turn on the Quest while it’s charging (it needs its rest) • Charge the battery until it is fully charged - up to 6 hours •... -
Page 8: Unfolding The Quest
6. UNFOLDING THE QUEST Unclip Unclip the Handlebar from the Rear Fender Release Lever Close the Release Lever by lifting it Lift Handlebars away from Deck up until it clicks... - Page 9 Turn to lock Make sure the Release Lever and Handlebars are secure. Lock the Release Lever...
-
Page 10: Operating The Quest
7. OPERATING THE QUEST LED Display Power Button • Powering On/Off - Hold the Power Button for 3 seconds to turn the Quest on or off. • LED Display - Shows current speed, speed mode, and battery life remaining. •... -
Page 11: Battery Indicator
8. BATTERY INDICATOR Battery Indicator BATTERY LEVELS: • 5 Lights - 81-100% Power • 4 Lights - 61-80% Power • 3 Lights - 41-60% Power • 2 Lights - 21-40% Power • 1 Light - 1-20% Power (please charge the Quest immediately!) -
Page 12: Speed Settings
9. SPEED SETTINGS Speed mode Press the Power Button once to cycle through the speed settings. • 1 - Max speed up to 4 mph • 2 - Max speed up to 8 mph • 3 - Max speed up to 15 mph... -
Page 13: Riding The Quest
10. RIDING THE QUEST • Place one foot in front. • Place the other foot in back, at a 70-90° angle. • Turn the handlebar to the left or right to make turns. -
Page 14: Using The Thumb Throttle
11. USING THE THUMB THROTTLE Quick Note: The Quest is motion activated, you will need to push forward with one foot before using the Thumb Throttle. Also, please try to take it easy on the throttle until you get used to it. -
Page 15: Using The Handbrake
12. USING THE HANDBRAKE Quick Note: Squeeze the Handbrake slowly to avoid stopping abruptly or losing control. -
Page 16: Adjusting The Handbrake
13. ADJUSTING THE HANDBRAKE Hold nut in place Twist Barrel Adjuster BRAKE ADJUSTMENT • Twist the barrel adjuster counterclockwise about a quarter to half turn to tighten the brake. • Twist the barrel adjuster clockwise about a quarter to half turn to loosen the brake. -
Page 17: Using The Kickstand
14. USING THE KICKSTAND 14.1 14.2... -
Page 18: Folding The Quest
15. FOLDING THE QUEST 15.1 Turn to unlock Unlock the Release Lever 15.2 15.3 Release Lever Lower the the Release Lever... - Page 19 15.4 15.5 Lower the Handlebar towards the Deck 15.6 Connect the hook to the Rear Fender...
-
Page 20: Connecting To Bluetooth
16. CONNECTING TO BLUETOOTH® Your Jetson Quest is Bluetooth® 4.0 enabled, so you can pair it with the Ride Jetson app on your personal Bluetooth® enabled device. The Ride Jetson app is available for download from the App Store and the Google Play Store, and it’s free! -
Page 21: Care And Maintenance
• Speed and Driving Style: Frequent starting and stopping will reduce driving distance. CLEANING THE QUEST To clean the Quest, carefully wipe with a damp cloth, then dry with a dry cloth. Do not use water to clean the Quest, as the electrical and electronic systems may get wet, resulting in personal injury or malfunction of the Quest. -
Page 22: Safety Warnings
18. SAFETY WARNINGS • For your safety, please read the user manual and safety warnings carefully, and make sure you understand and accept all the safety instructions. The user will be responsible for any loss or damage caused by improper use. •... - Page 23 MODIFICATIONS Do not attempt to disassemble, modify, repair, or replace the unit or any components of the unit without instruction from Jetson Customer Support. This will void any warranty, and can lead to malfunctions which may cause injury. ADDITIONAL OPERATION CAUTIONS Do not lift the product off the ground while it is on and the wheels are in motion.
- Page 24 1 Rewe Street, Brooklyn, NY 11211 help@ridejetson.com US 1-(888) 976-9904 www.ridejetson.com...
Need help?
Do you have a question about the Quest and is the answer not in the manual?
Questions and answers