Newage Pro 3.0 Series Assembly Instructions Manual
Hide thumbs
Also See for Pro 3.0 Series:
- Installation instructions manual (25 pages) ,
- Installation manual (25 pages)
Table of Contents
Advertisement
Available languages
Available languages
PRO3.INSTALL.REV.04
Pro 3.0 Series
Warning: Excessive weight hazard!
Use two or more people to move, assemble or install cabinets and locker to avoid back injury.
Do not leave children unattended near cabinets. High risk of tipping if cabinets are installed
incorrectly: securely attach cabinets to the wall to avoid serious injury.
For assistance, call 1.877.306.8930; for UK 0800.031.4069; e-mail at info@newageproducts.com
STOP
WARNING: Excessive weight hazard!
Use two or more people to move, assemble, or install cabinets and
locker to avoid back injury. Do not leave children unattended near
cabinets. High risk of tipping if cabinets are installed incorrectly:
securely attach cabinets to the wall to avoid serious injury.
For assistance, call 1.877.306.8930; for U.K 0800.031.4069; e-mail at
info@newageproducts.com.
ATTENTION:
Is your cabinet damaged?
Need help or spare parts? For fastest service, contact
NewAge Products at 1-877-306-8930; for U.K 0800-031-4069
or support@newageproducts.com.
Do not return to the retailer.
Advertisement
Chapters
Table of Contents

Subscribe to Our Youtube Channel
Related Manuals for Newage Pro 3.0 Series


Summary of Contents for Newage Pro 3.0 Series
- Page 1 For assistance, call 1.877.306.8930; for U.K 0800.031.4069; e-mail at info@newageproducts.com. ATTENTION: Is your cabinet damaged? STOP Need help or spare parts? For fastest service, contact NewAge Products at 1-877-306-8930; for U.K 0800-031-4069 or support@newageproducts.com. Do not return to the retailer.
-
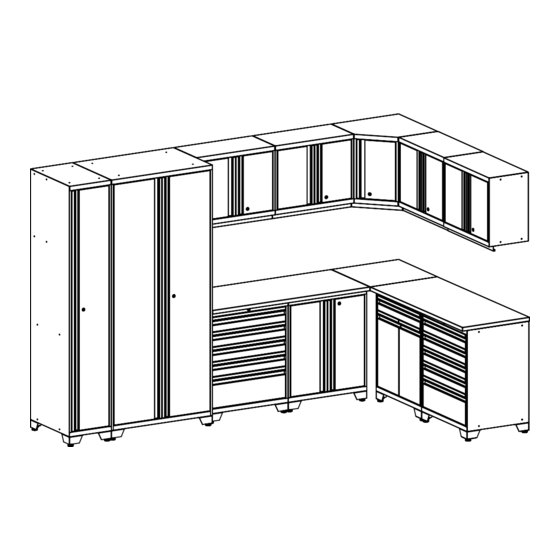
Page 2: Table Of Contents
Worktop 24” Corner Worktop INDEX 56” Worktop. Fits over 2 Cabinets Index - 2 Installing worktop support bracket - 11 84” Worktop. Fits over 3 Cabinets Guidelines and weight capacity - 2-3 Attaching worktop( on 2 cabinets) - 12 Parts list - 4 Installing closet rod -13 Weight Tools needed - 5... - Page 3 Worktop 24” Corner Worktop 56” Worktop. Fits over 2 Cabinets 84” Worktop. Fits over 3 Cabinets Weight lbs. Capacity lbs. lbs. lbs. Wall Cabinets Max 200 lbs. lbs. 600 lbs. 600 lbs. lbs. lbs. lbs. lbs. lbs. lbs. lbs. lbs. lbs.
- Page 4 Closet Rod Brackets with Rubber Coated Hooks EVA Foam Drawer Liners Garbage Bin Parts Bins Light Valence Long Drawer Dividers Short Drawer Dividers Side Support Brackets Easy Wall Hanging Brackets NewAge Logo Clothes Full Width Light Valance Support Bracket Height-Adjustable Rod and Adjustable Steel Leveling Legs...
-
Page 5: Tools Needed
When this product is installed, operated and maintained according to the instructions attached to or furnished with the product, NewAge Products Inc. will replace the defective product or parts if the part fails as a result of defective materials or workmanship for the Lifetime of the product. - Page 6 Installing the Feet Open cabinet, remove any shelves Parts Needed. or loose items. Height-Adjustable 16 X Foot Steel Leveling Legs Attachment Screws Align foot with edge of cabinet. Screw Flip cabinet upside down, in 4 x foot attachment screws using #3 locate holes at corners.
- Page 7 Installing Casters Note: Caster kits sold separately. shopnewage .com Open cabinet, remove any shelves Parts Needed. or loose items. 4 x Casters 16 X Hex Bolt (1/4” x 5/8”) 16 X Washer 16 X Lock Nut (1/4”) (1/4”) Align foot with holes. Attach with 4 hex Flip cabinet upside down, bolts, washers, and nuts.
- Page 8 Installing the Drawers Inserting Drawers. Align Rails Slide In Removing Drawers. Slide drawer out completely Right Side Left Side Slide Out...
- Page 9 Note: Ensure there is enough assembly Installing Corner Worktop room. Cabinets must be assembled away from corner to access backs of cabinets. On adjacent edges attach 2 support Parts Needed. brackets to underside of corner top using the supplied (4) 38 x 5/8” screws. 4x Washer 4x Lock Nut (1/4”)
-
Page 10: Stacking Cabinets
Stacking Cabinets Position a second base cabinet on Parts Needed. top of an existing base cabinet. 4 X Hex Bolt (1/4” x 5/8”) 8 X Washer 4 X Lock Nut (1/4”) (1/4”) Attach cabinets using the supplied Locate punch holes on adjoining 1/4”... -
Page 11: Installing Worktop Support Bracket
Installing Worktop Note: Support bracket included with locker. Side Support Bracket Parts Needed. Open locker and locate holes on either side. 1x Support 2 X Hex Bolt Bracket (1/4” x 5/8”) 4 X Washer 2 X Lock Nut (1/4”) (1/4”) Align bracket. - Page 12 Mounting the Worktop (On 2 Cabinets) Place worktop on cabinets. Locate 2 punch holes both sides. Drill into the worktop using the #8 x 5/8” wood screwes. Use 2 washers & #8 x 5/8” wood screws. Optional: For locker support bracket. Provided in the locker packaging.
- Page 13 Inserting Locker Utility Rod and Hangars Open cabinet Doors. Insert clips into slots in corners. Rotate to engage. Ensure rear flange slides down behind Place hangar against locker wall clips and that the bracket is secure. above supports. Interior Interior Side View Side View Lower rod into cradle.
- Page 14 Inserting Cabinet Shelves Stand cabinet up. Insert shelf clip on slight angle and rotate to level position. Insert shelf on a angle and rotate Lower shelf onto supports. to level position. Interior Side View Insert remaining shelves. Rest shelf on supports. Interior Side View...
- Page 15 Mounting Cabinets (Drywall/Studded Wall) Use stud finder to locate the studs Gather parts. and mark the wall with a pencil. Wall Screw Wall Washer (1/4” x 2.5”) (1/4”) Wall & Locker: 4 wall screws and 4 washers Corner Wall: 6 wall screws and 6 washers Base &...
-
Page 16: Hanging Cabinets On Stud Wall
Hanging Cabinets on Wall (optional) Use stud finder to locate the studs Parts Needed. and mark the wall with a pencil. Lag Screw (1/4” x 2.5”) Planning the general position of cabinets. Step A. Determine the height off the ground you would like the base and locker cabinets to be and make a horizontal mark at this position. - Page 17 Hanging Cabinets on Wall (cont.) Planning the general position of cabinets. (cont.) Step C. Measuring up from the line marked in Step A, make a horizontal mark at the following heights where they intersect the wall stud marks to determine where the top of the cabinet will be (and where the hanging bracket will be installed).
- Page 18 Hanging Cabinets on Wall (cont.) Hanging cabinets on wall. A lign the top of the wall hanging brackets with the lines marked for the position of the top of the cabinets(Step C) and attach the brackets securely into the studs using the supplied lag bolts and washers.
- Page 19 Hanging Cabinets on Wall (cont.) Bolt each subsequent cabinet to the previous one using the supplied ¼” x 5/8” Parts Needed. hex bolts and lock nuts provided in each base and wall cabinet. Hex Bolt (1/4” x 5/8”) Washer Lock Nut (1/4”) (1/4”) WARNING: Wall backets are not designed to support the weight of a loaded cabinet.
-
Page 20: Hanging Cabinets On Slatwall
Note: Slatwall Brackets for use with standard 3” slatwall Sold Separately. Check with your slatwall supplier to determine the rated capacity of your slatwall. DO NOT OVERLOAD. NewAge Slatwall Brackets are only compatible with standard 3” on center Slatwall. Parts Needed. - Page 21 Align bolt with slots on back of cabinet Attach bracket to slatwall at desired and hang cabinet . height. Note:For Locker cabinet attach second bracket 66” below first bracket.For Base cabinet attach second bracket 18” below first bracket. Using 7/16” drill socket or 7/16” wrench securely tighten lock nuts to each wall bracket from inside cabinet .
-
Page 22: Fastening Cabinets Together
Fastening Cabinets Note: Fasten additional cabinets to initial securely mounted cabinet. Parts Needed. Align bolts, tighten lightly. Hex Bolt (1/4 x 5/8”) Washer Lock Nut (1/4”) (1/4”) Note: Remove all drawers before fastening cabinets. Level cabinets and tighten all bolts. -
Page 23: Attaching Light Valance
Attaching Light Valance to Wall Cabinet Align holes of valance with cabinet. Insert and tighten bolt and nuts. Cross Section View Parts Needed. Light Valance Bolt (M5 x 12mm) (M5) -
Page 24: Utility Hole
Utility hole allows easy access to electrical outlet Thank you for purchasing a NewAge Product! Please give us a call or visit online if you have any questions. Call 1.877.306.8930; for UK 0800.031.4069; e-mail at info@newageproducts.com... - Page 25 1.877.306.8930; au R.-U., composer le 0800.031.4069; ou envoyer un courriel à l’adresse info@newageproducts.com. ATTENTION: Est votre armoire endommagée? ARRÊT Avez vous besoin d’aide ou de pièces de rechange? Contactez NewAge Products a 1-877-306-8930; ou support@newageproducts.com. Ne pas retourner au détaillant.
- Page 26 Plan de travail INDEX Plan de travail d’angle de 24 po Plan de travail d’angle de 56 po. Convient à 2 armoires Index - 2 Montage du plan de travail Capacités poids - 3 (sur 2 armoires) - 12 Pièces fournies- 4 Installation de triangles de vêtements -13 Plan de travail d’angle de 84 po.
-
Page 27: Capacités Poids
Plan de travail d’angle de 84 po. Convient à 3 armoires Capacité de poids 90kg (200 lb) 45kg (100 lb) 45kg (100 lb) 136kg (300 lb) Armoires murales Max. 90kg 200lb) 136kg (300 lb) 227kg (500 lb) 272kg (600 lb) 272kg (600 lb) 45kg (100 lb) lbs. -
Page 28: Pièces Fournies
Tablettes ajustables d’etagère Cache-néon Pattes de mise à niveau sur toute la largeur Tringle à vêtements en acier ajustables et crochets en hauteur Logo NewAge Vis à tête Boulon Écrous Support murale Support Vis pour hexagonale (M5 x 12mm) d’étagère... -
Page 29: Outils Nécessaires
NEWAGE PRODUCTS INC. N’ASSUMERA PAS LES COÛTS SUIVANTS : Les appels de service pour corriger l’installation de tout produit NewAge ou pour vous montrer comment les utiliser ou les installer. Les dommages causés par une manutention ou une expédition inadéquate du produit, ou des produits endommagés par un accident, une mauvaise utilisation, un abus, un incendie, une inondation, une installation inadéquate, un cas fortuit, une négligence, la... -
Page 30: Installation Des Pieds
Installation des pieds Ouvrir l’armoire et retirer les étagères ou Pièces nécessaires. les objets épars. 16 X Vis à sécurités Pattes de mise à niveau en acier ajustables en hauteur Aligner le pied sur le bord de l’armoire. Visser Retourner l’armoire et 4 vis à... -
Page 31: Installation Des Roulettes
Installation des roulettes Remarque : Les roulettes sont vendues séparément. shopnewage .com Ouvrir l’armoire et retirer les étagères ou Pièces nécessaires. les objets épars. 4 x roulettes 16 X boulons à tête hexagonale (1/4” x 5/8”) 16 X rondelles 16 X (1/4 po) contre-écrous (1/4 po) -
Page 32: Installation Des Tiroirs
Installation des tiroirs Insertion des tiroirs. Aligner les glissières Glisser les tiroirs vers l’intérieur Enlèvement des tiroirs. Côté droit Côté gauche Glisser les tiroirs vers l’extérieur... -
Page 33: Installation D'armoire De Coin
Installation des armoires de coin Remarque : S’assurer d’avoir suffisamment de place pour l’assemblage. Les armoires ne doivent pas être assemblées près des coins d’armoire pour avoir accès à l’arrière des armoires. Sur les bords adjacents, fixer 2 supports à la face Pièces nécessaires. -
Page 34: Emboîtement Des Armoires
Emboîtement des armoires Positionner une deuxième armoire sur plancher sur le dessus de l’armoire sur Pièces nécessaires. plancher existante. 4 X boulons à tête hexagonale (1/4 po x 5/8 po) 8 X rondelles (1/4 po) contre-écrous (1/4 po) Fixer les armoires à l’aide des boulons à Repérer les trous prépercés sur la tête hexagonale de 1/4 po x 5/9 po, des surface adjacente et insérer les boulons. -
Page 35: Installation Du Palier De Support Latéral Du Plan De Travaill
Installation du palier de support latéral du plan de travail Remarque : Le palier de support est inclus avec l’armoire-vestiaire. Ouvrir l’armoire-vestiaire et repérer les trous Pièces nécessaires. de chaque côté de l’armoire. 2 X boulons à tête hexagonale (1/4 po x 5/8 po) 4 X rondelles contre-écrous (1/4 po) -
Page 36: Montage Du Plan De Travail (Sur 2 Armoires)
Montage du plan de travail (sur 2 armoires) Repérer les 2 trous de fixation des deux Placer le plan de travail sur les armoires. côtés des armoires. Percer le plan de travail à l’aide des vis à bois #8 x 5/8 po. Facultatif : Pour le palier de support de Utiliser 2 rondelles et vis à... - Page 37 Insertion de la tringle et du portemanteau de l’armoire Insérer les agrafes dans les fentes situées Ouvrir les portes de l’armoire. dans les coins. Faire tourner pour enclencher. S’assurer que le rebord arrière glisse derrière Placer le portemanteau contre le mur les agrafes et que le support est bien fixé.
-
Page 38: Insertion Des Étagères D'armoires
Insertion des étagères d’armoire Insérer l’agrafe de l’étagère légèrement en Relever l’armoire. biais et faire pivoter jusqu’à ce qu’elle soit à niveau. Insérer l’étagère en biais et faire pivoter Abaisser l’étagère sur des supports. jusqu’à ce qu’elle soit à niveau. Intérieur Vue latérale Insérer le reste des étagères. -
Page 39: Assemblage Des Armoires (Cloison Sèche Et Cloison Creuse A Colombage) -15
Assemblage des armoires (cloison sèche et cloison creuse à colombage) Utiliser le localisateur de montants pour Rassembler les pièces. repérer les montants et tracer une ligne sur la cloison avec un crayon. Vis murale Rondelle (1/4 po x 2,5 po) murale (1/4 po) Armoire murale et armoire-vestiaire : 4 vis murales et 4 rondelles... - Page 40 Fixation des armoires au mur (facultatif) Utiliser le localisateur de montants pour Pièces nécessaires. repérer les montants et faire une ligne sur le mur avec un crayon. Tire-fond (1/4 po x 2,5 po) Planification de la position générale des armoires. Étape A.
- Page 41 Fixation des armoires au mur (suite) Planification de la position générale des armoires (suite) Étape C. En mesurant à partir de la ligne faite à l’étape A, faire une marque horizontale à la hauteur à laquelle elle croise les marques du panneau mural pour déterminer la hauteur de l’armoire voulue (et l’endroit où...
- Page 42 Fixation des armoires au mur (suite) Fixation des armoires au mur. Aligner le dessus des supports d’accrochage sur les lignes identifiées pour la position du dessus des armoires (étape C) et fixer solidement les supports dans les montants à l’aide des tirefonds et des rondelles fournis. Remarque : Il est possible de contrebalancer le support vers un côté...
- Page 43 Fixation des armoires au mur (suite) Visser chaque armoire subséquente à la précédente en utilisant les boulons à tête hexagonale de Pièces nécessaires. 1/4 po x 5/8 po et les contre-écrous fournis avec chaque armoire sur plancher et murale. Rondelle de Boulon à...
-
Page 44: Fixation Des Armoires Sur Une Paroi À
Fixation au mur Remarque : Les supports ne sont pas conçus pour supporter le poids d’une armoire remplie. Les armoires doivent être fixées au mur à l’aide de tirefonds de 1/4 po x 2,5 po. En utilisant des tirefonds et des rondelles (4) de Pièces nécessaires. - Page 45 Aligner le boulon sur les fentes à l’arrière de Fixer le support à la paroi à lattes à la l’armoire et suspendre l’armoire. hauteur voulue. Remarque : Pour l’armoire-vestiaire, fixer le deuxième support à 66 po au-dessous du premier support. Pour l’armoire sur plancher, fixer le deuxième support à...
- Page 46 Raccord des armoires Remarque : Raccorder les autres armoires à la première armoire solidement assemblée. Pièces nécessaires. Aligner les boulons, serrer légèrement. Boulon à tête hexagonale (1/4 po x 5/8 po) Rondelle Contre-écrou (1/4 po) (1/4 po) Remarque : Retirer tous les tiroirs avant de raccorder les armoires ensemble.
- Page 47 Fixer le cache-néon à l’armoire murale Aligner les trous du cache-néon sur ceux Insérer et serrer les boulons et écrous. de l’armoire. Vue transversale.
-
Page 48: Trous D'accès
Le trou d’accès permet un branchement facile à la prise de courant. Merci d’avoir acheté un produit NewAge! Si vous avez des questions, veuillez nous appeler ou visiter notre site Web. Appeler au 1.877.306.8930; pour le R.-U., composer le 0800.031.4069; envoyer un...
Need help?
Do you have a question about the Pro 3.0 Series and is the answer not in the manual?
Questions and answers