Petsafe SmartDoor Operating Manual
Electronic pet door
Hide thumbs
Also See for SmartDoor:
- Operating manual (104 pages) ,
- Manual (56 pages) ,
- Get started (24 pages)
Table of Contents
Advertisement
Available languages
Available languages
Quick Links
Porte électronique pour animaux SmartDoor
SmartDoor
Porta elettronica per animali domestici SmartDoor
SmartDoor
Manuel d'utilisation
Gebruiksaanwijzing
Manual de adiestramiento
SmartDoor
SmartDoor
-elektronisch huisdierluik
™
Puerta para mascotas electrónica
™
elektronische Haustiertür
™
Please read this entire guide after the
Installation Guide
Veuillez lire l'intégralité de ce manuel après le
guide d'installation
Lees deze handleiding helemaal door nadat u de
montagehandleiding hebt gelezen
Lea esta guía en su totalidad después del
Manual de instalación
Leggere attentamente la presente guida dopo il
manuale di installazione
Lesen Sie die Gebrauchsanleitung vollständig nach
der Montageanleitung
Operating Guide
Guida all'uso
Betriebsanleitung
PPA19-15791
PPA19-15792
Electronic Pet Door
™
™
™
Advertisement
Chapters
Table of Contents

Related Manuals for Petsafe SmartDoor


Summary of Contents for Petsafe SmartDoor
-
Page 1: Installing Your Pet Door
Porte électronique pour animaux SmartDoor ™ SmartDoor -elektronisch huisdierluik ™ SmartDoor Puerta para mascotas electrónica ™ Porta elettronica per animali domestici SmartDoor ™ SmartDoor elektronische Haustiertür ™ Please read this entire guide after the Installation Guide Veuillez lire l’intégralité de ce manuel après le guide d’installation... - Page 2 Hereinafter Radio Systems Corporation, Radio Systems PetSafe Europe Ltd., Radio Systems Australia Pty Ltd. and any other affiliate or Brand of Radio Systems Corporation may be referred to collectively as “We” or “Us”. IMPORTANT SAFETY INFORMATION Explanation of Attention Words and Symbols used in this guide This is the safety alert symbol.
- Page 3 • Keep these instructions with important papers; be sure to transfer these instructions to the new owner of the property. • Unauthorised changes or modifications may void the user’s authority to operate this equipment, and void the warranty. SAVE THESE INSTRUCTIONS www.petsafe.net...
-
Page 4: Table Of Contents
To get the most protection out of your warranty, please register your product within 30 days at www.petsafe.net. By registering and keeping your receipt, you will enjoy the product’s full warranty and should you ever need to call the Customer Care Centre, we will be able to help you faster. -
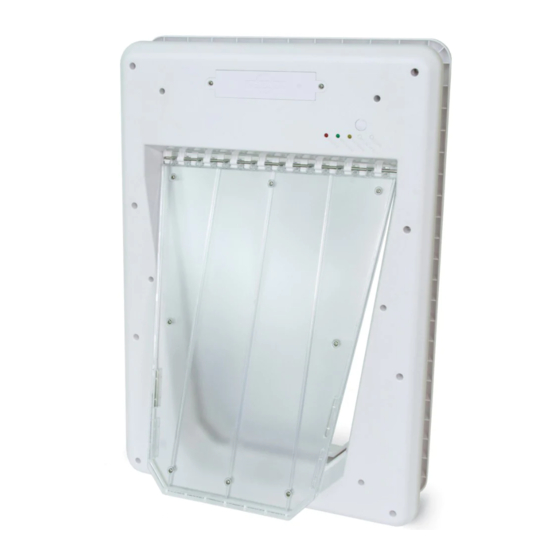
Page 5: Components
™ signal from the SmartKey Electronic Key and triggers a battery power-driven flap to ™ unlock so your pets can come and go as they please. When the SmartDoor Electronic ™ Pet Door no longer senses your pet's SmartKey Electronic Key, the flap automatically ™... -
Page 6: Install The Pet Door Through A Wall With The Smartdoor ™ Conversion Kit
™ extension conversion kit frames out exposed areas, giving your door installation a clean, smooth, finished look. For brick, concrete or block wall construction an additional extension is available for the Large Conversion Kit. Note: The SmartDoor Conversion ™ Kit is designed to be recessed into the brick and does not require additional tunnel extensions. - Page 7 Electronic Key and is ™ replaceable. Additional RFA-67 batteries are available at retailers, or by calling PetSafe Customer Care Centre or visiting www.petsafe.net. Typical life of the RFA-67 is ® approximately six months. Overall Size – Pet Door dimensions including outer frame Cut-out Size –...
-
Page 8: Prepare
2. Using a coin, rotate one-quarter turn clockwise to secure the PetSafe RFA-67 battery. ® NOTE: The SmartKey Electronic Key has a red light that will flash when the PetSafe ™ ® RFA-67 battery is low; the battery should be replaced as soon as possible. www.petsafe.net... -
Page 9: Check Operational Modes Before Installation
™ light illuminates and release when selected. Five SmartKey Electronic Keys can be ™ programmed to one SmartDoor Electronic Pet Door for selective entry and exit during ™ AUTOMATIC Mode. NOTE: If at any time the red light remains illuminated, replace with a set of fresh batteries. -
Page 10: Check The Pet Door Location Before Installation
Check The Pet Door Location Before Installation DO NOT REMOVE SENSITIVITY STICKER BEFORE INSTALLING THE PET DOOR. Prior to installation, it is recommended to check that the SmartDoor Electronic Pet Door ™ will operate properly in the intended location or application to guard against possible severe radio-frequency interference. -
Page 11: Install
(Fig. 2A). When applying the template there should be a minimum of 7.6 cm between the bottom and sides of the door and the Fig. 2A outer edge of the template to maintain the structural integrity of the door. www.petsafe.net... - Page 12 90° angle. This will prevent the blade from cutting unevenly between interior and exterior areas of door. Make sure there is nothing on the other side of the door where you will be drilling the holes or cutting out opening. www.petsafe.net...
- Page 13 Tighten with screwdriver. DO NOT OVERTIGHTEN (Fig. 5A). Helpful Tip: If using an electric screwdriver, set on low torque. NOTE: Small SmartDoor Electronic Pet Door has four ™ screw placement holes and Large SmartDoor Electronic ™ Pet Door has eight screw placement holes. www.petsafe.net...
- Page 14 Electronic Key is detected. Do not allow your pet to run or charge ™ through the Pet Door. Due to variable radio-frequency interferences it could take several seconds for the unique code of the SmartKey Electronic Key to read properly and pet ™ door flap to unlock. www.petsafe.net...
-
Page 15: Set
This may take up to fifteen seconds after the SmartKey Electronic Key no longer is detected. ™ 8. Now confirm the sensitivity level by approaching the Pet Door again. The door should unlock when you step within approximately 60 cm in front of the Pet Door. www.petsafe.net... -
Page 16: Understanding Sensitivity And The Active Area
Key to the Pet’s Collar A split key ring has been provided to attach to your pet’s collar and should hang under the pet’s neck. The Pet Door includes one SmartKey Electronic ™ Key which comes pre-programmed and ready to use. www.petsafe.net... -
Page 17: Operate
Electronic Key; up to five SmartKey Electronic Keys can be programmed ™ ™ into one SmartDoor Electronic Pet Door for selective entry and exit during automatic ™ mode. To set: hold the MODE-RESET button until the yellow light illuminates and release when selected. -
Page 18: Troubleshooting
Clear any obstructions that keep the flap from locking. When the flap successfully locks, normal operation is resumed. • If your large SmartDoor Electronic Pet Door does ™ not close properly, you can purchase an additional... -
Page 19: Revert Smartkey ™ Electronic Key To Default Factory Setting
Electronic Keys have been cleared. Replacement Parts and Accessories To purchase replacement parts for your PetSafe SmartDoor Electronic Pet Door, ® ™ contact the Customer Care Centre or visit our website at www.petsafe.net to locate a retailer near you. www.petsafe.net... -
Page 20: Terms Of Use And Limitation Of Liability
Please return it to where it was purchased in order that it can be placed in our recycling system. If this is not possible, please contact the Customer Care Centre for further information. www.petsafe.net... -
Page 21: Battery Disposal
Battery Disposal Separate collection of spent batteries is required in many regions; check the regulations in your area before discarding spent batteries. SmartDoor Electronic Pet Door: ™ This device operates on four Alkaline batteries of the type LR20/D-cell with a 1.5 Volt, 18,000 mAH capacity. -
Page 22: Warranty
Three Year Non-Transferrable Limited Warranty This Product has the benefit of a limited manufacturer’s warranty. Complete details of the warranty applicable to this Product and its terms can be found at www.petsafe.net and/ or are available by contacting your local Customer Care Centre. - Page 23 Should you have any queries or require any further information, please contact our Customer Care Centre on 1800 786 608 (Australia) or 0800 543 054 (New Zealand). www.petsafe.net...
- Page 24 Ci-après, « Nous » peut renvoyer collectivement à Radio Systems Corporation, Radio Systems PetSafe Europe Ltd., Radio Systems Australia Pty Ltd., ainsi qu’à toute autre filiale ou marque de Radio Systems Corporation. CONSIGNES DE SÉCURITÉ IMPORTANTES Description des termes et symboles utilisés dans ce manuel Ce symbole est une alerte de sécurité.
- Page 25 • Gardez ces instructions avec les documents importants ; veillez à les transférer au nouveau propriétaire de votre maison, le cas échéant. • Les modifications ou les changements non approuvés peuvent annuler le droit de l’utilisateur à utiliser l’appareil et invalider sa garantie. CONSERVEZ CES INSTRUCTIONS www.petsafe.net...
- Page 26 Fonctionnement de la porte pour animaux..... . . 27 Installer la porte pour animaux sur un mur avec le kit de conversion SmartDoor .
-
Page 27: Contenu Du Kit
• Ruban adhésif • Crayon • Ficelle Fonctionnement de la porte pour animaux Avec sa technologie radio-fréquence, la porte électronique pour animaux SmartDoor ™ détecte le signal unique émis par la clé électronique SmartKey et déclenche l’ouverture ™ du rabat, alimenté par des piles, pour que vos animaux puissent entrer et sortir à... -
Page 28: Installer La Porte Pour Animaux Sur Un Mur Avec Le Kit De Conversion Smartdoor
Vous pouvez acheter un kit de conversion SmartDoor ou de grandes ™ extensions sur certains sites en ligne, sur www.petsafe.net ou en appelant notre service clientèle. Voir la section « Pièces de rechange » pour plus d’informations. Définitions Technologie radio-fréquence – Utilisation d’un signal de radio-fréquence pouvant être transmis sans fil. - Page 29 à ™ l’emploi. Vous pouvez enregistrer jusqu’à cinq clés électroniques SmartKey (chacune ™ vendue séparément) sur une porte électronique pour animaux SmartDoor ™ Modes de fonctionnement Mode LOCKED (Fermé) – Le rabat SmartDoor est verrouillé et ne permet à...
-
Page 30: Préparer
REMARQUE : la porte doit se trouver en position verticale pour que le rabat se centre convenablement et fonctionne correctement. ETAPE 2 Placer la batterie dans la clé électronique SmartKey ™ 1. Placez la batterie PetSafe RFA-67 sur le ® fond de la clé électronique SmartKey ™ 2. À l’aide d’une pièce, faites tourner la batterie PetSafe RFA-67 d’un quart de tour... -
Page 31: Vérifier Les Modes De Fonctionnement Avant Installation
™ gardez le bouton MODE-RESET (Réinitialisation du mode) enfoncé jusqu’à ce que le voyant jaune s’allume puis relâchez le bouton. Vous pouvez enregistrer cinq clés électroniques SmartKey sur une porte électronique pour animaux SmartDoor afin ™ ™ de permettre l’entrée et la sortie de certains animaux lorsque la porte est réglée sur le Mode AUTOMATIC (Automatique). -
Page 32: Vérifier L'emplacement De La Porte Pour Animaux Avant Installation
Vérifier l’emplacement de la porte pour animaux avant installation NE RETIREZ PAS L’AUTOCOLLANT DE SENSIBILITÉ AVANT LA FIN DE L’INSTALLATION. Avant d’installer la porte électronique pour animaux SmartDoor , il vous est ™ recommandé de vérifier que celle-ci fonctionnera correctement là où vous souhaitez l’installer, afin d’éviter toute interférence radio-fréquence potentiellement importante. -
Page 33: Installer
(Fig. 2A). Lors de l’application du gabarit, vous devez laisser au moins 7,6 cm entre le bas Fig. 2A et les côtés de la porte et le bord extérieur du gabarit afin de préserver l’intégrité structurelle de votre porte. www.petsafe.net... - Page 34 éviterez ainsi que la lame effectue une découpe irrégulière entre les faces intérieure et extérieure de la porte. Vérifiez qu’il n’y a rien de l’autre côté de la porte à l’endroit où vous allez percer les trous ou découper l’ouverture. www.petsafe.net...
- Page 35 Astuce utile : si vous utilisez un tournevis électrique, réglez-le sur un couple de rotation faible. REMARQUE : la petite porte électronique pour animaux SmartDoor possède quatre trous de vis, tandis que la ™ grande porte électronique pour animaux SmartDoor ™ possède huit. www.petsafe.net...
- Page 36 En raison des interférences radio-fréquence variables, il peut s’écouler quelques secondes avant que le code unique de la clé électronique SmartKey soit détecté correctement et que le rabat de la porte pour animaux s’ouvre. ™ www.petsafe.net...
-
Page 37: Paramétrer
8. Vérifiez maintenant le niveau de sensibilité en vous approchant de nouveau de la porte pour animaux. La porte pour animaux devrait s’ouvrir lorsque vous êtes à environ 60 cm de cette dernière. www.petsafe.net... -
Page 38: Comprendre La Sensibilité Et La Zone Active
Un anneau de porte-clés vous est fourni pour attacher la clé au collier de votre animal. Cette dernière doit pendre en dessous du cou de votre animal. Le kit de porte pour animaux comprend une clé électronique SmartKey , enregistrée et prête à l’emploi. ™ www.petsafe.net... -
Page 39: Utiliser
électronique SmartKey enregistrée d’entrer et de sortir. Vous pouvez enregistrer jusqu’à ™ cinq clés électroniques SmartKey sur une porte électronique pour animaux SmartDoor ™ ™ afin de permettre l’entrée et la sortie de certains animaux lorsque la porte est réglée sur le Mode automatique. -
Page 40: Dépannage
Retirez tout élément empêchant le rabat de se verrouiller. Lorsque le rabat se ferme avec succès, le fonctionnement normal reprend. • Si votre grande porte électronique pour animaux SmartDoor ne se ferme pas correctement, vous ™ pouvez acheter un kit d’aimant supplémentaire pour l’aider à... -
Page 41: Remettre La Clé Électronique Smartkey ™ Aux Réglages D'usine Par Défaut
Pièces de rechange et accessoires Pour acheter des pièces de rechange pour votre porte électronique pour animaux PetSafe SmartDoor , contactez le service clientèle ou visitez notre site Web, ® ™ www.petsafe.net, afin d’obtenir l’adresse d’un revendeur près de chez vous. www.petsafe.net... -
Page 42: Conditions D'utilisation Et Limitation De Responsabilité
Veuillez le rapporter là où vous l’avez acheté pour qu’il soit recyclé. En cas d’impossibilité, veuillez contacter le service clientèle pour de plus amples informations. www.petsafe.net... -
Page 43: Élimination Des Batteries Usagées
être obtenus en contactant votre service clientèle local. Europe – Radio Systems PetSafe Europe Ltd., 2nd Floor, Elgee Building, Market Square, Dundalk, Co. Louth, A91 YR9X Ireland Canada –... - Page 44 Hierna kunnen Radio Systems Corporation, Radio Systems PetSafe Europe Ltd., Radio Systems Australia Pty Ltd. en andere aangesloten ondernemingen of merken van Radio Systems Corporation gezamenlijk “Wij” of “Ons” worden genoemd. BELANGRIJKE VEILIGHEIDSINFORMATIE Uitleg van in deze handleiding gebruikte belangrijke woorden en symbolen Dit is het symbool voor een veiligheidswaarschuwing.
- Page 45 • Bewaar deze instructies bij belangrijke papieren en geef deze instructies aan de nieuwe eigenaar van de woning. • Onbevoegde wijzigingen of aanpassingen kunnen ervoor zorgen dat de gebruiker niet bevoegd is om deze apparatuur te gebruiken; bovendien kan de garantie vervallen. BEWAAR DEZE INSTRUCTIES www.petsafe.net...
- Page 46 U vindt een overzicht van telefoonnummers van de klantenservice op onze website www.petsafe.net. Registreer uw product binnen 30 dagen op www.petsafe.net om het meeste uit uw garantie te halen. Door te registeren en uw aankoopbon te bewaren, hebt u volledige garantie op het product en zijn wij in staat u sneller te helpen, mocht u ooit een keer genoodzaakt zijn de klantenservice te bellen.
-
Page 47: Onderdelen
SmartKey -elektronische sleutel en dit zorgt ™ ervoor dat de klep (werkt op batterijen) ontgrendeld, zodat uw huisdieren naar wens naar binnen en naar buiten kunnen lopen. Wanneer het SmartDoor -elektronische ™ huisdierluik de SmartKey -elektronische sleutel van uw huisdier niet meer waarneemt, ™... -
Page 48: Installatie Van Het Huisdierluik Door Een Muur Met De Smartdoor ™ -Ombouwset
U kunt een SmartDoor -ombouwset of large verlengingen bestellen via geselecteerde ™ websites, www.petsafe.net of door te bellen met onze klantenservice. Zie het deel over “Vervangende onderdelen” voor meer informatie. Belangrijke definities Radiofrequentietechnologie - Het gebruik van een radio-frequentiesignaal dat zonder kabels kan worden verzonden. - Page 49 Het gevoeligheidsniveau is vooraf ingesteld in de fabriek en dient pas na installatie aangepast te worden. Het gevoeligheidsniveau moet bijvoorbeeld verhoogd worden als de SmartDoor ™ in een metalen deur is geïnstalleerd. Zie het deel over “Het gevoeligheidsniveau van het huisdierluik instellen”...
-
Page 50: Voorbereiden
SmartKey -elektronische sleutel. ™ 2. Gebruik een muntje, draai een kwartslag met de klok mee om de PetSafe RFA-67 batterij vast te zetten. ® OPMERKING: De SmartKey -elektronische sleutel heeft een rood lichtje dat gaat ™... -
Page 51: Controleer Operationele Modi Vóór Installatie
MODE-RESET (mode-reset)-knop ingedrukt tot het gele lichtje aan gaat en laat los om te selecteren. Er kunnen vijf SmartKey -elektronische sleutels geprogrammeerd worden ™ voor één SmartDoor -elektronisch huisdierluik, voor het selectief binnen en buiten lopen ™ tijdens de AUTOMATIC (automatische)-modus. -
Page 52: Controleer De Plaats Van Het Huisdierluik Vóór Installatie
Controleer de plaats van het huisdierluik vóór installatie VERWIJDER DE GEVOELIGHEIDSSTICKER PAS NA INSTALLATIE VAN HET HUISDIERLUIK. Het wordt aanbevolen om de werking van het SmartDoor -elektronische huisdierluik ™ op de gewenste plaats of in de gewenste instelling vóór installatie te controleren, om ernstige radiofrequentie-interventie te voorkomen. -
Page 53: Installeer
(Afb. 2A). Wanneer het sjabloon wordt aangebracht, moet er minimaal 7,6 cm tussen de onder- en zijkanten Afb. 2A van de deur en de buitenrand van het sjabloon worden vrijgehouden om de structurele integriteit van de deur te behouden. www.petsafe.net... - Page 54 90°. Hiermee voorkomt u dat het blad ongelijk zaagt tussen de binnen- en buitenkant van de deur. Zorg dat er niets aan de andere zijde van de deur staat waar u gaten gaat boren of de opening gaat zagen. www.petsafe.net...
- Page 55 Afb. 5A buitenframe. Vastdraaien met een schroevendraaier. NIET TE STRAK AANDRAAIEN (Afb. 5A). Handige tip: stel een lage koppel in indien u een elektrische schroevendraaier gebruikt. OPMERKING: Het small SmartDoor -elektronisch ™ huisdierluik heeft vier schroefgaten en het large SmartDoor -elektronische huisdierluik heeft ™...
- Page 56 Laat uw huisdier niet door het huisdierluik rennen of aanvallen. Als gevolg van variabele radiofrequentie-interferenties kan het een paar seconden duren om de unieke code van de SmartKey -elektronische sleutel goed te lezen en de klep ™ te ontgrendelen. www.petsafe.net...
-
Page 57: Instellen
3 meter naar achteren, zodat de klep automatisch vergrendeld. Dit duurt maximaal vijftien seconden nadat de SmartKey -elektronische sleutel niet meer ™ wordt waargenomen. 8. Bevestig nu het gevoeligheidsniveau door opnieuw richting het huisdierluik te lopen. Het luik moet ontgrendelen wanneer u ongeveer 60 cm voor het huisdierluik staat. www.petsafe.net... -
Page 58: Gevoeligheid En Het Actieve Gebied Begrijpen
Een sleutelring is bijgevoegd om aan de halsband van uw huisdier te bevestigen en moet onder de nek van uw huisdier hangen. Bij het huisdierluik is één SmartKey ™ elektronische sleutel bijgevoegd. Deze is geprogrammeerd en klaar voor gebruik. www.petsafe.net... -
Page 59: Bediening
AUTOMATIC (automatische)-modus – Huisdieren met een geprogrammeerde SmartKey -elektronische sleutel kunnen naar binnen of buiten; maximaal vijf ™ SmartKey -elektronische sleutels kunnen voor één SmartDoor -elektronisch ™ ™ huisdierluik geprogrammeerd worden, voor het selectief binnen en buiten lopen in de automatischemodus. -
Page 60: Probleemoplossing
• U kunt een extra magneetset aanschaffen om de klep te centreren bij constante wind of drukverschil tussen binnen en buiten, indien uw large SmartDoor -elektronisch huisdierluik niet goed sluit. ™ Neem telefonisch contact op met de klantenservice voor ondersteuning. -
Page 61: Zet De Smartkey -Elektronische Sleutel Terug Naar De Standaardinstellingen
Vervangende onderdelen en accessoires Neem voor het aanschaffen van vervangende onderdelen voor uw PetSafe ® SmartDoor -elektronisch huisdierluik contact op met onze klantenservice of ga naar ™ onze website op www.petsafe.net om een verkoper in uw buurt te vinden. www.petsafe.net... -
Page 62: Gebruiksvoorwaarden En Beperking Van Aansprakelijkheid
Indien u dit apparaat niet langer nodig hebt, werp het dan niet weg bij het gewone huisvuil. Breng het apparaat terug naar de plaats van aankoop, zodat het kan worden opgenomen in ons recyclingsysteem. Als dit niet mogelijk is, neem dan contact op met de klantenservice voor meer informatie. www.petsafe.net... -
Page 63: Wegwerpen Van Batterijen
Europa – Radio Systems PetSafe Europe Ltd., 2de Etage, Elgee Building, Market Square, Dundalk, Co. Louth, Ierland... - Page 64 De ahora en adelante podemos hacer referencia a Radio Systems Corporation, Radio Systems PetSafe Europe Ltd., Radio Systems Australia Pty Ltd. y cualquier otra filial o marca de Radio Systems Corporation colectivamente como “Nosotros” o “A nosotros”. INFORMACIÓN DE SEGURIDAD IMPORTANTE Explicación de las palabras y símbolos de atención de este manual...
- Page 65 • Conserve estas instrucciones con sus documentos importantes, asegúrese de transferir estas instrucciones al nuevo propietario de la vivienda. • Los cambios o modificaciones no autorizados podrían anular la autoridad del usuario para hacer funcionar el equipo y anularán la garantía. CONSERVE ESTAS INSTRUCCIONES www.petsafe.net...
- Page 66 Para aprovechar al máximo la protección de su garantía, registre su producto antes de que transcurran 30 días a partir de la compra en www.petsafe.net. Al registrarse y conservar su recibo de compra, disfrutará de la garantía plena del producto y, si tuviera necesidad de contactar con el centro de atención al cliente, podremos ayudarle con...
-
Page 67: Componentes
Cuando la puerta para mascotas electrónica SmartDoor ya no detecta la llave electrónica SmartKey de su mascota, el batiente ™ ™ se bloquea automáticamente. La puerta para mascotas electrónica SmartDoor puede ™ detectar hasta cinco llaves electrónicas SmartKey programadas, y también funciona ™... -
Page 68: Instalación De La Puerta Para Mascotas En Una Pared Con El Kit De Conversión Smartdoor
SmartDoor o extensiones grandes en páginas web específicas, ™ www.petsafe.net o por teléfono a través de nuestro Centro de atención al cliente. Consulte el apartado "Piezas de repuesto" si desea más información. Definiciones Tecnología de radio frecuencia: una señal de radio frecuencia puede transmitirse sin cables. - Page 69 El nivel de sensibilidad, preconfigurado de fábrica, no debe ajustarse hasta concluir la instalación. Por ejemplo, puede ser necesario aumentar el nivel de sensibilidad si la SmartDoor se instala en ™...
-
Page 70: Preparación
SmartKey ™ 2. Con ayuda de una moneda, gire un cuarto en el sentido de las agujas del reloj para fijar la batería RFA-67 PetSafe ® NOTA: La llave electrónica SmartKey cuenta con una luz roja que parpadeará cuando la ™... -
Page 71: Comprobación De Los Modos De Funcionamiento Antes De La Instalación
™ Mantenga pulsado el botón MODE-RESET (Modo-reiniciar) hasta que la luz amarilla se ilumine y suéltelo al seleccionarse. Pueden programarse cinco llaves electrónicas SmartKey con una puerta electrónica SmartDoor para la entrada y salida selectiva en ™ ™ el modo AUTOMATIC (Automático). -
Page 72: Comprobación De La Ubicación De La Puerta Para Mascotas Antes De La Instalación
™ (RFA-67) al llevar a cabo el paso 4 excepto en el caso de la llave electrónica SmartKey incluida con la puerta para mascotas electrónica SmartDoor ™ ™ Si la puerta para mascotas no se desbloquea, muévala a otra ubicación y repita los pasos de nuevo. -
Page 73: Instalación
(Fig. 2A). Al aplicar la plantilla, debe haber como mínimo 7,6 cm entre la parte inferior y los laterales de la puerta y el borde Fig. 2A exterior de la plantilla para mantener la integridad estructural de la puerta. www.petsafe.net... - Page 74 Así evitará que la hoja corte de forma desigual entre las zonas interna y externa de la puerta. No debe haber nada al otro lado de la puerta donde perforará orificios o cortará la abertura. www.petsafe.net...
- Page 75 NO LOS APRIETE EN EXCESO (Fig. 5A). Consejo útil: Si utiliza un destornillador eléctrico, ajústelo a un par bajo. NOTA: La puerta para mascotas electrónica SmartDoor ™ pequeña cuenta con cuatro orificios para la colocación de tornillos y la puerta para mascotas electrónica SmartDoor grande con ocho orificios para la colocación...
- Page 76 Como consecuencia de la variabilidad en las interferencias de radio frecuencia, podría llevar varios segundos que se lea adecuadamente el código único de la llave electrónica SmartKey y que el batiente de la puerta para mascotas se desbloquee. ™ www.petsafe.net...
-
Page 77: Configuración
SmartKey ™ 8. A continuación confirme el nivel de sensibilidad; acérquese de nuevo a la puerta para mascotas. La puerta debe desbloquearse cuando se acerque a aproximadamente 60 cm de la puerta para mascotas. www.petsafe.net... -
Page 78: Sobre La Sensibilidad Y El Área Activa
Se suministra una anilla para llaves para colocarla en el collar de su mascota; debe colgar bajo el cuello de la mascota. La puerta para mascotas incluye una llave electrónica SmartKey que viene ™ preprogramada y lista para su uso. www.petsafe.net... -
Page 79: Funcionamiento
SmartKey programada; Pueden programarse cinco ™ llaves electrónicas SmartKey con una puerta para mascotas electrónica SmartDoor ™ ™ para la entrada y salida selectiva en el modo automático. Para configurarla: Mantenga pulsado el botón MODE-RESET (Modo-reiniciar) hasta que la luz amarilla se ilumine y suéltelo al seleccionarse. -
Page 80: Resolución De Problemas
Elimine cualquier obstrucción que impida que el batiente se bloquee. Una vez el batiente se bloquea correctamente, se reanuda el funcionamiento normal. • Si la puerta para mascotas electrónica SmartDoor ™ grande no se cierra correctamente, puede comprar... -
Page 81: Revertir La Llave Electrónica Smartkey ™ A La Configuración De Fábrica Por Defecto
Accesorios y piezas de recambio Para adquirir piezas para la puerta para mascotas electrónica PetSafe SmartDoor ® ™ contacte con el Centro de atención al cliente o visite nuestro sitio web www.petsafe.net para localizar una tienda cerca de usted. www.petsafe.net... -
Page 82: Términos De Uso Y Limitación De Responsabilidad
Si no necesita más este equipo, no lo deje en el sistema de basuras normal municipal. Devuélvalo al sitio donde lo compró para que pueda incluirse en nuestro sistema de reciclado. Si esto no es posible, contacte con el Centro de atención al cliente para más información. www.petsafe.net... -
Page 83: Eliminación De Las Baterías
Europa: Radio Systems PetSafe Europe Ltd., 2nd Floor, Elgee Building, Market Square, Dundalk, Co. Louth, A91 YR9X Ireland www.petsafe.net... - Page 84 Di seguito Radio Systems Corporation, Radio Systems PetSafe Europe Ltd., Radio Sys- tems Australia Pty Ltd. e qualunque altra affiliata o marchio di Radio Systems Corpora- tion possono essere indicati collettivamente con “Noi”. IMPORTANTI INFORMAZIONI DI SICUREZZA Spiegazione dei termini e dei simboli di attenzione utilizzati in questa guida Questo è...
- Page 85 • Conservare queste istruzioni con i documenti importanti; accertarsi di trasmettere queste istruzioni ai nuovi proprietari dell'immobile. • Modifiche o variazioni non autorizzate possono invalidare l’autorizzazione all’uso del dispositivo e rendere nulla la garanzia. CONSERVARE LE PRESENTI ISTRUZIONI www.petsafe.net...
- Page 86 Come funziona la porta per animali domestici ....87 Installare la porta per animali domestici in un muro con il kit di conversione SmartDoor ™...
-
Page 87: Componenti
• Matita • Corde Come funziona la porta per animali domestici Grazie alla tecnologia a radiofrequenza, la porta elettronica per animali domestici SmartDoor legge un segnale univoco dalla chiave elettronica SmartKey e attiva lo ™ ™ sblocco del flap alimentato a batteria, in modo da permettere agli animali domestici di entrare e uscire quando vogliono. -
Page 88: Installare La Porta Per Animali Domestici In Un Muro Con Il Kit Di Conversione Smartdoor
SmartDoor ™ Per le strutture di installazione a parete sono disponibili i kit di conversione SmartDoor ™ Il kit di conversione per l'estensione della parete incornicia le aree esposte, conferendo all'installazione della porta un aspetto pulito, lineare e finito. Per le pareti in mattoni, cemento o di blocchi, è... - Page 89 Il livello di sensibilità predefinito dalla fabbrica deve essere regolato soltanto dopo l'installazione. Ad esempio, potrebbe essere necessario aumentare il livello di sensibilità se la SmartDoor è installata su una ™ porta metallica. Vedere la sezione "Impostazione del livello di sensibilità della porta per animali domestici"...
-
Page 90: Preparazione
® fondo della chiave elettronica SmartKey ™ 2. Utilizzando una moneta, ruotare in senso orario di un quarto di giro per fissare la batteria PetSafe RFA-67 . ® N.B. La chiave elettronica SmartKey ha una spia rossa che lampeggia quando la ™... -
Page 91: Controllare Le Modalità Di Funzionamento Prima Dell'installazione
è selezionata la modalità desiderata. È possibile programmare cinque chiavi elettroniche SmartKey per una ™ Porta elettronica per animali domestici SmartDoor per l'ingresso e l'uscita selettiva ™ durante la Modalità AUTOMATIC (Automatica). -
Page 92: Controllare L'ubicazione Della Porta Per Animali Domestici Prima Dell'installazione
™ (RFA-67) mentre si effettua la fase 4 tranne quelle della chiave elettronica SmartKey ™ inclusa nella Porta per animali domestici SmartDoor ™ Se la porta per animali domestici non si sblocca, spostarla in un'altra sede e ripetere nuovamente le fasi. Se la verifica della collocazione della Porta per animali domestici non riuscisse, rivolgersi al nostro Centro assistenza clienti. -
Page 93: Installazione
(Fig. 2A). Quando si applica la sagoma per il taglio, lasciare minimo 7,6 cm fra la base Fig. 2A e i lati della porta e il bordo esterno della sagoma per garantire l'integrità strutturale della porta. www.petsafe.net... - Page 94 Ciò eviterà che la lama tagli in modo non uniforme la parte interna ed esterna della porta. Accertarsi che non ci sia nulla sull'altro lato della porta su cui si creeranno i fori con il trapano o si taglierà l'apertura. www.petsafe.net...
- Page 95 NON STRINGERE TROPPO LE VITI (Fig. 5A). Consiglio utile: se si utilizza un cacciavite elettrico, impostarlo su bassa coppia. N.B. La Porta per animali domestici SmartDoor piccola ™ ha 4 fori di fissazione delle viti e la Porta per animali...
- Page 96 A causa delle interferenze a radiofrequenza variabili, potrebbero essere necessari diversi secondi prima che la chiave elettronica SmartKey venga letta correttamente e che il ™ flap della porta per animali domestici si sblocchi. www.petsafe.net...
-
Page 97: Impostazioni
SmartKey non viene più rilevata. ™ 8. Adesso confermare il livello di sensibilità avvicinandosi di nuovo alla porta per animali domestici. Avvicinandosi frontalmente a circa 60 cm di distanza dalla porta per animali domestici, questa dovrebbe sbloccarsi. www.petsafe.net... -
Page 98: Comprensione Della Sensibilità E Dell'area Attiva
™ Viene fornito in dotazione un anello portachiavi da applicare al collare dell'animale, in modo che gli penda sotto il collo. La porta per animali domestici include una chiave elettronica SmartKey viene consegnata ™ già pre-programmata e pronta all'uso. www.petsafe.net... -
Page 99: Funzionamento
™ programmare fino a cinque chiavi elettroniche SmartKey per una Porta elettronica ™ per animali domestici SmartDoor per l'ingresso e l'uscita selettivi durante la modalità ™ automatica. Per impostarla: tenere premuto il pulsante MODE-RESET (Resetta modalità di funzionamento) fino all'accensione della spia gialla e rilasciarlo quando si è... -
Page 100: Individuazione E Risoluzione Dei Guasti
Rimuovere le eventuali ostruzioni che impediscono al flap di bloccarsi. Quando il flap riesce a bloccarsi, riprende il funzionamento normale. • Se la porta per animali domestici SmartDoor grande ™ non si chiude correttamente, è possibile acquistare un... -
Page 101: Ripristino Delle Impostazioni Di Fabbrica Predefinite Della Chiave Elettronica Smartkey
Ricambi e accessori Per acquistare i pezzi di ricambio per la porta elettronica per animali domestici SmartDoor PetSafe , rivolgersi al nostro Centro assistenza clienti o visitare il nostro sito ™ ® all'indirizzo www.petsafe.net per individuare un rivenditore nelle vicinanze. www.petsafe.net... -
Page 102: Limitazione Di Responsabilità E Condizioni Di Utilizzo
Affinché possa essere inserita nel nostro sistema di riciclaggio, si invita l'utilizzatore a riconsegnare l'apparecchiatura al punto vendita presso cui è stata acquistata. Se ciò non fosse possibile, si invita l'utilizzatore a contattare il Centro assistenza clienti per informazioni in merito. www.petsafe.net... -
Page 103: Eliminazione Delle Batterie
Questo prodotto è coperto da una garanzia limitata del produttore. Informazioni esaurienti sulla garanzia di questo prodotto e le sue condizioni sono disponibili sul sito Web www.petsafe.net e/o possono essere richieste al Centro assistenza clienti di zona. Europa – Radio Systems PetSafe Europe Ltd., 2nd Floor, Elgee Building, Market Square, Dundalk, Co. - Page 104 Im Folgenden bezieht sich „wir“ oder „uns“ auf Radio Systems Corporation, Radio Systems PetSafe Europe Ltd., Radio Systems Australia Pty Ltd. und jegliche an- deren Tochtergesellschaften oder Marken von Radio Systems Corporation. WICHTIGE SICHERHEITSINFORMATIONEN Erklärung der in dieser Anleitung verwendeten Warnungen und Symbole Das ist das Sicherheitswarnsymbol.
- Page 105 Sie darauf, dass Sie die Anleitung einem neuen Eigentümer der Immobilie aushändigen. • Unbefugte Änderungen an diesem Produkt können die Befugnis des Benutzers für den Betrieb des Geräts aufheben und zum Erlöschen der Garantie führen. BITTE BEWAHREN SIE DIESE GEBRAUCHSANWEISUNG AUF www.petsafe.net...
- Page 106 Website unter www.petsafe.net. Damit Sie den maximalen Schutz aus Ihrer Garantie erhalten, registrieren Sie bitte Ihr Produkt innerhalb von 30 Tagen auf www.petsafe.net. Indem Sie Ihr Produkt anmelden und die Quittung aufbewahren, können Sie alle Vorzüge der Garantie nutzen und erhalten bei einem eventuellen Anruf bei der Kundenbetreuung schneller Hilfe.
-
Page 107: Bestandteile
Signal vom SmartKey elektronischen Schlüssel und veranlasst ™ eine batteriebetriebene Klappe dazu, sich zu öffnen, damit Ihre Haustiere kommen und gehen können, wie es ihnen gefällt. Wenn die SmartDoor elektronische Haustiertür ™ den SmartKey elektronischen Schlüssel ihres Haustieres nicht mehr empfängt, kehrt ™... -
Page 108: Wandinstallation Der Haustiertür Mit Dem Smartdoor ™ Umbausatz
Tunnelverlängerungen. Sie können einen SmartDoor Umbausatz oder eine große Verlängerung über ausgewählte Webseiten, ™ www.petsafe.net oder durch einen Anruf bei unserer Kundenbetreuung erwerben. Im Abschnitt „Ersatzteile“ finden Sie dazu weitere Informationen. Definitionen Radiofrequenztechnologie – Der Einsatz eines Funksignals, das drahtlos übertragen wird. - Page 109 Sie unsere PetSafe Kundenbetreuung an oder besuchen Sie ® www.petsafe.net. Die normale Lebensdauer der RFA-67 beträgt etwa sechs Monate. Gesamtgröße – Abmessungen der Haustiertür einschließlich Außenrahmen Ausschnittgröße – Passende Größe der Öffnung in der Tür des jeweiligen Hauses, in die die Haustiertür eingesetzt wird...
-
Page 110: Vorbereitung
Vierteldrehung im Uhrzeigersinn, um die PetSafe RFA-67 Batterien zu sichern. ® ANMERKUNG: Der SmartKey elektronische Schlüssel verfügt über eine rote Lampe, ™ die blinkt, wenn der Ladezustand der PetSafe RFA-67 Batterie niedrig ist; die Batterie ® sollte so bald wie möglich ersetzt werden. www.petsafe.net... - Page 111 ™ Einstellung: Halten Sie die Taste MODE-RESET (Modus zurücksetzen), bis die gelbe Lampe leuchtet, und lassen Sie sie los, wenn dieser ausgewählt wurde. Es können fünf SmartKey elektronische Schlüssel für eine SmartDoor elektronische Haustiertür für ™ ™ selektiven Zugang und Ausgang im AUTOMATIC (Automatik) Modus programmiert werden.
-
Page 112: Überprüfung Des Standorts Der Haustiertür Vor Der Installation
Kit beilegt, bereits auf die Haustiertür programmiert wurde. ANMERKUNG: Wenn bereits SmartKey elektronische Schlüssel im Haushalt ™ vorhanden sind, alle (RFA-67) Batterien, bis auf die Batterien des im Kit der SmartDoor ™ elektronischen Haustiertür enthaltenen SmartKey elektronischen Schlüssels, aus diesen ™... -
Page 113: Installation
Klebebandreste von der Tür (Abb. 2A). Beim Anbringen der Schneideschablone sollte zwischen der Unterkante und den Abb. 2A Seiten der Tür und dem äußeren Rand der Schablone ein Abstand von mindestens 7,6 cm verbleiben, damit die Struktur der Tür intakt bleibt. www.petsafe.net... - Page 114 Händen, um sie langsam und ruhig in einem 90°-Winkel zu führen. Hierdurch wird ungleichmäßiges Sägen zwischen Innen- und Außenseite der Tür verhindert. Achten Sie darauf, dass sich beim Bohren und Sägen nichts auf der anderen Seite der Tür befindet. www.petsafe.net...
- Page 115 Drehen Sie die Schrauben mit dem Schraubenzieher fest. WENDEN SIE KEINE ÜBERMÄßIGE KRAFT AN (Abb. 5A). Tipp: Stellen Sie bei Verwendung eines elektrischen Schraubenziehers ein niedriges Drehmoment ein. ANMERKUNG: Die kleine SmartDoor elektronische ™ Haustiertür verfügt über vier Schraubenlöcher und die große SmartDoor elektronische Haustiertür hat...
- Page 116 Erlauben Sie Ihrem Haustier nicht, durch die Haustiertür zu rennen bzw. auf sie loszustürmen. Aufgrund verschiedener Funkstörungen kann es mehrere Sekunden dauern, bis der unverwechselbare Code des SmartKey elektronischen Schlüssels richtig ™ ausgelesen wird und sich die Klappe der Haustiertür öffnet. www.petsafe.net...
-
Page 117: Einstellung
Sekunden dauern, ab dem Zeitpunkt, an dem der SmartKey elektronische ™ Schlüssel nicht mehr erkannt wird. 8. Bestätigen Sie jetzt den Empfindlichkeitsgrad, indem sich der Haustiertür erneut nähern. Die Tür sollte entsperrt werden, wenn Sie sich in einem Abstand von 60 cm vor der Haustiertür befinden. www.petsafe.net... -
Page 118: Verständnis Von Empfindlichkeit Und Aktivitätsbereich
Schlüssels am Halsband des Haustieres Beiliegend erhalten Sie einen Schlüsselring für die Anbringung des elektronischen Schlüssels am Halsband ihres Haustieres. Dieser sollte am Hals des Haustieres hängen. Die Haustiertür wird mit einem vorprogrammierten und betriebsbereiten SmartKey elektronischen Schlüssel geliefert. ™ www.petsafe.net... -
Page 119: Betrieb
AUTOMATIC (Automatik) Modus – Dieser erlaubt einem Haustier, das einen programmierten SmartKey elektronischen Schlüssel trägt, herein- und herauszugehen. Es ™ können bis zu fünf SmartKey elektronische Schlüssel in einer SmartDoor elektronischen ™ ™ Haustiertür für selektives Hinein- und Herausgehen im Automatik-Modus programmiert werden. -
Page 120: Mögliche Probleme Und Lösungen
Haustiertür versucht, die Klappe zu schließen. Entfernen Sie alle Hindernisse, die die Klappe am Schließen hindern. Wenn die Klappe erfolgreich schließt, wird der Normalbetrieb wieder aufgenommen. • Wenn ihre große SmartDoor elektronische Haustiertür ™ nicht richtig schließt, können Sie ein zusätzliches Magnetset kaufen, das die Klappe zentriert, wenn sie durch ständigen... -
Page 121: Den Smartkey ™ Elektronischen Schlüssel Auf Werkseinstellungen Zurücksetzen
Ersatzteile und Zubehör Für den Kauf von Ersatzteilen für Ihre PetSafe SmartDoor elektronische Haustiertür ® ™ wenden Sie sich an die Kundenbetreuung oder besuchen Sie unserer Webseite www.petsafe.net, auf der Sie Informationen zu einem Händler in Ihrer Nähe erhalten. www.petsafe.net... -
Page 122: Nutzungsbedingungen Und Haftungsbeschränkung
Abfall entsorgt werden. Bitte senden Sie es dahin zurück, wo Sie es gekauft haben, damit es in unser Recyclingsystem aufgenommen werden kann. Ist dies nicht möglich, setzen Sie sich bitte mit der Kundenbetreuung in Verbindung, die Ihnen weitere Informationen gibt. www.petsafe.net... -
Page 123: Batterieentsorgung
Dieses Produkt besitzt eine beschränkte Herstellergarantie. Alle Details zu der für dieses Produkt geltenden Garantie und ihren Bestimmungen erhalten Sie auf www.petsafe.net und/oder bei Ihrer Kundenbetreuung vor Ort. Europa – Radio Systems PetSafe Europe Ltd., 2nd Floor, Elgee Building, Market Square, Dundalk, Co. Louth, A91 YR9X Ireland www.petsafe.net... - Page 128 To learn more about our extensive product range which includes Containment Systems, Training Systems, Bark Control, Pet Doors, Health & Wellness, Waste Management and Play & Challenge products, please visit www.petsafe.net. Les produits PetSafe sont conçus pour améliorer la relation entre vous et votre ®...
Need help?
Do you have a question about the SmartDoor and is the answer not in the manual?
Questions and answers