Table of Contents
Advertisement
Quick Links
Advertisement
Table of Contents

Related Manuals for StarTech.com ST12MHDLAN2K


Summary of Contents for StarTech.com ST12MHDLAN2K
- Page 1 HDMI Over IP Extender Kit - 1080p Actual product may vary from photos User Manual SKU#: ST12MHDLAN2K & ST12MHDLAN2R For the latest information and specifications visit www.startech.com/ST12MHDLAN2K www.startech.com/ST12MHDLAN2R Manual Revision: 10/22/2018...
- Page 2 Industry Canada Statement This Class A digital apparatus complies with Canadian ICES-003. Cet appareil numérique de la classe [A] est conforme à la norme NMB-003 du Canada. CAN ICES-3 (A)/NMB-3(A) To view manuals, videos, drivers, downloads, technical drawings, and more visit www.startech.com/support...
- Page 3 For the State of California WARNING: Cancer and Reproductive Harm www.P65Warnings.ca.gov To view manuals, videos, drivers, downloads, technical drawings, and more visit www.startech.com/support...
-
Page 4: Safety Statements
• Kablar (inklusive elkablar och laddningskablar) ska dras och placeras på så sätt att risk för snubblingsolyckor och andra olyckor kan undvikas. To view manuals, videos, drivers, downloads, technical drawings, and more visit www.startech.com/support... -
Page 5: Table Of Contents
Installing the IR Receiver and IR Blaster .................... 13 Mounting the Extender........................... 14 Installing the Feet ............................. 15 Configuration ..................16 Rotary DIP Switch ............................16 Serial 1 Control Port ..........................16 To view manuals, videos, drivers, downloads, technical drawings, and more visit www.startech.com/support... - Page 6 Adjusting the IP Address and Subnet Masks .................. 22 Switching Your Remote Displays Between Video Sources ............24 Configuring Your Remote Displays for a Video Wall Application ..........26 Adjusting Video Tear ..........................33 To view manuals, videos, drivers, downloads, technical drawings, and more visit www.startech.com/support...
-
Page 7: Product Diagram
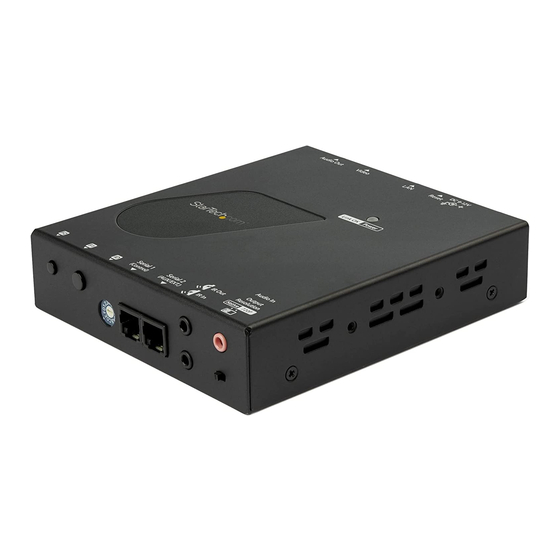
Rotary Control Port Switch Port Transmitter Rear (RJ-11) Audio Embed Locking Switch Screw LED Indicator Reset DC 12V Button Audio In Video In Power Port Port Port Port To view manuals, videos, drivers, downloads, technical drawings, and more visit www.startech.com/support... -
Page 8: Receiver Front
Resolution IR In Control Switch Rotary Port Port Switch (RJ-11) Receiver Rear Locking Screw LED Indicator Reset Button Audio Video In DC 12V Port Port Power Port Port To view manuals, videos, drivers, downloads, technical drawings, and more visit www.startech.com/support... -
Page 9: Product Information
Universal Power Adapters (NA, EU, UK, ANZ) x 1 • Hardware Kit x 1 • Mounting Brackets x 2 • Mounting Screws x 8 • HDMI Locking Screws x 1 • To view manuals, videos, drivers, downloads, technical drawings, and more visit www.startech.com/support... -
Page 10: Requirements
Phillips Head Screwdriver • Writing Utensil • Level • Display: HDMI Displays x 1 (per HDMI Receiver) • Devices: HDMI Video Source x 1 (per HDMI Transmitter) • To view manuals, videos, drivers, downloads, technical drawings, and more visit www.startech.com/support... - Page 11 Connect an HDMI Cable from the Video Out Port on the back of the HDMI Receiver to the HDMI Video Display Device. Notes: To connect additional HDMI Receivers (sold sepa- rately), repeat step 5. To view manuals, videos, drivers, downloads, technical drawings, and more visit www.startech.com/support...
-
Page 12: Optional Installation
HDMI Transmitter and the other end to the Audio Source Device. Connect a 3.5 mm Audio Cable to the Audio Out Port on the HDMI Receiver and the other end to an Output Device. To view manuals, videos, drivers, downloads, technical drawings, and more visit www.startech.com/support... -
Page 13: Connect The Devices To A Gigabit Lan Network
IGMP snooping is supported and enabled. Verify that the image from your Video Source appears on the Display Devices attached to the HDMI Receiver(s). To view manuals, videos, drivers, downloads, technical drawings, and more visit www.startech.com/support... -
Page 14: Using The Rj-11 To Rs-232 Adapters
Connect the IR Receiver to the IR In Port on the front of the HDMI Transmitter. Position the IR Receiver where you’ll point your IR Remote Control. To view manuals, videos, drivers, downloads, technical drawings, and more visit www.startech.com/support... - Page 15 If the device receiving the IR signal is at the HDMI Transmitter side: Connect the IR Receiver to the IR In Port on the HDMI Receiver. Position the IR Receiver where you’ll point your IR Remote Control. To view manuals, videos, drivers, downloads, technical drawings, and more visit www.startech.com/support...
-
Page 16: Mounting The Extender
HDMI Transmitter and/or HDMI Receiver onto a wall stud to provide the correct support. Measure the distance between the Mounting Screw Holes on the Mounting Brackets. To view manuals, videos, drivers, downloads, technical drawings, and more visit www.startech.com/support... -
Page 17: Installing The Feet
HDMI Receiver(s) must be set to the same position/ channel for the devices to communicate. Use the flat end of the Plastic Screwdriver (included) to • adjust the Rotary DIP Switch’s position. To view manuals, videos, drivers, downloads, technical drawings, and more visit www.startech.com/support... -
Page 18: Serial 1 Control Port
Sets the video output to a max of 1080p @ 60Hz. Scaling: Set the video output to 720p @ 60Hz Audio Embed Switch The Audio Embed Switch is located on the HDMI Transmitter and has two settings: To view manuals, videos, drivers, downloads, technical drawings, and more visit www.startech.com/support... -
Page 19: Function Buttons
Transmitter or HDMI Receiver). Release the F1 Button after 17 seconds (the Power/Link LED will flash green and blue). For a second time power cycle the HDMI Transmitter or HDMI Receiver. To view manuals, videos, drivers, downloads, technical drawings, and more visit www.startech.com/support... -
Page 20: Rebooting The System
With the HDMI Transmitter or HDMI Receiver powered on, Insert a pointed-tip object (e.g. pin) into the recessed Reset Button. Hold the recessed Reset Button until the HDMI Transmitter or HDMI Receiver reboots. To view manuals, videos, drivers, downloads, technical drawings, and more visit www.startech.com/support... -
Page 21: Startech.com Wall Control App
Demo Mode: Creates a virtual environment with multiple Transmitters and Receivers that enables you to configure a virtual setup without physically connecting the Transmitters or Receivers, to test the functionality. To view manuals, videos, drivers, downloads, technical drawings, and more visit www.startech.com/support... -
Page 22: Software Installation
Connect the device you installed the StarTech.com Wall Control app on to the same network as your transmitter(s) and receiver(s). Select on the StarTech.com Wall Control icon. To view manuals, videos, drivers, downloads, technical drawings, and more visit www.startech.com/support... - Page 23 The app will open to the DEVICES screen and automatically populate the DEVICES screen with all Transmitters and Receivers connected to the network. DEVICES screen To view manuals, videos, drivers, downloads, technical drawings, and more visit www.startech.com/support...
-
Page 24: Adjusting The Ip Address And Subnet Masks
On the DEVICES screen, click on a Transmitter or Receiver. The Device Properties screen will appear. Device Properties screen Click the Edit Icon next to the IP address you wish to configure. To view manuals, videos, drivers, downloads, technical drawings, and more visit www.startech.com/support... - Page 25 The Network Settings screen will appear. Network Settings screen Select the Static button, an IP Address and Subnet Mask field will appear. Static Button To view manuals, videos, drivers, downloads, technical drawings, and more visit www.startech.com/support...
-
Page 26: Switching Your Remote Displays Between Video Sources
Device Properties screen. Switching Your Remote Displays Between Video Sources On the DEVICES screen, select the SWITCHES button on the toolbar at the bottom of the screen. To view manuals, videos, drivers, downloads, technical drawings, and more visit www.startech.com/support... - Page 27 To assign a Video Source, or change the Video Source, select the transmitter listed next to your receiver that you would like to display. To view manuals, videos, drivers, downloads, technical drawings, and more visit www.startech.com/support...
-
Page 28: Configuring Your Remote Displays For A Video Wall Application
Video Wall Application On the DEVICES screen, select the WALLS button on the toolbar at the bottom of the screen. The WALLS screen will appear. WALLS screen To view manuals, videos, drivers, downloads, technical drawings, and more visit www.startech.com/support... - Page 29 Select the + icon, the Video Wall screen will appear. Video Wall screen Select the Wall Name field. Using the on-screen keyboard enter a name for the new video wall configuration. To view manuals, videos, drivers, downloads, technical drawings, and more visit www.startech.com/support...
- Page 30 Select the Columns field. From the drop-down list, select the number of rows in the video wall configuration. Note: The Cancel button will take you back to the WALLS screen without adding a video wall configuration. To view manuals, videos, drivers, downloads, technical drawings, and more visit www.startech.com/support...
- Page 31 - or - Click the Cancel button to return to the previous screen. Once a receiver is selected it will appear in yellow on the video wall display. To view manuals, videos, drivers, downloads, technical drawings, and more visit www.startech.com/support...
- Page 32 DisplayX: Allows you to adjust the total width of the • display in millimeters (mm). DisplayY: Allows you to adjust the total height of the • display in millimeters (mm). To view manuals, videos, drivers, downloads, technical drawings, and more visit www.startech.com/support...
- Page 33 On the Video Wall screen, click the Save button to save the video wall settings and return to the WALLS screen. - or - Click the Cancel button to discard changes and return to the WALLS screen. To view manuals, videos, drivers, downloads, technical drawings, and more visit www.startech.com/support...
- Page 34 Yellow: Indicates which devices in the video wall • configuration are active. Gray: Indicates that the receiver is currently being used in • another video wall configuration. To view manuals, videos, drivers, downloads, technical drawings, and more visit www.startech.com/support...
-
Page 35: Adjusting Video Tear
Adjusting Video Tear On the DEVICES screen, select the WALLS button on the toolbar at the bottom of the screen. The WALLS screen will appear. WALLS screen To view manuals, videos, drivers, downloads, technical drawings, and more visit www.startech.com/support... - Page 36 The Video Tear Correction screen will appear. Video Tear Connection screen Adjust the Sliders until the video tear line moves off the display. Click the Done button once you have adjust the video tear. To view manuals, videos, drivers, downloads, technical drawings, and more visit www.startech.com/support...
- Page 37 Limitation of Liability In no event shall the liability of StarTech.com Ltd. and StarTech.com USA LLP (or their officers, directors, employees or agents) for any damages (whether direct or indirect, special, punitive, incidental, consequential, or otherwise), loss of profits, loss of business, or any pecuniary loss, arising out of or related to the use of the product exceed the actual price paid for the product.
- Page 38 StarTech.com is an ISO 9001 Registered manufacturer of connectivity and technology parts. StarTech.com was founded in 1985 and has operations in the United States, Canada, the United Kingdom and Taiwan servicing a worldwide market.
Need help?
Do you have a question about the ST12MHDLAN2K and is the answer not in the manual?
Questions and answers