Table of Contents

Related Manuals for HME SYS6700HD


Summary of Contents for HME SYS6700HD
- Page 1 SYS6700HD Drive-Up Communication System Operator Instructions HM ELECTRONICS, INC. HME# 400G753 2848 Whiptail Loop, Carlsbad, CA 92010 USA Rev D 3/16/18 Phone: 1-800-848-4468 Fax: 858-552-0172 Website: www.hme.com Email: support@hme.com...
-
Page 3: Table Of Contents
INTRODUCTION . . . . . . . . . . . . . . . . . . . . . . . . . . . . . . . . . . . . . . . . . . . . . . . . . . . . . . . . 1 Full Duplex and Half Duplex Modes . - Page 4 SYS6700HD standard equipment . . . . . . . . . . . . . . . . . . .
-
Page 5: Introduction
INTRODUCTION The 6700HD Wireless Drive-thru Audio System is designed to deliver a clear drive-thru conversation . The Push-to-Talk feature is a basic headset operation that allows customer communication by holding a headset button to talk and listen . The headset button is released to disconnect (see below) . Hands Free headset modes allow Order Takers to communicate with customers as they would in a phone call by pressing a button once to talk to a customer at the menu . -
Page 6: System 6700Hd Equipment
Model Number Figure 1. SYS6700HD standard equipment All-In-One Headset . . . . . . . . . . . . . . . . . . HS6200 Battery for Headset . -
Page 7: Headsets
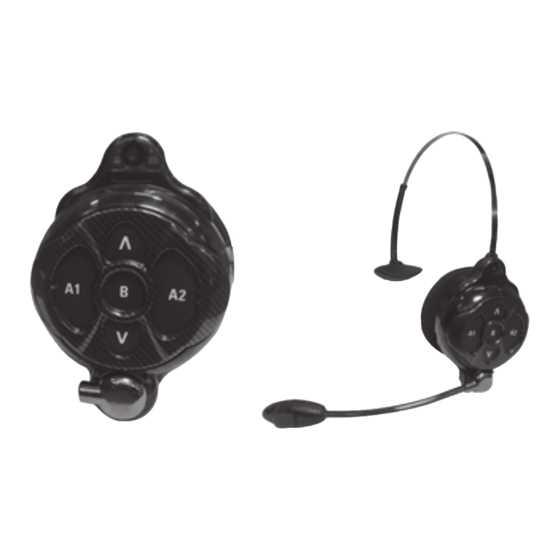
Headsets Features and Controls Power light Power button Volume-up button Channel “A1” button Channel “A2” button Transmit light Volume-down button Channel “B” button Figure 2. Headset controls Wearing the Headset ● Wear the headset with the microphone on your right or left side next to your mouth . ●... -
Page 8: Using The Headset Controls
Using the Headset Controls The control buttons will activate when pressed firmly. Use your fingertips, not your fingernails, to press the buttons . Power On/Off ● Power On — Press and release the Power button . A voice message in the headset will say “headset #, battery full/half/low” and both the power light and the transmit light will flash red. -
Page 9: Changing Language Of Headset Prompts
Auto-Hands-Free (AHF) Mode ● With the headset powered off, press and hold the volume-up Λ and A1 buttons while you press and release the Power button to turn it on in the AHF mode . ● When a car arrives at the menu, the headset will automatically latch on and you can speak and listen to the customer without pressing any buttons . -
Page 10: Headset Battery Removal And Replacement
Headset Battery Removal and Replacement To change batteries When a battery becomes weak, a voice in the headset will say “Change battery .” When this happens, press the battery-release button and slide the battery out of the headset as shown in Figure 5 . To replace batteries When replacing a battery in the headset, place the end of the battery with the metal contacts into the headset, in the same position as the battery you removed . -
Page 11: Battery Charger
Battery Charger Up to four batteries can be charged in the charger at the same time . Charging time is approximately 2 .5 hours . The battery status lights next to each charging port are explained below . Up to six fully charged batteries can be stored in the battery storage ports . -
Page 12: Console
Console The Console is a stationary control panel used to display messages and provide manual control for any selected base station in the system . ● The SELECT STALL and 0-9 keys are used to manually select a stall number . ●... -
Page 13: Base Station
Base Station All functions of the audio system are channeled through the base station . It is the electronic heart of the SYS6700HD . Figure 8. Base station front panel ● The menu-select buttons are used to make selections from the menu on the display screen . -
Page 14: System 6700Hd Operation
When Communicator button “A” has been pushed, indicates an empty queue (ex: 3. E) Indicates busy (ex: 1. b) Indicates terminate (ex: 3. t) Indicates an error message (ex: E.01) NOTE: If an error message appears, call HME at 1-800-848-4468. -
Page 15: Using A Pos System
Using a POS System 1 . See the HME Connection Status Grid displaying the base stations, stalls (or lanes) and the employees currently connected in the 6700HD system . 2 . View and use the POS Order Selection screen as an additional console to: ●... -
Page 16: Routine Operation
Routine Operation To operate the SYS6700HD, follow the instructions below . , press button “ ” or To connect to a stall or drive-thru “A2” on your headset , press button “ ” To disconnect from a stall or drive-thru on your headset. - Page 17 The following are examples of typical operating scenarios in routine drive-up service operations . They describe what you will normally hear and see using SYS6700HD equipment, and provide step-by-step instructions telling you exactly what to do in each situation .
- Page 18 ● Second customer presses call button (at stall 12), and is automatically placed next in the queue . Headset : No new call-button tone will sound to interrupt the conversation with your current customer. Ceiling speaker : Repeating tone Console display : Remote display : ●...
- Page 19 Press button “A1” or “A2” on your headset to connect to the next customer in the queue (at stall 12). Headset : Voice says “stall twelve” Ceiling speaker : Repeating tone Console display : Remote display : Talk and listen to the customer at stall 12 . Press button “B”...
- Page 20 Press button “B” on your headset to disconnect from the current customer (at stall 7). ● System is IDLE again . Headset : No sound in headset Ceiling speaker : No sound from ceiling speaker Console display : Remote display : System will remain idle until another customer presses a call button .
-
Page 21: Other Modes Of Operation
Other Modes of Operation Drive-Thru-Only Mode This mode allows one operator to serve the drive-thru lane exclusively . Any base station can operate in Drive-Thru Only mode, but only one base station at a time . First, choose the base station you want to use for Drive-Thru-Only mode, then: 1 . -
Page 22: Special Features
Special Features Manual Selection This allows any operator to manually select a base station or drive-up stall. 1 . Press the SELECT STATION key on the Console keypad . ¾ “STATION? ” appears on the second line of the Console display . 2 . -
Page 23: Base Station Settings
Base Station Settings Base Station Display Screen The display screen is where all menu selections are made for routine operation options . The display screen will turn off (sleep) if there is no button activity . Pressing any button will turn it back on (wake it up) . - Page 24 Volume Adjustments To adjust the volume of inbound and outbound audio on the base station MAIN STATUS display, select Menu and then, on the MAIN MENU select Volume adjust . Press the buttons on the left side of ¾ the VOLUME MENU to select which volume you want to adjust .
- Page 25 Scheduled Outbound You can use the scheduled outbound options to adjust audio levels for different times of the day . To begin, press × the Schedules button . × ¾ × There are 12 possible time periods . To select a time period to be edited, use the ▲(up) and ▼(down) buttons to scroll through the 12 available time periods on the EDIT SCHEDULE TIMES display .
- Page 26 Scheduled Outbound Settings To schedule outbound volume settings, select Settings from the IN/OUTBOUND VOLUME screen . Press the Enable button on the SCHEDULED OUTBOUND VOLUME SETTINGS screen . By default, it is set to – (off) . Enable it by selecting (on) . Use the + and −...
-
Page 27: Register Headsets
Register Headsets After each headset has been registered to a base station, the base station will recognize the headsets and differentiate between them and other electronic equipment operating on similar frequencies . Up to 15 headsets can be registered to a base station . Replacement headsets must be registered before they can be used . - Page 28 It is best NOT to use this option during store business hours. If you experience difficulties registering headsets: In the USA, call HME Technical Support at 1-800-848-4468 . Outside the USA, call your local HME representative for assistance .
-
Page 29: Sonic Settings
For stores with more than one base, use this option to choose the base address (1, 2, 3 or 4) for each base . Each base must be set to a different address . Note: The Base Address is set during installation and should not be changed unless instructed by HME Technical Support. System Learn The base tells the Bridge to Learn the entire Sonic system (Bases, Routers and Console) without the need to access the Bridge settings using a web browser . -
Page 30: Store Settings
On the ADVANCED MENU, press the Store settings button . installation. If you have questions ¾ ¾ × regarding these options, contact HME Technical × Support at 1-800-848-4468 or email support@hme.com. × × ¾ User Password If you need a password, the ENTER USER PASSWORD screen will be displayed . If you do not need a password, the STORE SETTINGS display shown below will appear immediately . - Page 31 Set User Password The User password is used to protect the Network, Volume Settings and Store Settings menus . This password is not the same as the Installer Password that is used to protect the Installer Settings . For security purposes, you may ×...
- Page 32 VAA Adjustment VAA settings can be adjusted to eliminate echo, feedback or fluctuating inbound audio levels. ¾ To turn the VAA feature on/off, or to adjust VAA levels, press the More button on the STORE SETTINGS display . On the ADVANCED STORE SETTINGS display, press the VAA button .
- Page 33 Restore Installer Settings To delete all of your custom settings and return to the original settings made by the installer, press the Restore installer settings button on the ADVANCED STORE SETTINGS display . You will be prompted “Are you sure?” to ensure this is an option you intend to use . This action cannot be reversed . If you are certain, press the Restore button on the RESTORE INSTALLER SETTINGS display .
- Page 34 LCD Contrast To adjust the light/dark contrast of the base station display, press the More button on the STORE SETTINGS display . On the ADVANCED STORE SETTINGS display, press the LCD Contrast button and then press the + (lighter) and − (darker) buttons to adjust the contrast. When you are finished, press the Back button as needed to save the setting and return to the desired display .
-
Page 35: Network Settings
If your base station is connected to a computer network, the network settings were set up by the installer . If you need to contact HME Technical Support regarding any problem with your network connection, you may be asked to make changes to the network settings . To do this, select the Menu button on the MAIN STATUS display and then select More on the MAIN MENU . - Page 36 ● DHCP – allows the base to automatically acquire its network ¾ settings from a DHCP server installed on the local network . NOTE: The Sonic Network does not use DHCP. This option does not require user modification. To edit this setting, press the DHCP button to highlight (on) or − (off).
-
Page 37: Advanced Network Settings
Advanced Network Settings For additional advanced network settings, press the More button on the NETWORK SETTINGS display . × ¾ ¾ × × ¾ ¾ × Press the respective button on the ADVANCED NETWORK SETTINGS display for each setting you would like to view or change . - Page 38 ◄ and ► button to move the highlighted box, and then × use the + and − buttons to change the number in the highlighted box . ● Telnet port – This port is reserved for use by HME Technical Support . ¾ ×...
-
Page 39: Diagnostics
Diagnostics If you make a service call to HME Technical Support, you may be asked to have diagnostics performed automatically by the base station . If so, press the Menu button on the base station MAIN STATUS display and then press the More button on the MAIN MENU . -
Page 40: Access Control Of The Base
● Store settings menus, Network settings menu, and Volume adjustment menus can be protected if a User password is created in the Store settings . These menus can be accessed using the User password, Installer password, or by an HME password (provided by HME if the User password is forgotten) . -
Page 41: Equipment Care And Cleaning
. ● Foam muffs on headset earpieces can easily be replaced for sanitary purposes . To order extra foam muffs, call your local HME sales representative . Battery Charger Avoid splashing water or grease on the battery charger . Clean the battery charger monthly as follows . -
Page 42: Troubleshooting
TROUBLESHOOTING In case of any problems with your SYS6700HD, refer to the following checklist . If you cannot correct any problems using the checklist, call HME Customer Support at 1-800-848-4468 . PROBLEM PROBABLE CAUSE SOLUTION Call tones heard in headset, but... - Page 43 In the event of an electrical power outage — such as from a lightning storm or power generator failure, if you experience problems with your HME equipment after the electricity comes on again, unplug the AC power adapters from their electrical outlets and wait 15 seconds, then plug them in...
-
Page 44: Fcc Notice
The term “IC:” before the certification/registration number only signifies that the Industry Canada technical specifications were met. Hereby, HM Electronics, Inc. declares that the SYS6700HD is in compliance with the essential requirements and other relevant provisions of the Radio Equipment Directive (RED).
Need help?
Do you have a question about the SYS6700HD and is the answer not in the manual?
Questions and answers