Table of Contents
Advertisement
Instruction Manual & Documentation
Citrocasa 8000 XB Advance
Citrocasa 8000 SB Advance
Citrocasa 8000 SB-ATS Advance
When ordering spare parts, be sure to mention machine type, article and serial number.
Version: 17.05.2018
Art.No.: 80.002 Version 11-ADV
Art.No.: 90.002Version 11-ADV
Art.No.: 90.002/ATS Version 12-ADV
8000 SB Advance
Industriezeile 47, 4020 Linz, Austria
Tel.: +43-732-75 01 73-0
Fax: +43-732-75 01 73-24
E-mail:
office@citrocasa.com
8000 SB-ATS Advance
Original Instruction Manual
Advertisement
Table of Contents

Related Manuals for Citrocasa 8000 XB Advance


Summary of Contents for Citrocasa 8000 XB Advance
- Page 1 Instruction Manual & Documentation Version: 17.05.2018 Citrocasa 8000 XB Advance Art.No.: 80.002 Version 11-ADV Citrocasa 8000 SB Advance Art.No.: 90.002Version 11-ADV Citrocasa 8000 SB-ATS Advance Art.No.: 90.002/ATS Version 12-ADV 8000 SB-ATS Advance 8000 XB Advance 8000 SB Advance When ordering spare parts, be sure to mention machine type, article and serial number.
-
Page 2: Table Of Contents
4.2. CHOICE OF THE DISPLAY LANGUAGE .................... 10 4.3. OPERATING THE MACHINE ......................11 4.3.1. Operation of the 8000 XB Advance ..................12 4.3.2. Operation of the 8000 SB & 8000 SB-ATS Advance .............. 14 4.4. CLEANING INSTRUCTION ......................21 5. -
Page 3: Important General Information
3. Finally switch off main power of the machine and unplug machine from power supply. • Citrocasa meets the necessary measures for a selective disposal of the devices brought on the market and provides for an environmentally friendly subsequent treatment. Please dispose of your machine in a proper way by contacting your official dealer/supplier. - Page 4 Only authorized service technicians are permitted to make any repairs to the inside of the machine. • In case of damage to the machine, we ask you to either contact CITROCASA directly or contact your dealer who supplied you with the machine. •...
-
Page 5: Important Information
IMPORTANT INFORMATION 1.1. In order to ensure a proper functioning of the machine and in order to avoid injury, we ask you to please follow the following points: 1. The fastening screws of the cross holder cannot be loose or missing. ……………………... -
Page 6: Guarantee
3. GUARANTEE Our quality and examination controls ensure that the machine was supplied in perfect condition. The guarantee covers all complaints caused by construction or material defects which influence the optimal operation of the machine. The guarantee does not cover any damages caused by improper usage of the machine. Any changes to the identification plate nullify all possibilities of any guarantee claims. -
Page 7: Operating Instructions
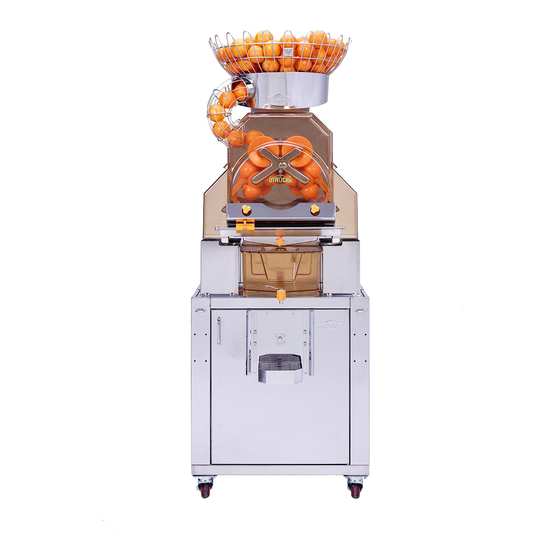
4. OPERATING INSTRUCTIONS 4.1. FIRST STEPS Before operating the machine for the first time, please observe the following: 8000 XB-ADV, 8000 SB-ADV, 8000 SB-ATS-ADV After unpacking the machine, ensure that the machine is placed on a flat ground. Ensure that the MTS-System (and self service tap with the 8000 SB+SB-ATS) are mounted properly as shown in Picture 1 and Picture 2. - Page 8 If the Citrocasa 8000 Advance is to be operated with the Cabinet 8000 Advance, please observe the following points: 1. Leave enough room for the cabinet door to be opened, allowing access for the waste container to be removed. 2. Place the rolling stand on a flat and even surface. Engage the brakes on the front wheels.
- Page 9 Insert the peel chutes (left and right) in the cut-outs (see Picture 9) next to the juice tank. Attention: Use only the special ATS side chutes and drip plate for the 8000 ATS machines! Peel chutes Picture 9 Use the mix arm before releasing any juice out of the tank in order to mix the pulp with the juice.
-
Page 10: Choice Of The Display Language
Picture 11: Nr. 2 & 3: Select your required language by pressing the ON and OFF-Button / + and - Orange button together. Picture 11: Nr. 1: Afterwards select with the FUNC-Button the required menu item. Due to this fact the display language is stored. Picture 10 8000 SB/SB-ATS Advance 8000 XB Advance Picture 11... -
Page 11: Operating The Machine
4.3. OPERATING THE MACHINE Fill the fruit basket with oranges. Do not use fruits larger than 80mm in size. To make sure that the machine works properly, use fruits between 65 – 8 mm in diameter. (Picture 12) Picture 12... -
Page 12: Operation Of The 8000 Xb Advance
4.3.1. Operation of the 8000 XB Advance Place a glass or another container under the juice outlet. To begin the pressing procedure, follow the instructions mentioned below: Digi-Mode Picture 13: Switch on the main power switch located at the side of the machine. - Page 13 Continuous Mode: Picture 16: Switch on the main power switch located at the side of the machine. The red control lamp lights up. Picture 18: No. 1 FUNC button: Select the continuous mode by pressing this button. „Continuous Push “ON”“ is indicated on the display. Picture 17: Start and stop pressing with the ON/OFF button.
-
Page 14: Operation Of The 8000 Sb & 8000 Sb-Ats Advance
4.3.2. Operation of the 8000 SB & 8000 SB-ATS Advance Place a glass or another container under the juice outlet. To begin the pressing procedure, follow the instructions mentioned below: Self-Service Mode: Picture 19: Switch on the main power switch located at the side of the machine. The red control lamp lights up. - Page 15 Continuous Mode: Picture 22: Switch on the main power switch located at the back of the machine. The red control lamp lights up. Picture 23: No. 4: Activate switch to position AUTO. Picture 23: No. 1: Select the continuous mode by pressing the FUNC-Button. „Continuous Push “ON”“...
- Page 16 Picture 25: No.3: To unlock the machine empty the peel bucket and press the OFF-Button /▼-Button for 5 sec. Afterwards the machine can be started again. Picture 24 8000 SB/SB-ATS Advance 8000 XB Advance Picture 25...
- Page 17 Attention Switch off intelligent stop function To switch off the intelligent stop function please adjust to 00 oranges! Switch on intelligent stop function (adjusted orange changed from 00 – XX) Adjust the amount of pressed oranges – start the machine and press one orange – Machine stops automatically –...
- Page 18 Picture 27: No.2: Adjust the desired display function 8000 SB & 8000 SB-ATS Advance Picture 27: No.1+2: Press the OFF-Button + FUNC-Button → Display locked 8000 XB Advance Picture 27: No.1+2: Press the FUNC-Button + +1-Button → Display locked 8000 SB/SB-ATS Advance...
- Page 19 8000 XB Advance 8000 SB/SB-ATS Advance Picture 28 Unlock display 8000 SB & 8000 SB-ATS Advance Picture 27: No.1+2: Press the FUNC-Button + OFF-Button → Display unlocked 8000 XB Advance Picture 27: No.1+2: Press the FUNC-Button + +1-Button → Display unlocked Display Function –...
- Page 20 Display Function – Operation time Picture 30: No. 1 FUNC button: Press this function button to indicate the total operating time. 8000 SB/SB-ATS Advance 8000 XB Advance Picture 30 Factory mode (Only for technician) The factory mode is used to adjust different parameters of the machine. This function should only be used from technician and is locked with a password.
-
Page 21: Cleaning Instruction
4.4. CLEANING INSTRUCTION In order to clean the machine properly, please follow the instructions below: The below-mentioned cleaning steps are to be completed at least twice every 24 hours. IMPORTANT: Before cleaning the machine, ensure that the machine is disconnected from power (unplug the machine). - Page 22 4. Remove the fixation screws of the front cover. 5. Remove the front cover: Pull the lower part of the front cover slightly towards the front. Then lift the cover away from the retaining bolts. Clean the hood with water (30 – 50°C) and a cleaning cloth to remove any juice and fruit pulp residues.
- Page 23 7. Remove the cross holder. 8. Separate the knife guide from the cross holder by pulling out the cross holder screw. (3 individual parts: cross holder, knife guide, screw) Caution: When reinstalling the knife make sure that it rests in the correct position and that the screw is properly tightened by hand.
- Page 24 9. Remove the peel ejectors (left and right). 10. Remove the upper pressing units. 11. Remove the lower pressing units.
- Page 25 12. Lift up the knife and pull it out. 13. Open the feeder tube fixation lever and remove the feeder tube. 14. Remove the double plate.
- Page 26 15. Remove the MTS-System and disassemble the MTS-Pusher. (Press the fixation clip) 16. Cleaning the housing. Clean the “pressing area” with a cleaning towel and water (30 to 50°C). Clean thoroughly and dry with disposable towels. 17. Unscrew cap-screw to remove fruit sieve. Afterwards wash thoroughly in a sink with warm water or wash in dishwasher.
- Page 27 Cleaning the fruit supply basket (Upper part of machine) 1. Remove the basket by gently turning to the right. Gently lift up the basket 2. Remove the rotary table and place in dishwasher or thoroughly wash by hand in the sink. 3.
- Page 28 ONLY FOR 8000 SB SENSOR TAP 1. Remove tap by unscrewing from machine. 2. Unscrew and separate lower tap art from upper tap part. 3. Rinse separated tap thoroughly 4. Afterwards, upper from lower parts to be washed in dishwasher or thoroughly wash by hand in a sink with only warm water.
- Page 29 ONLY FOR 8000 SB – ATS 1. Remove the ATS-band from the fruit cup 2. Clean it with fresh water Attention: Please note when installing the ATS-band that the drive shaft of the belt snaps to 100% in the consumption of the machine. Press to the locking wheel on ATS-band (see figures below) Intake driving shaft ATS- Band Driving shaft ATS-Band...
- Page 30 Cleaning the Stainless Steel Cabinet 8000 1. Remove the juice tank and wash with warm water (30 bis 50 °C) and cleaning towel. 2. Removable parts (such as drip tray, drip plate, peel chute or peel funnel) to be washed in dishwasher or thoroughly washed by hand in the sink.
-
Page 31: Troubleshooting
5. TROUBLESHOOTING PROBLEM POSSIBLE CAUSE SOLUTION The machine isn’t working Connect to power source Check if machine is plugged into power outlet No electricity from power Check the power outlet for outlet electricity Front cover is mounted Check that the front cover is wrongly or magnet(s) are mounted properly and that missing... - Page 32 PROBLEM POSSIBLE CAUSE SOLUTION Check if the magnets are present in the side chutes. (If yes, contact your customer service technician. If no, order new front cover) Display shows “Cross holder” Cross holder mounted Mount the Cross holder incorrectly. according to the instruction manual.
-
Page 33: Zertificates
6. ZERTIFICATES... -
Page 44: Most Important Spare Parts
7. MOST IMPORTANT SPARE PARTS Peel remover left Art. No. 800.163.002 Peel remover right Art. No. 800.163.102 Left peel remover compl. with brackets and screws Art. No. 800.163.040 800211033 800163040... - Page 45 Right peel remover compl. with brackets and screws Art. No. 800.163.140 800211033 800163120 800163140 Knife Up&Down System Art No.: 500.108.022 Knife guide Art No.: 500.109.002 Cross holder knob Art. No.: 500.111.022 500111022...
- Page 46 Cross holder Art. No.: 800258003 Cross holder bolt Art. No.: 500.212.023 Crossholder-Screw Art. Nr.: 500.213.023 Elektronic Box Art. no.: 500.280.000-V2...
- Page 47 Knife guide complete Art. no.: 500.113.020 500113020 Frontcover complete Art. no. 800.173.000 Side chute front cover Art. Nr. 800.172.000 Double plate complete Art. Nr. 800257000...
- Page 48 Magnet and magnet cover for Front-Cover series 8000 Art. No. 600.653.000 600653000 Screw Front-Cover series 8000 Art. No. 800.157.002 Front cover fixation nut Art. No. 800.157.002 Juice tank complete with cover and tap Art. No. 800.158.000...
- Page 49 Juice tank tap complete Art. No. 800.165.000 Upper Press Element Art. No. 800.160.022 Lower Press Element Art. No. 800.161.052 800161052 MTS-System 8000 XB ADV Art. Nr. 800.254.020 800254020...
- Page 50 MTS-System 8000 SB ADV Art. Nr. 800.255.020 800255020 MTS-Pusher support Art. No.: 800.131.002 MTS-Pusher Art. No.: 800.256.003 Screw MTS-System Art. No.: 500.299.003...
- Page 51 Spring MTS-System Art. No.: 500.287.003 Fine sieve SB Art. No.: 800.237.SB3 Fruit sieve support SB Art. No.: 800.227.SB3 Fruit sieve support 8000XB Art. No.: 800.232.XB3...
- Page 52 Feeder tube 8000 ADV series Art. No.: 800.208.053 800208053 Fruit basket 8000 ADV series Art. No.: 800.200.043 800200043 Peel bucket 8000 ADV series Art. No.: 800.224.293...
- Page 53 SB-TAP Magnet ring tap Citrocasa Art. No.: 600600001-11 Pressure spring DF Art. No.: 1045003-3 Start button incl. magnet Art. No.: 1024010 SB-Hahn komplett SB-TAP Upper part Art. Nr. ZH0049S Art. No.: 1045003-CN...
- Page 54 SB-TAP Lower part Art. No.: 1045003-SB SB-TAP complete Art. No.: 1045013...
Need help?
Do you have a question about the 8000 XB Advance and is the answer not in the manual?
Questions and answers