Table of Contents
Advertisement
Quick Links
Instruction Manual & Documentation
Version: 28.05.2018
Citrocasa Fantastic ECO
Art.Nr.: 60.500 Version 00
When ordering spare parts, be sure to mention machine type, article and serial number!
Industriezeile 47, 4020 Linz, Austria
Tel.: +43-732-75 01 73-0
Fax: +43-732-75 01 73-24
e-mail:
office@citrocasa.com
Original Instruction Manual
Advertisement
Table of Contents

Subscribe to Our Youtube Channel
Related Manuals for Citrocasa Fantastic ECO


Summary of Contents for Citrocasa Fantastic ECO
- Page 1 Instruction Manual & Documentation Version: 28.05.2018 Citrocasa Fantastic ECO Art.Nr.: 60.500 Version 00 When ordering spare parts, be sure to mention machine type, article and serial number! Industriezeile 47, 4020 Linz, Austria Tel.: +43-732-75 01 73-0 Fax: +43-732-75 01 73-24 e-mail: office@citrocasa.com...
-
Page 2: Table Of Contents
Contents 1. IMPORTANT GENERAL INFORMATION ............3 1.1. IMPORTANT INFORMATION ..............5 2. TECHNICAL DETAILS.................... 5 3. GUARANTEE ......................5 4. OPERATING INSTRUCTIONS ................6 4.1. FIRST STEPS ....................6 4.2. OPERATING THE MACHINE ................8 4.3. CLEANING INSTRUCTIONS ................9 5. -
Page 3: Important General Information
Only authorized service technicians are permitted to make any repairs to the inside of the machine. • In case of damage to the machine, we ask you to either contact CITROCASA directly or contact your dealer who supplied you with the machine. - Page 4 • Should you have any suggestions to improvement, questions or comments, please feel free to contact us with the contact information provided below: Industriezeile 47, 4020 Linz, Austria Tel.: +43-732-75 01 73-0 Fax: +43-732-75 01 73-24 E-mail: office@tmp.at This unit can be used by children aged 8 years and above and persons with reduced physical, sensory or mental capabilities or lack of experience and knowledge when they have been given supervision or instruction concerning the safe use of the device and understand the resulting risks.
-
Page 5: Important Information
1.1. IMPORTANT INFORMATION In order to ensure a proper functioning of the machine and in order to avoid injury, we ask you to please follow the following points: 1. The fastening screws of the cross holder must not be loose or missing. ………………... -
Page 6: Operating Instructions
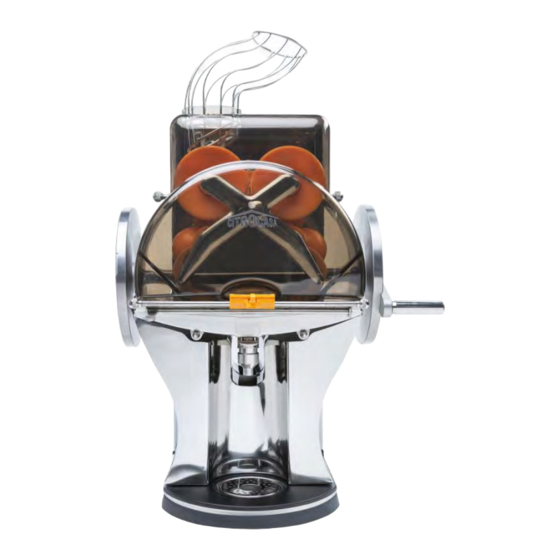
4. OPERATING INSTRUCTIONS 4.1. FIRST STEPS In order to achieve an optimum operation of the machine, please follow the below-mentioned steps carefully. 1. After unpacking and positioning the machine on a level surface, remove the front cover by unscrewing the 2 fastening screws shown in Picture 1. Lift the front cover out of its anchoring to expose the pressing system. - Page 7 3. Place peel basket and drip cup as shown in Picture 3 & Picture 4 Peel basket Drip cup Picture 3 Picture 4 4. Make sure that the MTS-System is in its proper position and that the front cover is closed (see Picture 5 and Picture 6).
-
Page 8: Operating The Machine
4.2. OPERATING THE MACHINE 1. Fill the fruit basket with oranges. Do not use fruits larger than 80mm in size. To make sure that the machine works properly, use fruits between 65 – 78 mm in diameter. (Picture 9&10) Picture 9 Picture 10 2. -
Page 9: Cleaning Instructions
4.3. CLEANING INSTRUCTION In order to clean the machine properly, please follow the instructions below: The below-mentioned cleaning steps are to be completed at least twice every 24 hours. 1. Either press the oranges remaining in the fruit basket or remove them by hand. 2. - Page 10 5. Unscrew the cross holder screw 6. Pull off the cross holder. 7. Separate the knife guide from the cross holder by pulling out the cross holder screw. (3 individual parts: cross holder, knife guide, screw)
- Page 11 Caution: When reinstalling the knife make sure that it rests in the correct position and that the screw is properly tightened by hand. In case of disregard, either the blade system or the upper pressing units of the machine might get damaged. 8.
- Page 12 10. Remove the lower pressing units (right and left). 11. Lift the knife and pull it out. 11. Unclamp the fixation lever of the feeder and remove the supply tunnel 12. Remove the front plate / double cover.
- Page 13 13. Pull out the MTS-System. 14. Remove the MTS-Pusher. Press the fixation clip and pull out the pusher 15. Press the lifting lever to Remove the fruit sieve from the fruit sieve supporter. 16. Remove the peel basket.
- Page 14 17. Remove the drip cup 18. Remove the sieve from the cup Clean all parts (with the exception of the acrylic front cover) in the dishwasher.
- Page 15 19. Clean the housing. The machine must not be cleaned by means of a water jet but with a wet cloth and clear water only. Wipe clean with a cleaning cloth and dry with a disposable tissue Re-Mount all parts after cleaning in the opposite order of removal. Ensure that all parts are correctly mounted and tightened! We recommend cleaning the machine twice within 24 hours.
- Page 16 Cleaning the Self-Service Tap Disassembly of the self-service tap 1. Press the supporter of the tap upwards, accordingly push towards the front 2. Pull the tap bottom downwards. 3. Press supporter upwards, accordingly push the supporter towards the back to disassemble the supporter.
- Page 17 Assembly of the self-service tap 6. Re-Mount all parts after cleaning in Guide bolt the opposite order of removal. Ensure that all parts are correctly mounted and tightened! Caution: Make sure that the guide bolt of the tap bottom faces the rear when assembling the tap.
-
Page 18: Certificates
5. CERTIFICATES... -
Page 23: Most Important Spare Parts
6. MOST IMPORTANT SPARE PARTS Feeder tube Fantastic ECO Art. No.: 500.207.SB43 500207SB43 Peel remover left Art No.: 500.104.100 500.104.100 Peel remover right Art No.: 500.105.100 500.105.100 Knife SCS Up&Down Art No.: 500.108.032 Knife guide Art No.: 500.109.012... - Page 24 Plastic knob cross holder Art. No.: 500.111.022 500.111.022 Cross holder Art. No.: 500.211.003 Bolt with magnet of the cross holder Art. No.: 500.212.023 Cross holder screw Art. No.: 500.213.023 500213023 500223033 500113020 Double Cover Art. No.: 500.223.040 500223040...
- Page 25 Front cover screw Art. No.: 500.225.003 500.225.003 Knife holder and guide complete Art. No.: 500.113.000 Front cover Fantastic Art. No.: 500.110.020 500.110.020 Upper pressing element Art. No.: 800.160.022 Lower Pressing element Art. No. 500.106.002 500106002...
- Page 26 MTS-System Fantastic SB Art. No.: 500.288.060 500288060 Pusher support MTS-System Fantastic Art. No.: 800.131.002 Pusher MTS-System Fantastic Art. No.: 500.286.003 Screw MTS-System Art. No.: 500.299.003 Spring MTS-System Art. No.: 500.287.003...
- Page 27 Ground plate inlet Art. No.: 500120052 Lower part SB-Tap Art. No.: 500268070 500268070 Inlet (wooden) Art. No.: 500311004-2 Inlet (green) Art. No.: 500311004-5 Inlet (stainless steel) Art. No.: 500311004-6 Handle Art. No.: 500311004-3...
Need help?
Do you have a question about the Fantastic ECO and is the answer not in the manual?
Questions and answers