
Related Manuals for Snapmaker Snapmaker


Summary of Contents for Snapmaker Snapmaker
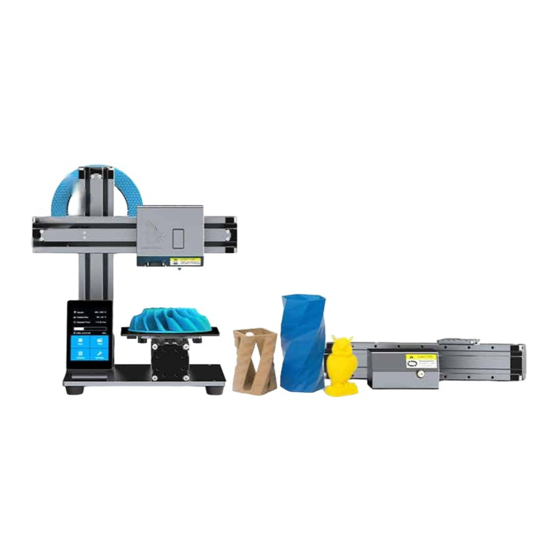
- Page 1 Quick Start Guide Quick Start Guide | Guide de démarrage | Guía de inicio rápido 快速安装指南 | クイックスタートガイド | 빠른 가이드...
-
Page 2: Table Of Contents
Content Inhalt | Sommaire | Contenido | 目录 | 目次 | 내용 Before You Start Bevor Sie Beginnen | Avant de commencer | Antes de empezar 开始之前 | 初めに | 시작하기전 Assemble the 3D Printer Aufbau des 3D-Druckers | Assembler l’imprimante 3D | Montar la impresora 3D 组装... - Page 3 Parts List Teileliste | Contenu | Lista de componentes | 零部件清单 | パーツリスト | 파트 리스트 Laser Engraving Module Filament Holder Lasergravur-Modul | 激光模组 Filamenthalter | 料架 Support de bobine | フィラメントホルダー Module de gravure laser | レーザー刻印モジュール Módulo de grabado láser | 레이저모듈 Soporte de filamento | 필라멘트...
- Page 4 Heated Bed Touch Screen Heizbett | 热床 Touchscreen | 屏幕 Filament Power Adapter Plateau chauffant | ヒートベッド Ecran tactile | タッチスクリーン Cama caliente | 히팅베드 레벌맞추기 Pantalla táctil | 터치 스크린 Stickerx 1 USB Disk Sticker | 贴纸 USB-Stick | U 盘 Autocollant | ステッカー...
-
Page 5: Before You Start
Before You Start Bevor Sie Beginnen | Avant de commencer | Antes de empezar 在开始之前 | 初めに | 시작하기전 Get the Screwdriver Ready Halten Sie den Schraubenzieher bereit | 把螺丝刀组装好 Tournevis prêt pour utilisation | ドライバーをご用意ください Prepare el destornillador | 드라이버 준비하기 Verwendete Symbole | Symboles utilisés | Símbolos usados | 使用符号... -
Page 6: Befestigen Sie Die Füsse An Der Grundplatte. | 将脚垫固定在底板上
Attach the feet to the Base Plate. Befestigen Sie die Füsse an der Grundplatte. | 将脚垫固定在底板上。 1/10 Fixez les pieds au chassis. | ゴム足をベースプレートに取り付けます。 Fije los pies a la placa base. | 밑판에 고정시킵니다. M4 x 8 Foot Base Plate... - Page 7 Attach the Heated Bed to any one of the Linear Modules (Y axis). | 将热床连接到任意一个直线模组上 (后称 Y 轴) 。 2/10 Befestigen Sie das Heizbett an einem der Linearmodule (Y-Achse). | ヒートベッ ドをいずれのリニアモジュール (Y 軸) に取り付けます。 Fixez le lit chauffant à l’un des modules linéaires (Axe Y). | 히팅베드를...
-
Page 8: Befestigen Sie Die Y-Achse An Der Grundplatte. | 将 Y 轴连接到底板上
Attach the Y axis to the Base Plate. Befestigen Sie die Y-Achse an der Grundplatte. | 将 Y 轴连接到底板上。 3/10 | Y 軸をベースプレートに取り付けます。 Fixez l’axe Y à la plaque chassis. Fije el eje Y a la placa base. | Y 축을 베이스 판에 연결합니다. M4 x 8... -
Page 9: Befestigen Sie Die Z-Achse An Der Grundplatte. | 将另一个直线模组 (后称 Z 轴) 连接到底板上
Attach the Z axis to the Base Plate. Befestigen Sie die Z-Achse an der Grundplatte. | 将另一个直线模组 (后称 Z 轴) 连接到底板上。 4/10 Fixez l’axe Z à la plaque chassis. | Z 軸をベースプレートに取り付けます。 Fije el eje Z a la placa base. | Z 축을 베이스 판에 연결합니다. M4 x 8 Linear Module... - Page 10 Assemble the Screen Holder and then slide the Touch Screen into the Screen Holder. 5/10 5/10 Montieren Sie den Bildschirmhalter auf der Grundplatte und stellen Sie dann den Touchscreen in den Bildschirmhalter. Assemblez le support d’écran puis y insérer l’écran tactile. Monte el soporte de pantalla y después deslice la pantalla táctil en el soporte.
-
Page 11: Befestigen Sie Die X-Achse An Der Z-Achse. | 将最后一个直线模组 (后称 X 轴) 固定到 Z 轴上。 6/10
Attach the X axis to the Z axis. Befestigen Sie die X-Achse an der Z-Achse. | 将最后一个直线模组 (后称 X 轴) 固定到 Z 轴上。 6/10 6/10 Fixez l’axe X sur l’axe Z. | X 軸を Z 軸に取り付けます。 Fije el eje X al eje Z. | X 축을 Z 축에 부착합니다. M4 x 8 Linear Module... -
Page 12: Befestigen Sie Das 3D-Druckmodul An Der X-Achse. | 将 3D 打印模组固定到X轴上。 7/10
Attach the 3D Printing Module to the X axis. Befestigen Sie das 3D-Druckmodul an der X-Achse. | 将 3D 打印模组固定到X轴上。 7/10 7/10 Fixez le module d’impression 3D sur l’axe X. | 3D プリン トモジュールを X 軸に取り付けます。 Fije el módulo de impresión 3D al eje X. | 3D 프린터 모듈을 X 축에 부착합니다. M4 x 8 3D Printing Module... - Page 13 Attach the Controller to the Z axis. Befestigen Sie das Steuerungsmodul an der Z-Achse. | 将控制器固定到 Z 轴上。 8/10 Fixez le contrôleur sur l’axe Z. | コン トローラを Z 軸に取り付けます。 Fije el controlador al eje Z. | 컨트롤 박스를 Z 축에 부착합니다. M4 x 28 Controller...
- Page 14 Attach Filament Holder to the Z axis. 将料架固定在 Z 轴上。 Befestigen Sie den Filamenthalter an der Z-Achse. | 9/10 Fixez le support de bobine sur l’axe Z. | フィ ラメン トホルダーを Z 軸に取り付けます。 Fije el soporte de filamento al eje Z. | 필라멘트 거치치대를 Z 축에 고정합니다. M4 x 28 Filament Holder...
- Page 15 Connect the modules to the Controller as illustrated and power on. Verbinden Sie die Linarmodule wie abgebildet mit dem Steuerungsmodul und schalten Sie das Gerät ein. | 按图示将模组连接到控制器, 打开电源。 10/10 | 図のようにコン トローラにモジュールを接続し、 電源をオンして ください。 Branchez les câbles sur le contrôleur comme indiqué puis mettez sous tension. Conecte los módulos al controlador como en la ilustración y enciéndala.
-
Page 16: Use The 3D Printer
Use the 3D Printer Verwendung des 3D-Druckers | Utilisation de l’imprimante 3D | Usar la impresora 3D 使用 3D 打印机 | 3D プリンターの使用 | 3D 프린터 사용하기 Level the Heated Bed Load Filament Start Printing >> >> Nivellieren des Heizbettes Filament einfügen 3D-Druck starten Mise à... -
Page 17: Level The Heated Bed
Level the Heated Bed Nivellieren des Heizbettes | Mise à niveau du lit chauffant | Nivelar cama caliente 调平 | ヒートベッ ドの調整 히팅베드 수평맞추기 Leveling the Heated Bed makes sure the print sticks to the Heated Bed. Nivellieren Sie das Heizbett und stellen Sie sicher, dass der Druck auf dem Heizbett aufliegt. | 调平热床确保打印成品能贴在热床上。 La mise à... - Page 18 Level the four corners IN ORDER. Nivellieren Sie die vier Ecken in folgender Reihenfolge. | 按顺序调平四个角。 Mettre à niveau les quatres coins du plateau DANS L’ORDRE INDIQUE. | 順番に従ってレベリングして ください。 Nivele las cuatro esquinas POR ORDEN. | 순서대로 4개포인트의 수평을 조절 합니다. These corners correspond to the numbers on the Touch Screen shown in the next step.
- Page 19 Level the first corner. Nivellieren Sie die erste Ecke. | 调平第一个角。 Mise à niveau du premier coin. | 一つ目のコーナーを調整します。 Nivele la primera esquina. | 첫번째 포인트의 수평을 맞춥니다.
- Page 20 Put a piece of A4 paper between the Heated Bed and the nozzle. | 在喷嘴与热床之间放一张A4纸。 Legen Sie ein Stück DIN A4-Papier zwischen das Heizbett und die Düse. Utiliser une feuille A4 entre la buse et le plateau chauffant. | ヒートベッ ドとノズルの間にA4用紙を1枚入れます。 Coloque una hoja de papel A4 entre la cama caliente y la boquilla.
- Page 21 Adjust the distance between the Heated Bed and the nozzle using the Up and Down buttons. Stellen Sie den Abstand zwischen dem Heizbett und der Düse mit den Tasten “Up” und “Down” ein. | 通过 Up (上升) 和 Down ( 下降) 按钮调整喷嘴与热床之间的距离。 Ajuster la distance entre la buse et le plateau, utilisez les boutons Up et Down.
- Page 22 Keep adjusting until there is slight resistance on the A4 paper from the nozzle. Passen Sie den Abstand so lange an, bis Sie einen leichten Widerstand auf dem Papier durch die Düse spüren. | 不断调整直到在拉动A4纸时能感受到来自喷嘴的轻微阻力。 Régler la distance pour obtenir une légère pression sur la feuille A4. | ノズルからA4用紙の隙間をわずかに抵抗を感じるまで調整して ください。 Siga ajustando hasta que note una ligera resistencia en la hoja de papel A4 desde la boquillla.
- Page 23 Tap 2 and follow steps 3-5 to level the second corner. Use the same method to level the third and fourth corners. Tippen Sie auf 2 und folgen den Schritten 3-5, um die zweite Ecke zu ebnen. Verwenden Sie die gleiche Methode zum Ausgleichen der dritten und vierten Ecke. Appuyez ensuite sur 2 et suivre les étapes 3 à...
- Page 24 When all the corners are leveled, tap Save. Wenn alle Ecken nivelliert sind, drücken sie “save”. | 当所有的角被调平, 点击 Save ( 保存) 。 Quand tous les coins sont réglés, appuyez sur Save. | すべてのコーナーが調整できたら、 「 Save」 をタップして ください。 Cuando todas las esquinas estén niveladas pulse Guardar. | 모든 포인트 수평을 맞춘 후 저장을 클릭합니다.
- Page 25 You can use the Reset button to reset the calibration to factory default settings when needed. Sie können die Reset-Taste verwenden, um die Kalibrierung bei Bedarf auf die Werkseinstellungen zurückzusetzen. Utiliser le bouton Reset pour remettre en configuration usine le réglage plateau si besoin. Puede usar el botón de Reset para establecer la calibración a los valores predeterminados de fabrica cuando sea necesario.
-
Page 26: Load Filament
Load Filament Filament einführen | Chargement du filament | Cargar filamento 装料 | フィ ラメン トの取付 | 필라멘트 장착하기... - Page 27 Use Jog Mode to move the 3D Printing Module to the illustrated position. Verwenden Sie den Jog-Modus, um das 3D-Druckmodul an die dargestellte Position zu bewegen. | 使用 Jog Mode ( 点动模式) 将 3D 打印模组移动到图示位置。 Utiliser le bouton Jog pour bouger le module d’impression à la position choisie. | ジョグモードを使用して 3D プリン トモジュールを図示の位置に移動させます。 Use el modo Jog para mover el módulo de impresión 3D a la posición como en la ilustración.
- Page 28 Preheat the nozzle. Heizen Sie die Düse vor. | 预热喷嘴。 Préchauffer l’extrudeur. | ノズルを予熱します。 Precaliente la boquilla. | 노즐 예열을 합니다.
- Page 29 Change the Target Temperature based on the gilament you use. Ändern Sie die Zieltemperatur basierend auf der von Ihnen verwendeten Filamentart. | 根据您使用的耗材改变目标温度。 Modifier la température cible de l’extrudeur suivant le filament utilisé. | ご使用のフィ ラメン トに基づいて目標温度を設定します。 Cambie la temperatura según el filamento que vaya usar. | 소재의 종류에 따라서 온도를 조절합니다.
- Page 30 When you wait for the temperature to rise, hang the filament over the Filament Holder. Warten Sie bis die Temperatur ansteigt und hängen Sie dann das Filament über den Filamenthalter. | 当您等待温度上升时, 把耗材挂在料架上。 Pendant que l’extrudeur chauffe, fixer la bobine sur le support. | 温度が上がるのを待っている間にフィ ラメン トをフィ ラメン トホルダーに掛けます。 Mientras espera, coloque el filamento en el soporte de filamento.
- Page 31 When the Current Temp reaches the Target Temp, press the button and insert the filament. Wenn die aktuelle Temperatur die Zieltemperatur erreicht, drücken Sie die Taste und fügen Sie das Filament ein. | 当前温度达到目标温度时, 按下按钮并插入耗材。 l’extrudeur est à température, appuyer sur le bouton et insérer le filament. | 温度が目標温度に達すると、 ボタンを押しながらフィ ラメン トを挿入します。 Cuando la temperatura actual haya alcanzado la temperatura objetivo, pulse el botón e inserte el filamento.
- Page 32 Keep inserting the filament until you see some filament coming out of the nozzle. Drücken Sie das Filament so lange ein, bis Sie ein Filament aus der Düse kommen sehen. | 不断插入耗材, 直到看到一些耗材从喷嘴中挤出。 Pousser le filament jusqu’à ce qu’il resorte par la buse. | フィ ラメン トがノズルから出て く るまでフィ ラメン トを押し続けて ください。 Siga insertando el filamento hasta que vea que sale algún filamento por la boquilla.
- Page 33 Clean the nozzle and tap Back. Reinigen Sie die 3D-Druckdüse. | 清理喷嘴上的耗材后点击 Back ( 返回) 。 Enlever le filament qui sort de la buse et appuyer sur Retour. | ノズルをクリーニングし、 「 Back」 をタップして ください。 Limpie la boquilla y pulse Atrás. | 노즐을 청소하고 뒤로 뻅니다.
-
Page 34: Start Printing
3D-Druck starten | Débuter l’impression | Comenzar a imprimir | 开始打印 | 造形を始めよう | 프린팅 시작하기 Please refer to the online manual for details: manual.snapmaker.com/3d_printing/ Details finden Sie im Online-Handbuch | 详情请参阅在线手册 Merci de consulter le manuel en ligne pour de plus amples informations | 詳細はオンラインマニュアルをご覧ください... - Page 35 Partagez votre expérience avec d’autres utilisateurs Snapmaker sur notre forum | フ ォーラムで他の Snapmaker ユーザーと情報を共有することができます Comparta todo lo que desee con otros usuarios de Snapmaker en nuestro foro | 포럼을 이용하여 다른 Snapmaker 사용자들과 정보를 공유하세요 We are here for you whenever you need general information, technical support or have any sales inquiries.
- Page 36 Thomas Edison once said, “A minor invention every ten days, and a big one every six months or so.” What is your first invention with the Snapmaker? To use the laser engraver and CNC carver, please read the corresponding guide.
Need help?
Do you have a question about the Snapmaker and is the answer not in the manual?
Questions and answers