Table of Contents
Advertisement
Advertisement
Table of Contents

Related Manuals for DAMSON S-Series


Summary of Contents for DAMSON S-Series
- Page 1 S-SERIES U S E R G U I D E S U P P O R T S...
- Page 2 Congratulations on purchasing the Damson S-Series Home Cinema System The Damson S-Series Home Cinema system was specifically designed to allow you to enjoy lifelike cinematic sounds from the latest movie, event or concert in the comfort of your own home without the need for extra trailing cables and a room full or oversized speakers.
-
Page 3: Table Of Contents
Table of Contents Before you begin Setup Connecting/Disconnecting your S-Bar to Bluetooth What’s in the box? Instructions for 5.1.2 setup using one HDMI Using the Remote Control Connections and supported formats Diagram of setup using one Using the buttons on the HDMI input S-Bar Get the best out of your... -
Page 4: Before You Begin
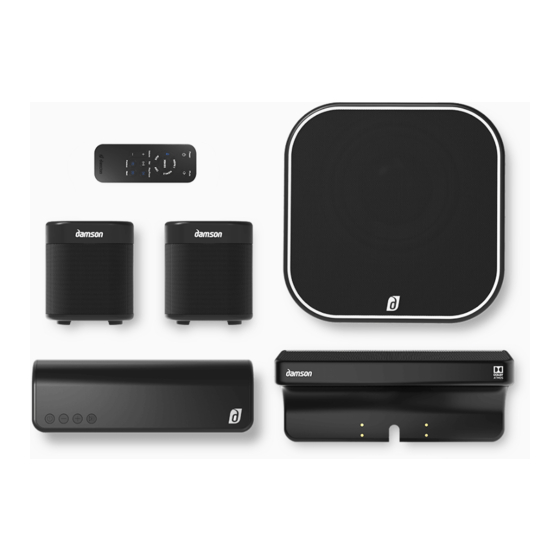
Before you begin What’s in the box Connections and supported formats 1 x S-Bar 1 x S-Atmos Connections 1 x S-Woofer Output - HDMI (ARC) Input - 2 x HDMI which supports 1 x remote control Dolby Atmos, Dolby True HD, Dolby Digital +, Dolby Digital, 2 x power cables for S-Cubes ProLogic. -
Page 5: Get The Best Out Of Your System
A 4K TV or projector is required to deliver UHD content with Dolby From a sound perspective, Dolby Atmos is experiencing sound from in Atmos. Please note if you do not have a 4K TV, the S-Series will front, above and behind. From a technical perspective, Dolby Atmos is automatically downscale content to the next best Dolby format. -
Page 6: Unboxing
Unboxing Open the master carton. 2. Remove the four inner boxes. 3. S-Cube boxes: Remove the two S-Cubes from the packages, the associated power cables, power adaptors ( 2 x 1500mAh) and optional wall mount. 4. S-Atmos box: Remove the S-Atmos speaker. 5. -
Page 7: General Speaker Placement
General Speaker Placement Perspective view To get the best out of your home cinema system, we recommend PLEASE NOTE: in order to reduce interference we do not recommend the you layout the system similar to the diagram above. S-Woofer is placed inside a cabinet or too close to other electrical devices. The S-Woofer should be positioned no more than 1.5m away from the TV/ projector screen. - Page 8 Speaker 2 & 3 – Left and Right S-Cube The rear speakers give an extra sense of immersion. These can be walled mounted using the brackets included. If you prefer not to wall mount the S-Cubes, a windowsill or bookshelf will suffice. Each S-Cube contains four full range drivers and a woofer which compliments the S-Woofer.
-
Page 9: Parts In Detail
Parts in Detail S-Woofer Controls There are no control buttons on the S-Woofer. The led is in the “d” logo on the front of the speaker. The modes are: S-Woofer Front Flashing (any colour) – receiving Dolby Atmos content. Solid red - S-Woofer is connected to the power and turned on. It is optimised for stereo or general home cinema content. -
Page 10: S-Bar & S-Atmos
Green – connected via AUX Blue – connected via Bluetooth Your S-Series will remember the mode it was last set to when you power off. Next time you power on, it will be set to the last mode it was in. -
Page 11: S-Cube
Parts in Detail S-Cube Controls on the top Controls on the back Left to right JetStreamNet Pairing (pairing the S-Cube to other Power on: S-Cubes or to the Home 1: Power on the unit 3. 4. Cinema System) 2: Toggle between 2, 3, 4 –... - Page 12 To work as a full surround sound setup toggle the S-Cube to the When two or more S-Cubes are being used independently from the JetStreamNet mode (light blue LED). The S-Series Home Cinema system Home Cinema, the lights in the d logo, at the top of the speakers, have...
-
Page 13: Remote Control
Play/Pause music and also when Optimises the sound XBASS pairing your streaming device to for music whether this the S-Series via Bluetooth. is via a streaming app or Previous – previous track. watching on screen Only works in Bluetooth mode. -
Page 14: Instructions For 5.1.2 Setup Using One Hdmi
Instructions for 5.1.2 setup using one HDMI PLEASE NOTE BEFORE COMMENCING SETUP On initial set up it is recommended to connect the power supply of the S-Woofer last as this provides auto-power upon initial setup. If the S-Woofer is powered up before the Insert batteries into Select a location for the Select a location for the... -
Page 15: Diagram Of Setup Using One Hdmi Input
Diagram of setup using one HDMI input We recommend inserting Dolby Atmos compatible devices in to the S-Series inputs and not to use the TV’s ARC HDMI HDMI HDMI INPUT1 INPUT2 OUTPUT PLEASE NOTE: This guide is for setting up one device to the S-Series. -
Page 16: Diagram Of Setup Using Two Hdmi Inputs
Diagram of setup using two HDMI inputs Typical set up for a set top box (Sky/Comcast/Xfinity), Blu-ray, Games Console, Apple TV or Amazon Fire 4K HDMI HDMI HDMI INPUT1 INPUT2 OUTPUT Wall Socket... -
Page 17: Setup Using Your Tv's Arc Function
ARC. If it is supported then the LED on the S-Woofer will flash to Change the S-Series to the “ARC” mode. The indicate it is receiving UHD audio LED in the d logo on the S-Bar will turn white. -
Page 18: Virtual Surround Sound Setup
Virtual Surround Sound setup For Virtual Surround Sound setup, you require the following parts: S-Bar and S-Atmos S-Woofer Soundbar and Subwoofer will deliver Dolby Virtual Surround sound... -
Page 19: 5.1 Setup
5.1 Setup For the 5.1 setup you require the following parts: S-Bar (no S-Atmos attachment) S-Woofer 2 x S-Cubes Soundbar and Subwoofer with 2 S-Cubes work as Dolby 5.1 surround supporting Dolby Digital+ and Dolby TrueHD... -
Page 20: Connecting/Disconnecting Your S-Bar To Bluetooth
Using the Remote Control Using the buttons on the S-Bar It is not recommended to connect the S-Series Home Cinema to a TV • Ensure the S-Series is powered on and navigate to the Bluetooth via Bluetooth as the system and audio is not optimised for this use. It is settings of your smart device. -
Page 21: Multi Room Audio Setup
Multi room audio setup MULTI-ROOM AUDIO The S-Cube speakers can also be used as either standalone speakers or multi-room speakers using the Damson JetStreamNet. You can connect up to 16 S-Cubes throughout your home. Additional S-Cubes are available through www.damsonglobal.com... -
Page 22: S-Cube - Primary Functions And Setup
S-Cube - Primary functions and setup 1. Individual Stereo Speaker 2. Multi speaker setup If you wish to use an individual speaker, you can do so either using Bluetooth of AUX in. To use the S-Cube in To connect your S-Cube to a The S-Cube function mode Select a primary S-Cube Bring the additional speakers close to the primary speaker... -
Page 23: Establishing A Connection And
3. Establishing a connection and reconnecting the S-Cubes back into the Home Cinema System. Power on the S-Woofer Change the mode on the Short press the Pairing button on the S-Cube and the JSN/ On the left surround speaker On the right surround &... -
Page 24: Trouble Shooting
S-Series Troubleshooting PROBLEM PROBABLE CAUSE SOLUTION If you’re using ARC: the TV’s audio Picture is displayed but no audio is settings may not be configured for Navigate to the audio settings on your TV and select external speakers. playing. external speakers. - Page 25 Atmos unless it is connected to a 4K TV. The quality of audio is poor when my TV is BT is not recommended for TV/Projector Connect the S-Series to the TV via a high speed 2.0 HDMI cable. connected via Bluetooth to the S-Series? connection If you have any trouble setting up your system please contact us before returning as we can usually help solve your issues.
Need help?
Do you have a question about the S-Series and is the answer not in the manual?
Questions and answers