Advertisement
Quick Links
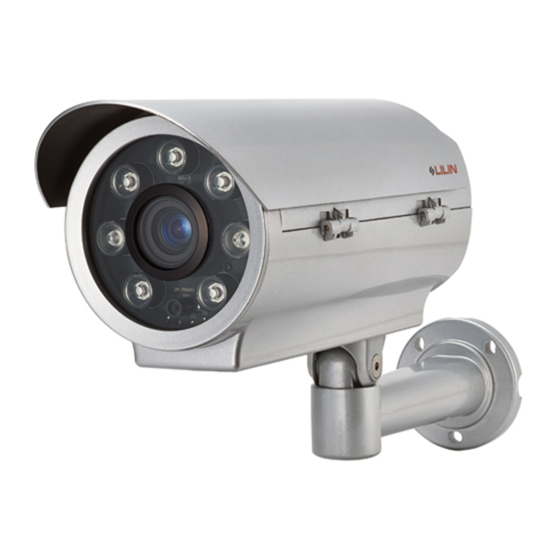
AHD IR CAMERA
Part Description & Dimensions
154
134
29
29
R 4.2
8.4
11
Unit: mm
Installation
1. Remove the bracket from the box first. Insert the power cable and video cable through
the bracket and then secure the bracket to the wall (FIG.1 & FIG.2).
F I G . 1
2. Next, remove the camera body and open the top cover with the included hexagon
screwdriver (FIG.3 & FIG.4).
F I G . 3
F I G . 4
3. Insert the power cable and video cable through the bracket rubber and then through
the bottom of camera body (FIG.5). Secure the power cable to the terminal and connect
the video cable to the video output of the camera (FIG.6).
F I G . 5
Instruction Manual
374
318
82.55
211.5
S U N S H I E L D
70
TO P C O V E R
B O T TO M C H A S S I S
B R A C K E T
PA N A D J U S T M E N T S C R E W
T I LT A D J U S T M E N T S C R E W
L E N S
L
N
N
L
L
Note: When using two-cord power cable,
please connect them to "Live" and
"Neutral".
Next, use the provided 1/4"-20UNC screws (silver-4pcs) to secure the camera body
to the bracket with the hexagon screwdriver (FIG.7).
4. Loosen the pan and tilt adjustment screw on the bracket to turn the camera body
to the desired angle and then tighten the screw (FIG.8).
5. Ensure to tighten the screws after adjusting the focus and zoom level (FIG 9
Use the 5 directional button to adjust the OSD menu settings for
-
.
best images To use UTC to change the OSD settings refer to 8.
LEFT
5-1. USER OSD SETTING
Setting switches and Functions.
A.
(UP)
B.
(LEFT)
C.
(RIGHT)
D.
(DOWN)
E. SET : Executes selections and displays a submenu for items
with the
F I G . 2
6. Adjust VR1 to adjust Infrared LED activation level (FIG.10). Turn the VR1
incrementally toward "MAX" to increase the Infrared LED activation Lux level,
and vice versa.
N
7. Close the top cover and tighten the screws (FIG.11 & FIG.12).
8. Connect to an Up-the-Coax (UTC) digital recorder that supports AHD-Coaxial
protocol. Then use the 8-directional buttons (FIG. 13) to adjust settings for the
best images.
F I G . 6
F I G . 7
F I G . 8
UP
RIGHT
L E
F T
SET
DOWN
: Press to move the cursor upwards or to select items.
: Press to move the cursor to the left and to select or
adjust the parameters of the selected item. The
parameters change each time this button is pressed.
: Press to move the cursor to the right and select or
adjust the parameters of the selected item. The
parameters change each time this button is pressed.
: Press to move the cursor downwards or to select items.
mark.
MAX
MIN
F I G 1 0
F I G . 11
UP
SET
LEFT
RIGHT
DOWN
66-AHD732ACSE-1
. ).
,
Z O O M
F O C U S
U
P
R
I G
H
T
D
O
W
N
F I G . 9
F I G . 1 2
FIG.13
Advertisement

Related Manuals for Lilin AHD7324AX10


Summary of Contents for Lilin AHD7324AX10
- Page 1 66-AHD732ACSE-1 AHD IR CAMERA Next, use the provided 1/4"-20UNC screws (silver-4pcs) to secure the camera body to the bracket with the hexagon screwdriver (FIG.7). Instruction Manual Part Description & Dimensions F I G . 7 4. Loosen the pan and tilt adjustment screw on the bracket to turn the camera body to the desired angle and then tighten the screw (FIG.8).
-
Page 2: Specifications
- COLOR BURST-OFF/ ON Specifications IR SMART LEVEL (0~15) 10X D/N 1080P AHD VARI-FOCAL IR CAMERA AREA POSITION/ SIZE - AHD7324AX10 AHD7328AX10 Model No. 2DNR MIDDLE/ HIGH/ OFF/ LOW Focal Length 5 - 50mm - 3DNR MIDDLE/ HIGH/ OFF/ LOW Iris F1.6...