
Related Manuals for Beckhoff EtherCAT EL9800


Summary of Contents for Beckhoff EtherCAT EL9800
- Page 1 EtherCAT Evaluation Kit Workshop – Installation Guide Version 1.2 Date: 2018-12-13...
- Page 2 Trademarks Beckhoff®, TwinCAT®, EtherCAT®, Safety over EtherCAT®, TwinSAFE® and XFC® are registered trademarks of and licensed by Beckhoff Automation GmbH. Other designations used in this publication may be trademarks whose use by third parties for their own purposes could violate the rights of the owners.
- Page 3 DOCUMENT HISTORY Comment Version First version Compiler Suite selection added MPLAB X related information added Add Excel and Wireshark requirement Remove old tool instructions (Only development board EL9800_6A shall be used) Installation Guide...
-
Page 4: Table Of Contents
CONTENTS Introduction EL9800 Hardware Revision Installation – Slave Stack Code Vendor ID .NET Framework SSC Source Files + Tool MPLAB X Compiler Installation IDE Installation USB driver and test of the communication Create a new Project Installation - TwinCAT TwinCAT development environment + runtime Real-Time Ethernet Driver Test of the communication Installation - Additional Tools... -
Page 5: Introduction
Introduction In order to properly operate with the Beckhoff EL9820 Evaluation Kit, the installation of three following software packages is needed: Slave Stack Code (SSC): source code (written in C programming language) implementing all general-purpose functionalities of an EtherCAT Slave as well as some application examples. -
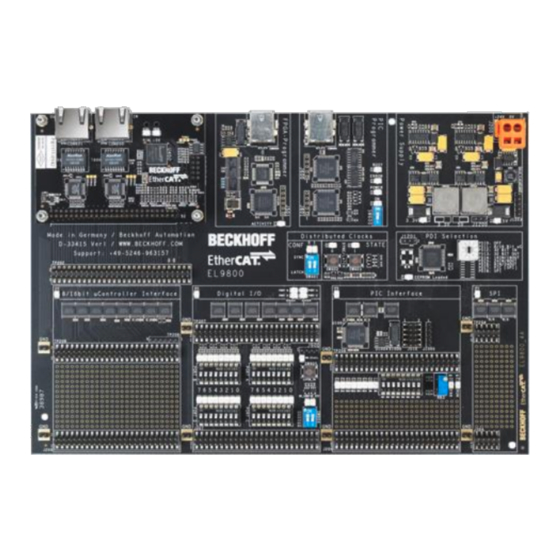
Page 6: El9800 Hardware Revision
EL9800 Hardware Revision The hardware revision of the EL9800 base board is reported on the board itself next to the Beckhoff and EtherCAT® logos. The current board hardware revision is EL9800_6A. In case an older board revision is used please contact mailto:Ethercatssc@beckhoff.com. -
Page 7: Installation - Slave Stack Code
Installation – Slave Stack Code The Slave Stack Code is a source code written in C programming language, provided and supported free-of-charge by Beckhoff Automation GmbH & Co. KG. Vendor ID Both for download and installation of the Slave Stack Code, an own EtherCAT Vendor ID is required. - Page 8 The SSC source files and SSC tool are installed by launching the *.exe file provided within the *.zip package: Installation Guide...
-
Page 9: Mplab
MPLAB X Compiler Installation The XC16 C Compiler needs to be separately installed. The component to be installed is the same both in case of MPLAB X and of MPLAB 8 IDEs. The installation file can be found at the directory: http://www.microchip.com/mplab/compilers. -
Page 10: Usb Driver And Test Of The Communication
Select “Download” at the bottom of the web page, and then the latest available build of MPLAB X (MPLAB® X IDE vx.yz): Run the *.exe setup file: Confirm all the default installation settings proposed by the installation wizard. USB driver and test of the communication With the board powered-off, connect the USB cable from a USB port of the PC to connector CON600 of the Evaluation Kit, and set switch SW600 to ON in order to enable the on-board debugger interface. - Page 11 Power the Evaluation Kit on with a standard 24V power supply. A new USB device will be detected. The corresponding USB driver should be automatically installed: in case the Operating System shows the dialog window, confirm the automatic installation. Installation Guide...
-
Page 12: Create A New Project
Create a new Project Open MPLAB IDE and create a new Project: Installation Guide... - Page 13 Select the Device “PIC24HJ128GP306” Select the “EL9800PICkit OnBoard Programmer”. If this option is not listed, check the USB connection and the correct driver installation. Installation Guide...
- Page 14 Select the XC 16 compiler Create the Project in a temporary location (directory and project name are not relevant): Installation Guide...
- Page 15 Refresh the debug tool status, and wait until the output interface reports correct connection (a new firmware version will be automatically installed if needed during the process). This confirms a correct communication between MPLAB X IDE and the Evaluation Kit. Installation Guide...
-
Page 16: Installation - Twincat
(only a displayed 5-digit code shall be copied in order to restart the trial license). TwinCAT development environment + runtime The installation file for TwinCAT can be downloaded by the website www.beckhoff.com. Select “Download” at the top of the page: Select the TE1xxx | Engineering version: : Take care not to install the “Runtime”... - Page 17 Select the installation file for TwinCAT 3.1: The download can be performed as Guest (the personal/company data provided are intended for information purposes only): NOTE : if you are working with Windows 7 Operating System or later, always perform the installation by selecting Run as Administrator: Installation Guide...
-
Page 18: Real-Time Ethernet Driver
Real-Time Ethernet Driver In order to use the standard PC network card of a PC as EtherCAT Master, an additional Real-Time Ethernet Driver shall be installed. The driver can be installed directly from the TwinCAT development environment. Open (the most recent version of) Visual Studio from the TwinCAT icon located on the Windows task bar: Select the menu “TwinCAT”... - Page 19 Select the network card that will be used as EtherCAT Master for testing purposes, and click on “Install”. : If a network card is listed under “Incompatible devices”, this does not mean that the card NOTE cannot be used as EtherCAT Master for testing purposes. It only means that this card will provide only weak real-time capabilities.
-
Page 20: Test Of The Communication
Test of the communication Connect the Evaluation Kit to the PC network card where the Real-Time Ethernet Driver was installed with a standard Ethernet cable (straight or cross), and power-on the Evaluation Kit. Create a new TwinCAT project by selecting the corresponding template in Visual Studio (project name and directory are arbitrary): Right mouse-click on “I/O”... - Page 21 Confirm the message, which is always shown by TwinCAT when automatically scanning the hardware: Check that the network card where the Real-Time Ethernet Driver was installed is marked as “Device n (EtherCAT)”, then select “OK” (if other Devices are shown, deselect them). Request scan of Slave devices: Installation Guide...
- Page 22 In case the following pop-up appears, just confirm it: Check that one Slave device was detected and automatically added to the tree configuration under the EtherCAT Master: NOTE : The particular icon and name of the detected device are not relevant, as they depend on the previous status of the Evaluation Kit.
-
Page 23: Installation - Additional Tools
Installation - Additional Tools Microsoft Excel® 2013 or later is required Wireshark should be installed (https://www.wireshark.org/download.html). Installation Guide...
Need help?
Do you have a question about the EtherCAT EL9800 and is the answer not in the manual?
Questions and answers