Table of Contents
Advertisement
Quick Links
Installation instructions for part 99-6525
Chrysler 300 2011-2014
KIT FEATURES
• ISO DIN radio provision with pocket
• ISO DDIN radio provision
• Integrated buttons and included interface for climate functions
• Painted matte black (99-6525B)
or high gloss black (99-6525HG)
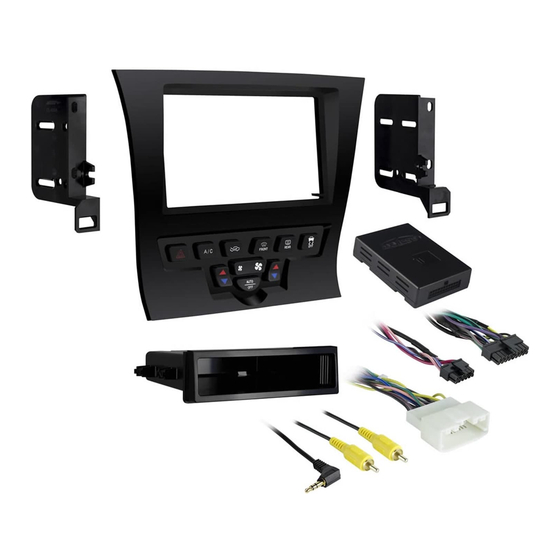
KIT COMPONENTS
• A)
Radio trim panel with climate controls
F) (2) Plastic panel clips • G) (2) #8 x 3/8" Phillips pan-head screws • H) (2) #8 x 1/2" Phillips countersunk flat-head screws
• Climate extension cable (not shown) • Axxess interface and wiring harness (not shown)
A
B
WIRING & ANTENNA CONNECTIONS (sold separately)
Wiring Harness: • Included Antenna Adapter: • 40-EU10
(with a 8" screen)
99-6525
• B) Radio brackets • C) Lower support bracket • D) Pocket • E) (2) Metal panel clips •
C
D
TOOLS REQUIRED
• Panel removal tool • Phillips screwdriver
• T-30 Torx driver
CAUTION: Metra recommends disconnecting the negative battery
terminal before beginning any installation, unless the vehicle
manufacturer recommends against so. Please check with your
local Dealership for more information. All accessories, switches,
climate controls panels, and especially air bag indicator lights
must be connected before reconnecting the battery or cycling
the ignition. Also, do not remove the factory radio with the key
in the on position, or the vehicle running. It would be best to
remove the key from the ignition and then wait a few seconds
before removing the factory radio.
F
E
G
H
Advertisement
Table of Contents

Related Manuals for Metra Electronics 99-6525


Summary of Contents for Metra Electronics 99-6525
- Page 1 Installation instructions for part 99-6525 TOOLS REQUIRED Chrysler 300 2011-2014 • Panel removal tool • Phillips screwdriver (with a 8” screen) • T-30 Torx driver 99-6525 CAUTION: Metra recommends disconnecting the negative battery terminal before beginning any installation, unless the vehicle manufacturer recommends against so.
-
Page 2: Dash Disassembly
99-6525 Dash Disassembly 1. Unclip and remove the top half of 4. Unclip and remove the climate the shift knob. (Figure A) control/radio control panel. Note: The harness removed from 2. Remove (1) T-30 Torx screw this panel will connect to the securing the knob and then climate extension cable. -
Page 3: Kit Assembly
99-6525 Kit Assembly ISO DIN radio provision with pocket 4. Remove the metal “DIN” sleeve Metal clips and trim ring from the aftermarket 1. Attach the provided clips to the radio. radio trim panel (metal clips at the 5. Slide the radio into the pocket/ top;... - Page 4 99-6525 Kit Assembly ISO DDIN radio provision Metal clips 1. Attach the provided clips to the radio trim panel (metal clips at the top; plastic clips at the bottom). (Figure A) 2. Attach the lower support bracket Plastic clip to the radio trim panel with climate controls.
- Page 5 99-6525 Axxess Interface Installation Connections to be made From the 16-pin harness to the aftermarket radio: FEATURES • Provides accessory power (12-volt 10-amp) • Connect the (2) Red wires to the accessory wire. Note: If using an ASWC-1 (sold separately), there will be a Red wire there to connect as well.
- Page 6 • Connect the White/Black wire to the left front negative speaker output 30 seconds, then turn the ignition back off, then back on again. Note: If the 99-6525 • Connect the Gray wire to the right front positive speaker output loses power for any reason, this step will need to be performed again.
- Page 7 99-6525 Screen Operation 1. Enter the settings menu by tapping 2. Once in the setting menu, scroll 3. Once in the customize menu, you 4. Tapping the About button will the gear icon in the upper left down and tap the Customize button...
Need help?
Do you have a question about the 99-6525 and is the answer not in the manual?
Questions and answers