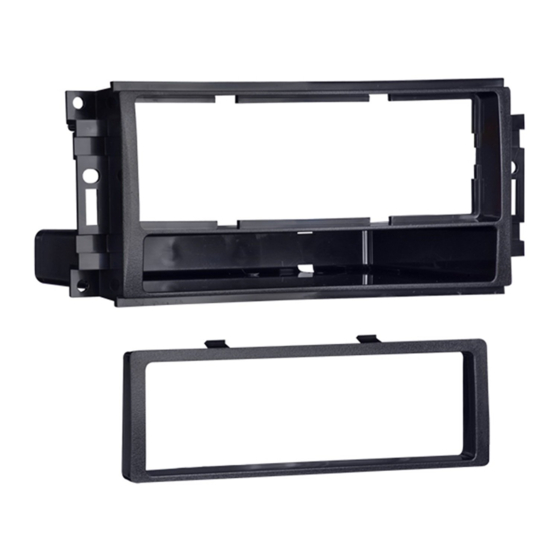
Metra Electronics 99-6511 Installation Instructions Manual
For chrysler sebring 2007, chrysler town and country 2008, dodge avenger 2007-2008, dodge dakota 2008, dodge grand caravan 2008, dodge nitro 2007, jeep wrangler 2007
Hide thumbs
Also See for 99-6511:
- Installation instructions manual (20 pages) ,
- Installation instructions manual (16 pages)
Table of Contents
Advertisement
INSTALLATION INSTRUCTIONS FOR PART 99-6511
APPLICATIONS
Chrysler Sebring 2007
Chrysler Town and Country 2008
Dodge Avenger 2007-2008
Dodge Dakota 2008
Dodge Grand Caravan 2008
Dodge Nitro 2007
Jeep Wrangler 2007
(Modifications to radio cavity required)
99-6511
KIT FEATURES
• DIN Mount Radio Provision with Pocket
• ISO Mount Radio Provision with Pocket
KIT COMPONENTS
A) Radio Housing with Pocket • B) ISO Brackets • C) ISO Trim Plate
A
B
C
TOOLS REQUIRED:
Small Flat Blade Screwdriver/ Panel Removal Tool
• Phillips Screwdriver • Socket Set
1-800-221-0932
www.metraonline.com
© COPYRIGHT 2004-2007 METRA ELECTRONICS CORPORATION
Advertisement
Table of Contents

Summary of Contents for Metra Electronics 99-6511
-
Page 1: Chrysler Sebring 2007
INSTALLATION INSTRUCTIONS FOR PART 99-6511 APPLICATIONS Chrysler Sebring 2007 Chrysler Town and Country 2008 Dodge Avenger 2007-2008 Dodge Dakota 2008 Dodge Grand Caravan 2008 Dodge Nitro 2007 Jeep Wrangler 2007 (Modifications to radio cavity required) 99-6511 KIT FEATURES • DIN Mount Radio Provision with Pocket •... -
Page 2: Table Of Contents
99-6511 T ABLE OF CONTENTS Dash Disassembly - Chrysler Sebring 2007 ....... 1 - Chrysler Town and Country 2008 . -
Page 3: Chrysler Sebring 2007
99-6511 DASH DISASSEMBL Y CHRYSLER SEBRING 2007 Disconnect the negative battery ter- minal to prevent an accidental short circuit. Unclip entire panel surrounding radio including a/c vents and clock. Unplug and remove panel. (Figure A) Remove (4) 7MM screws securing radio. -
Page 4: Chrysler Town And Country 2008
99-6511 DASH DISASSEMBL Y CHRYSLER TOWN AND COUNTRY 2008 DODGE GRAND CARAVAN 2008 Disconnect the negative battery ter- minal to prevent an accidental short circuit. Remove (2) screw covers facing up above radio then remove the (2) Phillips screws exposed. (Figure A) - Page 5 99-6511 DASH DISASSEMBL Y CHRYSLER TOWN AND COUNTRY 2008 DODGE GRAND CARAVAN 2008 5 Remove (2) Phillips screws exposed at bottom edge radio trim panel. (Figure D) Unclip and remove entire panel sur- rounding radio including climate con- trols, vents and clock. (Figure E) Remove (4) Phillips screws securing radio.
-
Page 6: Dodge Avenger 2007-2008
99-6511 DASH DISASSEMBL Y DODGE AVENGER 2007-2008 Disconnect the negative battery ter- minal to prevent an accidental short circuit. Unclip and remove the center console trim panel. (Figure A) Unclip the center dash trim panel. (Figure B) Remove (4) screws securing the radio. -
Page 7: Dodge Dakota 2008
99-6511 DASH DISASSEMBL Y DODGE DAKOTA 2008 Disconnect the negative battery ter- minal to prevent an accidental short circuit. Unclip and remove the trim panel sur- rounding the radio. (Figure A) Remove (4) Phillips screws securing the radio. (Figure B) Continue to kit assembly. -
Page 8: Dodge Nitro 2007
99-6511 DASH DISASSEMBL Y DODGE NITRO 2007 Disconnect the negative battery ter- minal to prevent an accidental short circuit. Unclip entire panel surrounding radio and climate controls, including a/c vents. Unplug and remove panel. Remove (4) 7MM screws securing radio. Unplug and remove radio. -
Page 9: Jeep Wrangler 2007 (Modifications To Radio Cavity Required)
99-6511 DASH DISASSEMBL Y JEEP WRANGLER 2007 Disconnect the negative battery ter- minal to prevent an accidental short circuit. Unclip and remove the lower center trim below a/c controls. (Figure A) Remove (2) Phillips screws exposed behind lower center panel. (Figure A) -
Page 10: Din Mount Radio Provision With Pocket
99-6511 KIT ASSEMBL Y DIN MOUNT RADIO PROVISION WITH POCKET Note: Refer also to the instructions included with the aftermarket radio. Slide the DIN cage into the Radio Housing and secure by bending the metal locking tabs outward. (Figure A) Slide the aftermarket radio into the DIN cage until it snaps into place. -
Page 11: Iso Mount Radio Provision With Pocket
99-6511 KIT ASSEMBL Y ISO MOUNT RADIO PROVISION WITH POCKET Note: Refer also to the instructions included with the aftermarket radio. Mount the ISO Brackets to the radio using the screws supplied with the radio. (Figure A) Slide the radio into the radio opening until it snaps into place. -
Page 12: Final Assembly
99-6511 FINAL ASSEMBL Y FINAL ASSEMBL Y (A) Strip wire ends back 1/2" B) Twist ends together C) Solder D) Tape Locate the factory wiring harness in the dash. Metra recommends using the proper mating adapter and making connections as shown. (Isolate and individ- ually tape off the ends of any unused wires to prevent electrical short circuit.) - Page 13 99-6511 NOTES...
- Page 14 99-6511 NOTES...
- Page 15 99-6511 NOTES...
- Page 16 99-6511 INSTRUCTIONS 1-800-221-0932 www.metraonline.com REV. 09/28/07 © COPYRIGHT 2004-2007 METRA ELECTRONICS CORPORATION INST99-6511...


Need help?
Do you have a question about the 99-6511 and is the answer not in the manual?
Questions and answers