Metra Electronics 99-6536 Installation Instructions Manual
Hide thumbs
Also See for 99-6536:
- Installation instructions manual (32 pages) ,
- Installation instructions manual (14 pages)
Table of Contents
Advertisement
Quick Links
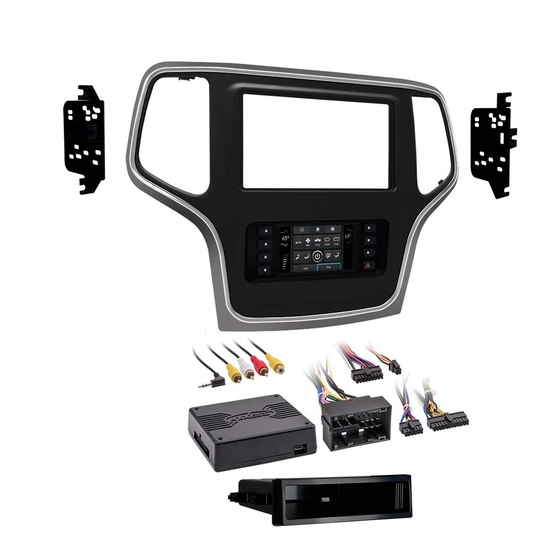
KIT COMPONENTS
• A) Radio trim panel with touchscreen display • B) Radio brackets • C) Pocket • D) #8 x 3/8" Phillips screws (4) • E) Panel clips (10)
• F) Wiring harness (not shown) • G) Antenna adapter (not shown)
A
B
Metra. The World's Best Kits.
®
Jeep Grand Cherokee
Visit
MetraOnline.com
for more detailed information about the product and up-to-date vehicle
specific applications
KIT FEATURES
• ISO DIN radio provision with pocket
• ISO DDIN radio provision
• Retains audio controls on the steering wheel
• Retains the factory backup camera
• Touchscreen display for climate and personalization features
• Painted: Bronze - 99-6536BZ, Silver - 99-6536S
C
D
metraonline.com
2014-2017
E
© COPYRIGHT 2021 METRA ELECTRONICS CORPORATION
99-6536
I N S TA L L AT I O N I N S T R U C T I O N S
TABLE OF CONTENTS
Dash Disassembly ..................................................2
Kit Preparation .......................................................3
Kit Assembly
–ISO DIN radio provision with pocket ..................4
–ISO DDIN radio provision .....................................4
Axxess Interface Installation ............................5-14
WIRING & ANTENNA CONNECTIONS
Wiring Harness: Axxess interface built into
touchscreen
Antenna Adapter: Included with kit
TOOLS REQUIRED
• Panel removal tool • Phillips screwdriver
• 9/32" Socket wrench • 5.5mm Socket wrench
ATTENTION: With the key out of the ignition,
disconnect the negative battery terminal
before installing this product. Ensure that all
installation connections are secure before
cycling the ignition to test this product.
NOTE: Refer also to the instructions included
with the aftermarket radio.
REV. 12/13/21 INST99-6536
Advertisement
Table of Contents

Related Manuals for Metra Electronics 99-6536


Summary of Contents for Metra Electronics 99-6536
- Page 1 Ensure that all installation connections are secure before cycling the ignition to test this product. NOTE: Refer also to the instructions included with the aftermarket radio. Metra. The World’s Best Kits. metraonline.com ® © COPYRIGHT 2021 METRA ELECTRONICS CORPORATION REV. 12/13/21 INST99-6536...
- Page 2 DASH DISASSEMBLY 1. Using the panel removal tool, gently unclip, unplug, and remove the climate control panel. (Figure A) 2. Remove (4) 9/32" screws securing the radio/display screen, and then unplug and remove. (Figure B) 3. Remove (3) 5.5mm screws securing the black control module in the sub-dash, and then relocate lower to allow clearance for the aftermarket...
- Page 3 From the factory radio/climate control panel: 1. Unclip the A/C vents from the back of the panel. (Figure A) To the 99-6536 radio trim panel: 1. Attach the A/C vents to the back of the panel. (Figure B) 2. Attach the (10) panel clips provided in this kit to the clips on the back of the panel.
- Page 4 KIT ASSEMBLY ISO DIN radio provision with pocket ISO DDIN radio provision 1. Attach the pocket to the radio brackets 1. Attach the radio brackets to the radio using the (4) #8 x 3/8" Phillips screws using the screws supplied with the provided in this kit.
-
Page 5: Table Of Contents
AXXESS INTERFACE INSTALLATION INTERFACE FEATURES TABLE OF CONTENTS • Provides accessory power (12-volt 10-amp) Connections • Retains R.A.P. (retained accessory power) For Models without an Amplifier ....................6 • Provides NAV outputs (parking brake, reverse, speed sense) For Models with an Amplifier....................7 •... -
Page 6: For Models Without An Amplifier
CONNECTIONS Attention! This interface will work with models that are either non-amplified, or amplified. From the 6536 harness to the aftermarket radio, connect as indicated: Please follow the instructions carefully for your model vehicle. Failure to do so will result in •... -
Page 7: For Models With An Amplifier
CONNECTIONS (CONT.) Attention! This interface will work with models that are either non-amplified, or amplified. The following (3) wires are only for multimedia/navigation radios that require these wires. Please follow the instructions carefully for your model vehicle. Failure to do so will result in • Blue/Pink wire to the VSS/speed sense wire. either no sound, or low sound. -
Page 8: Connections
CONNECTIONS (CONT.) 3.5mm jack steering wheel control retention: 4-pin harness with yellow RCA jacks: The 3.5mm jack is to be used to retain audio controls on the steering wheel. • If retaining the factory backup camera to the touchscreen display is desired, connect the Yellow RCA jack labeled “Rearview camera”, to the Yellow RCA jack •... -
Page 9: Installation
INSTALLATION PROGRAMMING ATTENTION: It is highly advisable to read the following steps beforehand, to ensure a clear 1. Connect the 6536 harness to the wiring harnesses in the vehicle. Then insert the 6536 harness understanding of what is to be expected. The following steps must be done in the order that into port “A”... -
Page 10: Touchscreen Display Operation
TOUCHSCREEN DISPLAY OPERATION Climate Control screen Heated/Cooled Seats screen • This is the climate control screen which will be displayed on the touchscreen display. • This is the Heated/Cooled Seats, Heated Steering, and Mirror Dimming screen which will be This is considered the Main Menu screen. displayed on the touchscreen display. - Page 11 TOUCHSCREEN DISPLAY OPERATION (CONT.) Settings screen • Display • Engine Off Options - Factory features • System Configuration • Backlight - For controlling the color of the buttons • Steering Wheel Controls • About - Information regarding the software in the kit and back-light intensity.
-
Page 12: Steering Wheel Control Settings
STEERING WHEEL CONTROL SETTINGS Remap Button screen Dual Assign screen • The interface has the ability to change the button assignment for the steering wheel • The interface has the capability to assign two functions to a single button, except control audio buttons, except Volume-Up and Volume-Down. - Page 13 STEERING WHEEL CONTROL SETTINGS (CONT.) Select Radio screen Following is a list of radio manufacturers that the interface presently acknowledges. Others may be added at a later date. Universal “2 or 3 wire” radios can show up as any of these radio manufacturers. Radio Radio Eclipse (type 1) †...
-
Page 14: Troubleshooting
TROUBLESHOOTING Resetting the Axxess interface Option # 1 1. With everything connected and the car running. 2. Hold the bottom (2) buttons for (3) seconds, then release. (Figure A) (The screen will turn black and then the vehicle selection screen will appear) 3. - Page 15 REV. 12/13/21 INST99-6536...
- Page 16 Log onto www.installerinstitute.edu or call 386-672-5771 for more information and take steps toward a better tomorrow. Metra recommends MECP certified technicians Metra. The World’s Best Kits. metraonline.com ® © COPYRIGHT 2021 METRA ELECTRONICS CORPORATION REV. 12/13/21 INST99-6536...
Need help?
Do you have a question about the 99-6536 and is the answer not in the manual?
Questions and answers