Table of Contents
Advertisement
Available languages
Available languages
Quick Links
Advertisement
Chapters
Table of Contents

Related Manuals for HiTi Digital P530D


Summary of Contents for HiTi Digital P530D
- Page 1 Users manual V_0.1...
-
Page 2: Table Of Contents
Contents Regulatory compliance statements--------------------------------------------------------------------------2 Chapter 1. Important safety instruction ◎ Safety Instruction------------------------------------------------------------------------------------------4 ◎ Environments-----------------------------------------------------------------------------------------------4 ◎ Handling Instruction--------------------------------------------------------------------------------------5 ◎ Handling Instruction for Consumable and Printed Outputs-------------------------------------7 Chapter 2. Accessory items ◎ Accessory Item---------------------------------------------------------------------------------------------8 Chapter 3. Basic functions introduction ◎ Appearance-------------------------------------------------------------------------------------------------9 ◎ Parts Name and Function-------------------------------------------------------------------------------10 Chapter 4. -
Page 3: Regulatory Compliance Statements
Regulatory compliance statements American Users FCC Part 15 For a Class A digital device or peripheral, the instructions furnished the user shall include the following or similar statement, placed in a prominent location in the text of the manual. This equipment has been tested and found to comply with the limits of a Class A digital device, pursuant to Part 15 of the FCC Rules. -
Page 4: Chapter 1. Important Safety Instruction
Chapter 1. Important safety instruction ◎ Safety Instruction This manual provides detail instructions for the safety use of the printer. Please read this manual carefully before operating the printer to ensure having proper use. ◆ In this manual, there are notes that require special attention. For your safety operation, Safety Notices are separated as follows: : Inappropriate handing can cause the death or serious wounds. -
Page 5: Handling Instruction
: Do not place the printer on rickety place and/or inclined place. Printer may fall down or tumble and it can cause serious injury. * Attention: Keep the printer out of direct sunlight * Attention: Do not put metallic objects or case/cup with any liquid on top of the printer. Water spilt on metallic items fall into the printer may cause the fire and electric shock. - Page 6 : Please make sure the power is off and the power cord is removed from the printer before transportation. : In the cause of dropping the printer during transportation, contact HiTi dealers or service center for inspection of the printer. Using the printer with possible damage without proper inspection may cause fire or electric shock.
-
Page 7: Handling Instruction For Consumable And Printed Outputs
◎ Handling Instruction for Consumable and Printed Outputs In handling the ink ribbon, paper and printed outputs, please pay attention to the followings: * Attention: Paper handling Use only the duplex photo paper specified by HiTi. Do not put any other simplex photo paper in the printer. -
Page 8: Chapter 2. Accessory Items
Chapter 2. Accessory items Before using the printer, please make sure the Chapter 1. Important Safety Instruction is fully-acknowledged carefully. ◎ Accessory Item Paper flange Scrap Receptacle Power cord USB cable Warranty card Quick guide Master CD * Please note that the accessories vary from region to region. -
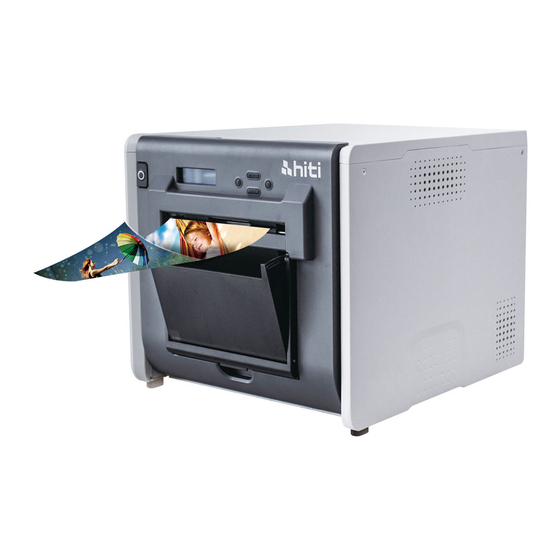
Page 9: Chapter 3. Basic Functions Introduction ◎ Appearance
Chapter 3. Basic functions introduction ◎ Appearance <Front View> <Rear View>... -
Page 10: Parts Name And Function
(10) <Internal view> ◎ Parts Name and Function Name Function Door open Press the button to open the front door button Control panel Four hard-key and one mono LCM to control and monitor the condition of the printer Print Output slot The slot where printed output and scrap come out Scrap receptacle Clean it up periodically before full of scraps in the... -
Page 11: Chapter 4. Installing And Operation
Connect the power cord which is conformed to safety regulations below. 4.1 Connect the printer power cord to the back of P530D (as figure shown) and AC power receptacle. : Make sure to switch off the power of the printer before connecting to AC power. -
Page 12: Operation Process
◎ Connect the USB cable Connect the USB cable with printer and PC/laptop for further operation. 4.2 Connect USB cable from personal computer to USB connector on the left rear side of the printer. : Before removing the USB cable, please make sure the printer finish its internal operations. : Removing the USB cable while data transferring, printer may not be able to print data correctly and it may cause waste. -
Page 13: Ribbon/Paper Installing
◎ Ribbon/Paper Installing 4.5.1 Install the paper flanges to both side of the paper roll. Remove the seal attached on the paper and make sure the front end of the paper has been pulled up. 4.5.2 Press the button of the rear paper rack to open the paper rack. - Page 14 4.5.5 Pull back the rear paper rack to the original position until a click heard. Loading Ink Ribbon 4.6 Loading ribbon instructions Stretch the ribbon and load in right position. * Attention: It is a mistake-proofing for users; Please be sure the white head locates on white indentation and black head locates on black indentation.
-
Page 15: Printer Transportation
◎ Printer transportation The following cautions are necessary in transportation of the printer. Since an incorrect transportation method causes a printer fault, please follow the correct method. 1. Remove the ribbon and paper from the printer before transporting the printer. If the ribbon or paper cannot be removed due to a fault, consult with HiTi dealers or service center. -
Page 16: Chapter 5. Operation Panel And Printer Status
Chapter 5. Operation panel and Printer Status (1) (2) Name Function Left button Use this button to select preferred setting Manu button Use this button to view the printer status Right button Use this button to select preferred setting EXEC button Use this button execute cutting paper LCD Display See as below table... -
Page 17: User Set Up Mode
◎ User Set Up Mode To set the user set up mode, press the “Menu” button in standby mode. When the “Menu” button is being pressed, display changes as follows. PRINTER READY <6X8> menu PRINTS MADE Display total prints TOTAL [00100] menu MEDIA LEFT... - Page 18 Setting of wireless mode Press [MENU] to the page of “WIRELESS STATUS”. There are three wireless statuses as below. Follow the below instructions to set up wireless mode. WIRELESS STATUS WIRELESS STATUS WIRELESS STATUS <CONNECTED> <CONNECTING> <DISCONNECTED> [EXEC] [EXEC] Display current wireless connection modes. Check if wireless USB dongle has been CURRENT MODE...
-
Page 19: Chapter 6. Routine Maintenance ◎ Cleaning Of Thermal Printing Head And Roller
Chapter 6. Routine Maintenance ◎ Cleaning of Thermal Printing Head and Roller By using thermal transfer technology, daily maintenance is not necessary if the printer has been using properly. However, in order to keep the best print quality, it is highly recommended to clean Thermal Printing Head and Roller regularly. -
Page 20: Chapter 7. Error Message Handling ◎ Error Message And Corrective Actions
Chapter 7. Error Message Handling ◎ Error Message and Corrective Actions LCD Message Status Corrective Action 0100 Cover Open The front cover is opened Close the front cover 0101 Cover Open fail The front cover is not Press the button again to opened reset 0102 Jam door Open... -
Page 21: Failure Symptoms
◎ Failure Symptoms When detecting a failure symptom, check the printer by the following table. Symptom Action Power is not switch on Please check if the power cable is firmly ● connected The personal computer does not Check if the USB cable is connected to the recognize the printer personal computer or printer The printer does not ready... - Page 22 Check the paper path 1.2.3. to remove jammed paper * Attention: To prevent damage to the printer, please do not pull the paper abruptly. Cut off the folded paper or printed section by scissors. When the paper is folded inside of the printer, pull it out gently and slowly.
-
Page 23: Power Supply Interrupted During Printing
* Attention: If the paper is used without cutting off the folded or printer section, paper jam occurs every time or the ribbon may snap during printing. Always cut off the creased or printed section of the paper. * Attention: Cut off the paper straight and at right angles to the roll paper direction *... -
Page 24: Chapter 8. Specification
Chapter 8. Specification ◎ Specification Model Name HiTi P530D Printing Method Dye Diffusion Thermal Transfer Resolution 300 x 300 dpi Printing Size & Capacity 4” x 6” (102 x 152mm): 250 prints(duplex print) 6” x 6” (152 x 152mm): 125 prints(duplex print) 6”... - Page 25 manual del usuario V_0.1...
- Page 26 Contenido Declaraciones de cumplimiento regulatorio------------------------------------------------------------2 Capítulo 1. Información de seguridad importante ◎ Instrucciones de seguridad---------------------------------------------------------------------------4 ◎ Entornos de uso-----------------------------------------------------------------------------------------4 ◎ Instrucciones de manipulación----------------------------------------------------------------------5 ◎ Instrucciones de manipulación para consumibles e impresiones---------------------------7 Capítulo 2. Accesorios ◎ Accesorios------------------------------------------------------------------------------------------------8 Capítulo 3. Introducción de las funciones básicas ◎...
-
Page 27: Declaraciones De Cumplimiento Regulatorio
Declaraciones de cumplimiento regulatorio Usuarios de EE. UU. FCC Parte 15 Para un dispositivo o periférico Clase "A", las instrucciones otorgadas al usuario deberán incluir la siguiente declaración o similar, colocada en una ubicación destacada del texto del manual. Este equipo se ha sometido a pruebas y demostró cumplir con los límites de un dispositivo digital Clase "A", conforme la Parte 15 de las Reglas de la FCC. - Page 28 Declaración de exposición a radiación de radiofrecuencia de la FCC: Este transmisor no deberá ubicarse o utilizarse en conjunto con cualquier otra antena o transmisor. Este equipo cumple con los límites de exposición a radiación de radiofrecuencia de la FCC establecidos para un entorno sin control.
-
Page 29: Capítulo 1. Información De Seguridad Importante
Capítulo 1. Información de seguridad importante ◎ Instrucciones de seguridad Este manual proporciona instrucciones detalladas para el uso seguro de la impresora. Lea detenidamente este manual antes de utilizar la impresora para garantizar que está realizando un uso seguro. ◆ En este manual, existen notas que requieren atención especial. Para un funcionamiento seguro, los avisos de seguridad se separan de la siguiente manera: : La manipulación incorrecta puede causar muertes o heridas graves. -
Page 30: Instrucciones De Manipulación
: No coloque la impresora en una ubicación húmeda o polvorienta. Esto podría causar incendios,descargas eléctricas o problemas con la impresora. No coloque la impresora en lugares expuestos a polvo, arena o humedad elevada, como baños, aguas termales o en la calle. - Page 31 : Al mover la impresora, sujete el borde inferior de la misma. Se recomienda que una o dos personas sujeten la impresora durante el transporte. : Tenga cuidado al transportar la impresora sobre pisos resbaladizos. : Asegúrese de que la alimentación esté apagada y que el cable de alimentación se haya extraído de la impresora antes de realizar su transporte.
-
Page 32: Instrucciones De Manipulación Para Consumibles E Impresiones
: Este producto deberá tener una conexión a tierra en todo momento durante el funcionamiento y se deberá utilizar siempre con el cable de alimentación especificado o el cable de alimentación suministrado con este producto. Si el producto se utiliza sin una conexión a tierra y ocurre una fuga de corriente, es posible que se produzca un incendio o descarga eléctrica y también podrían producirse interferencias con la recepción de señales de radio, TV y otros dispositivos eléctricos similares. -
Page 33: Capítulo 2. Accesorios
Capítulo 2. Accesorios Antes de utilizar la impresora, asegúrese de haber comprendido por completo el Capítulo 1. Información de seguridad importante. ◎ Accesorios Rodillo de papel Receptáculo de Cable de alimentación Cable USB residuos Guía rápida CD de controladores/ Tarjeta de garantía manual del usuario /AP *Tenga en cuenta que los accesorios varían de una región a otra. -
Page 34: Capítulo 3. Introducción De Las Funciones Básicas ◎ Apariencia
Capítulo 3. Introducción de las funciones básicas ◎ Apariencia < Vista frontal > < Vista posterior >... - Page 35 (10) < Vista interna > ◎ Nombre de las partes y función Núm. Nombre Función Tapa Presione este botón para abrir la tapa frontal Panel de control 4 botones y una pantalla LCM monocromática para controlar y supervisar el estado de la impresora Ranura de Salida de La Ranura donde las impresiones y los desechos salen Impresora...
-
Page 36: Capítulo 4. Instalación Y Funcionamiento ◎ Instalación
4.1 Conecte el cable de alimentación de la impresora en la parte inferior del modelo P530D (tal como se muestra en la ilustración) y en un tomacorriente de alimentación de CA. : Asegúrese de apagar la alimentación de la impresora antes de conectar con la alimentación de CA. -
Page 37: Proceso De Operaciones
◎ Conecte el cable USB Conecte el cable USB entre la impresora y la PC/computadora portátil para su funcionamiento. 4.2 Conecte el cable USB desde la computadora personal al conector USB sobre el lado izquierdo trasero de la impresora : Antes de extraer el cable USB, asegúrese de que la impresora haya finalizado sus operaciones internas. -
Page 38: Instalación De La Cinta De Tinta/Papel
◎ Instalación de la cinta de tinta/papel 4.5.1 Instale la brida del papel hacia ambos lados del rollo del papel. Retire el sello adjunto sobre el papel y asegúrese de que el extremo delantero del papel haya sido arrancado. 4.5.2 Presione el botón de la rejilla trasera de papel para accesar a la rejilla de papel. - Page 39 4.5.5 Retroceda la rejilla trasera de papel hacia la posición original hasta que se oiga el sonido de un clic. Cargando la cinta 4.6 Instrucciones para cargar la cinta de tinta Estire la cinta de tinta y cargue en la posición correcta.
-
Page 40: Transporte De La Impresora
◎ Transporte de la impresora Se deberán tomar las siguientes precauciones al transportar la impresora. Debido a que un método de transporte incorrecto podría provocar una falla de la impresora, siga el método correcto. 1. Extraiga la cinta de tinta y el papel de la impresora antes de transportarla. Si la cinta de tinta o el papel no pueden extraerse debido a una falla, comuníquese con los distribuidores o centro de servicio técnico de HiTi. -
Page 41: Capítulo 5. Panel De Operaciones Y Estado De La Impresora
Capítulo 5. Panel de operaciones y estado de la impresora (1) (2) (3) Núm. Nombre Función Botón hacia la izquierda Utilice este botón para seleccionar la configuración deseada Botón Menú Utilice este botón para visualizar el estado de la impresora Botón hacia la derecha Utilice este botón para seleccionar la configuración deseada Botón de ejecución... -
Page 42: Modo De Configuración Del Usuario
◎ Modo de configuración del usuario Para establecer el modo de configuración del usuario, presione el botón "Menú" en el modo de espera. Mientras se presiona el botón "Menú", la pantalla cambiará de la siguiente manera: PRINTER READY <6X8> menu PRINTS MADE Muestre total de impresiones TOTAL... - Page 43 Configuración del modo inalámbrico Presione [MENU] hacia la página “WIRELESS STATUS”. Existen tres estados inalámbricos como se muestra abajo. Siga las instrucciones de abajo para establecer el modo inalámbrico. WIRELESS STATUS WIRELESS STATUS WIRELESS STATUS <CONNECTED> <CONNECTING> <DISCONNECTED> [EXEC] [EXEC] Muestre los modos actuales de conexión inalámbrica Compruebe si dongle USB inalámbrico se ha...
-
Page 44: Capítulo 6. Mantenimiento De Rutina ◎ Limpieza Del Cabezal De Impresión Térmico Y Rodillo
Capítulo 6. Mantenimiento de rutina ◎ Limpieza del cabezal de impresión térmico y rodillo Gracias a la utilización de la tecnología de transferencia térmica, no se requiere el mantenimiento diario si la impresora se utiliza de forma correcta. Sin embargo, a fin de mantener la mejor calidad de impresión, se recomienda realizar periódicamente la limpieza del cabezal térmico y el rodillo. - Page 45 Chapter 7. Error Message Handling ◎ Error Message and Corrective Actions Mensaje en la pantalla LCD Estado Acción correctiva 0100 Tapa abierta La tapa frontal está Cierre la tapa frontal abierta. 0101 Error de tapa abierta La tapa frontal no Presione el botón nuevamente para está...
-
Page 46: Síntomas De Fallas
◎ Síntomas de fallas Al detectar un síntoma de falla, inspeccione la impresora según lo que se indica en la siguiente tabla. Síntoma Acción La alimentación no se enciende Compruebe si el cable de alimentación está conectado ● de forma correcta La computadora personal no Compruebe si el cable USB está... - Page 47 Revise la ruta 1.2.3. del papel para retirar el papel atascado * Atención: Para prevenir daños a la impresora, por favor no hale el papel abruptamente. Corte el papel forrado o la sección impresa con una tijera. Cuando el papel está forrado dentro de la impresora, estírelo hacia fuera gentilmente y lentamente.
-
Page 48: Suministro De Alimentación Interrumpido Durante La Impression
* Atención: Si se utiliza el papel sin cortar la sección plegada o impresa, ocurrirá siempre un atasco de papel o la cinta podría salirse durante la impresión. Corte siempre la sección arrugada o impresa del papel. * Atención: Corte el papel de forma recta y en ángulos rectos a la dirección del rollo de papel. *... -
Page 49: Capítulo 8. Especificaciones
Capítulo 8. Especificaciones ◎ Especificaciones Nombre del modelo HiTi P530D Método de impresión Transferencia térmica de difusión de tinta (tecnología D2T2) Resolución 300 x 300 dpi Tamaño y capacidad de 4” x 6” (102 x 152mm): 250 impresiones (Impresión de dos caras) impresión... - Page 50 manual do utilizador V_0.1...
- Page 51 Índice Declarações de conformidade regulatória---------------------------------------------------------------2 Capítulo 1. Instruções importantes de segurança ◎ Instrução de segurança--------------------------------------------------------------------------------4 ◎ Ambientes-------------------------------------------------------------------------------------------------4 ◎ Instrução de Manuseio---------------------------------------------------------------------------------5 ◎ Instrução de manuseio para Consumíveis e Saídas Impressas--------------------------------7 Capítulo 2. Itens de acessórios ◎ Itens de acessório----------------------------------------------------------------------------------------8 Capítulo 3. Introdução das funções básicas ◎...
-
Page 52: Declarações De Conformidade Regulatória
Declarações de conformidade regulatória Usuários americanos FCC Parte 15 Para um dispositivo digital de Classe A ou periférico, as instruções fornecidas ao usuário devem incluir a seguinte ou semelhante declaração, colocada em um local de destaque no texto do manual. Este equipamento foi testado e julgado como de acordo como os limites para um dispositivo digital Classe A, no que se refere à... - Page 53 Declaração de Exposição à Radiação FCC RF: 1. Este Transmissor não deve ser co-localizado ou operado juntamente com qualquer outra antena ou transmissor. 2. Este equipamento está de acordo com os limites de exposição à radiação FCC RF definidos para um ambiente sem controle. Este equipamento deve ser instalado e operado a uma distância mínima de 20 centímetros entre o radiador eo seu corpo.
-
Page 54: Capítulo 1. Instruções Importantes De Segurança ◎ Instrução De Segurança
Capítulo 1. Instruções importantes de segurança ◎ Instrução de segurança Este manual fornece instruções detalhadas de segurança para o uso da impressora. Por favor, leia com atenção este manual antes de operar a impressora para assegurar uma utilização correta. ◆ Neste manual, há... -
Page 55: Instrução De Manuseio
: Não coloque a impressora em superficiais desequilibradas e/ou posição inclinada. A impressora pode cair e pode causar ferimentos graves. * Atenção: Não coloque a impressora sob baixas temperaturas, como pátio de esqui, pista de patinação ou ao ar livre com luz solar direta. *... - Page 56 : Por favor, certifique-se que a energia está desligada e o cabo de alimentação está removida da impressora antes do transporte. : No causo de deixar cair a impressora durante o transporte, entre em contato com revendedores HiTi ou centro de assistência para inspeção da impressora. Utilizar a impressora com possíveis danos sem inspeção adequada pode causar incêndio ou choque elétrico.
-
Page 57: Instrução De Manuseio Para Consumíveis E Saídas Impressas
◎ Instrução de manuseio para Consumíveis e Saídas Impressas Ao lidar com a fita de tinta, papel e saídas impressas, por favor, preste atenção aos seguintes itens: * Atenção: Manipulação de papel Utilize apenas papel fotográfico dupla-face especificado pela HiTi. Não colocar outro papel fotográfico simplex na impressora. -
Page 58: Capítulo 2. Itens De Acessórios
Capítulo 2. Itens de acessórios Antes de usar a impressora, certifique-se do Capítulo 1. Instrução Importante de Segurança é totalmente reconhecido com cuidado. ◎ Itens de acessório Flange de papel Receptáculo de lixo Cabo de alimentação Cabo USB Guia rápido CD de controladores Folheto de garantia *Por favor, note que os acessórios variam de região para região. -
Page 59: Capítulo 3. Introdução Das Funções Básicas ◎ Aparência
Capítulo 3. Introdução das funções básicas ◎ Aparência < Vista frontal > < Vista traseira >... -
Page 60: Nome E Função Dos Components
(10) < Vista interna > ◎ Nome e função dos componentes N° Nome Função Porta Pressione o botão para abrir a porta frontal. Painel de controle Quatro botões físicos e um mono LCM para controlar e monitorar a condição da impressora Ranhura de saída da Slot onde as impressões e os detritos. -
Page 61: Capítulo 4. Instalação E Operação
Conecte o cabo de alimentação que está conformado com as normas de segurança abaixo. ◎ Instalando 4.1 Conecte o cabo de alimentação da impressora na parte de trás da P530D (como mostrado na figura) e tomada de energia AC. : Certifique-se de desligar a energia da impressora antes de conectar à rede elétrica. -
Page 62: Processo Da Operação
◎ Ligar o cabo USB Conecte o cabo USB com a impressora e PC/laptop para operação posterior. 4.2 Conecte o cabo USB do PC ao conector USB na parte traseira esquerda da impressora. : Antes de retirar o cabo USB, certifique-se de que a impressora tenha terminado suas operações internas. -
Page 63: Instalação Da Fita/Papel
◎ Instalação da Fita/Papel 4.5.1 Instalar a flange de papel em ambos os lados do rolo de papel. Remover o selo anexado em papel e certifique-se de que a extremidade da frente do papel foi inicializado. 4.5.2 Pressione o botão no papel da grade de volta para acessar o papel da grade. - Page 64 4.5.5 Rebobinar o papel da grade traseira para a posição original até que o som de um clique é ouvido. Carregando Ribbon 4.6 Instruções para carregamento de fita Estique a fita e carregue na posição correta. * Atenção: É uma prova de erro para os usuários;...
-
Page 65: Transporte Da Impressora
◎ Transporte da impressora As seguintes precauções são necessárias no transporte da impressora. Uma vez que um método de transporte incorreto faz causa uma falha da impressora, siga o método correto. 1. Retire a fita e papel da impressora antes de transportar a impressora. Se a fita ou papel não puderem ser removidos devido a uma falha, consulte com os revendedores ou centro de serviço da HiTi. -
Page 66: Capítulo 5. Painel De Operação E Status Da Impressora
Capítulo 5. Painel de operação e Status da impressora ◎ Painel de Operação (1) (2) N° Nome Função Botão esquerdo Utilize este botão para selecionar a configuração preferida Botão de menu Utilize este botão para visualizar o status da impressora Botão direito Utilize este botão para selecionar a configuração preferida Botão EXEC... -
Page 67: Modo De Configuração Do Usuário
◎ Modo de Configuração do Usuário Para definir o modo de configuração do usuário, pressione o botão "Menu" no modo de espera. Quando o botão "Menu" está sendo pressionado, o visor muda da seguinte forma. PRINTER READY <6X8> menu PRINTS MADE Exibir o total de impressões TOTAL [00100]... - Page 68 Configurar o modo sem fio Pressione [MENU] vá para a página "ESTADO do Sem Fio". Há três estados do sem fio, conforme abaixo. Siga as instruções abaixo para configurar o modo sem fio WIRELESS STATUS WIRELESS STATUS WIRELESS STATUS <CONNECTED> <CONNECTING>...
-
Page 69: Capítulo 6. Manutenção De Rotina ◎ Limpeza Da Cabeça De Impressão Térmica E Do Rolo
Capítulo 6. Manutenção de rotina ◎ Limpeza da cabeça de impressão térmica e do rolo Usando a tecnologia de transferência térmica, a manutenção diária não é realmente necessária se a impressora tiver sido usada corretamente. No entanto, a fim de manter a melhor qualidade de impressão, é... -
Page 70: Capítulo 7. Lidando Com Mensagem De Erro
Capítulo 7. Lidando com Mensagem de Erro ◎ Mensagem de erro e Ações corretivas Mensagem do LCD Status Ação Corretiva 0100 Tampa aberta A tampa da frente está Feche a tampa da frente. aberta 0101 Abrir Tampa falhou A tampa da frente não Pressione o botão novamente e está... -
Page 71: Sintomas De Falha
◎ Sintomas de falha Ao detectar um sintoma de falha, verifique a impressora na tabela a seguir. Sintoma Ação Energia não está ligada Verifique se o cabo de alimentação está conectado à tomada de energia da impressora ou não O computador pessoal não Verifique se o cabo de USB está... - Page 72 Ver o percurso 1.2.3. o de papel para remover o papel preso. * Atenção: Para evitar danos à impressora, por favor, não puxe o papel abruptamente. Cut papel pautado ou secção com uma tesoura impresso. Quando o papel é revestido no interior da impressora, retire-o com cuidado e lentamente.
-
Page 73: Fonte De Alimentação Interrompida Durante A Impressão
* Atenção: Se o papel for usado sem cortar a seção dobrada ou impressa, a obstrução de papel ocorre sempre ou a fita pode prender durante a impressão. Sempre corte a parte enrugada ou impressa do papel. * Atenção: Corte o papel em linha reta e em ângulo reto com a direção do rolo de papel *... -
Page 74: Capítulo 8. Especificação
Capítulo 8. Especificação ◎ Especificação Nome do Modelo HiTi P530D Método de Impressão Transferência Térmica de Difusão de Tinta (Tecnologia D2T2) Resolução 300 x 300 dpi Tamanho de impressão 4” x 6” (102 x 152mm): 250 Impressões (Impressão frente e verso) e Capacidade 6”... - Page 75 使用手冊 使用手冊 使用手冊 使用手冊 V_0.1...
- Page 76 目錄 目錄 目錄 目錄 ---------------------------------------------------------------------------------------------------------------2 第一章 第一章 第一章 第一章 產品安全使用 產品安全使用 產品安全使用 產品安全使用 ---------------------------------------------------------------------------------------3 --------------------------------------------------------------------------------3 -----------------------------------------------------------------------------------4 -------------------------------------------------------------------6 第二章 第二章 第二章 第二章 配件盒 配件盒 配件盒 配件盒 ------------------------------------------------------------------------------------------7 第三章 相片印相機功能性介紹 -------------------------------------------------------------------------------------------------8 --------------------------------------------------------------------------9 第四章 第四章 第四章 第四章 安裝及操作說明 安裝及操作說明 安裝及操作說明 安裝及操作說明 --------------------------------------------------------------------------------------------------------10 -------------------------------------------------------------------------------------------11 -----------------------------------------------------------------------------------12 ----------------------------------------------------------------------------------------14 第五章...
- Page 78 第一章 第一章 產 產 產 產 品安全使用 第一章 第一章 品安全使用 品安全使用 品安全使用 使用安全與提醒 使用安全與提醒 使用安全與提醒 使用安全與提醒 關 關 關 關 於 於 於 於 使 使 使 使 用 用 用 用 環 環 環 環 境 境 境 境 和 和 和 和 設 設 設 設 置 置 置 置...
- Page 79 關於印相機的使用...
- Page 81 關於耗材的使用和相紙的保存 關於耗材的使用和相紙的保存 關於耗材的使用和相紙的保存 關於耗材的使用和相紙的保存 60% RH ° 60% RH °...
- Page 82 第二章 第二章 第二章 第二章 配件盒 配件盒 配件盒 配件盒 ” ” 配件盒 配件盒 配件盒 配件盒內容物 內容物 內容物 內容物 USB 線 紙捲架 紙屑筒 電源線 保固卡 快速使用指南 隨...
- Page 83 第三章 相片印相機功能性介紹 印相機外觀 < > < >...
- Page 84 (10) < > 部位名稱及功能 部位名稱及功能 部位名稱及功能 部位名稱及功能 Left right Execute Menu 100V~240V (10)
- Page 85 第四章 第四章 第四章 第四章 安裝及操作說明 安裝及操作說明 安裝及操作說明 安裝及操作說明 連接電源線 連接電源線 連接電源線 連接電源線...
- Page 86 連接 USB 連接線 連接 連接線 連接 連接 連接線 連接線 按下電源開關 按下電源開關 按下電源開關 按下電源開關 ”ON” ”OFF” 開啟前蓋面板 開啟前蓋面板 開啟前蓋面板 開啟前蓋面板...
- Page 87 相紙 相紙 相紙 相紙/色帶安裝說明 色帶安裝說明 色帶安裝說明 色帶安裝說明 4.5.1. 4.5.2 4.5.3 4.5.4...
- Page 88 4.5.5 4” x 6” Menu -> -> < > < >...
- Page 89 關 關 關 關 於 於 於 於 印 印 印 印 相 相 相 相 機 機 機 機 運 運 運 運 送 送 送 送...
- Page 90 第五章控制面板以及相片印相機狀態說明 ◎ 控制面板 控制面板 控制面板 控制面板 (1) (2) Left Manu Right EXEC LCM(5) 相 < > 4” x 6” < 4” x 6” >...
- Page 91 用戶模式 用戶模式 用戶模式 用戶模式選擇說明 選擇說明 選擇說明 選擇說明 ”Menu” <6X8> menu TOTAL [00100] menu 80/125 <6X8> [80/125] menu < > 4” x 6” 自 動 < > < > 4” x 6” menu Left/Right < 繁 中 > menu [EXEC] 已 連 線 <...
- Page 92 [MENU] 連 線 狀 態 連 線 狀 態 連 線 狀 態 < 已 連 線 > < 連 線 中 > < 未 連 線 > [EXEC] [EXEC] 顯 示 當 前 無 線 連 接 模 式 檢...
- Page 93 第六章 第六章 第六章 第六章 日常 日常 日常維護 日常 維護 維護 維護 列印頭及滾輪清潔 列印頭及滾輪清潔 列印頭及滾輪清潔 列印頭及滾輪清潔 : 請 相 滾 滾 滾 滾 輪 輪 輪 輪 清 清 清 清 潔 潔 潔 潔 : 外 外 外 外 部 部 部 部 清 清 清 清 潔 潔 潔 潔 相...
- Page 94 第七章 第七章 第七章 第七章 故障時的處理 故障時的處理 故障時的處理 故障時的處理 故障 故障 故障 故障訊息及故障排除方式 訊息及故障排除方式 訊息及故障排除方式 訊息及故障排除方式 0100 0101 0102 0200 0201 0202 0203 0300 0400 0401 0500 0501 0502 0503 0504 0505 0506 0600 1500 1501...
- Page 95 故障症狀 故障症狀 故障症狀 故障症狀 ● ● ● ● ● ● ● ● 卡紙排除方法 卡紙排除方法 卡紙排除方法 卡紙排除方法 1.2.3.
- Page 97 列印時斷電的故障排除 列印時斷電的故障排除 列印時斷電的故障排除 列印時斷電的故障排除 色帶斷裂的故障排除 色帶斷裂的故障排除 色帶斷裂的故障排除 色帶斷裂的故障排除...
- Page 98 第八章 規格說明 規格說明 規格說明 規格說明 產品規格 產品規格 產品規格 產品規格 HiTi P530D YMCO 300 x 300 dpi 4” x 6” (10.2 x 15.2 ): 250 6” x 6” (15.2 x 15.2 ): 125 6” x 8” (15.2 x 20.3 ): 125 4”...
- Page 99 guide de l'utilisateur V_0.1...
- Page 100 Table des matières Déclarations de conformité réglementaire-----------------------------------------------------------------2 Chapitre 1. Consigne de sécurité importante ◎ Consigne de sécurité---------------------------------------------------------------------------------------4 ◎ Environnements---------------------------------------------------------------------------------------------4 ◎ Consignes de manipulation-------------------------------------------------------------------------------5 ◎ Instructions de manipulation pour les consommables et les sorties d'impression---------7 Chapitre 2. Accessoires ◎ Accessoire-----------------------------------------------------------------------------------------------------8 Chapitre 3. Présentation des fonctions de base ◎...
-
Page 101: Déclarations De Conformité Réglementaire
Déclarations de conformité réglementaire Utilisateurs américains FCC section 15 Pour un périphérique ou un appareil numérique de classe A, les instructions fournies à l'utilisateur doivent comprendre la déclaration suivante ou similaire, placée dans un emplacement visible dans le texte du manuel. Cet équipement a été... - Page 102 Déclaration de la Federal Communications Commission (FCC) Vous êtes informé que les changements ou les modifications non expressément approuvés par la partie responsable de la conformité peuvent annuler le droit de l'utilisateur à utiliser cet équipement. Cet appareil est conforme à la section 15 des règlements de la FCC. Le fonctionnement est soumis aux deux conditions suivantes : 1) cet appareil ne doit pas causer d'interférences nocives et 2) cet appareil doit accepter toutes les interférences reçues, dont les interférences pouvant causer un...
-
Page 103: Chapitre 1. Consigne De Sécurité Importante ◎ Consigne De Sécurité
Chapitre 1. Consigne de sécurité importante ◎ Consigne de sécurité Ce manuel fournit des consignes détaillées pour une utilisation en toute sécurité de l'imprimante. Veuillez lire attentivement ce manuel avant d'utiliser l'imprimante pour garantir une utilisation correcte. ◆ Dans ce manuel, des remarques demandent une attention particulière. Pour un fonctionnement en toute sécurité, les avis de sécurité... -
Page 104: Consignes De Manipulation
: Ne placez pas l'imprimante sous un endroit humide ou poussiéreux. Cela peut causer un incendie, une décharge électrique ou un problème d'imprimante. Ne placez pas l'imprimante dans de la poussière, du sable ou une humidité élevée, comme une baignoire, une salle de bains, une source chaude ou la rue. : Ne placez pas l'imprimante sur un endroit bancal et/ou incliné. - Page 105 : L'imprimante seule (sans avoir installé le papier et le ruban) pèse environ 18 kg. Veuillez manipuler l'imprimante avec soin pour éviter des blessures corporelles et des dommages à l'imprimante. : Lors du déplacement de l'imprimante, tenez le bord inférieur de l'imprimante. Il est vivement recommandé...
-
Page 106: Instructions De Manipulation Pour Les Consommables Et Les Sorties D'impression
: N'essayez pas d'entretenir l'imprimante au-delà des consignes figurant dans ce document. En cas de problème irrémédiable, veuillez contacter les revendeurs HiTi ou le centre de service. : Ce produit doit être relié à la terre à tout moment lors de son fonctionnement. Il doit toujours être utilisé... -
Page 107: Chapitre 2. Accessoires
Chapitre 2. Accessoires Avant d'utiliser l'imprimante, veuillez vous assurer que le Chapitre 1. Consignes importantes de sécurité sont prises en compte entièrement et attentivement. ◎ Accessoire Bride de papier Bac à rebuts Cordon d'alimentation Câble USB Carte de garantie Guide rapide CD avec pilotes/l'utilisateur *S'il vous plaît noter que les accessoires varient de région à... -
Page 108: Chapitre 3. Présentation Des Fonctions De Base ◎ Apparence
Chapitre 3. Présentation des fonctions de base ◎ Apparence < Vue de face > < Vue arrière >... -
Page 109: Nom Et Fonction Des Pieces
(10) < Vue interne > ◎ Nom et fonction des pièces N° Fonction Porte Appuyez sur le bouton pour ouvrir la porte avant Panneau de commande Quatre touches mécaniques et un LCM mono pour commander et vérifier l'état de l'imprimante Fente de sortie La fente où... -
Page 110: Chapitre 4. Installation Et Fonctionnement
◎ Branchez le cordon d'alimentation de Branchez le cordon d'alimentation conforme aux réglementations de sécurité ci-dessous. 4.1 Branchez le cordon d'alimentation de l'imprimante à l'arrière du P530D (comme indiqué sur la figure) et à une prise secteur. : Assurez-vous de mettre l'imprimante hors tension avant de la brancher à... -
Page 111: Processus De Fonctionnement
: Veuillez éviter d'empiler, ce qui peut causer un incendie et une décharge électrique. ◎ Raccorder le câble USB à Raccordez le câble USB à l'imprimante et à un ordinateur PC/potable pour poursuivre l'utilisation. Branchez le câble USB de votre ordinateur personnel au connecteur USB sur le côté... - Page 112 ◎ Ouvrez le capot de l'imprimante 4.4 Ouvrez le capot de l'imprimante Appuyez sur le bouton dans le coin supérieur gauche du capot avant de l'imprimante. * Attention : Réservez un espace pour la sortie du capot ◎ Ribbon/Paper Installing 4.5.1 Installez les brides de papier des deux côtés du rouleau de papier.
- Page 113 4.5.4 Vous devriez tourner manuellement les brides de papier pour étirer la longueur appropriée du papier à travers de la fente de la grille de papier arrière jusqu'à ce que les feux de capteurs s'allument. 4.5.5 Tirez sur la grille arrière du papier et restaurez la position d'origine jusqu'au moment, ce que vous entendiez un clic.
-
Page 114: Transport De L'imprimante
Fermer le couvercle avant lorsque le chargement du ruban et du papier est terminé, vous pouvez ensuite fermer la porte sur le cote avant de l'imprimante. ◎ Transport de l'imprimante Les précautions suivantes sont nécessaires lors du transport de l'imprimante. Dans la mesure où... -
Page 115: Chapitre 5. Panneau De Commande Et Statut De L'imprimante ◎ Panneau De Commande
Chapitre 5. Panneau de commande et statut de l'imprimante ◎ Panneau de commande (1) (2) (3) N° Fonction Bouton gauche Utilisez ce bouton pour sélectionner le réglage préféré Bouton Manu Utilisez ce bouton pour afficher le statut de l'imprimante Bouton droit Utilisez ce bouton pour sélectionner le réglage préféré... -
Page 116: Mode Configuration Utilisateur
◎ Mode configuration utilisateur Pour définir le mode configuration utilisateur, appuyez sur le bouton « Menu » en mode veille. Quand le bouton « Menu » est actionné, l'écran change comme suit. PRINTER READY <6X8> menu PRINTS MADE Afficher les impressions TOTAL [00100] menu... - Page 117 Paramétrage du mode sans fil Appuyer sur [MENU] sur la page "WIRELESS STATUS". Il y a trois statuts sans fil comme suit. Suivez les instructions ci-dessous pour paramétrer le mode sans fil. WIRELESS STATUS WIRELESS STATUS WIRELESS STATUS <CONNECTED> <CONNECTING> <DISCONNECTED>...
-
Page 118: Chapitre 6. Entretien Courant ◎ Nettoyage De La Tête D'impression Thermique Et Du Rouleau
Chapitre 6. Entretien courant ◎ Nettoyage de la tête d'impression thermique et du rouleau En utilisant la technologie de transfert thermique, entretien quotidien n’est pas vraiment nécessaire si l'imprimante a été utilisé correctement. Toutefois, afin de maintenir la meilleure qualité d'impression, il est fortement recommandé de nettoyer la tête thermique et les rouleaux régulièrement. -
Page 119: Chapitre 7. Traitement Des Messages D'erreur ◎ Message D'erreur Et Actions Correctives
Chapitre 7. Traitement des messages d'erreur ◎ Message d'erreur et actions correctives Message LCD État Action corrective 0100 Ouverture capot Le capot avant est ouvert Fermez le capot avant 0101 Échec de l'ouverture Le capot avant n'est pas Appuyez à nouveau sur le bouton capot ouvert pour réinitialiser l'erreur... -
Page 120: Symptômes Des Panes
◎ Symptômes des pannes Lors de la détection d'un symptôme de panne, vérifiez l'imprimante en fonction du tableau suivant. Symptôme Action L'appareil n'est pas sous Vérifiez si le câble d'alimentation est branché à la prise tension électrique et à l'imprimante L'ordinateur ne reconnaît pas Vérifiez si le câble USB est raccordé... - Page 121 Vérifiez le "chemin" du papier 1.2.3. pour retirer le papier coincé. * Attention: Pour éviter d'endommager l'imprimante, s'il vous plaît ne tirez pas sur le papier brusquement. Coupez le papier plié ou la section imprimé avec des ciseaux. Lorsque le papier est plié à l'intérieur de l'imprimante, tirez-le doucement et lentement.
-
Page 122: Alimentation Électrique Interrompue Pendant L'impression
* Attention: Si le papier est utilisé sans couper la section pliée ou imprimée, un bourrage papier se produit à chaque fois ou le ruban peut casser net pendant l'impression. Coupez toujours la section plissée ou imprimée du papier. * Attention: Découpez le papier droit et à angles droits dans le sens du rouleau de papier. *... -
Page 123: Chapitre 8. Spécification
Chapitre 8. Spécification ◎ Spécification Nom du modèle HiTi P530D Méthode d'impression Transfert thermique à diffusion de colorant (Technologie D2T2) Résolution 300 x 300 dpi Format et capacité 4” x 6” (102 x 152mm): 250 impressions (Impression recto verso) d'impression 6”... - Page 124 Benutzerhandbuch V_0.1...
- Page 125 Inhalt Erklärungen zur Richtlinienkonformität-------------------------------------------------------------------2 Kapitel 1. Wichtige Sicherheitsanweisungen ◎ Sicherheitsanweisungen-------------------------------------------------------------------------------4 ◎ Umgebung-------------------------------------------------------------------------------------------------4 ◎ Hinweise zum Umgang mit dem Drucker----------------------------------------------------------5 ◎ Hinweise zum Umgang mit Verbrauchsmaterialien und Ausdrucken-----------------------7 Kapitel 2. Zubehör ◎ Zubehörartikel---------------------------------------------------------------------------------------------8 Kapitel 3. Vorstellung der Basisfunktionen ◎ Aussehen----------------------------------------------------------------------------------------------------9 ◎ Komponenten und ihre Funktion----------------------------------------------------------------------10 Kapitel 4.
-
Page 126: Erklärungen Zur Richtlinienkonformität
Erklärungen zur Richtlinienkonformität Nutzer in Amerika FCC, Teil 15 Bei einem Digitalgerät oder Peripherie der Klasse A sollte die Bedienungsanleitung für den Nutzer an einer auffälligen Stelle im Text die folgende oder eine ähnliche Erklärung aufweisen. Dieses Gerät wurde getestet und als mit den Grenzwerten für Digitalgeräte der Klasse A gemäß Teil 15 der FCC-Regularien übereinstimmend befunden. - Page 127 FCC-Erklärung zur Hochfrequenz-Belastung: Dieser Sender darf nicht gemeinsam mit jeglichen anderen Antennen oder Sendern installiert oder betrieben werden. Diese Ausrüstung erfüllt die FCC-Hochfrequenzbelastungsgrenzwerte, die für ein unbeaufsichtigtes Umfeld festgelegt wurden. Dieses Gerät sollte bei einem Mindestabstand von 20 Zentimetern zwischen dem Sender und Ihrem Körper installiert und betrieben werden.
-
Page 128: Kapitel 1. Wichtige Sicherheitsanweisungen
Kapitel 1. Wichtige Sicherheitsanweisungen ◎ Sicherheitsanweisungen Diese Anleitung bietet detaillierte Anweisungen zur sicheren Benutzung des Druckers. Bitte lesen Sie vor der Bedienung des Druckers zur Gewährleistung eines ordnungsgemäßen Einsatzes aufmerksam diese Anleitung. ◆ In dieser Anleitung gibt es Hinweise, die besondere Aufmerksamkeit erfordern. Zur Gewährleistung Ihrer Sicherheit während des Betriebs werden folgende Sicherheitshinweise unterteilt: Warnung: Unsachgemäße Handhabung kann lebensgefährliche oder ernsthafte... - Page 129 : Stellen Sie den Drucker nicht an einem feuchten oder staubigen Ort auf. Andernfalls können Brände, Stromschläge und Druckerprobleme auftreten. Stellen Sie den Drucker nicht an staubigen, sandigen oder sehr feuchten Orten auf, wie bspw. in Badezimmern, Saunen oder im Freien. : Stellen Sie den Drucker nicht auf wackeligen und/oder geneigten Oberflächen auf.
- Page 130 : Bitte seien Sie beim Transportieren auf rutschigen Böden besonders vorsichtig. : Bitte stellen Sie vor dem Transport sicher, dass das Gerät abgeschaltet und das Netzkabel vom Drucker getrennt ist. : Falls der Drucker während des Transports herunterfällt, lassen Sie ihn von Ihrem HiTi-Händler oder vom Kundendienst prüfen.
- Page 131 : Dieses Produkt muss während des Betriebs stets geerdet sein; verwenden Sie ausschließlich das angegebene bzw. das mit diesem Produkt gelieferte Netzkabel. Falls das Produkt ohne Erdung verwendet wird, drohen Verluststrom, Brände und Stromschläge; außerdem kann der Signalempfang von Radios, Fernsehern und ähnlichen Elektrogeräten gestört werden.
-
Page 132: Kapitel 2. Zubehör
Kapitel 2. Zubehör Bitte stellen Sie vor Inbetriebnahme des Druckers sicher, dass Sie Kapitel 1. Wichtige Sicherheitsanweisungen vollständig gelesen und verstanden haben. ◎ Zubehörartikel Papierflansch Abfallbehälter Netzkabel USB-Kabel Garantiekarte Kurzanleitung Treiber-CD *Bitte beachten Sie, dass das Zubehör von Region zu Region variieren. -
Page 133: Kapitel 3. Vorstellung Der Basisfunktionen ◎ Aussehen
Kapitel 3. Vorstellung der Basisfunktionen ◎ Aussehen < Ansicht von vorn > < Ansicht von hinten >... -
Page 134: Komponenten Und Ihre Funktion
(10) < Geräteinneres > ◎ Komponenten und ihre Funktion Name Funktion Abdeckung Taste zum Öffnen der Frontabdeckung drücken Bedienfeld Vier Taste und ein monochromes LCM zum Steuern und Überwachen des Druckerzustandes Druckausgabeschlitz Der Schlitz aus dem die Druckausgabe sowie Papierreste heraus kommen Abfallbehälter Regelmäßig leeren, bevor er vollständig gefüllt ist USB-Port (Typ A) -
Page 135: Kapitel 4. Installation Und Bedienung
◎ Installation Beachten Sie beim Einstecken des Kabels die folgenden Sicherheitshinweise. 4.1 Netzkabel an der Rückseite des P530D (wie abgebildet) und einer Steckdose anschließen : Achten Sie darauf, den Drucker vor Anschluss an die Stromversorgung abzuschalten. : Achten Sie darauf, dass Netzkabel nicht mit feuchten oder gar nassen Händen anzuschließen oder zu trennen. -
Page 136: Bedienung
◎ Anschließen des USB-Kabels Verbinden Sie das USB-Kabel mit Drucker und PC/Notebook. 4.2 Verbinden Sie das USB-Kabel des Computers mit der USB-Anschlussbuchse an der Rückseite des Druckers (links) : Bitte stellen Sie vor Zeihen des USB-Kabels sicher, dass der Drucker alle internen Vorgänge abgeschlossen hat. -
Page 137: Farbband/Papier Installieren
◎ Farbband/Papier installieren 4.5.1 Befestigen Sie den Papierflansch auf beiden Seiten der Papierrolle. Entfernen Sie das auf dem Papier befindliche Siegel und stellen Sie sicher, dass das vordere Ende des Papiers heraufgezogen wurde. 4.5.2 Drücken Sie die Taste auf der hinteren Papierhalterung, um diese zu öffnen. - Page 138 4.5.5 Ziehen Sie die hintere Papierhalterung in die ursprüngliche Position zurück, bis ein Klicken zu hören ist. Loading Ink Ribbon 4.6 Anweisungen zum Einlegen des Farbbandes Spannen Sie das Farbband und legen es in der richtigen Position ein. * Achtung: Bitte achten Sie darauf, dass sich der weiße Kopf an der weißen Vertiefung und der schwarze Kopf an der schwarzen Vertiefung befindet.
-
Page 139: Drucker Transportieren
◎ Drucker transportieren Folgende Warnhinweise müssen beim Transportieren des Druckers beachtet werden. Bitte halten Sie sich an die Anweisungen, da ein unsachgemäßer Transport Druckerfehler verursachen kann. Entfernen Sie vor dem Transport Farbband und Papier aus dem Drucker. Falls Farbband und Papier aufgrund eines Fehlers nicht entfernt werden können, wenden Sie sich an Ihren HiTi-Händler oder den Kundendienst. -
Page 140: Kapitel 5. Bedienfeld Und Druckerstatus
Kapitel 5. Bedienfeld und Druckerstatus (1) (2) Name Funktion Linkstaste Mit dieser Taste die gewünschte Einstellung wählen Menütaste Mit dieser Taste den Druckerstatus anzeigen Rechtstaste Mit dieser Taste die gewünschte Einstellung wählen EXEC-Taste Mit dieser Taste Papierschnitt ausführen LCD-Anzeige Siehe nachstehende Tabelle Das LCD-Display (5) zeigt den Druckerstatus wie folgt an. -
Page 141: Nutzereinrichtungsmodus
◎ Nutzereinrichtungsmodus Drücken Sie zur Festlegung des Nutzereinrichtungsmodus im Bereitschaftsmodus die Menü-Taste. Wenn die Menü-Taste gedrückt wird, ändert sich die Anzeige wie folgt. PRINTER READY <6X8> menu PRINTS MADE Alle Drucke anzeigen TOTAL [00100] menu MEDIA LEFT Verbleibende Drucke (verfügbare Drucke) <6X8>... - Page 142 Wireless-Modus einstellen Drücken Sie [[[MENU]]] bis zur Seite “WIRELESS STATUS”. Es gibt drei Drahtlos-Einstellungen wie unten angegeben. Folgen Sie den untenstehenden Anweisungen um den Wireless-Modus einzurichten. WIRELESS STATUS WIRELESS STATUS WIRELESS STATUS <CONNECTED> <CONNECTING> <DISCONNECTED> [EXEC] [EXEC] Aktuelle Einstellungen der drahtlosen Überprüfen Sie, ob Wireless-USB-Dongle CURRENT MODE...
-
Page 143: Kapitel 6. Regelmäßige Wartung ◎ Thermodruckkopf Und Walze Reinigen
Kapitel 6. Regelmäßige Wartung ◎ Thermodruckkopf und Walze reinigen Durch die Verwendung von Thermotransfer- Technologie , ist die tägliche Wartung nicht wirklich notwendig , wenn der Drucker ordnungsgemäß eingesetzt wird und um die beste Druckqualität zu behalten , ist es sehr empfehlenswert dem Thermokopf und Walze regelmäßig zu reinigen. -
Page 144: Kapitel 7. Umgang Mit Fehlermeldungen
Kapitel 7. Umgang mit Fehlermeldungen ◎ Fehlermeldungen und Korrekturmaßnahmen LCD-Mitteilung Status Korrekturmaßnahme 0100 Abdeckung offen Die Frontabdeckung ist Schließen Sie die offen Frontabdeckung 0101 Abdeckung nicht offen Die Frontabdeckung ist Drücken Sie noch einmal Taste nicht offen und setzen den Fehler zurück 0102 Abfallbehälter offen Die Abfallbehälter ist Schließen Sie die... -
Page 145: Fehlersymptome
◎ Fehlersymptome Prüfen Sie den Drucker bei Erkennung eines Fehlers anhand der nachstehenden Tabelle. Symptom Maßnahme Das Gerät schaltet sich nicht ein Prüfen Sie, ob das Netzkabel richtig an ● Steckdose und Drucker angeschlossen ist Der PC erkennt den Drucker nicht Prüfen Sie, ob das Netzkabel an PC und Drucker angeschlossen ist Der Drucker arbeitet nicht... - Page 146 Prüfen Sie die Papierwege 1, 2 und 3, um gestautes Papier zu entfernen * Achtung: Um Schäden am Drucker zu vermeiden, ziehen Sie das Papier bitte nicht schlagartig an. Schneiden Sie das gefaltete Papier oder die bedruckte Stelle mit einer Schere ab. Wenn das Papier im Inneren des Druckers gefaltet ist, ziehen sie es langsam und vorsichtig heraus.
-
Page 147: Unterbrechung Der Stromversorgung Während Des Druckens
* Achtung: Wenn Sie das Papier verwenden, ohne den zerknitterten oder bedruckten Bereich abzuschneiden, tritt bei jedem Druck ein Papierstau auf; außerdem kann das Farbband reißen. Schneiden Sie den zerknitterten oder bedruckten Bereich des Papiers immer ab. * Achtung: Schneiden Sie das Papier gerade und im rechten Winkel zur Rollenpapierausrichtung ab. *... -
Page 148: Kapitel 8. Technische Daten
Kapitel 8. Technische Daten ◎ Technische Daten Modellname HiTi P530D Druckmethode Farbdiffusion/Thermotransfer (D2T2-Technologie) Auflösung 300 x 300 dpi Druckgröße und 4” x 6” (102 x 152mm): 250 Drucke (Duplexdruck) Kapazität 6” x 6” (152 x 152mm): 125 Drucke (Duplexdruck) 6” x 8” (152 x 203mm): 125 Drucke (Duplexdruck) Druckgeschwindigkeit 4”... - Page 149 Gebruikershandleiding V_0.1...
- Page 150 Inhoud Wettelijke conformiteitsverklaringen-------------------------------------------------------------2 Hoofdstuk 1. Belangrijke veiligheidsrichtlijnen ◎ Veiligheidsinstructies---------------------------------------------------------------------------4 ◎ Omgevingen--------------------------------------------------------------------------------------4 ◎ Hanteringsinstructies---------------------------------------------------------------------------5 ◎ Hanteringsinstructies voor verbruiksproducten en afdrukken-----------------------7 Hoofdstuk 2. Accessoires ◎ Accessoires----------------------------------------------------------------------------------------8 Hoofdstuk 3. Inleiding op de basisfuncties ◎ Uiterlijk---------------------------------------------------------------------------------------------9 ◎ Naam en functie onderdelen-----------------------------------------------------------------10 Hoofdstuk 4. Installatie en bediening ◎...
-
Page 151: Wettelijke Conformiteitsverklaringen
Wettelijke conformiteitsverklaringen Amerikaanse gebruikers FCC Deel 15 Voor een digitaal of randapparaat van Klasse A, moeten de instructies die de gebruiker krijgt, de volgende of een soortgelijke verklaring bevatten die op een opvallende locatie in de tekst van de handleiding is geplaatst. Dit apparaat werd getest en voldoet aan de beperkingen voor een klasse B digitaal apparaat, conform deel 15 van de FCC-voorschriften. - Page 152 Dit apparaat voldoet aan Deel 15 van de FCC-voorschriften. De werking is onderhevig aan de volgende twee voorwaarden: 1) Dit apparaat mag geen schadelijke storing veroorzaken en. 2) Dit apparaat moet elke ontvangen storing aanvaarden, met inbegrip van storing die ongewenste werking van het apparaat kan veroorzaken.
-
Page 153: Hoofdstuk 1. Belangrijke Veiligheidsrichtlijnen
Hoofdstuk 1. Belangrijke veiligheidsrichtlijnen ◎ Veiligheidsinstructies Deze handleiding bevat gedetailleerde instructies voor het veilig gebruik van de printer. Lees deze handleiding aandachtig door voordat u de printer gebruikt om zeker te zijn van een correct gebruik. ◆ In deze handleiding zijn er notities die speciale aandacht vereisen. Voor een veilig gebruik worden de veiligheidsrichtlijnen als volgt onderscheiden: : Verkeerde hantering kan de dood of ernstige letsels veroorzaken. -
Page 154: Hanteringsinstructies
: plaats de printer niet op een vochtige of stofrijke locatie. Hierdoor kan brand, elektrische schok of een printerprobleem worden veroorzaakt. Plaats de printer niet op een plaats waar stof, zand of een hoge vochtigheidsgraad is, zoals in een zwembad, badkamer, warmwaterbron of op straat. - Page 155 : als u de printer verplaatst, moet u de onderkant van de printer vasthouden. Het is sterk aanbevolen de printer door één of twee personen te laten hanteren tijdens het verplaatsen. : weer voorzichtig wanneer u de printer verplaatst via een gladde vloer. : controleer of de voeding is uitgeschakeld en of de voedingskabel is losgekoppeld van de printer voordat u deze verplaatst.
-
Page 156: Hanteringsinstructies Voor Verbruiksproducten En Afdrukken
: dit product moet op elk ogenblik tijdens het gebruik geaard zijn en moet altijd uitsluitend met de opgegeven voedingskabel of met de voedingskabel die bij dit product is geleverd, worden gebruikt. Als het product wordt gebruikt zonder aarding, kan dit leiden tot stroomlekken, brand of elektrisch schok. Er kan ook storing worden veroorzaakt aan de signaalontvangst van radio, tv en andere soortgelijke elektrische apparaten. -
Page 157: Hoofdstuk 2. Accessoires
Hoofdstuk 2. Accessoires Voordat u de printer gebruikt, moet u ervoor zorgen dat u Hoofdstuk 1. Belangrijke veiligheidsrichtlijnen aandachtig en volledig hebt gelezen. ◎ Accessoires Papierflens Afvalopvangbak Voedingskabel USB-kabel Snelle handleiding Garantiekaart Stuurprogramma CD * Let op: de accessoires variëren van regio tot regio. -
Page 158: Hoofdstuk 3. Inleiding Op De Basisfuncties ◎ Uiterlijk
Hoofdstuk 3. Inleiding op de basisfuncties ◎ Uiterlijk < Vooraanzicht > < Achteraanzicht >... -
Page 159: Naam En Functie Onderdelen
(10) < Intern overzicht > ◎ Naam en functie onderdelen Naam Functie Deur Druk op de knop om de voordeur te openen Bedieningspaneel Vier apparaattoetsen en één mono-LCM voor het controleren en bewaken van de status van de printer Print output gleuf De gleuf waaruit de geprinte foto en restpapier uitkomt Afvalopvangbak Maak deze regelmatig leeg voordat de bak te vol raakt... -
Page 160: Hoofdstuk 4. Installatie En Bediening
Sluit een voedingskabel aan die voldoet aan de onderstaande veiligheidsvoorschriften. 4.1 Sluit de voedingskabel van de printer aan op de achterkant van de P530D (zoals weergegeven) en op het stopcontact. : Zorg dat u de voeding van de printer uitschakelt voordat u deze aansluit op de netstroom. -
Page 161: Bedieningsproces
◎ Sluit de USB-kabel Sluit de USB-kabel aan op de printer en pc/laptop voor verder gebruik. 4.2 Sluit de USB kabel van uw computer aan op de USB connector aan de linker achterzijde van de printer. : Voordat u de USB-kabel verwijdert, moet u controleren of alle interne bewerkingen van de printer zijn voltooid. -
Page 162: Lint/Papier Installeren
◎ Lint/papier installeren 4.5.1 Installeer de flenzen aan beide zijde van de papierrol, Verwijder de zegel en verzeker u ervan dat het begin van de papierrol uitgestrekt 4.5.2 Druk op de knop van de achterste papier rack om het papier rack te openen. 4.5.3 Plaats het papier in de papieren rack let hierbij op dat de kleur van de flenzen en die van... - Page 163 4.5.5 Trek de achterste papier rack naar de oorspronkelijke positie totdat u een klik hoort. Loading Ink Ribbon 4.6 Instructies voor het installeren van het lint. Trek aan het lint en laad het in de juiste positie. * Opgelet: dit is een controle op fouten voor de gebruikers.
-
Page 164: De Printer Vervoeren
◎ De printer vervoeren Houd rekening met de volgende waarschuwingen bij het vervoeren van de printer. Omdat een onjuiste vervoermethode een printerfout kan veroorzaken, moet u de juiste methode volgen. 1. Verwijder het lint en papier uit de printer voordat u de printer vervoert. Als het lint of papier niet kan worden verwijderd door een defect, neemt u contact op met een HiTi-dealer of -onderhoudscentrum. -
Page 165: Hoofdstuk 5. Bedieningspaneel En Printerstatus
Hoofdstuk 5. Bedieningspaneel en printerstatus (1) (2) Naam Functie Linkerknop Gebruik deze knop om de voorkeursinstelling te selecteren. Manu-knop Gebruik deze knop om de printerstatus weer te geven. Rechterknop Gebruik deze knop om de voorkeursinstelling te selecteren. EXEC-knop Gebruik deze knop voor het snijden van het papier. LCD-scherm Zie onderstaande table. -
Page 166: Gebruikersinstellingsmodus
◎ Gebruikersinstellingsmodus Om de gebruikersinstellingsmodus in te stellen, drukt u in de stand-bymodus op de knop “Menu”. Wanneer op de knop “Menu” wordt gedrukt, verandert het scherm als volgt. PRINTER READY <6X8> menu PRINTS MADE Totale afdrukken TOTAL [00100] menu Resterende afdrukken weergeven (beschikbare MEDIA LEFT afdrukken). - Page 167 Instelling van draadloze modus [MENU] indrukken op de pagina "WIRELESS STATUS." Hieronder staan drie draadloze statussen. Volg de onderstaande instructies voor het instellen van draadloze modus. WIRELESS STATUS WIRELESS STATUS WIRELESS STATUS <CONNECTED> <CONNECTING> <DISCONNECTED> [EXEC] [EXEC] Toon huidige draadloze verbindingsmodus. Controleer of de draadloze CURRENT MODE...
-
Page 168: Hoofdstuk 6. Routinematig Onderhoud ◎ De Thermische Printkop En Rol Reinigen
Hoofdstuk 6. Routinematig onderhoud ◎ De thermische printkop en rol reinigen Door het gebruik van thermal transfer technology, is dagelijks onderhoud van de printer niet noodzakelijk bij normaal gebruik. Echter, om de beste afdrukkwaliteit te houden, is het sterk aan te raden om de thermal head en roller regelmatig schoon te maken. : Onjuiste reiniging van de thermal head kan schade hieraan veroorzaken.Neem u a.u.b. -
Page 169: Hoofdstuk 7. Afhandelen Van Foutberichten
Hoofdstuk 7. Afhandelen van foutberichten ◎ Foutbericht en corrigerende acties LCD-bericht Status Corrigerende actie 0100 Klep open De voorklep is geopend Sluit de voorklep 0101 Openen klep is mislukt De voorklep is niet geopend Druk opnieuw op de knop en herstel de fout 0200 IC-chip ontbreekt Geen RFID-sleutel... -
Page 170: Foutsymptomen
◎ Foutsymptomen Wanneer een foutsymptoom is gedetecteerd, controleert u de printer volgens de onderstaande tabel. Symptoom Actie De voeding schakelt niet in Controleer of de voedingskabel is aangesloten ● op het stopcontact en op de printer. De computer herkent de printer niet Controleer of de USB-kabel is aangesloten op de pc of printer. - Page 171 Controleer de papierbaan 1.2.3 . om vastgelopen papier te verwijderen. * Opgelet :Om schade aan de printer te oorkomen trekt u niet te hardhandig aan het papier. knip het gevouwen papier of geprint gedeelte door met een schaar . Wanneer het papier in de printer is opgevouwen , trek het langzaam en voorzichtig los.
-
Page 172: Stroom Onderbroken Tijdens Afdruk
* Opgelet: Als het papier wordt gebruikt zonder het geplooide of afgedrukte deel af te snijden, treedt er telkens een papierstoring op of kan het lint doorspringen tijdens het afdrukken. Snijd altijd het geplooide of afgedrukte deel van het papier af. *... -
Page 173: Hoofdstuk 8. Specificaties
Hoofdstuk 8. Specificaties ◎ Specificaties Modelnaam HiTi P530D Afdrukmethode Kleursublimatie met thermische overdracht Resolutie 300 x 300 dpi Afdrukgrootte en 4” x 6” (102 x 152mm): 250 afdrukken(Duplex print) -capaciteit 6” x 6” (152 x 152mm): 125 afdrukken(Duplex print) 6” x 8” (152 x 203mm): 125 afdrukken(Duplex print) Afdruksnelheid 4”... - Page 174 Manuale dell'utente V_0.1...
- Page 175 Indice Dichiarazioni sulla conformità alle normative-----------------------------------------------------------2 Capitolo 1. Istruzioni importanti per la sicurezza ◎ Istruzioni per la sicurezza------------------------------------------------------------------------------4 ◎ Condizioni d'uso------------------------------------------------------------------------------------------4 ◎ Istruzioni per la manipolazione-----------------------------------------------------------------------5 ◎ Istruzione per la manipolazione di consumabili e stampe--------------------------------------7 Capitolo 2 Accessori ◎ Accessori----------------------------------------------------------------------------------------------------8 Capitolo 3.
-
Page 176: Dichiarazioni Sulla Conformità Alle Normative
Dichiarazioni sulla conformità alle normative Utenti americani FCC Parte 15 Per un dispositivo o una periferica digitali di classe A, le istruzioni fornite all'utente devono includere dichiarazioni uguali o simili alle seguenti, collocate in un posto chiaramente visibile all'interno del manuale. - Page 177 Comunicazione sull’esposizione alle radiazioni FCC 1. Questo trasmettitore non deve essere posizionato o utilizzato in combinazione ad altre antenne o trasmettitori. 2. Questa apparecchiatura è conforme con i limiti di esposizione alle radiofrequenze previsti per un ambiente non controllato. Questa apparecchiatura deve essere installata e messa in funzione ad una distanza minima di 20 centimetri tra il radiatore ed il proprio corpo.
-
Page 178: Capitolo 1. Istruzioni Importanti Per La Sicurezza
Capitolo 1. Istruzioni importanti per la sicurezza ◎ Istruzioni per la sicurezza Il presente manuale fornisce istruzioni dettagliate per un uso sicuro della stampante. Per garantire un uso corretto, leggere attentamente il manuale prima di utilizzare la stampante. ◆ Nel presente manuale, non sono presenti note che richiedono particolare attenzione. Per questioni di sicurezza, le avvertenze riguardanti la sicurezza sono state divise come segue: Avvertenza: Un uso improprio può... -
Page 179: Istruzioni Per La Manipolazione
: Non collocare la stampante su luoghi instabili e/o luoghi in pendenza. La stampante potrebbe cadere o rovesciarsi provocando lesioni gravi. * Attenzione: Non collocare la stampante in luoghi a basse temperature quali piste da sci, piste da pattinaggio o in luoghi all'aperto esposti alla luce solare diretta. *... - Page 180 : Accertarsi che sia spenta e che il cavo di alimentazione sia rimosso dalla stampante prima del trasporto. : Qualora la stampante cada durante il trasporto, contattare un rivenditore HiTi o il servizio assistenza per un controllo della stampante. L'uso di una stampante con possibili danni senza un controllo adeguato può...
-
Page 181: Istruzione Per La Manipolazione Di Consumabili E Stampe
◎ Istruzione per la manipolazione di consumabili e stampe Prestare attenzione a quanto segue durante la manipolazione dei nastri d'inchiostro, della carta e delle stampe. * Attenzione: Gestione della carta Utilizzare solamente la carta fotografica duplex indicata da HiTi. Non inserire altri tipi di carta n fotografica simplex nella stampante, potrebbero causare la rottura del nastro. -
Page 182: Capitolo 2 Accessori
Capitolo 2 Accessori Prima dell'uso della stampante, accertarsi che sia stato letto e compreso attentamente il Capitolo 1. Istruzioni importanti per la sicurezza. ◎ Accessori Flangia per carta Raccoglitore per gli Cavo di alimentazione Cavo USB scarti Guida rapida Scheda di garanzia CD contenente il driver *Si prega di notare che gli accessori variano da regione a regione. -
Page 183: Capitolo 3. Introduzione Alle Funzionalità Di Base ◎ Aspetto
Capitolo 3. Introduzione alle funzionalità di base ◎ Aspetto < Vista frontale > < Vista posteriore >... - Page 184 (10) < Vista interna > ◎ Parts Name and Function Nome Funzione Sportello Premere il pulsante per aprire lo sportello anteriore Pannello di Quattro tasti hard-key ed un display LCM monocromatico per controllo verificare e monitorare le condizioni della stampante Uscita stampe Porta di uscita dei prodotti di stampa e carta di scarto Raccoglitore per gli...
-
Page 185: Capitolo 4. Installazione E Funzionamento
Collegare il cavo di alimentazione conforme alle normative di sicurezza riportate di seguito. ◎ Installazione 4.1 Collegare il cavo di alimentazione della stampante sul retro di P530D (come mostrato nella figura) e ad una presa di corrente AC. : Accertarsi di spegnere l'alimentazione della stampante prima di effettuare il collegamento alla presa di corrente AC. -
Page 186: Funzionamento
◎ Collegamento del cavo USB Collegare il cavo USB con la stampante ed il PC/laptop per ulteriori funzionalità. 4.2 Connettere il cavo USB dal personal computer al connettore USB nella parte posteriore sinistra della stampante : Prima di effettuare la rimozione del cavo USB, accertarsi che la stampante abbia terminato di funzionare. -
Page 187: Installazione Del Nastro E Della Carta
◎ Installazione del nastro e della carta 4.5.1 Istallare le flange su entrambi i lati del rotolo di carta. Rimuovere il sigillo adesivo dalla carta ed assicurarsi che l'inizio della carta sia rivolto verso l'alto. 4.5.2 Premere il pulsante per aprire lo scomparto posteriore della carta. - Page 188 4.5.5 Tirare lo scomparto posteriore della carta verso la sua posizione iniziale fino a sentire un clic. Installazione del nastro 4.6 Istruzioni per il caricamento del nastro Stendere il nastro e caricarlo in posizione corretta. * Attenzione: A scanso di equivoci, accertarsi di posizionare la testina bianca nella dentellatura bianca e la testina nera nella dentellatura nera.
-
Page 189: Trasporto Della Stampante
◎ Trasporto della stampante Usare le seguenti precauzioni durante il trasporto della stampante. Un metodo di trasporto non corretto provocherà un malfunzionamento della stampante, quindi seguire la procedura corretta. 1. Rimuovere il nastro e la carta dalla stampante prima del trasporto. Se il nastro o la carta non possono essere rimossi a causa di un malfunzionamento, consultare il rivenditore HiTi o il servizio assistenza. -
Page 190: Capitolo 5. Pannello Di Controllo E Stato Della Stampante ◎ Pannello Di Controllo
Capitolo 5. Pannello di controllo e stato della stampante ◎ Pannello di controllo (1) (2) (3) Nome Funzione Tasto sinistro Usare questo tasto per selezionare le impostazioni preferite. Tasto Exec Premere questo tasto per tagliare 4 fogli di carta in modalità “taglio carta manuale”. Premere questo tasto per visualizzare lo stato della Tasto Menu stampante. -
Page 191: Modalità Impostazioni Utente
◎ Modalità impostazioni utente Per impostare la modalità impostazioni utente, premere il tasto "Menu" in modalità di standby. Una volta premuto il tasto "Menu", il display cambierà come segue. PRINTER READY <6X8> menu PRINTS MADE Mostra totale stampe TOTAL [00100] menu MEDIA LEFT Mostra stampe rimanenti (stampe disponibili) - Page 192 Impostare la modalità wireless Selezionare dal [MENU] la pagina “WIRELESS STATUS”. Di seguito sono elencati tre stati di connessione wireless. Seguire le istruzioni riportate per impostare una connessione wireless. WIRELESS STATUS WIRELESS STATUS WIRELESS STATUS <CONNECTED> <CONNECTING> <DISCONNECTED> [EXEC] [EXEC] Mostra modalità...
-
Page 193: Capitolo 6. Manutenzione Ordinaria ◎ Pulizia Delle Testine Termiche Della Stampante E Del Rullo
Capitolo 6. Manutenzione ordinaria ◎ Pulizia delle testine termiche della stampante e del rullo Tramite la tecnologia di trasferimento termico, non occorre una manutenzione quotidiana se la stampante è stata utilizzata correttamente. Tuttavia, per mantenere la qualità di stampa migliore, si consiglia vivamente di pulire regolarmente la testina termica e il rullo. : Una pulizia non corretta della testina termica può... -
Page 194: Capitolo 7. Gestione Dei Messaggi Di Errore
Capitolo 7. Gestione dei messaggi di errore ◎ Error Message and Corrective Actions Messaggio sul display Stato Intervento correttivo 0100 Coperchio aperto Il coperchio anteriore è Chiudere il coperchio anteriore aperto 0101 Impossibile aprire coperchio Il coperchio anteriore Premere di nuovo il tasto per non è... -
Page 195: Malfunzionamenti
◎ Malfunzionamenti Quando viene rilevato un malfunzionamento, effettuare un controllo della stampante secondo quanto riportato nella tabella seguente. Sintomo Intervento Alimentazione assente Verificare se il cavo di alimentazione è collegato alla presa di corrente e alla stampante Il computer non riconosce la Verificare che il cavo USB sia collegato al stampante computer o alla stampante. - Page 196 Seguire il precorso della carta 1.2.3 per rimuovere la carta inceppata * Attenzione: Non tirare la carta con forza per evitare danni alla stampante Usare delle forbici per tagliare la carta piegata o la sezione già stampata. Se la carta è ripiegata dentro la stampante, tirarla lentamente e delicatamente.
-
Page 197: Interruzione Dell'alimentazione Durante La Stampa
* Attenzione: Se si usa la carta senza tagliare la carta piegata o la sezione stampata, la carta continuerà ad incepparsi o il nastro potrebbe spezzarsi durante la stampa. Tagliare sempre la sezione stropicciata o stampata della carta. * Attenzione: Tagliare diritta la carta e con l'angolazione giusta secondo la direzione del rotolo della carta *... -
Page 198: Capitolo 8. Specifiche
Capitolo 8. Specifiche ◎ Specifiche Nome del modello HiTi P530D Metodo di stampa Trasferimento termico a sublimazione (Tecnologia D2T2) Risoluzione 300 x 300 dpi Formato e capacità di 4” x 6” (102 x 152mm): 250 stampe (stampa duplex) stampa 6” x 6” (152 x 152mm): 125 stampe (stampa duplex) 6”... - Page 199 kullanım kılavuzu V_0.1...
- Page 200 ÖNSÖZ Düzenleyici kurum uyum beyanları------------------------------------------------------------------2 Bölüm 1. Önemli Güvenlik Talimatları ◎ Güvenlik---------------------------------------------------------------------------------------------3 ◎ Çevre-------------------------------------------------------------------------------------------------3 ◎ İşleme Alma Talimatları--------------------------------------------------------------------------4 ◎ Sarf Malzemeleri ve Çıktılar için İşleme Alma Talimatları--------------------------------6 Bölüm 2. Aksesuarların ◎ Aksesuarların---------------------------------------------------------------------------------------7 Bölüm 3. Parça Adı ve İşlevi ◎ Görünüm---------------------------------------------------------------------------------------------8 ◎...
-
Page 201: Düzenleyici Kurum Uyum Beyanları
Düzenleyici kurum uyum beyanları Amerika'daki Kullanıcılar FCC Bölüm 15 A Sınıfı dijital cihazlar ve çevre birimler için kullanıcıya sunulan talimatlar aşağıdaki ifadeyi ya da benzer bir ifadeyi içermeli ve bu ifade kılavuz metninde görünür bir alana yerleştirilmelidir. Bu ekipman, FCC Kuralları Bölüm 15 kapsamında test edilmiş ve A Sınıf dijital cihaz sınırlarına uygun bulunmuştur. -
Page 202: Bölüm 1. Önemli Güvenlik Talimatları ◎ Güvenlik
Bölüm 1. Önemli Güvenlik Talimatları ◎ Güvenlik Bu kılavuz, yazıcının güvenli kullanımı ile ilgili ayrıntılı talimatlar sunmaktadır. Lütfen kullanım öncesinde kılavuzu dikkatlice okuyun ve ileride kullanmak ya da yeniden okumak için güvenli bir yerde saklayın. Yazıcıyı güvenli bir şekilde kullanmak için lütfen aşağıdaki hususlara özen gösterin: Aşağıda listelenen simgeler, kullanıcıların fiziksel olarak yaralanmasını... -
Page 203: İşleme Alma Talimatları
: İkaz: Yazıcıyı, küvet, sıcak havuz ya da cadde üzeri gibi ıslak ya da tozlu bir ortama yerleştirmeyin. Bu durum yangına, elektrik çarpmasına ya da yazıcı sorununa neden olabilir. İkaz: Yazıcıyı dengesiz bir yüzey üzerine yerleştirmeyin. Yazıcı düşebilir ya da devrilebilir ve ciddi yaralanmalara neden olabilir. - Page 204 Uyarı: Yazıcıyı kaygan bir zemin üzerinde taşırken lütfen dikkatli olun. Uyarı: Lütfen gücün kapalı olduğundan ve güç kablosunun taşınmadan önce yazıcıdan çıkarıldığından emin olun. Uyarı: Taşıma sırasında, yazıcının düşmesi durumunda, yazıcının denetlenmesi için HiTi bayileriyle veya hizmet merkeziyle irtibata geçin. Yazıcının olası hasarla birlikte, denetim olmadan kullanılması...
-
Page 205: Sarf Malzemeleri Ve Çıktılar Için İşleme Alma Talimatları
Uyarı: Bu ürün, çalışma sırasında her zaman topraklanmış olmalı ve daima bu ürünle birlikte verilen özel güç kablolarıyla beraber kullanılmalıdır. Ürün, topraklama olmadan kullanılırsa ve bir akım kaçağı oluşursa, yangın veya elektrik çarpması görülebilir, bu durum aynı zamanda radyo, televizyon ya da sinyal alıcı benzer elektrikli aletlerde parazite neden olabilir. -
Page 206: Bölüm 2. Aksesuarların
Bölüm 2. Aksesuarların Yazıcıyı kullanmadan önce, Bölüm 1. Önemli Güvenlik Talimatı dikkatlice tamamen okudugunuzdan emin olun. ◎ Aksesuarların Kağıt flanşı Parçacık Alıcı Güç kablosu USB Kablosu Garanti Bilgileri Hızlı kılavuz Ana CD (Sürücü/Kullanıcı kılavuzu) *aksesuarlar bölgeden bölgeye farklılık unutmayın. -
Page 207: Bölüm 3. Parça Adı Ve İşlevi ◎ Görünüm
Bölüm 3. Parça Adı ve İşlevi ◎ Görünüm < Önden Görünüm > < Arkadan Görünüm >... -
Page 208: Parça Adı Ve İşlevi
(10) < İç Görünüm > ◎ Parça Adı ve İşlevi İşlev Açma Düğmesi Ön kapağı açarken bu düğmeye basın. Kontrol düğmeleri, LCD ve yazıcı durumu ekran ışıkları panel üzerinde yer İşletim Paneli alır. Baskı çıktı yuvası Baskı ve Atık kagıt cıkışı. Hazne içindeki atıkları... -
Page 209: Bölüm 4. Kurulum Ve Ayarlar
Bölüm 4. Kurulum ve Ayarlar ◎ Güç Kablosunun Bağlanması Güç kablosunu aşağıdaki güvenlik talimatlarına uygun şekilde bağlayın. 4.1 AC güç prizi ve P530D yazıcının arkasına güç kablosunu (şekilde gösterildiği gibi). Uyarı: Güç kablosunu takmadan önce yazıcının gücünü kapattığınızdan emin olun. - Page 210 Uyarı: Yangına ve elektrik çarpmasına neden olabilecek "yığın halindeki" bağlantılardan kaçının. ◎ USB Kablosunun Bağlanması Daha fazla çalışma için yazıcı ve PC / dizüstü bilgisayar ile USB kablosunu bağlayın. 4.2 Yazıcının sol arka tarafında bulunan USB konnektörüne kişisel bilgisayardan USB kablosunu bağlayın. Uyarı: USB kablosunu çıkarmadan önce, yazıcı...
-
Page 211: Kağıtların Yüklenmesi/ Şerit Yerleştirme
◎ Ön kapağı açın 4.4 Yazıcının kapağını açın Yazıcının ön kapağının sol üst düğmesine basın. * Dikkat: Kapagın dısarı cıkması için yer ayırın. ◎ Kağıtların Yüklenmesi/ Şerit Yerleştirme 4.5.1 Kağıt rulonun her iki tarafına kağıt flanşları takın. Kağıt üzerinde takılı mührünü çıkarın ve kağıdın ön ucu yukarı... - Page 212 4.5.4 Kağıt kenarları dönen manuel sensör yanana dek arka kağıt rafın boşluktan kağıt doğru uzunluğunu gerin. 4.5.5 Bir klik sesi duyulana kadar orijinal konumuna arka kağıt rafı geri çekin. Şerit Yerleştirme 4.6 Yükleme şerit klavuzu Ribonu dogru pozisyonda yerlestirin. * Dikkat: Kullanıcıların control hatasıdır.Lütfen siyah baslıgın sıyaha beyaz baslıgın beyaza geldıgınden emin olun.
-
Page 213: Yazıcının Taşınması
4.7 Ön kapağı kapatın Ribon ve kagıt yuklemesi tamamlandıgında ön kapağı kapatın. Kağıt rulo yüklendiğinde veya değiştirildiğinde, kağıt 4 yaprak otomatik toz ve parmak izi önlemek için atılacaktır. ◎ Yazıcının Taşınması Yazıcının taşınmasında aşağıdaki tedbirlerin alınması gerekmektedir. Yanlış bir taşıma yöntemine başvurulması, yazıcının arızalanmasına neden olabilir, lütfen aşağıdaki doğru talimatları... -
Page 214: Bölüm 5. İşletim Paneli ◎ İşletim Paneli
Bölüm 5. İşletim Paneli ◎ İşletim Paneli (1) (2) (3) İşlev Sol Düğme Tercih edilen ayarı seçmek için bu düğmeyi kullanın. Menü Düğmesi Makine durumunu görüntülemek için bu düğmeye basın. Sağ Düğme Tercih edilen ayarı seçmek için bu düğmeyi kullanın. Yürüt Düğmesi ”Manuel kağıt kesme”... -
Page 215: Kullanıcı Kurulumu Modu
◎ Kullanıcı Kurulumu Modu Kullanıcı Ayar Modunu belirlemek için bekleme modunda Menü düğmesine basın. Menü düğmesine yeniden basıldığında, ekran aşağıdaki gibi değişir. YAZICI HAZIR <6X8> menu ALINAN ÇIKTILAR Toplam baskıyı görüntüle. TOPLAM [00100] menu ORTAMDAN ÇIKILDI Kalan baskıları görüntüle (kullanılabilir baskıları). <6X8>... - Page 216 Kablosuz mod ayarı "KABLOSUZ DURUMU" sayfasının [[[MENU]]]'süne basın. Aşağıda üç kablosuz durum modu vardır. Kablosuz modu ayarlamak için aşağıdaki talimatları takip edin. KABLOSUZ KABLOSUZ KABLOSUZ < BAĞLI > < BAĞLANIYOR> < BAĞLANTI YOK> [EXEC] [EXEC] Mevcut kablosuz bağlantı modlarını göster. Kablosuz USB dongle yazıcıya GÜNCEL MOD...
-
Page 217: Bölüm 6. Rutin Bakım ◎ Termal Başlığın Ve Silindirin Temizlenmesi
Bölüm 6. Rutin Bakım ◎ Termal Başlığın ve Silindirin Temizlenmesi Termal transfer teknolojisinden faydalanılması ile yazıcı düzgün şekilde kullanıldığında, günlük bakım gerekli değildir. Ancak, en iyi yazdırma kalitesini korumak için, Termal Başlığın ve Silindirin düzenli olarak temizlenmesi şiddetle önerilir. : İkaz: Termal başlığın uygun olmayan şekilde temizlenmesi, termal başlığa hasar verebilir. Termal başlığın temizlenmesi ve bakımı... -
Page 218: Hata Mesajı Ve Düzeltici Eylem
Bölüm 7. Hata Mesajlarının İşleme Alınması ◎ Hata Mesajı ve Düzeltici Eylem Hata oluştuğunda, işletim panelinin LCD ekranı üzerinde hata mesajı görüntülenecektir. LCD Mesajı Durum Düzeltici Eylem 0100 Kapak Açık Ön kapak açık. Ön kapağı kapatın. 0101 Kapak açma hatası Ön kapak açılmadı. -
Page 219: Arıza Belirtileri
◎ Arıza Belirtileri Bir hata belirtisi algılandığında, aşağıdaki tabloyu kullanarak yazıcıyı kontrol edin. Belirti Eylem Güç açık durumda değil. Güç kablosunun yazıcıya ve priz yuvasına bağlı olup ● olmadığını kontrol edin. Kişisel bilgisayar, yazıcıyı tanımadı. USB kablosunun kişisel bilgisayara veya yazıcıya bağlı olup olmadığını... - Page 220 Makas katlanmış kağıt veya basılı bölümü kesti. Kağıt yazıcının içine katlandığında, nazikçe ve yavaşça çekin. Arka kağıt sıkışması Arka sıkışması kapağını açın ve sıkışan kağıdı çıkarmak için hafifçe vurun. Ortada kağıt tepsisini geri itin ve Sıkışma kapağını kapatın. * Dikkat: Kağıt katlı ya da basılı kısım kesilmeden kullanılırsa, yeniden kağıt sıkışması oluşur ya da yazdırma işlemi sırasında mürekkep şeridi kopabilir.
-
Page 221: Yazdırma İşlemi Sırasında Güç Kaynağının Kesintiye Uğraması
◎ Yazdırma İşlemi Sırasında Güç Kaynağının Kesintiye Uğraması Yazdırma işlemi sırasında güç kaynağının kesintiye uğraması halinde, Termal Başlık Kağıt silindirine basılı olarak korunacaktır. Uzun bir süre bu durumda kalınması halinde, Kağıt silindirinin şekli eğik olabilir. Bu durumdan kaçınmak için lütfen aşağıdaki talimatları izleyin. 1. -
Page 222: Bölüm 8. Özellikler
Bölüm 8. Özellikler ◎ Özellikler Model Adı HiTi P530D Yazdırma Yöntemi Boya Difüzyonu ile Isıl Transfer Çözünürlük 300 x 300 dpi Baskı Boyutu ve Kapasitesi 4x6 inç (102 x 152 mm) 250 baskı (Çift taraflı baskı) 6x6 inç (152 x 152 mm) 125 baskı... - Page 223 V_0.1...
- Page 225 999/5 EN 623 :2008 EN 60950- :2006 + A : 20 0 + A :2009 + A 2:20 EN30 489- 7 V2. . :2009 EN30 489- .9.2:20 EN300 328 V .7. :2006...
- Page 227 *...
- Page 228 * *...
- Page 229 HiTi * * HiTi...
- Page 230 HiTi * * HiTi * *...
- Page 232 < > < >...
- Page 233 < > HiTi " " " " (10)
- Page 234 P530D...
- Page 236 4.5.1 . .3 Plac...
- Page 237 4.5.5 ◎...
- Page 238 HiTi Ribbon Missing...
- Page 239 (1) (2) EXEC Printer Ready Prints Made Media left Paper cutting FW version Language Selection Initializing Media checking Data Sending System cooling System warm up...
- Page 240 Menu Menu P R I N T E R R E A D Y < 6 X 8 > m e n u P R I N T S M A D E T O T A L [ 0 0 1 0 0 ] m e n u M E D I A L E F T <...
- Page 241 [MENU] ( "WIRELESS STATUS" ( ". W I R E L E S S S T A T U S W I R E L E S S S T A T U S W I R E L E S S S T A T U S <...
- Page 242 ◎ ◎ ◎ ◎...
- Page 243 Cover Open 0100 Cover Open fail 0101 RFID IC chip missing 0200 RFID Ribbon Missing 0201 RFID Ribbon Mismatch 0202 RFID Security Check fail 0203 Ribbon Out 0300 Paper Out 0400 Paper Out 0401 0500 Front Paper Jam 01 0501 Front Paper Jam 02 0502 Rear Paper Jam 01 0503 Front Paper Jam 03 0504 Rear Paper Jam 02...
- Page 245 1.2.3 * * * * HiTi...
- Page 247 HiTi P530D × × × × × × × × × × Mac OSX Windows 2000/XP/Vista/Win7/Win 8 USB 2.0 × × × ×...
- Page 248 TEL: +1-844-319-0099, +1-909-594-0099 FAX: +1-909-598-0011 Latin America HiTi Digital, Inc. Oficina de Enlace en México Pilares 506 Col. Del Valle Del. Benito Juárez CDMX 03100 MÉXICO TEL: +52 (55) 7587-4057 , +52 (55) 7587-4058 ,+52 (55) 7587-4059 ,+52 (55) 7587-4060...
Need help?
Do you have a question about the P530D and is the answer not in the manual?
Questions and answers