Advertisement
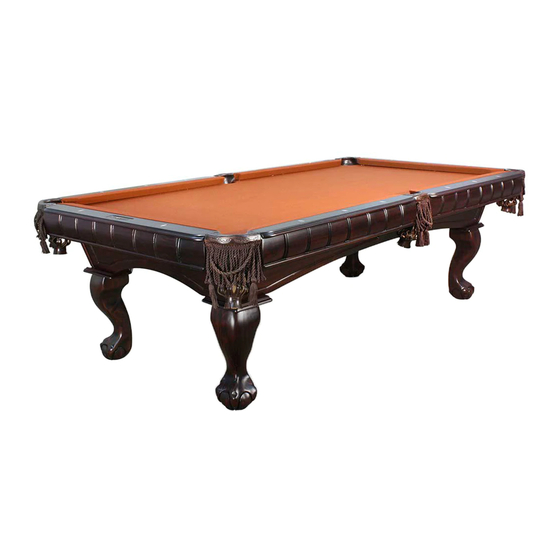
KRUGER BILLIARD TABLE CABINET BUILD-UP INSTRUCTIONS
NOTE: THESE CABINETS CAN BE DISASSEMBLED FOR DIFFICULT INSTALLATIONS.
Tools required by the installer:
Socket wrench 1/2", 9/16"
End wrench 1/2", 9/16"
Phillips screwdriver, #2 & #3
Staple gun to apply felt
½" Drive flex T handle
9/16" Socket (1/2" drive)
3' or 4' Spirit level
Prior to installation of the table please check for damaged or missing parts. Call Presidential Billiards at
866-728-2253 if there is a problem. The hardware is packed in several different packets. Each packet
indicates a step number. This coincides with the steps in this installation instruction and will hopefully
reduce your time to verify what hardware is required where. It is suggested that you retain the bolts in
their respective packets for ease of installation.
STEP 1
ATTACHING THE LEGS TO THE MAIN CABINET
1.1
Turn the cabinet upside down on the floor. (Note: DO NOT pick up table by the wings, they will
break off.)
1.2
Install the hanger bolt in the legs.
TIP:
Jam 2 nuts together on the machine screw end of the hanger bolt and seat to the proper
depth in the leg. A long handled wrench, such as the flex-T socket handle will make this easier.
Ideally, an electric impact wrench with a 9/16" socket could be used. You may choose to install
the hanger bolts in the warehouse before going out to install the table.
1.3
Place the 4 legs in position and loosely bolt in place with the nuts and washers provided.
1.4
Having placed all these components in position, align them so that all joints close tightly.
Tighten the bolts ensuring that the joints remain closed.
1.5
Set the cabinet up on its legs.
1.6
Install the wood screws through the leg bracket holes into the legs and tighten. (Pre-drill with a
5/32" bit.)
!!
CAUTION
Due to the extreme
hardness of the Teak timber, it is
necessary to pre-drill for the installation
of screws in the legs. (3/16"Drill)
1
Advertisement
Table of Contents

Related Manuals for Presidential Billiards KRUGER


Summary of Contents for Presidential Billiards KRUGER
- Page 1 9/16” Socket (1/2” drive) 3’ or 4’ Spirit level Prior to installation of the table please check for damaged or missing parts. Call Presidential Billiards at 866-728-2253 if there is a problem. The hardware is packed in several different packets. Each packet indicates a step number.
- Page 2 Lay out all the rails upside down and install the pockets using the bolts supplied. Keep the rail/pocket joint as tight as possible. WARNING: Use of non-Presidential Billiards pocket bolts will result in damaged rails. Having bolted the U frame rails together turn the rail and pocket assembly right side up and place on the table.
- Page 3 KRUGER BILLIARD TABLE CABINET BUILD-UP HARDWARE Step 1 3/8” – 16 x 4” Hanger bolts NU24461 3/8” Pyramidal tooth washer NE3649 3/8– 16 Hex Nut NU0013 #12– 11 x 1-3/4" Phillips Pan Screw NU0097 Step 2 1/4– 14 x 2-1/2" Phillips Head Screw...
- Page 4 9/16” Socket (1/2” drive) 3’ or 4’ Spirit level Prior to installation of the table please check for damaged or missing parts. Call Presidential Billiards at 866-728-2253 if there is a problem. The hardware is packed in several different packets. Each packet indicates a step number.
- Page 5 Lay out all the rails upside down and install the pockets using the bolts supplied. Keep the rail/pocket joint as tight as possible. WARNING: Use of non-Presidential Billiards pocket bolts will result in damaged rails. Having bolted the U frame rails together turn the rail and pocket assembly right side up and place on the table.
- Page 6 KRUGER BILLIARD TABLE HARDWARE Step 1 3/8” – 16 x 4” Hanger bolts NU24461 3/8” Pyramidal tooth washer NE3649 3/8– 16 Zinc Finish Grade A Finished Hex Nut NU0013 #12– 11 x 1-3/4" Phillips Pan Head Sheet Metal NU0097 Screw Step 2 1/4–...
Need help?
Do you have a question about the KRUGER and is the answer not in the manual?
Questions and answers