Advertisement
Quick Links
Before You Begin:
Product Features
□ Multiple ON/OFF settings for each day of the week, daily cycles, or weekday - weekend cycles
□ Stores up to seven individual programs
□ A Random feature, which turns the lights off and on between 30 minutes before and after the programmed
time, giving the appearance that somebody currently is home
Pre-Installation Requirements
□ This timer requires that your switch box have a neutral wire in order for the timer to operate correctly. If
you open up your switch box and see only two wires, this indicates that your switch box does not have a
neutral wire, and this timer will not work.
□ This timer will work in a single-pole or 3-way installation. It will not work in a 4-way installation.
□ This timer will only work on loads up to 15A.
Safety Information
RISK OF ELECTRIC SHOCK:
… Shut off the power at the fuse box or circuit breaker before installation.
… Do not use in wet locations.
… Use indoors only.
RISK OF ELECTRIC FIRE:
WARNING
… Do not use to control appliances that contain heating elements such as cooking
appliances, heaters, and irons.
… Do not exceed electrical ratings.
… Do not use to control receptacles.
… Use only copper wire with this device.
… Tighten all connections to 1-1.4 N-m (8.85 to 12.39 lbf-in.).
… For supply connections, use 14 AWG or larger wire rated at least 75°C.
… For grounding lead, use 12 AWG or larger wire rated at least 75°C.
Pre-Installation
PREPARING THE TIMER FOR INSTALLATION
a. Remove the timer from the packaging and locate the LINE, LOAD, NEUTRAL, and GROUND
terminals on the back of the timer.
b. Loosen the LINE, LOAD, NEUTRAL, and GROUND screws with either a flathead or Phillips
screwdriver. When loosening screws, stop when you feel resistance.
Installation Terms and Options
WARNING: Shut off power at the fuse box or circuit breaker before performing any wiring or installation.
BASIC WIRING TERMINOLOGY
To better familiarize yourself with the wiring terminology and concepts referenced in this manual, please review the following information before you begin wiring this timer to your switch outlet.
If at any time during the wiring process you become uncertain, please contact a certified electrician.
□ Line: 120VAC (hot) wire that supplies voltage from the breaker box to the wall outlet
□ Load: 120VAC (hot) wire that connects the wall outlet to the device (load) being controlled
□ Neutral: 120V return connection completing the circuit to the breaker box
□ Ground: 120V safety wire providing a path for electricity to be discharged
□ Traveler-1 and Traveler-2: wires running between two 3-way switches for installations where an outlet is controlled by two switches
INSTALLATION OPTIONS
To begin the installation process, you must first know what type of installation is needed. Below are the three different installation options. Please refer to the following descriptions for the installation
instructions that apply to you.
1 Single-Pole Installation (Go to install section 1 on page 2):
This installation option should be used when a switch only controls one outlet from a single location. Typically you would find a single-pole switch in your bedroom or bathroom.
2 3-Way Installation, Load Side (Go to install section 2 on page 2):
This installation option replaces a switch which controls an outlet that can be controlled from two separate switches and in most installations has the common (hot) terminal tied to the
device/load. The switch turns OFF and ON. Typically these types of installations are in stairwells, hallways, and large rooms with multiple access points.
3 3-Way Installation, Line Side (Go to install section 3 on page 2):
This installation option replaces a switch which controls an outlet that can be controlled from two separate switches and in most installations has the common (hot) terminal tied to
120VAC. Typically these types of installations are in stairwells, hallways, and large rooms with multiple accesses points.
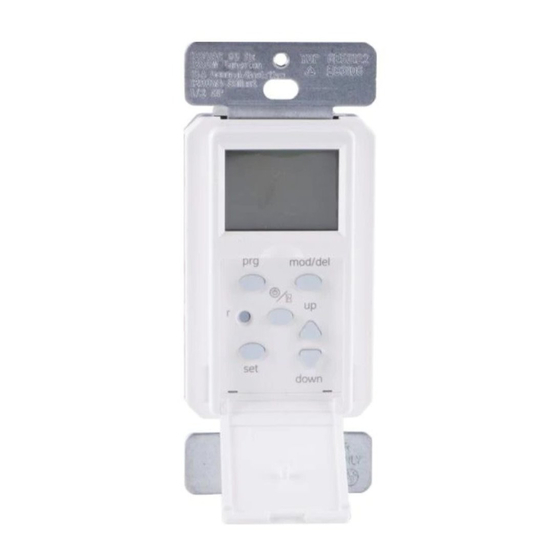
Use and Care Guide
DAYLIGHT ADJUSTING INDOOR DIGITAL TIMER
CHANGING THE FACEPLATE
This device includes a light-almond faceplate. To switch faceplates, complete these steps:
a. Gently remove the white faceplate using a flathead screwdriver. Find the slots at the
b. Find the light-almond faceplate in the package. Place the new faceplate into position
1
Product Specifications
□ Single-pole or 3-way installation
RATINGS
125 VAC,
15A
10A
10A
60 Hz
Resistive
Tungsten
Ballast
Hardware Included
AA - Face Plates x2
BB - Screw x2
(White & Light Almond)
Suggested Tools
Phillips screwdriver
Wire strippers
bottom left or right of the white faceplate and pry the faceplate loose. See Figure 1.
Work around the faceplate until it pops off.
and push the top of the faceplate into position. Then hold the top of the faceplate in
place and push the bottom of the faceplate until it snaps into place.
Figure 1 - Removing the Faceplate
Item #1002-229-532
Model #32648
UPC #030878326483
1/2 HP
Motor
CC - Jumper Wire x2
Wire Nut
(3-way installation only)
Flathead screwdriver
(not included)
HOMEDEPOT.com
Please contact 1-844-871-8796 for further assistance.
Advertisement

Related Manuals for Defiant 32648


Summary of Contents for Defiant 32648
-
Page 1: Safety Information
Use and Care Guide Item #1002-229-532 Model #32648 DAYLIGHT ADJUSTING INDOOR DIGITAL TIMER UPC #030878326483 Before You Begin: Product Features Product Specifications □ Multiple ON/OFF settings for each day of the week, daily cycles, or weekday - weekend cycles □ Single-pole or 3-way installation □... - Page 2 Use and Care Guide Item #1002-229-532 Model #32648 DAYLIGHT ADJUSTING INDOOR DIGITAL TIMER UPC #030878326483 Please reference page 1 to identify the right installation method for your timer and basic wiring terms. Single-Pole Installation WARNING: If you are unsure or unclear about this installation, or if the wires in your box do not match the manual (not all switch boxes have neutral wires), contact a qualified, licensed electician.
-
Page 3: Initial Setup
Use and Care Guide Item #1002-229-532 Model #32648 DAYLIGHT ADJUSTING INDOOR DIGITAL TIMER UPC #030878326483 Programming Instructional Video To view an instructional video on how to program this product: Scan QR code to see video 1. Go to www.homedepot.com and enter either the Item or Model number found in the top right corner of this instruction sheet in the search field. -
Page 4: Troubleshooting
Use and Care Guide Item #1002-229-532 Model #32648 DAYLIGHT ADJUSTING INDOOR DIGITAL TIMER UPC #030878326483 Programming PROGRAMMING THE ON/OFF DAYS PROGRAMMING THE ON/OFF TIME a. Press the PROGRAM (prg) button (A) to begin a. Press UP/DOWN buttons (F) to choose from one of MO TU WE TH FR SA programming times.
Need help?
Do you have a question about the 32648 and is the answer not in the manual?
Questions and answers
D o es it have battery backup?
I was able to program all seven days for the light to come on at 5 PM and go off at 11 PM and it works. However, when I wake up in the morning, the light is on, so how do I fix that issue?
To fix the issue of your Defiant 32648 light turning on in the morning despite programming it for 5 PM to 11 PM, follow these steps:
1. Check the Clock Time – Ensure the timer's clock is set to the correct AM/PM time. If the time is incorrect, the programmed schedule may not work as expected.
2. Verify Dusk and Dawn Settings – Make sure the dusk and dawn times are not reversed, as this could cause the light to turn on at unintended times.
3. Check for Conflicting Programs – Scroll through all seven programs to see if any other programmed schedule is conflicting with your 5 PM to 11 PM setting. Delete or adjust any conflicting settings.
4. Reset the Timer – If the issue persists, perform a reset by pressing and holding the reset button with a small pin. Then, reprogram the timer from the beginning.
5. Ensure Proper Wiring – If the timer is controlling lights all day unexpectedly, check the jumper wiring and make sure it is correctly set up.
Following these steps should resolve the issue.
This answer is automatically generated
Does the unit have a backup battery? If power is lost, will it loose its settings? Have a Defiant model 32648
Is there a battery in these that needs to be replaced? If so, how? My switches worked fine until recently. Now, when I lose power to the house I lose the programming and have to reprogram them.
I have two of these timers. One for the front porch lights and one for the lamppost. The porch light timer does not work anymore. I have to manually turn it on. I have reprogrammed it several times and it still will not work. Do I need a new one or can an electrician fix a wire? It is only 2 years old. The lamppost timer works fine.
I want to manually turn it off and on and I can not get the timer to shut off.
I have just had three timers installed. The lights switch on and off manually just fine but I have now tried to program for AUTO - same program all 7 days and believe I have done it correctly but the timers do not work at all. If I turn on the lights they stay on until I manually turn them back off. If they are off they stay off until I manually turn them on. What’s up?