Table of Contents
Advertisement
Quick Links
Advertisement
Table of Contents

Related Manuals for Micronics U1000MKII FM


Summary of Contents for Micronics U1000MKII FM
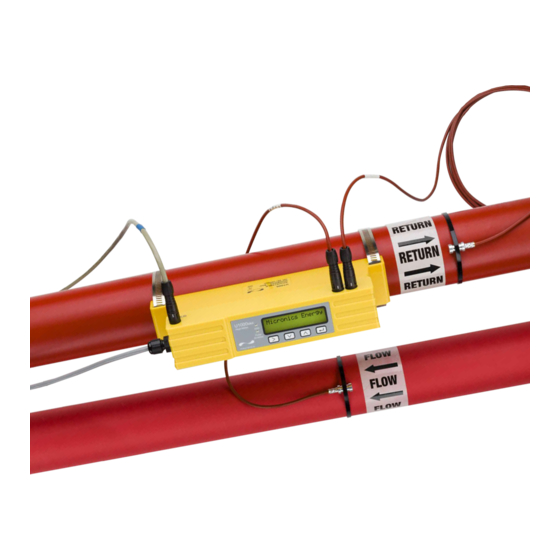
- Page 1 Micronics U1000MKII-FM User Manual U1000MKII FM Ultrasonic Flowmeter User Manual Micronics Ltd, Knaves Beech Business Centre, Davies Way, Loudwater, High Wycombe, Bucks HP10 9QR Telephone: +44(0)1628 810456 E-mail: sales@micronicsltd.co.uk www.micronicsflowmeters.com Issue 2.0 June 18 Page 1...
-
Page 2: Table Of Contents
Micronics U1000MKII-FM User Manual Contents General Description ............................3 Quick start procedure ........................... 4 How does it work? ............................5 User interface ............................... 6 Key switches ............................6 Installing the U1000MKII-FM ........................7 Preparation ............................8 Sensor separation ..........................8 Adaptors for small pipes ........................ -
Page 3: General Description
Micronics U1000MKII-FM User Manual 1 General Description • Fixed installation, clamp-on flowmeter • Easy to install • Requires the minimum of information to be entered by the user • Both the electronics and guide rail housings form an integral unit •... -
Page 4: Quick Start Procedure
Micronics U1000MKII-FM User Manual 2 Quick start procedure The following procedure details the steps required to set up the flow meter. See the sections referred to if you are unsure about how to install the instrument. 1. Wire the electronics up to a 12 to 24V ac or dc power supply (7VA minimum per instrument) via the Blue and Brown wires. -
Page 5: How Does It Work
Micronics U1000MKII-FM User Manual 3 How does it work? The U1000MKII-FM is a clamp-on, ultrasonic flowmeter that uses a cross correlation transit time algorithm to provide accurate flow measurements. Figure 1 Principle of Transit-Time operation An ultrasonic beam of a given frequency is generated by applying a repetitive voltage pulse to the transducer crystals. -
Page 6: User Interface
Micronics U1000MKII-FM User Manual 4 User interface Figure 2 illustrates the U1000MKII-FM user interface comprising:- • One 2 line x 16 character LCD with backlight • Four tactile key switches • Two LEDs Figure 2 U1000MKII-FM User Interface 4.1 Key switches >... -
Page 7: Installing The U1000Mkii-Fm
Key Point: Do not expect to obtain accurate results if the transducers are positioned close to any obstruction that distorts the uniformity of the flow profile. Micronics Ltd accepts no responsibility or liability if product has not been installed in accordance with the installation instructions applicable to the product. -
Page 8: Preparation
Micronics U1000MKII-FM User Manual 5.1 Preparation 1. Before attaching the transducers first ensure that the proposed location satisfies the distance requirements shown in Figure 3 otherwise the resulting accuracy of the flow readings may be affected. 2. Prepare the pipe by degreasing it and removing any loose material or flaking paint in order to obtain the best possible surface. - Page 9 Micronics U1000MKII-FM User Manual The diagram below shows how to adjust the separation of the sensors Figure 5 Separation Setting NOTE. When the sensors have been moved to the correct setting and the guide rail is attached to the pipe REMOVE the sensor holding screws, which will allow the spring loaded transducers to make contact with the pipe.
-
Page 10: Adaptors For Small Pipes
Micronics U1000MKII-FM User Manual 5.3 Adaptors for small pipes Less than 40mm outside diameter 40 to 60mm outside diameter Greater than 60mm outside diameter Figure 6 Pipe Adaptors Adaptors are supplied for use on small pipes. The diagrams above show how these are fitted around the pipe. -
Page 11: Attaching The U1000Mkii-Fm To The Pipe
Micronics U1000MKII-FM User Manual 5.4 Attaching the U1000MKII-FM to the pipe After applying the Gel pads centrally on the sensors, then follow the four steps shown in Figure 7 below to attach the U1000MKII-FM to the pipe. Remove the covers from the Gel pads. -
Page 12: U1000Mkii-Fm Interface Cables
Micronics U1000MKII-FM User Manual 5.5 U1000MKII-FM Interface Cables The U1000MKII-FM interface cable supplied is a 6-core cable for power, 4-20mA and pulse output connections and a separate 4 core plug-in cable for the Modbus connections. The un-insulated wire is the connection to the screen of the cable and should be earthed for full immunity to electrical noise. -
Page 13: Pulse Output Connection
Micronics U1000MKII-FM User Manual 5.7 Pulse Output connection The isolated pulse output is provided by a SPNO/SPNC MOSFET relay which has a maximum load current of 500mA and maximum load voltage of 48V AC. The relay also provides 2500V isolation, between the sensor’s electronics and the outside world. -
Page 14: Powering Up For The First Time
Micronics U1000MKII-FM User Manual 6 Powering up for the first time Powering up for the first time will initiate the sequence shown in Figure 9: Figure 9 Initial power up screens 1. The start-up screen is displayed for 5 seconds. -
Page 15: How To Enter The Pipe Id
Micronics U1000MKII-FM User Manual Please note: There is little available data on the specific heat capacity (K factor) for water glycol mixes and there is no practical method of determining the percentage of glycol in a system or the type of glycol in use. The calculations are based on a Water/Ethylene glycol mix of 30%. -
Page 16: Pulse Output
Micronics U1000MKII-FM User Manual > Press key to move to the units digit (050.0). The units digit should now blink. Increment or decrement the units digit in an identical manner to the tens digit described above. Press > key to move to the decimal digit (050.0). The decimal digit should now blink. -
Page 17: Flow Alarm - High/Low Flow Or Signal Loss
Micronics U1000MKII-FM User Manual US gallons/minute multiply by 0.06309 US gallons/hour multiply by 0.00105 Imperial gallons/minute multiply by 0.07577 Imperial gallons/hour multiply by 0.001263 6.2.3 Flow Alarm - Low Flow or Signal loss It is possible to use the pulse output as a High/Low Flow Alarm or a Signal Loss Alarm. -
Page 18: Modbus
Micronics U1000MKII-FM User Manual 6.4 Modbus(if fitted) The Modbus RTU interface is configured via the Modbus sub menu in the password controlled menu. The data rate can be selected in the range 1200 to 38400 baud. The address can be set in the range 1 to 126. - Page 19 Micronics U1000MKII-FM User Manual 0x41 40015 Units in Degrees Celsius for 0x98 iee754 Measured Temperature (Hot) Metric Units in Degrees 0x00 Fahrenheit for Imperial 40016 0x00 0x41 40017 Units in Degrees Celsius for 0x88 iee754 Measured Temperature (Cold) Metric Units in Degrees...
-
Page 20: Subsequent Power-On Sequence
Micronics U1000MKII-FM User Manual 7 Subsequent Power-ON Sequence If the power supply is cycled OFF/ON after the unit is in the flow reading screen all subsequent start-ups will use the same configuration as was previously entered. If the configuration needs to be changed for any reason, the user can make use of the password-controlled menu as described in section 8. -
Page 21: Data Entry Menus
Micronics U1000MKII-FM User Manual 9.1.2 Data entry menus Menus containing a numeric value can be altered using the following procedure. For example, consider changing the Flow at maximum current from the default setting 1000 litres as indicated in Figure 13 to 1258 litres. - Page 22 Micronics U1000MKII-FM User Manual PASSWORD CONTROLLED MENUS Sig: 87% l/min 246.3 Invalid & OR No input for 10 seconds Enter Password: ***** Setup Menu User Menu: Setup Pulse Output Menu User Menu: Pulse Output User Menu: Comms Output Menu ...
- Page 23 Micronics U1000MKII-FM User Manual SETUP MENU Range 0.79 – 6.50 1.969 inches Select Dims: mm | inches Invalid Inches & & mm & Invalid & Range 20 – 165mm Enter Pipe ID: Enter Pipe ID: 050.0 mm 050.0 mm...
- Page 24 Micronics U1000MKII-FM User Manual PULSE OUTPUT MENU Select Pulse: Off & OFF | ON On & Pulse Type: Volume/Flow Alarm/ Frequency Select Level or Freq & Volume & Sig loss & Max Pulse Freq: Volume per Pulse: Flow Alarm: 010.000 Units...
- Page 25 Micronics U1000MKII-FM User Manual CURRENT OUTPUT MENU (IF FITTED) Select 4-20mA: ON | OFF ON & Flow @ 20mA 1000.0 OFF & Valid & Flow @ 4mA 0000.0 Valid & Figure 17 4-20mA Menu MODBUS SETUP MENU Invalid &...
- Page 26 Micronics U1000MKII-FM User Manual CALIBRATION MENU Damping Time [s] Select 10, 20, 30, 50 or 100 sec Invalid & Zero Cut-off: Range 0.00 – 0.50 0.02 m/s 0.02 m/s Valid & v To Set Zero Offset: Zero Offset: ^ To Clear Averaging…9...
-
Page 27: Diagnostics Menu
Micronics U1000MKII-FM User Manual 10 Diagnostics Menu The diagnostics menu provides some additional information about the flowmeter and its setup. The menu > can be accessed by pressing the key from the main flow-reading screen. The menu shown below describes the various diagnostics items. -
Page 28: Relocation Of Guide Rail
Micronics U1000MKII-FM User Manual 11 Relocation of guide rail If it is necessary to relocate the guide rail and sensor assembly use the following procedure. 1. Remove complete assembly from the pipe. 2. Undo the screw at the end of the guide rail and gently lift the same end as shown. -
Page 29: Appendix I - U1000Mkii-Fm Specification
Micronics U1000MKII-FM User Manual 12 Appendix I – U1000MKII-FM Specification Table 1 lists the U1000MKII-FM Product Specification. General Measuring Technique Transit time Measurement channels Timing Resolution ±50ps Turn down ratio 200:1 Flow velocity range 0.1 to 10m/s Applicable Fluid types or up to Clean water with <... -
Page 30: Appendix Ii - Default Values
Micronics U1000MKII-FM User Manual Weight 0.5kg Environmental Maximum Pipe temperature 0°C to 85°C Operating temperature 0°C to 50°C (Electronics) Storage temperature -10°C to 60°C Humidity 90% RH at 50°C Max Display 2 line x 16 characters Viewing angle Min 30°... -
Page 31: Appendix Iii - Error And Warning Messages
Micronics U1000MKII-FM User Manual 14 Appendix III – Error and Warning Messages Error Messages Error Messages are displayed as a number in the diagnostics menu. Contact Micronics if other messages appear. Common Error Message Error Message Error Meaning None or 0... - Page 32 Micronics U1000MKII-FM User Manual Modbus Error Messages (if Modbus fitted) Transmitter Test case CRC-16 Address Command Start Register Length (no of registers) [2 bytes] [2 bytes] [1 byte] [1 byte] [2 bytes] No error 0x01 0x03 0x00 0x00 0x00 0x20...
- Page 33 Micronics U1000MKII-FM User Manual 3. When programming a Frequency Pulse output the frequency is limited to the range 1 to 200 Hz. If an invalid value is entered then the following warning message is displayed. Range 1 - 200 4. When programming a Volume Pulse output the pulse width is limited to the range 3 to 99ms. If an invalid value is entered then the following warning message is displayed.
-
Page 34: Declaration Of Conformity
Micronics U1000MKII-FM User Manual 15 Declaration of Conformity Issue 2.0 June 18 Page 34...
Need help?
Do you have a question about the U1000MKII FM and is the answer not in the manual?
Questions and answers