
Subscribe to Our Youtube Channel
Related Manuals for Kohler C3-225


Summary of Contents for Kohler C3-225
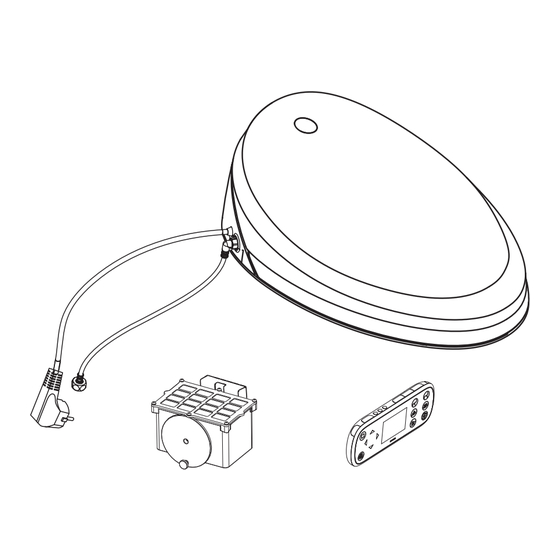
- Page 1 Installation Guide -225 Toliet Seat with Bidet Functionality คู ่ ม ื อ การติ ด ตั ้ ง ฝารองนั ่ ง พร้ อ มอุ ป กรณ์ ช ำ า ระ รุ ่ น C -225 K-4736X ©2012 Kohler Co. 1103349-X2-C...
-
Page 2: Before You Begin
Thank you for choosing Kohler. Kohler craftsmanship offers you a rare combination of proven performance and graceful sophistication that will satisfy you for years to come. The dependability and beauty of your Kohler product will surpass your highest expectations. We’re very proud of our products here at Kohler and we know you will be too. -
Page 3: Tools And Materials
All information in these instructions is base on the latest product information ¨ available at the time of publication. Kohler Co. reserves the right to make changes at any time without notice. Do not use an extension cord with the product. - Page 4 Position a container under the fill valve to catch any excess water. ¨ Disconnect the water supply hose from the toilet fill valve. ¨ Ensure that there are no obstracles within 25 cm in front of the toilet. ¨ 1103349-X2-C Kohler Co.
-
Page 5: Install The Mounting Plate
Insert a bolt through the mounting plate and the toilet mounting holes. ¨ Position the washers so they rest in the grooves of mounting plate. ¨ Thread a nut onto each of the bolts. Handtighten the nut. ¨ Kohler Co. 1103349-X2-C... -
Page 6: Install The Seat
No need to remove the seat for seat position adjustment, as shown in ¨ Fig 2. Adjust the position seat and mounting plate only by loosening nuts and tightening nuts when they are adjusted to properly align the seat. 1103349-X2-C Kohler Co. -
Page 7: Connect The Water Supply
Connect the T-valve to the toilet seat with the supplied hose. ¨ Connect the water supply to the T-valve. ¨ Turn on the water supply. ¨ Check all connections for leaks and make any adjustment as needed. ¨ Kohler Co. 1103349-X2-C... - Page 8 Install the screw covers on the screws. ¨ Place the remote controller on the holder. ¨ NOTE: If the wall for installation is made of special material (such as wood board, density board and etc.), suitable fixing methods shall be adopted. 1103349-X2-C Kohler Co.
- Page 9 Rotate the auto flush dial manually. Ensure the dial can lift up the sealing ¨ float completed in the rotation to achieve best flushing effect. Press key to double confirm the flushing mechanism works smoothly. ¨ Cover the tank cover properly. ¨ Kohler Co. 1103349-X2-C...
-
Page 10: Installation Checkout
Place one piece of dampened cloth or wet tissue in the seat inductive area to ¨ imitate the status of seat taking. Verify the function of flushing (refer to the homeowner’s guide). Make sure to take away the cloth or tissue in the seat inductiue area after ¨ normality confirmation. 1103349-X2-C Kohler Co. - Page 11 ข้ อ ควรระวั ง อั น ตร�ยที ่ เ กิ ด จ�กกระแสไฟฟ้ � คว�มเสี ่ ย งที ่ อ �จทำ � ให้ ผ ลิ ต ภั ณ ฑ์ ชำ � รุ ด อย่ � ให้ ผ ลิ ต ภั ณ ฑ์ เ ปี ย กนำ ้ � Kohler Co. 1103349-X2-C...
- Page 12 ถ้ � ไม่ ม ี ก �รใช้ ง �นฝ�รองนั ่ ง เป็ น เวล�น�นให้ ถ อดปลั ๊ ก ไฟ แล้ ว ปล่ อ ยนำ ้ � ที ่ ค ้ � งในสุ ข ภั ณ ฑ์ อ อก ¨ เครื ่ อ งมื อ ประแจเลื ่ อ น ไขควงแฉก สว า น ไขควงปากแบน 1103349-X2-C Kohler Co.
- Page 13 ถอดส�ยนำ ้ � ดี อ อกจ�กว�ล์ ว นำ ้ � ¨ ให้ แ น่ ใ จว่ � ไม่ ม ี ส ิ ่ ง กี ด ขว�งในพื ้ น ที ่ 25 ซม. จ�กด้ � นหน้ � โถสุ ข ภั ณ ฑ์ ¨ Kohler Co. 1103349-X2-C...
- Page 14 ให้ ม ั ่ น ใจว่ � แหวนรอง อยู ่ ใ นร่ อ งฐ�นยึ ด ของโถสุ ข ภั ณ ฑ์ ¨ สวมนอตเข้ � กั บ โบลท์ ขั น ให้ แ น่ น ด้ ว ยมื อ ¨ 1103349-X2-C Kohler Co.
- Page 15 ไม่ ต ้ อ งถอดชุ ด ฝ�รองนั ่ ง ออก ดั ง ภ�พแสดงในรู ป ที ่ 2 ก�รปรั บ ตำ � แหน่ ง ฝ�รองนั ่ ง และ ¨ ฐ�นยึ ด ทำ � ได้ โ ดยคล�ยนอตออก จั ด ตำ � แหน่ ง ชุ ด ฝ�รองนั ่ ง และขั น นอตให้ แ น่ น Kohler Co. 1103349-X2-C...
- Page 16 ต่ อ ส�ยนำ ้ � ดี เ ข้ � กั บ ว�ล์ ว ส�มท�ง ¨ เปิ ด ว�ล์ ว นำ ้ � ¨ ตรวจสอบข้ อ ต่ อ ทุ ก ชิ ้ น ห�กพบก�รรั ่ ว ซึ ม ให้ ท ำ � ก�รแก้ ไ ข ¨ 1103349-X2-C Kohler Co.
- Page 17 ข้ อ สั ง เกต ถ้ � ผนั ง ทำ � ม�จ�กวั ส ดุ อ ื ่ น อย่ � งเช่ น ไม้ , ผนั ง สำ � เร็ จ รู ป , ฯลฯควรพิ จ �รณ�วิ ธ ี ก �รติ ด ตั ้ ง ให้ เหม�ะสม Kohler Co. 1103349-X2-C...
- Page 18 ต�มจั ง หวะก�รหมุ น เพื ่ อ ประสิ ท ธิ ภ �พของก�รชำ � ระ กดปุ ่ ม เพื ่ อ ยื น ยั น ว่ � อุ ป กรณ์ ช ำ � ระทำ � ง�นปกติ ¨ ปิ ด ฝ�ถั ง พั ก นำ ้ � ¨ 1103349-X2-C Kohler Co.
- Page 19 ระบบก�รชำ � ระ (ดู ค ู ่ ม ื อ ก�รดู แ ลรั ก ษ�) นำ � ผ้ � หรื อ กระด�ษชำ � ระชุ บ นำ ้ � หม�ดๆออกจ�กที ่ ร องนั ่ ง หลั ง จ�กทดสอบเรี ย บร้ อ ยแล้ ว ¨ Kohler Co. 1103349-X2-C...
- Page 20 KOHLER (THAILAND) PUBLIC COMPANY LIMITED FL. Jasmine City Bldg., 2 Soi Sukhumvit 23, Sukhumvit Road, Wattana, Bangkok 10110 Thailand Call Center Tel. +(66) 2204 6222 Fax. +(66) 2204 6224 บริ ษ ั ท โคห์ เ ลอร์ (ประเทศไทย) จำ า กั ด (มหาชน) ชั...
Need help?
Do you have a question about the C3-225 and is the answer not in the manual?
Questions and answers