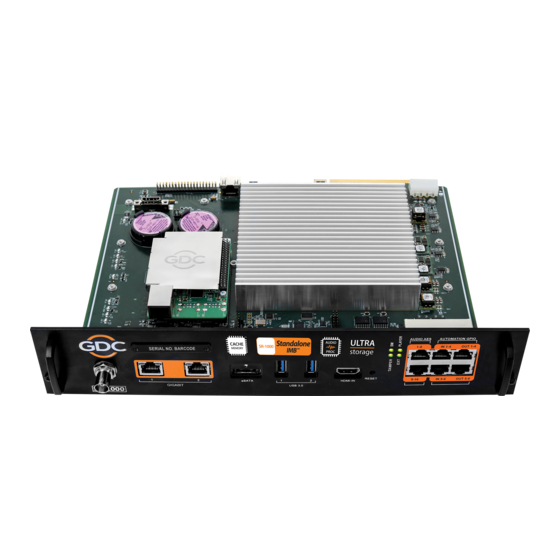
GDC SR-1000 User Manual
Standalone integrated media block
Hide thumbs
Also See for SR-1000:
- User manual (137 pages) ,
- Installation manual (51 pages) ,
- User & installation manual (42 pages)

Related Manuals for GDC SR-1000


Summary of Contents for GDC SR-1000
- Page 1 USER MANUAL FOR SR-1000 STANDALONE INTEGRATED MEDIA BLOCK™ Version 17.0 March 23, 2018...
-
Page 2: Table Of Contents
General Safety Instructions ..................7 1.2.2 Electrical Safety ....................... 7 1.2.3 Testing & Certification ....................7 The SR-1000 Web User Interface (WebUI) ..........8 Access Levels ..................9 General Notes on the SR-1000 WebUI ..........10 2.2.1 Recommended web browsers ................10 2.2.2... - Page 3 High bitrate playback test .................. 62 System ....................63 Maintenance ..................68 APPENDIX Ⅰ ....................70 IMB Sync ....................70 8.1.1 IMB Synchronized Playback Operation ..............72 APPENDIX Ⅱ ....................74 - 2 - User Manual for SR-1000 Standalone Integrated Media Block™ March 23, 2018...
- Page 4 Thank you for purchasing a GDC SR-1000 Standalone Integrated Media Block™ from GDC Technology Limited. To ensure proper operation and to maximize value of the SR-1000, please review this User Manual. It will guide you through all the features and benefits of the new SR-1000 Standalone Integrated Media Block™.
- Page 5 Tel: +51 1 340 5146 Tel: +1 818 972 4370 / CEP 18047-620, Brasil Tel: +65 6222 1082 +1 877 743 2872 (Toll Free) Tel: +55 15 33269301 - 4 - User Manual for SR-1000 Standalone Integrated Media Block™ March 23, 2018...
- Page 6 Tel: +91 22 4044 0500 Tel: +52 55 8851 1198/ ___+52 55 8851 1165 United Arab Emirates (Dubai) Business Centre, Dubai World Central, PO Box 390667, Dubai UAE - 5 - User Manual for SR-1000 Standalone Integrated Media Block™ March 23, 2018...
-
Page 7: Introduction
1. INTRODUCTION 1 INTRODUCTION 1.1 About This Manual This manual provides instructions on how to use and manage the GDC SR-1000 Standalone Integrated Media Block . The SR-1000 has a web-based user interface (WebUI). The WebUI functionality can be broken down into five main sections: Dashboard, Playback, Automation, Content and Configuration. -
Page 8: Safety Instructions
All instructions for operating and maintaining the SR-1000 must be followed closely. 1.2.2 Electrical Safety Safety Warning • Do not expose the SR-1000 to rain or moisture, to prevent fire or electrical shock hazard. • Consult GDC Technical Support for servicing or maintaining the SR-1000. •... -
Page 9: The Sr-1000 Web User Interface (Webui)
2. The SR-1000 WebUI can be accessed by a web browser (Google Chrome or Mozilla Firefox are recommended). 3. Enter the IP address of the SR-1000 on the web browser to access the login page on the WebUI. 4. There are 3 levels of users available (User/Technician/Maintenance). Select the required access level (see section 2.1 for more details) and enter the corresponding... -
Page 10: Access Levels
Dashboard, Playback, Automation, Content and Configuration* tabs. Technician (*Only maintenance tab under Configuration is accessible.) Dashboard, Playback, Automation, Content and Maintenance Configuration tabs. Figure 3: User Accounts - 9 - User Manual for SR-1000 Standalone Integrated Media Block™ March 23, 2018... -
Page 11: General Notes On The Sr-1000 Webui
These web browsers are recommended for use with the SR-1000 WebUI. 2.2.2 Single User Access The SR-1000 WebUI allows single user access only. When a second user logs in using the same or a higher access level, the second user is allowed to choose whether to take over the first user’s session. -
Page 12: Session Expiry
3. DASHBOARD 2.2.3 Session Expiry The SR-1000 WebUI session will expire if there is no activity from the user for 5 minutes. A warning message will be displayed and the user will be logged out. Click on this warning message to prevent automatic logout. -
Page 13: Dashboard
3. DASHBOARD 3 DASHBOARD In the SR-1000 WebUI, the dashboard menu displays basic information related to the SR-1000, such as System Information, Network Information, Storage Information, Licenses installed, Capabilities and System alerts. Figure 5: Dashboard layout [System Information] Displays SR-1000 system information. - Page 14 To shutdown the server, press Shutdown. A pop-up window will be displayed. Click OK to confirm shutdown. [Capabilities] Displays the supported features or capabilities of the SR-1000. [SM Connection Status] Displays the connection status of the SM or Security Manager.
-
Page 15: Playback
When playback is paused, the Playback Progress Bar can be moved to the left or right to seek within the clip. - 14 - User Manual for SR-1000 Standalone Integrated Media Block™ March 23, 2018... - Page 16 The display shows the name of the active playlist, and the name of the clip currently being played. Information and errors encountered during playback will also be displayed here. - 15 - User Manual for SR-1000 Standalone Integrated Media Block™ March 23, 2018...
-
Page 17: Edit
Figure 7: Edit Playlist [Filter] Filter the content list based on content name. [Content List] Available content on the SR-1000 is listed here. Use the arrow to expand and list all the clips under the selected category. Content can be dragged and dropped between [Content List] and [Playlist Editor]. - Page 18 [Manage Playlist options to Delete, Rename, Copy or Filter the playlists. [Show List] List of playlists available on the SR-1000. The selected playlist content will be shown in the [Playlist Editor]. Note: A playlist that is currently playing cannot be edited.
-
Page 19: Edit Cpl Properties
[Cue list] Sets automation cues to execute during playback. Select the cue from the dropdown list, enter the Frame/Time and click the + Insert button. - 18 - User Manual for SR-1000 Standalone Integrated Media Block™ March 23, 2018... -
Page 20: Schedule
This tab is used to schedule playback Figure 9: Scheduler [List, Day, Week, Month] Select to display the schedules on the SR-1000 in a list; per day, per week or per month. [Today] Switch back to current day in month or week view. - Page 21 Displays the details of the selected show. [Delete] Delete the selected schedule. [Enable Scheduler] Enable or disable the scheduler function. It is recommended to keep the scheduler enabled. - 20 - User Manual for SR-1000 Standalone Integrated Media Block™ March 23, 2018...
-
Page 22: Automation
Figure 10: GDC Automation Workflow 5.1 Trigger This tab is used manually trigger automation cues and commands for configured devices Figure 11: Cue Trigger Setup - 21 - User Manual for SR-1000 Standalone Integrated Media Block™ March 23, 2018... -
Page 23: Schedule
Execute button to send the command to the projector. 5.2 Schedule This tab is used to schedule automation cues to execute at the specified date and time. Figure 12: Scheduling Cues - 22 - User Manual for SR-1000 Standalone Integrated Media Block™ March 23, 2018... -
Page 24: Cue
[- Remove Schedule] Click – to remove the selected scheduled automation cue. 5.3 Cue This tab shows the automation cues configured on the SR-1000. New automation cues can be added and configured on this tab. Figure 13: Create and Edit Cues [Cue] A complete list of configured cues is displayed here. - Page 25 Param for each action then click the Save button to save this cue. [Delete] Deletes the selected cue. [Execute] Executes the selected cue. This can be used to test the cue. - 24 - User Manual for SR-1000 Standalone Integrated Media Block™ March 23, 2018...
-
Page 26: Input
5. AUTOMATION 5.4 Input This tab is used to configure input automation triggers on the SR-1000. When input is detected on supported devices, the configured automation cues will be triggered on the SR-1000. Figure 14: Input Triggers [Add Trigger] Click + to add an input trigger. -
Page 27: Device
5. AUTOMATION 5.5 Device This tab is used to configure the SR-1000 to communicate with external automation devices. Figure 15: List of configured Automation devices [Device] This is a list of configured automation devices on the SR-1000. When a device is selected from the list, device details are displayed. - Page 28 5. AUTOMATION 5.6 Option This tab is used to configure automation cues that will be triggered on SR-1000 boot-up and when playback errors occur. Figure 16: Option [Startup Label] Select a specific automation cue which will be executed when the server fully boots up...
-
Page 29: Import/ Export
Import allows user to select configuration file containing all automation cues from an alternate server Export automatically saves the configuration file containing all automation cues to your web browser’s default download location. - 28 - User Manual for SR-1000 Standalone Integrated Media Block™ March 23, 2018... -
Page 30: Content
7. CONFIGURATION 6 CONTENT The Content tab is used to manage the content, keys and licenses on the SR-1000. It allows the operator to: 1. Ingest content from disk or network source. 2. Ingest Key Delivery Messages (KDMs) required for playing encrypted content. -
Page 31: Package
7. CONFIGURATION Click the Refresh button to update the displayed information. 6.2 Package This tab shows the content available on the SR-1000. Figure 19: List of CPL’s or PKL’s [PKL/CPL] Displays list by CPLs or PKLs. [Filter] PKL/CPL list will be filtered by the text entered here. - Page 32 The following content delete options are available: Immediately Delete: Delete the selected PKL and CPL immediately. Schedule Delete: Set a date and time to delete this content. - 31 - User Manual for SR-1000 Standalone Integrated Media Block™ March 23, 2018...
-
Page 33: Kdm
7. CONFIGURATION 6.3 KDM This tab displays all the KDMs present on the SR-1000 Figure 20: List of KDMs [KDM List] Displays a list of the KDMs on the SR-1000. When a KDM is selected from the list, KDM details are displayed on the right panel. -
Page 34: Ldm
7. CONFIGURATION 6.4 LDM This tab displays the list of licenses on the SR-1000. Figure 21: List of LDMs [LDM List] Displays a list of licenses installed on the SR-1000. When an LDM is selected from the list, LDM details are displayed on the right panel. -
Page 35: Source
7. CONFIGURATION 6.5 Source This tab is used to configure the content ingest sources on the SR-1000. Figure 22: List of ingest sources [Source] Displays a list of configured content ingest sources on the SR-1000. [Live Source] Displays the list of content for Live Play (Please refer to Section 6.5.1 for details.) -
Page 36: Live Source
Live play allows playback from content ingest source without ingesting. Live play is supported for USB/ eSATA sources only. Content should always be ingested before playback whenever possible. Figure 23: Live Play - 35 - User Manual for SR-1000 Standalone Integrated Media Block™ March 23, 2018... -
Page 37: Schedule
This tab shows the scheduled content ingest and verification tasks. Figure 24: List of Scheduled Ingest tasks [Schedule] Displays a list of scheduled content ingest tasks. [Refresh] Click Refresh to refresh the list of schedules. - 36 - User Manual for SR-1000 Standalone Integrated Media Block™ March 23, 2018... -
Page 38: Status
Displays the list of content ingest, delete and verify tasks. [Refresh] Click Refresh to refresh the list of schedules. [Delete] Click Delete to delete a selected schedule. - 37 - User Manual for SR-1000 Standalone Integrated Media Block™ March 23, 2018... -
Page 39: Configuration
7. CONFIGURATION 7 CONFIGURATION The configuration tab is used to change SR-1000 settings and configure aspects of SR-1000 operation. SR-1000 configuration consists of five categories: General, Playback, Storage, System and Maintenance. 7.1 General This tab is used to configure general options for the SR-1000. -
Page 40: Snmp Configuration
Click Save to save the settings or Close to cancel the changes. 7.1.1 SNMP Configuration The SNMP feature is an option on the SR-1000 that enables the use of SNMP to monitor the IMB. The SNMP interface contains many useful SNMP traps and is easy to configure. -
Page 41: General
Check SNMP Agent Stop to activate the Trap. Un-check the SNMP Agent Stop to deactivate the Trap. NOTE: When Trap is On, a trap is sent when the SNMP Agent is stopped. - 40 - User Manual for SR-1000 Standalone Integrated Media Block™ March 23, 2018... -
Page 42: System Information
Automatically set System Name to Server model option is enabled. [System Location] The location where the SR-1000 is installed. This value will be displayed when SNMP information is queried. [System Description] A brief description of the server. This value will be displayed when SNMP information is queried. -
Page 43: System Setting
CPL without a valid [Dropped Frame Threshold] Set a threshold limit based on the number of frames dropped in the specified time period (in seconds) - 42 - User Manual for SR-1000 Standalone Integrated Media Block™ March 23, 2018... -
Page 44: Encrypt
Allows user to enable SNMP Authentication by providing Username. The default Password can be changed using the Change button. Note: The new password should be atleast 8 characters long. - 43 - User Manual for SR-1000 Standalone Integrated Media Block™ March 23, 2018... -
Page 45: Storage
Check Mount Data Storage to activate the Trap. [Mount Data Storage] NOTE: When Trap is On, a trap will be sent if the data storage is not mounted on the system. - 44 - User Manual for SR-1000 Standalone Integrated Media Block™ March 23, 2018... -
Page 46: Sensor
Check CPU Temperature Threshold to activate the Trap. NOTE: When Trap is On, a trap is sent if the CPU temperature exceeds the maximum threshold temperature. - 45 - User Manual for SR-1000 Standalone Integrated Media Block™ March 23, 2018... -
Page 47: Ethernet
Enables sending an SNMP trap if the system detects that the selected network interface is down. [Monitor IMB Ethernet 1] Enables sending an SNMP trap if the system detects that the selected network interface is down. - 46 - User Manual for SR-1000 Standalone Integrated Media Block™ March 23, 2018... -
Page 48: Playback
7. CONFIGURATION 7.2 Playback This tab is used to configure video, audio, subtitle and other playback settings on the SR-1000. Figure 34: Playback Configuration (1) [Options] Automatically fix invalid If this option is enabled, non-playable CPLs in a show playlist show playlist will be skipped during playback. - Page 49 SR-1000. Maximum waiting time Specifies the maximum time to wait for the closed caption device to report it is ready, before starting playback. - 48 - User Manual for SR-1000 Standalone Integrated Media Block™ March 23, 2018...
- Page 50 Force 2D playback for 3D content. A valid license is required to enable this option. Enable RealD Ghostbusting Valid license(s) are required to enable RealD Ghostbusting or Dolby 3D color correction. Enable Dolby 3D Correction - 49 - User Manual for SR-1000 Standalone Integrated Media Block™ March 23, 2018...
- Page 51 Use the audio channel mapping interface to map content audio Channel Mapping channels to different audio output channels. Refer to Section 7.2.1 for details related to Audio Channel Mapping. - 50 - User Manual for SR-1000 Standalone Integrated Media Block™ March 23, 2018...
- Page 52 7. CONFIGURATION Figure 36: Playback Configuration (3) [Dolby Atmos] Enable Configure the SR-1000 to work with a Dolby CP850 sound processor with Dolby Atmos. A valid license is required to enable Dolby Atmos support on the SR-1000: Check Enable to enable Dolby Atmos support.
-
Page 53: Audio Channel Mapping
7. CONFIGURATION 7.2.1 Audio Channel Mapping Using Audio Channel Mapping, audio output from the SR-1000 can be re-mapped to appear on different audio channels. Figure 37: Using DCP Channel order Audio output based on the number of audio channels in the audio track of the DCP can be configured in this tab. - Page 54 Audio output for individual SMPTE audio channel labels can be changed here. Check the Use SMPTE audio labels checkbox to route audio output based on SMPTE audio channel configuration labels. - 53 - User Manual for SR-1000 Standalone Integrated Media Block™ March 23, 2018...
-
Page 55: Preset
Add a new preset or delete the current preset. Audio configuration for an audio preset can be changed here. Click Return to return to Audio Channel Mapping configuration. - 54 - User Manual for SR-1000 Standalone Integrated Media Block™ March 23, 2018... -
Page 56: Storage
7. CONFIGURATION 7.3 Storage This tab is used to configure the storage settings on the SR-1000. Figure 40: Storage Configuration [IMB Storage] Configure the primary storage for the SR-1000. Storage Type CineCache: Select this option to use the built-in CineCache as storage. - Page 57 Hard disk information § RAID filesystem check § Storage performance § Increase Rebuild Speed § High bitrate playback test (Please refer to Section 7.3.1 for details.) - 56 - User Manual for SR-1000 Standalone Integrated Media Block™ March 23, 2018...
-
Page 58: Actions Of Portable/Enterprise Storage
Select the drive name and click on Create. The RAID creation process will be initiated and the progress will be shown. Once complete, click on Close to return to the Storage menu - 57 - User Manual for SR-1000 Standalone Integrated Media Block™ March 23, 2018... -
Page 59: Hard Disk Information
7. CONFIGURATION 7.3.1.2 Hard disk information Figure 42: Select disk Figure 43: Hard Disk Information - 58 - User Manual for SR-1000 Standalone Integrated Media Block™ March 23, 2018... -
Page 60: Raid Filesystem Check
Click on Save to save the results to the local computer/ laptop (in the form of a .txt file). Click on Close to return to the Storage menu. - 59 - User Manual for SR-1000 Standalone Integrated Media Block™ March 23, 2018... -
Page 61: Storage Performance
7. CONFIGURATION 7.3.1.4 Storage Performance Figure 46: Select disk Figure 45: Storage Performance - 60 - User Manual for SR-1000 Standalone Integrated Media Block™ March 23, 2018... -
Page 62: Increase Rebuild Speed
To resume highest rebuild speed after playback is finished, click on Increase Rebuild Speed. This will immediately set RAID array to rebuild at highest speed. - 61 - User Manual for SR-1000 Standalone Integrated Media Block™ March 23, 2018... -
Page 63: High Bitrate Playback Test
7. CONFIGURATION 7.3.1.6 High bitrate playback test Figure 48: HBR Playback fitness test (1) Figure 49: HBR Playback fitness test (2) - 62 - User Manual for SR-1000 Standalone Integrated Media Block™ March 23, 2018... -
Page 64: System
(in the form of a .txt file). Click on Close to return to the Storage menu. 7.4 System This tab is used to configure the system settings on the SR-1000. Figure 50: System Configuration (1) - 63 - User Manual for SR-1000 Standalone Integrated Media Block™... - Page 65 Click the Marry button to clear the Marriage Tamper. IMB Marriage Click the Close button to clear the Service Door tamper. Service Door NOTE: The SR-1000 will not allow playback if these tampers are not cleared. For IMB Marriage please refer to the SR-1000 Installation manual.
- Page 66 Gateway Specify the network gateway for the SR-1000. IMB Ethernet 2 This is the main IP address of the SR-1000. The Web-UI interface can be reached at this IP address. IMB Ethernet 1 Enable this to set up a secondary network on the SR-1000. This is usually connected to a content management network.
- Page 67 Check IP Conflict “eth0” or “eth1” and click Check Conflict. [Extract logs and configuration] This allows the operator to extract debug logs from the SR-1000 for analysis by GDC personnel. Time duration includes 1 Week, 1 Month, 3 Months and All.
- Page 68 [Extract SMPTE Log] This allows the operator to extract SMPTE audit logs from the SR-1000. After selecting the Date/Time, Generate SMPTE Log button will be enabled. A pop-up window will be shown to display the log extraction progress.
-
Page 69: Maintenance
Users can upload the configuration files. 7.5 Maintenance This tab is used to install software upgrades on the system. Warranty information is also displayed in this section. Figure 53: Maintenance Configuration - 68 - User Manual for SR-1000 Standalone Integrated Media Block™ March 23, 2018... - Page 70 Select the upgrade package file and click Upload to upload it to the SR-1000. Once the upload is complete, the Upgrade button will be enabled. Click Upgrade to start the upgrade process. - 69 - User Manual for SR-1000 Standalone Integrated Media Block™ March 23, 2018...
-
Page 71: Appendix Ⅰ
This section describes optional features on the SR-1000 that require licenses from GDC. 8.1 IMB Sync Two SR-1000 systems can work in sync for dual projector playback of content. This can be used for increasing the brightness of the image by overlaying the output from the projectors on the same screen, for making a video-wall or any other applications where two systems need to play in sync. - Page 72 Multicast group address for each set of IMB sync systems must be unique. [Server Mode] Select Master on the master server, and Slave on the slave server. - 71 - User Manual for SR-1000 Standalone Integrated Media Block™ March 23, 2018...
-
Page 73: Imb Synchronized Playback Operation
2. Create an SPL with same name on the 'slave' server. 3. Start playback from the 'master' server. 4. The 'slave' server will automatically start playback of the SPL with the same name. - 72 - User Manual for SR-1000 Standalone Integrated Media Block™ March 23, 2018... - Page 74 SPL with 2D Will play as 2D on each projector (3D is projector (2D content is played and 3D content played as left or right eye) as 3D) - 73 - User Manual for SR-1000 Standalone Integrated Media Block™ March 23, 2018...
-
Page 75: Appendix Ⅱ
7. CONFIGURATION 9 APPENDIX Ⅱ The SR-1000 has undergone and passed on first attempt the following quality assurance tests, with reports issued by the world’s leading inspection, verification, testing and certification company– SGS Labs (https://www.sgs.com). 1. Temperature Humidity Cycling Test •... - Page 76 Cert. No. CN09/32221 GDC Technology manufacturing facility is ISO 9001:2008 certified. Copyright © 2018 GDC Technology Limited. All rights reserved. All trademarks listed in this manual are properties of their respective owners. Specifications are subject to change without notice due to ongoing product development and improvement.
Need help?
Do you have a question about the SR-1000 and is the answer not in the manual?
Questions and answers