Table of Contents
Advertisement
Quick Links
Advertisement
Table of Contents

Related Manuals for Larson Davis NoiseTutor


Summary of Contents for Larson Davis NoiseTutor
- Page 1 NoiseTutor System Manual...
- Page 2 Larson Davis NoiseTutor System Manual I021.02 Rev A NoiseTutor System Manual...
- Page 3 Copyright Copyright 2011 by PCB Piezotronics, Inc. This manual is copyrighted, with all rights reserved. The manual may not be copied in whole or in part for any use without prior written consent of PCB Piezotronics, Inc. Disclaimer The following paragraph does not apply in any state or country where such statements are not agreeable with local law: Even though PCB Piezotronics, Inc.
-
Page 4: Table Of Contents
Chapter 1 Introduction Setting up the NoiseTutor Station ........... 1-2 Configuring the NoiseTutor Server ..........1-3 System requirements for NoiseTutor Server Configuration ... 1-4 Installing NoiseTutor System Software .......... 1-4 System Requirements for NoiseTutor System Software ....1-4 Chapter 2 Setting up the NoiseTutor Server Installing IIS on Windows 7 ............ - Page 5 Main Setup .................... 4-3 Recipient Lists ..................4-5 Graph Setup ..................4-7 Data File ....................4-9 E-mail Service ....................4-9 FTP Setup Service ..................4-11 Realtime Report Setup ................ 4-12 E-mail Publishing ..................4-13 Web Publishing ..................4-14 System Administration Messages ............4-18 Chapter 5 Commands Menu 1 Main commands ...................
-
Page 6: Chapter 1 Introduction
Setting up the NoiseTutor System includes the following steps: Step 1 Setting up the NoiseTutor station Step 2 Configuring the NoiseTutor server Step 3 Installing the NoiseTutor System software, if not The NoiseTutor System software comes pre-installed when NoiseTutor already pre-installed. -
Page 7: Setting Up The Noisetutor Station
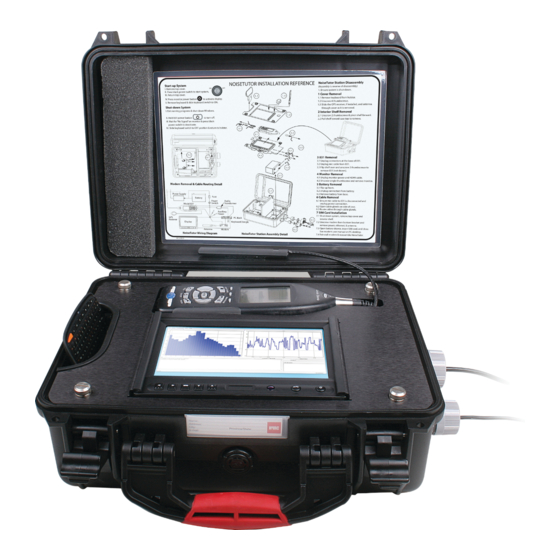
FIGURE 1-1 Components and Architecture - NoiseTutor System Setting up the NoiseTutor Station Start by reading the NoiseTutor To set up your NoiseTutor station, refer to the NoiseTutor Quick Start Guide. It is a card Quick Start Guide and the NoiseTutor Installation located inside your station case that Reference. -
Page 8: Configuring The Noisetutor Server
NoiseTutor Server on a Windows 7 platform are provided in this manual. The NoiseTutor System also functions on Windows XP SP 3 and Windows Vista SP 1. However, the steps and options are NoiseTutor System Manual... -
Page 9: System Requirements For Noisetutor Server Configuration
To install and configure the NoiseTutor System on these platforms, Larson Davis recommends that you consult with an IT professional. Detailed instructions for setting up a server on other platforms are not available from Larson Davis. -
Page 10: Chapter 2 Setting Up The Noisetutor Server
IT professional working with your NoiseTutor System. Installing IIS on Windows 7 The NoiseTutor System also functions on Windows XP SP 3 and Windows Vista SP 1. However, the steps and options are different than those represented in this manual. To install... - Page 11 Control Panel. FIGURE 2-1 Turn Windows Features On or Off Step 4 Select Internet Information Services. Step 5 Expand Internet Information Services. Step 6 Expand FTP Server. Select all items, as shown in FIGURE 2-2. NoiseTutor System Manual...
- Page 12 Step 8 Select World Wide Web Services, as shown in FIGURE 2-2. Accept all defaults. FIGURE 2-2 Windows Features - Internet Information Services Step 9 Click OK.Wait for Windows to make changes, as shown in FIGURE 2-3. FIGURE 2-3 Microsoft Windows - Please Wait NoiseTutor System Manual...
- Page 13 Configuring the IIS Web Server You can configure the IIS web server to set up your NoiseTutor web site. The following configuration places the web pages for your site in a virtual directory and sets the FTP server upload location as a subdirectory of that virtual directory.
- Page 14 FIGURE 2-4 IIS Manager - Expand Sites Step 6 Select Default Web Site. Step 7 Select View Virtual Directories, as shown in FIGURE 2-5. NoiseTutor System Manual...
- Page 15 Step 9 In the Add Virtual Directory dialog box, Alias, type LarsonDavis in the Alias field, as shown in FIGURE 2-7. Larson Davis strongly recommends Step 10 For Physical path, specify LarsonDavis as the that you specify, select, or accept all...
- Page 16 FIGURE 2-7 Add Virtual Directory - Connect As Step 12 In the Connect As dialog box, select the Application user (pass-through authentication) option and click OK, as shown in FIGURE 2-8. FIGURE 2-8 Connect As - Application User (pass through authentication) NoiseTutor System Manual...
- Page 17 FIGURE 2-10. Ensure the user or group has the following permissions: A. Read & execute B. List folder contents C. Read It is recommended that you not grant other permissions. Step 16 Click Apply if you have made changes. Otherwise, click OK. NoiseTutor System Manual...
- Page 18 FIGURE 2-10 Larson Davis Properties - Security Step 17 Expand Default Web Site and double-click LarsonDavis. Step 18 Double-click Default Document, as shown in FIGURE 2-11. NoiseTutor System Manual...
- Page 19 Step 20 If index.html is not present, click Add and in the Add Default Document dialog box, type index.html and then click OK, as shown in FIGURE 2-12. FIGURE 2-12 Add Default Document Step 21 Close the IIS Manager. 2-10 NoiseTutor System Manual...
-
Page 20: Installing The Noisetutor Server Configuration Tool
Installing the NoiseTutor Server Configuration Tool To install the NoiseTutor Configuration Tool, follow these steps: Step 1 Insert NoiseTutor CD into your CD/DVD drive. Step 2 If auto start is not enabled, Click [CD / DVD]\NoiseTutorConfigurationInstaller.exe. Step 3 On the NoiseTutor Configuration Tool Setup Wizard, Click Next, as shown in FIGURE 2-13. - Page 21 Step 6 Click Next to install the default installation folder. FIGURE 2-14 Configuration Tool Installer - Select Installation Folder Step 7 To confirm the installation, click Next again. The wizard displays the installation progress as shown in FIGURE 2-15. 2-12 NoiseTutor System Manual...
-
Page 22: Running The Noisetutor Configuration Tool
FIGURE 2-15 Configuration Tool - Installing NoiseTutor Configuration Tool Step 8 Click Close. Running the NoiseTutor Configuration Tool The NoiseTutor Configuration Tool can be used to set up the following functionality on the server: • Generate web pages. • Request specific monitoring site information to populate web page templates. - Page 23 FIGURE 2-16 Configuration Tool - Launch Step 2 If you are configuring a new site, click New Configuration on the File menu of the NoiseTutor Site Configuration Tool dialog box. Skip to step 6. Step 3 If you are modifying an existing configuration, click Open Configuration on the File menu.
- Page 24 Step 7 For Sound Level Meter, specify the Type by selecting either 831 or LxT. The model type is shown on the front of your analyzer in the Larson Davis name. Step 8 For Serial Number, specify your analyzer serial number.
- Page 25 Click No to leave all previous files during generation. Duplicate files are overwritten. Step 15 On the Successful Generation box, click OK. Step 16 To close NoiseTutor Site Configuration Tool, click Exit on the File menu. 2-16 NoiseTutor System Manual...
-
Page 26: Creating User Accounts For Ftp Uploads
Step 5 Click the Users folder, as shown in FIGURE 2-18. Tools icon should appear with other icons in your Control Panel. FIGURE 2-18 Computer Management - Users Step 6 On the Action menu, click New User. 2-17 NoiseTutor System Manual... - Page 27 Larson Davis strongly recommends Step 7 In the New User box, provide the user name, full that you specify, select, or accept all name, description; and create a password as shown in defaults for your configuration, as FIGURE 2-19. The default name for user accounts is demonstrated in this manual.
- Page 28 Step 11 Provide the user account with the appropriate permissions to the FTP upload folder UploadImages and its sub-folders. This folder is a sub-folder in your NoiseTutor virtual directory. Permission options may vary but should include write access. It is best to restrict permissions to only the UploadImages folder and any sub-folders.
- Page 29 Step 20 Browse to the default virtual directory at c:\inetpub\wwwroot\LarsonDavis\UploadImages, as specified in step 7. Step 21 Right-click UploadImages and select Properties. Step 22 On the Properties dialog box, click Security Tab. Step 23 Click Edit…, as shown in FIGURE 2-22. 2-20 NoiseTutor System Manual...
- Page 30 FIGURE 2-22 UploadImages Properties - Security Step 24 On the Permissions dialog box, click Add..., as shown in FIGURE 2-23. 2-21 NoiseTutor System Manual...
- Page 31 UploadUser, if applicable, as shown in FIGURE 2-24. Step 26 Make sure the From this location references your computer. Step 27 Click Check Names. Step 28 Click OK on both boxes. 2-22 NoiseTutor System Manual...
- Page 32 FIGURE 2-24 Select User or Groups - Upload User Step 29 On the Security tab of the Properties box, click the user account name, or the default name UploadUser, if applicable, as shown in FIGURE 2-25. Step 30 Click Advanced. 2-23 NoiseTutor System Manual...
- Page 33 FIGURE 2-25 UploadImages Properties - Advanced Step 31 On the Advanced Security Settings box, click the Permissions tab. Step 32 Click the user account name, or the default UploadUser, if applicable, as shown in FIGURE 2-26. Step 33 Click Change Permissions…. 2-24 NoiseTutor System Manual...
- Page 34 FIGURE 2-26 Advanced Security Settings for UploadImages - Change Permissions Step 34 Click Edit..., as shown in FIGURE 2-27. 2-25 NoiseTutor System Manual...
- Page 35 • List folder/read data • Read attributes • Read extended attributes • Create files/write data • Create folders/append data • Write attributes • Write extended attributes • Delete sub-folders and files • Delete • Read permissions 2-26 NoiseTutor System Manual...
-
Page 36: Setting Up Ftp Servers
Setting up FTP Servers Setting up an FTP server allows you to upload the NoiseTutor client reports. The FTP server root folder should be specified as the sub-folder “UploadImages” for the web server. To set up the FTP server, follow these steps: Step 1 From the Start menu, click Computer. - Page 37 Step 6 On the Site Information page of the Add FTP Site wizard, type Upload Images FTP Site for the FTP site name, as shown in FIGURE 2-30. Step 7 Under Physical path: type c:\inetpub\wwwroot\LarsonDavis\UploadImages, as shown in FIGURE 2-30,or browse to the folder and select it. 2-28 NoiseTutor System Manual...
- Page 38 Step 10 Specify the port for the FTP site, as shown in FIGURE 2-31. The default is 21. Step 11 Clear the Enable Virtual Host Names: option. Step 12 Select Start FTP Site Automatically. Step 13 Select No SSL. Step 14 Click Next. 2-29 NoiseTutor System Manual...
- Page 39 Step 16 Select Specified Users for Allow access to: Step 17 Type in your user account name, or the default UploadUser, if applicable, as shown in FIGURE 2-32. Step 18 Select Read and Write under Permissions. Step 19 Click Finish. 2-30 NoiseTutor System Manual...
-
Page 40: Configuring Windows Firewalls
If you have a firewall present, you will need to allow web and FTP access. Below is an example for configuring Windows Firewalls. For other firewalls, refer to the documentation from that provider. Step 1 From the Start menu, click Control Panel. 2-31 NoiseTutor System Manual... - Page 41 Control Panel. FIGURE 2-33 Windows Firewall - Advanced Settings Step 4 On the Windows Firewall with Advanced Security screen, click Inbound Rules, as shown in FIGURE 2-34. Step 5 Click New Rule..., as shown in FIGURE 2-34. 2-32 NoiseTutor System Manual...
- Page 42 FIGURE 2-34 Windows Firewall with Advanced Security - New Rule Step 6 On the Rule Type page of the New Inbound Rule Wizard, select Predefined: as shown in FIGURE 2-35. Step 7 Select FTP Server, as shown in FIGURE 2-35. Step 8 Click Next. 2-33 NoiseTutor System Manual...
- Page 43 Passive (FTP Passive Traffic-In), as shown in FIGURE 2- Step 10 Select FTP Server Secure (FTP SSL Traffic-In), as shown in FIGURE 2-36. Step 11 Select FTP Server (FTP Traffic-In), as shown in FIGURE 2-36. Step 12 Click Next. 2-34 NoiseTutor System Manual...
- Page 44 FIGURE 2-36 Windows Firewall - New Inbound Rule Wizard - FTP Rules Step 13 On the Action page, select Allow the connection, as shown in FIGURE 2-37. Step 14 Click Finish. 2-35 NoiseTutor System Manual...
- Page 45 FIGURE 2-37 Windows Firewall - New Inbound Rule Wizard - FTP (Allow the connection) Step 15 On the Windows Firewall with Advanced Security screen, click Inbound Rules, as shown in FIGURE 2-38. Step 16 Click New Rule…, as shown in FIGURE 2-38. 2-36 NoiseTutor System Manual...
- Page 46 FIGURE 2-38 Windows Firewall with Advanced Security - New Rule Step 17 On the Rule Type page, select Predefined:, as shown in FIGURE 2-39. Step 18 Select World Wide Web Services (HTTP), as shown in FIGURE 2-39. Step 19 Click Next. 2-37 NoiseTutor System Manual...
- Page 47 FIGURE 2-39 Windows Firewall - New Inbound Rule Wizard - Predefined (World Wide Web) Step 20 On the Predefined Rules page, select World Wide Web Services (HTTP Traffic-In), as shown in FIGURE 2-40. Step 21 Click Next. 2-38 NoiseTutor System Manual...
- Page 48 FIGURE 2-40 Windows Firewall - New Inbound Rule Wizard - Rule (World Wide Web) Step 22 On the Action page. select Allow the connection, as shown in FIGURE 2-41. Step 23 Click Finish. 2-39 NoiseTutor System Manual...
-
Page 49: Verifying Access To Ftp Servers
Verify your access to the FTP server from your server (local), by following these steps: Step 1 Make sure the FTP server is running. Click Start in IIS if it is not, as shown in FIGURE 2-42. Local Access 2-40 NoiseTutor System Manual... -
Page 50: Local Network Access
Step 1 Follow the steps for verifying that your server can access the FTP server. Step 2 Verify that the FTP server's firewall allows FTP traffic, as shown in FIGURE 2-43. 2-41 Local Network Access NoiseTutor System Manual... -
Page 51: Public Access
Step 1 Follow instructions in Accessing FTP server from publicly accessible to receive data. another machine on the same network. Step 2 Verify that the router has port forwarding or port triggering rules for the FTP port, as shown in FIGURE 2-44. Public Access 2-42 NoiseTutor System Manual... -
Page 52: Verifying Browser Connections
FIGURE 2-44 Router Port Forwarding - FTP Service Verifying Browser Connections To verify your browser is connected and loads correctly, follow these steps. Step 1 Verify that the website is available on the web server. 2-43 Public Access NoiseTutor System Manual... - Page 53 FIGURE 2-45 IIS Manager - Website Running Step 5 Verify that the proxy user or supplied user has read access permissions, as shown in FIGURE 2-46. If not, grant read access to the proxy user or supplied user. Public Access 2-44 NoiseTutor System Manual...
- Page 54 FIGURE 2-46 Larson Davis Properties - Web User Access Rights Step 6 Verify that the file index.html is located in the virtual directory, as shown in FIGURE 2-47. If not, run ConfigurationTool.exe again. 2-45 Public Access NoiseTutor System Manual...
- Page 55 Step 7 To ensure access to your web site from another computer, verify that the server's firewall allows traffic through the web site port (Default 80), as shown in FIGURE 2-48. Change the firewall if needed. Public Access 2-46 NoiseTutor System Manual...
- Page 56 (and not just your local network), verify that the router has configure your routers for access. port forwarding or port triggering rules for your web site. Consult with your organization’s IT professional for help. 2-47 Public Access NoiseTutor System Manual...
- Page 57 Public Access 2-48 NoiseTutor System Manual...
-
Page 58: Chapter 3 Installation And Set-Up
Installing NoiseTutor Software Important: The NoiseTutor software If your NoiseTutor station was not purchased as part of a comes pre-installed when NoiseTutor system, or if for some other reason you need to install the is purchased as a system. If you... - Page 59 Step 1 Browse to the NoiseTutor link in the Windows Startup folder. Step 2 Right-click the NoiseTutor icon and click Properties, as shown in FIGURE 3-1. FIGURE 3-1 NoiseTutor Application Properties Access Step 3 In the Target field, replace C:\Program Files\NoiseTutor\NoiseTutor.exe with C:\ProgramFiles\...
-
Page 60: Starting The Noisetutor Station
NoiseTutor System: Installation Reference on the inside Step 1 Press the black power switch to start the system. of the NoiseTutor System case to set up your hardware. Step 2 Press the monitor power button to activate the display. -
Page 61: Installing Noisetutor System Licenses
Please contact PCB Technical Support to obtain license files. To install the license file, copy the license file to the NoiseTutor folder. The location of the NoiseTutor folder depends on the version of Windows you are using. To install the license file, follow these steps:... -
Page 62: Setting Up Data Transmission
Step 4 Paste the license file into NoiseTutor folder, as shown in FIGURE 3-4. FIGURE 3-4 NoiseTutor Folder Setting up Data Transmission You can set-up the remote delivery of collected sound level data via the following methods: All of these methods can be used •... - Page 63 Working mode and then click either Data File or Data File + Realtime Reports. The Data File option configures NoiseTutor to e-mail only data files; the Data File + Realtime Reports option configures NoiseTutor to deliver both data files and graphical reports via e-mail.
- Page 64 Step 1 On the Setup menu, click Recipient Lists. Step 2 In the List name field on the Recipient Lists box, type the name of the recipient list, as shown in FIGURE 3- Deliver Data Files via E-mail NoiseTutor System Manual...
- Page 65 FIGURE 3-6. Step 7 Click OK to add the recipient. Step 8 Repeat the previous steps for additional recipient e-mail addresses. FIGURE 3-6 Recipient List Set-up Deliver Data Files via E-mail NoiseTutor System Manual...
- Page 66 Step 7 Specify the height and width dimensions for the graphs in the attachments, as shown in FIGURE 3-7. Step 8 Select the Include the PC power status information option, if desired. Step 9 Click OK. Deliver Data Files via E-mail NoiseTutor System Manual...
-
Page 67: Deliver Data Files To An Ftp Site
Working mode and then click either Data File or from your network administrator. Data File + Realtime Reports. The Data File option configures NoiseTutor to deliver only data files to FTP Deliver Data Files to an FTP Site 3-10... - Page 68 Step 8 Click OK. Step 9 Verify that Internet Upload on the Commands menu is checked. Step 10 Configure other NoiseTutor data transmission options and begin taking sound level data by clicking Start on the Commands menu. 3-11...
-
Page 69: Create And Deliver Graphical Reports Via E-Mail
Step 7 In the Information request address field, type the e-mail address of the designated personnel to handle data inquiries, as shown in FIGURE 3-9. Step 8 Click OK. Create and Deliver Graphical Reports via E-mail 3-12 NoiseTutor System Manual... - Page 70 Step 11 Select Enable E-mail report 1 service. Step 12 In the Recipients list box, select the recipient list to which the sound level data will be sent, as shown in FIGURE 3-10. 3-13 Create and Deliver Graphical Reports via E-mail NoiseTutor System Manual...
- Page 71 Step 17 Select the Include the PC power status information option, if desired. Step 18 Click OK. Step 19 Verify that Internet Upload on the Commands menu is checked. Create and Deliver Graphical Reports via E-mail 3-14 NoiseTutor System Manual...
-
Page 72: Create And Publish Graphical Reports To Web Site
It Step 1 Create a web site that will accept graphical also enables the log of Internet reports. This can be done using the NoiseTutor Server connection statistics, or the logs of Configuration Tool located on the NoiseTutor CD. - Page 73 Leave the box exactly as shown in menu is checked. FIGURE 3-11. If you modify this setting, your system will not func- Step 16 Configure other NoiseTutor data transmission tion correctly. options and begin taking sound level data by clicking Start on the Commands menu.
- Page 74 FIGURE 3-11 Web Service Report Set-up 3-17 Create and Publish Graphical Reports to Web Site NoiseTutor System Manual...
- Page 75 Create and Publish Graphical Reports to Web Site 3-18 NoiseTutor System Manual...
-
Page 76: Chapter 4 Noisetutor Station Setup Menu
NoiseTutor Station Setup Menu This chapter provides information for the commands in the Setup menu of the NoiseTutor station, all of which affect data reporting for your system. The Setup commands described in Figure 4-1 shows the Setup menu commands for the this chapter apply to the NoiseTutor NoiseTutor station. -
Page 77: Working Mode
Table 4-1 Setup Commands and Functions Working Mode The Working Mode command provides two options for operating the NoiseTutor station: the Data File mode and the Realtime Report mode. The Data File working mode downloads the data file from the connected analyzer and sends it by e-mail to a recipient list or uploads it to an FTP site. -
Page 78: Main Setup
SMTP server. The Main Setup box is shown in FIGURE 4-2. Table 4-2 and Table 4-3 define both the application settings and the SMTP server settings. FIGURE 4-2 Main Setup Main Setup NoiseTutor System Manual... - Page 79 If you are using a dial- up connection with a wireless modem you may need to set the dial-up software to automatically connect when Windows is started. Table 4-2 Main Setup Application Setting Main Setup NoiseTutor System Manual...
-
Page 80: Recipient Lists
To enable the use of e-mail services, at least one recipient list must be defined. Click the New list button to create a new recipient list. Click the Remove list button to delete selected lists. Table 4-4 defines the Recipient List Window Settings. Recipient Lists NoiseTutor System Manual... - Page 81 E-mail addresses specified in the current recipient list Adds a new e-mail address Edit Edits the selected e-mail address Remove Deletes the selected e-mail address Copy from Copies all addresses from another recipient list Table 4-4 Recipient List Editing Controls Recipient Lists NoiseTutor System Manual...
-
Page 82: Graph Setup
The key points are represented by markers at the bottom of the color scale. Table 4-5 describes how to edit the key points. Graph Setup NoiseTutor System Manual... - Page 83 Change the level of a key point Select the key point and drag it with the mouse. Change the color of a key point Select the key point and click on the Current color button. Table 4-5 Editing Keypoint Instructions Graph Setup NoiseTutor System Manual...
-
Page 84: Data File
The E-mail 1... and the E-mail 2... options launch the E- mail Report Service Setup box. Only these two e-mail services are provided. The settings are shown in FIGURE 4- 6. Table 4-6 describes the settings for this box. Data File NoiseTutor System Manual... - Page 85 FIGURE 4-6 “Data File” E-mail setup Data File 4-10 NoiseTutor System Manual...
-
Page 86: Ftp Setup Service
The FTP1... and FTP2... options launch the FTP Service Setup box to setup the FTP upload service, as shown in FIGURE 4-7. Table 4-7 and Table 4-8 show the settings for FTP Service Setup. FIGURE 4-7 “Data File” FTP Setup Window 4-11 Data File NoiseTutor System Manual... -
Page 87: Realtime Report Setup
The Realtime Report command launches setup boxes for publishing real time reports in e-mail or on the web in the Realtime Report working mode. FIGURE 4-8 shows the Realtime Report command options. FIGURE 4-8 Realtime Report Setup Realtime Report Setup 4-12 NoiseTutor System Manual... -
Page 88: E-Mail Publishing
The settings are shown in FIGURE 4-9. Table 4-6 describes the settings for this box. Table 4-8 describes the settings for E-mail Report Service Setup. FIGURE 4-9 Realtime Report E-mail Setup Window 4-13 Realtime Report Setup NoiseTutor System Manual... -
Page 89: Web Publishing
Setting time data—and uploads it to the FTP site associated with the NoiseTutor Server, your graphs will web site. The graph is then published on the web site. be linked to web pages and be displayed within the pages. If you do... - Page 90 FIGURE 4-10 Web Publishing Setup 4-15 Realtime Report Setup NoiseTutor System Manual...
- Page 91 In the Web Graph box, you can specify that a single JPEG name specified in the Web Graph include a time history or a sonogram, or both. Do not change box. The NoiseTutor station auto- the file name. Wild cards are useful to distinguish JPEG matically populates this field.
- Page 92 Sets the update time interval. To keep the internet traffic man- ageable, select this value proportionally to the length of the time axis. Width/Height Size of the JPEG in pixels Filename The destination file name Table 4-10 JPEG Settings 4-17 Realtime Report Setup NoiseTutor System Manual...
-
Page 93: System Administration Messages
There are two events available: • When the connection with the instrument is not possible (or failed for any reason). • When Windows is restarted automatically by NoiseTutor (usually because of a locked internet connection). FIGURE 4-12 System Administration Messages System Administration Messages 4-18... -
Page 94: Chapter 5 Commands Menu
To setup the NoiseTutor station so that it automatically begins the Start command, refer to the section “Installing the NoiseTutor Software” in the Installation and Setup chapter of this manual. - Page 95 FIGURE 5-1 Direct Screen NoiseTutor System Manual...
-
Page 96: Appendix A Technical Specifications
18 x 13 x 7 in. (46 x 33 x 18 cm.) Environmental - 40 to 176F (- 40 to 80 C) Operating Temperature Humidity 0 to 99%, relative humidity, non- condensing Enclosure Rated IP66 NoiseTutor System Manual Technical Specifications... -
Page 97: Station Pc (Provided
Items not Included • Instrumentation Tripod (TRP003) • Website hosting items (PC, Microsoft IIS, and FTP) • SIM card for cell access • Software to administer the PC remotely, such as logmein, radmin, or teamviewer NoiseTutor System Manual... - Page 98 NoiseTutor System Manual...
-
Page 99: Appendix B Shipping Instructions
A P P E N D I X Shipping Instructions You may encounter some restrictions when shipping the NoiseTutor station because it includes a lithium ion battery. At the time of this printing, Fedex provides services for shipping products with lithium ion batteries;... - Page 100 Total Customer Satisfaction Guaranteed 3425 Walden Avenue, Depew NY USA 14043 Phone: 716-926-8243 Toll Free: 888-258-3222 LarsonDavis.com FAX: 716-926-8215...
Need help?
Do you have a question about the NoiseTutor and is the answer not in the manual?
Questions and answers