Table of Contents
Advertisement
Available languages
Available languages
NODE
Battery-Operated Controller
EN
Owner's manual and programming instructions
Programador de pilas
ES
Manual del usuario e instrucciones de programación
Programmateur à piles
FR
Manuel de l'utilisateur et consignes de programmation
Programmatore a batteria
IT
Manuale dell'utente e istruzioni per la programmazione
Batteriebetriebenes Steuergerät
DE
Bedienungs- und Programmieranleitung
Controlador de Funcionamento a Pilhas
PT
Manual do Proprietário e Instruções de Utilização
Pilli Kontrol Ünitesi
TR
Kurulum, Programlama ve Kullanım Kılavuzu
Advertisement
Chapters
Table of Contents

Related Manuals for Hunter NODE-100


Summary of Contents for Hunter NODE-100
- Page 1 NODE Battery-Operated Controller Owner’s manual and programming instructions Programador de pilas Manual del usuario e instrucciones de programación Programmateur à piles Manuel de l'utilisateur et consignes de programmation Programmatore a batteria Manuale dell’utente e istruzioni per la programmazione Batteriebetriebenes Steuergerät Bedienungs- und Programmieranleitung Controlador de Funcionamento a Pilhas Manual do Proprietário e Instruções de Utilização...
-
Page 2: Table Of Contents
TABLE OF CONTENTS NODE FEATURES . . . . . . . . . . . . . . . . . . . . . . . . . . . . . . . . . . . . . . . . . . . . . . . 2 BATTERY-LIFE INDICATOR . -
Page 3: Node Features
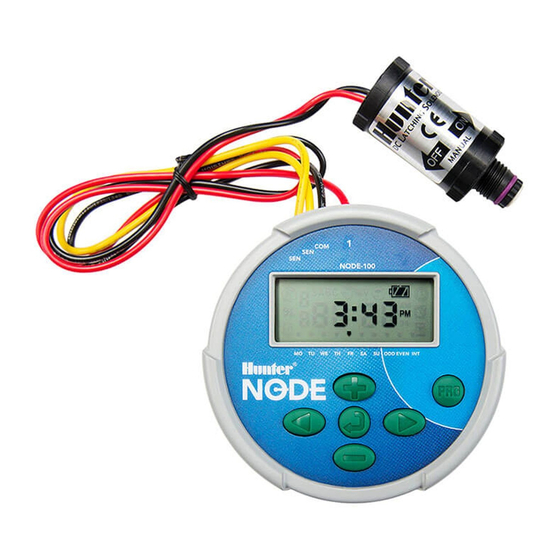
NODE FEATURES • Simple push-button programming • Single-station model (NODE-100) with DC latching solenoid . Single-, two-, four-, or six-station models are also available (solenoids not included) . • Large Liquid Crystal Display (LCD) with easy-to-understand icons • Operates using at least one standard nine-volt alkaline battery (use two for extended battery life) •... -
Page 4: Node Components
NODE COMPONENTS LCD Display This section provides an overview of some of the components of the NODE . Each item will be discussed in further detail later . However, this Main Display – Indicates all program information section can be helpful in getting acquainted with the different options available . -
Page 5: Connecting The Battery/Batteries
CONNECTING THE BATTERY/BATTERIES To Install the Battery/Batteries The NODE uses one or two standard nine-volt batteries (not included) to operate the valves and program the controller . The controller can Unscrew the rear body of the NODE body to gain access to the operate using either a single nine-volt battery or using two nine-volt battery compartment. -
Page 6: Attaching Solenoids
ATTACHING SOLENOIDS To Wire DC Solenoids to the NODE The NODE-100 is provided with a solenoid attached to the controller . The NODE-100-LS does not include a solenoid . The NODE-200, Attach the black leads from each solenoid to the single common NODE-400, and NODE-600 multi-station controllers will operate up to wire (black lead) coming from the NODE. -
Page 7: To Mount The Node To A Valve (Figure 1)
MOUNTING THE NODE CONNECTING A WEATHER SENSOR The NODE can easily be mounted on any Hunter plastic valve . A A Hunter Mini-Clik or Wired Rain-Clik rain sensor can be connected ® ® specially designed valve mounting clip makes installation a snap . A to the NODE . -
Page 8: Setting The Date And Time
(A, B, or C) and four start times per program . On standard indicator . After a short period of inactivity, the display will shut off to Hunter controllers a dial is used to scroll between the programming retain battery power . Pressing any button will bring the NODE into functions . -
Page 9: Setting Watering Start Times
PROGRAMMING (CONTINUED) 6 . All four numbers are shown with the two numbers on the left flashing, representing the hour. Use the buttons to change the hour. Press the button to proceed to setting the minutes. All four numbers are shown with the two numbers on the right flashing, representing the minutes. -
Page 10: Setting Watering Days
PROGRAMMING (CONTINUED) Setting Watering Days Press the button until the icon is displayed. 2 . The program letter (A, B, or C) will be displayed. 3 . Arrows point at the specific days of the week on which watering will occur. Press the buttons to scroll though the days. -
Page 11: Turning The System Off
PROGRAMMING (CONTINUED) 4 . To manually activate a program, press the button. The program letter (A, B, or C) will show on the screen. If a different program is needed, press the button until the desired program is displayed. 5 . To stop the Manual Watering cycle, press the button until the Turning the System Off time is reduced to zero. -
Page 12: Sensor Operation
PROGRAMMING (CONTINUED) Sensor Operation The NODE is compatible with Hunter Clik-type rain sensors, including Mini-Clik , Freeze-Clik, and Wired Rain-Click , as well as many other ® ® interrupt-type devices/sensors that do not require power . Simply connect the sensor to the NODE controller by cutting the yellow wire loop and connecting to the sensor wires . -
Page 13: Advanced Programming Features
ADVANCED PROGRAMMING FEATURES Easy Retrieve Memory All advanced programming functions are initiated from the idle mode, which shows the time, day of the week, and battery-life indicator on This function allows the user to save a preferred program to permanent the display . -
Page 14: Setting Master Valve Operation
ADVANCED PROGRAMMING FEATURES (CONTINUED) 3 . Press the button once and the MV icon will display on the screen and the time will disappear. Station 1 is now acting as the master valve and will not be available in other programming NOTE: Be careful when using Easy Retrieve screens. - Page 15 BATTERY-LIFE INDICATOR RESETTING CONTROLLER The remaining battery life can be estimated from the battery-life Resetting the controller will erase the current program data and restart indicator shown on the display . The NODE can operate using either the controller . A reset does not, however, delete a program saved to a single nine-volt battery or using two nine-volt batteries .
- Page 16 Faulty solenoid . Replace solenoid . Incompatible solenoid . Must use Hunter DC latching solenoid (P/N 458200) or other compatible DC latching solenoid . Automatic irrigation does not Controller in System Off mode . Verify that controller is programmed for start at start time.
- Page 17 CARACTERÍSTICAS DE PROGRAMACIÓN AVANZADAS ....12 Bypass del sensor Memoria Easy Retrieve Configuración del funcionamiento de la válvula maestra (sólo para NODE-200, NODE-400 y NODE-600) Apagado programable (hasta 99 días) Quick Check de Hunter...
-
Page 18: Características De Node
• Programación sencilla con un botón . • Modelo de una estación (NODE-100) con solenoides tipo “latch” de CC . También modelos de una, dos, cuatro o seis estaciones disponibles (no se incluyen los solenoides) . • Gran pantalla de cristal líquido (LCD) con iconos fáciles de entender . -
Page 19: Componentes De Node
COMPONENTES DE NODE Pantalla LCD Esta sección proporciona una vista general de algunos de los componentes del NODE . Cada elemento se describirá detalladamente Pantalla principal : indica toda la información del programa. en secciones posteriores . Sin embargo, esta sección puede resultar útil para familiarizarse con las distintas opciones disponibles . -
Page 20: Conexión De La(S) Pila(S)
CONEXIÓN DE LA(S) PILA(S) Instalación de las pilas El NODE utiliza una o dos pilas estándar de 9 voltios (no incluidas) para operar las válvulas y configurar el programador . El programador puede Desenrosque la tapa posterior del cuerpo de NODE para poder funcionar usando una sola pila de 9 voltios o dos pilas de 9 voltios . -
Page 21: Conexión De Solenoides
Cableado de solenoides DC a NODE El NODE-100 se proporciona con un solenoide conectado al programador . El NODE-100 se proporciona con un solenoide conectado Conecte los cables negros de cada solenoide al único cable común al programador . Los programadores multiestación NODE-200, (cable negro) de NODE. -
Page 22: Montaje De Node En Una Válvula (Figura 1)
CONEXIÓN DE UN SENSOR METEOROLÓGICO NODE se pude montar con facilidad en cualquier válvula de plástico Un sensor de lluvia Hunter Mini-Clik® o Rain-Clik® cableado se puede de Hunter . Una pinza de montaje de válvula especialmente diseñada conectar al NODE . El propósito de este sensor es detener el riego si lo permite que la instalación sea sencilla . -
Page 23: Configuración De La Fecha Y La Hora
(A, B, or C) and four start times per programa . En los y el indicador de carga de la pila . Después de un breve período de programadores Hunter estándar, se usa un dial para desplazarse por inactividad, la pantalla se apagará para conservar carga de la pila . -
Page 24: Configuración De Las Horas De Inicio De Riego
PROGRAMACIÓN (CONTINUACIÓN) 6 . Los cuatro números se muestran con los dos números parpadeantes 6 . Pulse el botón para continuar con la siguiente función de a la izquierda, que representan la hora. Utilice los botones programación o para permitir que el programador regrese al modo para cambiar la hora. -
Page 25: Configuración De Los Días De Riego
PROGRAMACIÓN (CONTINUACIÓN) Configuración de los días de riego Pulse el botón hasta que se muestre el icono 2 . Se mostrará la letra del programa (A, B o C). 3 . Las flechas señalan los días específicos de la semana en que el riego Selección de días de intervalo de riego se activará. -
Page 26: Apagado Del Sistema
PROGRAMACIÓN (CONTINUACIÓN) 3 . El valor programado del ajuste estacional se aplicará a todos los 3 . Utilice los botones para seleccionar la estación deseada programas de riego y se reflejará inmediatamente en los tiempos de y los botones para asignar el tiempo de riego manual para riego mostrados. -
Page 27: Funcionamiento Del Sensor
PROGRAMACIÓN (CONTINUACIÓN) Funcionamiento del sensor El NODE es compatible con los sensores de lluvia Hunter tipo Clik, incluyendo los Mini-Clik®, Freeze-Clik, y Rain-Click® cableado, así como con muchos otros dispositivos/sensores tipo interruptor que no requieren corriente . Basta con conectar el sensor al programador NODE cortando el bucle de cable amarillo y conectándolo a los cables... -
Page 28: Características De Programación Avanzadas
CARACTERÍSTICAS DE PROGRAMACIÓN AVANZADAS Memoria Easy Retrieve Todas las funciones de programación avanzada se inician desde el modo inactivo, que muestra la hora, el día de la semana y el indicador Esta función permite al usuario guardar un programa preferido a la de carga de la pila en la pantalla . -
Page 29: Configuración Del Funcionamiento De La Válvula Maestra
CARACTERÍSTICAS DE PROGRAMACIÓN AVANZADAS (CONTINUACIÓN) 3 . Pulse el botón una vez para que el icono MV aparezca en la pantalla y el tiempo desaparezca. A partir de ahora la estación NOTA: Preste atención al utilizar la memoria 1 actúa como la válvula maestra y no estará disponible en otras Easy Retrieve. - Page 30 INDICADOR DE CARGA DE LA PILA RESTABLECIMIENTO DEL PROGRAMADOR La carga restante de la pila se puede calcular con el indicador de carga Al restablecer el programador se borrarán los datos del programa de la pila que se muestra en la pantalla . El NODE puede funcionar actual y se reiniciará...
-
Page 31: Guía De Resolución De Problemas
Solenoide defectuoso . Sustituya el solenoide . Solenoide incompatible . Debe utilizar un solenoide de impulsos de Hunter (N/P 458200) u otro solenoide de impulsos compatible . El riego automático no se activa Programador en modo de sistema apagado . - Page 32 ESPECIFICACIONES Dimensiones: 89 mm (3½") de diámetro, 64 mm (2½") de alto Entradas para sensores: Uno Fuente de alimentación: Una pila alcalina de 9 voltios (use dos pilas para una mayor duración de las pilas). Temperatura de funcionamiento: - 17 ºC a 60 ºC o 0 ºF a 140 ºF Aprobaciones: IP68 C-Tick...
- Page 33 FONCTIONNALITÉS DE PROGRAMMATION AVANCÉES .....12 Dérivation de la sonde Mémoire Easy Retrieve Réglage du fonctionnement de l'électrovanne maîtresse (modèles NODE-200, NODE-400 et NODE-600 uniquement) Arrêt programmable (jusqu'à 99 jours) Procédure Quick Check de Hunter...
-
Page 34: Caracteristiques Du Node
• Programmation à l'aide d'un simple bouton . • Modèle à une seule station (NODE-100) avec solénoïde à impulsion CC . Des modèles à une, deux, quatre ou six stations sont également disponibles (solénoïdes non inclus) . • Grand écran à cristaux liquides (LCD) avec des icônes intuitives . -
Page 35: Composants De Node
COMPOSANTS DE NODE Ecran LCD Cette section présente certains composants du NODE . Chaque élément sera abordé plus en détails dans les chapitres suivants . Ecran principal : affiche toutes les informations du programme. Toutefois, cette section vous aidera à vous familiariser aux différentes options disponibles . -
Page 36: Connexion De La Ou Des Piles
CONNEXION DE LA OU DES PILES Pour installer la ou les piles Le NODE utilise une ou deux piles neuf volts standard (non incluses) pour activer les électrovannes et programmer le programmateur . Le Dévissez la partie arrière du corps du NODE afin d'ouvrir le programmateur peut fonctionner à... -
Page 37: Fixation Des Solenoides
FIXATION DES SOLENOIDES Câblage des solénoïdes à impulsion au NODE Le NODE-100 est livré avec un solénoïde connecté au programmateur . Le NODE-100-LS ne comprend pas de solénoïde . Les programmateurs Attachez les fils noirs de chaque solénoïde au seul câble neutre à... -
Page 38: Pour Monter Le Node Sur Une Électrovanne (Figure 1)
METEOROLOGIQUE Le NODE peut être monté facilement sur n'importe quelle électrovanne Une sonde de pluie Mini-Clik® o Rain-Clik® câblée de Hunter peut en plastique de Hunter . Cette installation est simplifiée grâce à être connectée au NODE . L'objectif de ce capteur est d'interrompre l'existence d'une bride spéciale de fixation sur électrovanne . -
Page 39: Réglage De La Date Et De L'heure
Le NODE utilise une programmation typique des programmateurs semaine, MV (si l'option d'électrovanne principale est activée), ainsi Hunter, avec trois programmes (A, B ou C) et quatre heures de que l'indicateur de durée de vie de la pile . Après une brève période démarrage par programme . -
Page 40: Définition Des Heures De Démarrage De L'arrosage
PROGRAMMATION (SUITE) 6 . Les quatre chiffres s'affichent, les deux de gauche représentant l'heure 6 . Appuyez sur le bouton pour passer à la fonction de programmation et clignotant. Appuyez sur le bouton pour changer l'heure. suivante ou pour revenir au mode de veille du programmateur. Appuyez sur le bouton pour passer au réglage des minutes. -
Page 41: Définition Des Jours D'arrosage
PROGRAMMATION (SUITE) Définition des jours d'arrosage Appuyez sur le bouton jusqu'à ce que l'icône s'affiche. 2 . La lettre du programme (A, B ou C) s'affiche. 3 . Les flèches pointent vers les jours de la semaine lors desquels aura Sélection du nombre de jours d'intervalle entre lieu un arrosage. -
Page 42: Mise Hors Tension Du Système
PROGRAMMATION (SUITE) 3 . La valeur programmée pour le réglage saisonnier est appliquée 3 . Sélectionnez la station souhaitée à l'aide des boutons à l'ensemble des programmes d'arrosage et elle est immédiatement puis réglez la durée d'arrosage manuel pour la station indiquée à prise en compte par les temps de fonctionnement affichés. -
Page 43: Fonctionnement Du Capteur
Fonctionnement du capteur Le NODE est compatible avec les sondes de pluie de type Clik de Hunter, notamment les Mini-Clik®, Freeze-Clik et Rain-Click® câblée, ainsi que de nombreux autres appareils/sondes d'interruption qui ne nécessitent pas d'alimentation . Il suffit de raccorder le capteur au programmateur NODE en coupant le câble jaune en boucle et en le... -
Page 44: Fonctionnalités De Programmation Avancées
FONCTIONNALITÉS DE PROGRAMMATION AVANCÉES Mémoire Easy Retrieve Toutes les fonctions de programmation avancées sont initiées à partir du mode veille, qui affiche l'heure, le jour de la semaine et Cette fonction permet à l'utilisateur d'enregistrer dans la mémoire l'indicateur de durée de vie de la pile sur l'écran . Quand un élément permanente du programmateur un programme préféré, qui pourra clignote à... -
Page 45: Réglage Du Fonctionnement De L'électrovanne Maîtresse
FONCTIONNALITÉS DE PROGRAMMATION AVANCÉES (SUITE) 3 . Appuyez une fois sur la touche ; l'icône MV s'affiche et la durée disparaît. La station 1 fait désormais office d'électrovanne Soyez attentif lors de l'utilisation de REMARQUE : maîtresse et elle ne sera pas disponible dans les autres écrans de la mémoire Easy Retrieve. - Page 46 INDICATEUR DE DURÉE DE VIE DE LA PILE RÉINITIALISATION DU PROGRAMMATEUR Il est possible d'estimer la durée de vie restante de la pile à l'aide de La réinitialisation du programmateur effacera les données du l'indicateur de durée de vie de la pile qui s'affiche sur l'écran . Le NODE programme active et redémarrera le programmateur .
- Page 47 Remplacez le solénoïde . passe. Solénoïde non compatible . Il faut utiliser un solénoïde à impulsion (n° de réf . 458200) de Hunter ou un autre solénoïde à impulsion compatible . L'arrosage automatique ne Le programmateur est en mode de système Assurez-vous que le programmateur est programmé...
- Page 48 . Active les solénoïdes à impulsion Hunter fonctionnant en 9 volts (n° de réf . Hunter 458200) Température de fonctionnement : De 0 ºF à 140 ºF ou - 17 ºC à 60 ºC...
- Page 49 FUNZIONI DI PROGRAMMAZIONE AVANZATE ........12 Bypass del sensore Memoria Easy Retrieve Impostazione del funzionamento valvola principale (solo NODE-200, NODE-400 e NODE-600) Spegnimento programmabile (fino a 99 giorni) Hunter Quick Check...
-
Page 50: Funzioni Node
• Programmazione con il semplice tocco di un pulsante • Modello a stazione singola (NODE-100) con solenoide bistabile CC . Sono disponibili anche modelli a una, due, quattro o sei stazioni (solenoidi non inclusi) . • LCD di grandi dimensioni con icone di facile utilizzo •... -
Page 51: Componenti Del Node
COMPONENTI DEL NODE Display LCD In questa sezione viene fornita una panoramica di alcuni componenti del programmatore NODE . Ogni elemento verrà analizzato in dettaglio Schermo principale – Mostra le impostazioni dei programmi successivamente . Questa sezione può comunque essere utile per conoscere le varie opzioni disponibili . -
Page 52: Collegamento Della Batteria/Batterie
COLLEGAMENTO DELLA BATTERIA/BATTERIE Per installare le batterie Il programmatore NODE usa una o due batterie standard a 9 V (non incluse) per il funzionamento delle valvole e la programmazione del Svitare la sezione posteriore del corpo di NODE per accedere allo programmatore . -
Page 53: Collegamento Dei Solenoidi
COLLEGAMENTO DEI SOLENOIDI Per cablare i solenoidi cc su NODE NODE-100 è fornito con un solenoide collegato al programmatore . NODE-100-LS non include un solenoide . I programmatori NODE-200, Collegare i contatti neri provenienti da ogni solenoide all'unico NODE-400, e NODE-600 a più stazioni funzioneranno con due, quattro cavo comune (contatto nero) proveniente da NODE. -
Page 54: Per Installare Node Su Una Valvola (Figura 1)
NODE può essere facilmente installato su qualsiasi valvola in plastica È possibile collegare un sensore pioggia Hunter Mini-Clik® o Rain-Clik® Hunter . L'installazione è facilitata da un apposito fermaglio per il cablato al programmatore NODE . Questo sensore ha lo scopo di montaggio sulle valvole . -
Page 55: Impostazione Di Data E Ora
(A, B o C) e quattro orari di avvio per durata batteria . Dopo un breve periodo di inattività, il display viene programma . Sui programmatori Hunter standard, è disponibile un spento per allungare la durata della batteria . La pressione di qualsiasi selettore che consente di scorrere le funzioni di programmazione . -
Page 56: Impostazione Degli Orari Di Partenza Dell'irrigazione
PROGRAMMAZIONE (CONTINUA) 6 . Tutti i quattro numeri vengono mostrati con i due numeri a sinistra 6 . Premere il pulsante per procedere alla funzione di lampeggianti, che rappresentano l’ora. Utilizzare i pulsanti programmazione successiva o più volte per riportare il per cambiare l'ora. -
Page 57: Impostazione Dei Giorni Di Irrigazione
PROGRAMMAZIONE (CONTINUA) Impostazione dei giorni di irrigazione Premere il pulsante fino a quando viene visualizzata l'icona 2 . Verrà visualizzata la lettera del programma (A, B o C). 3 . Le frecce indicano i giorni specifici della settimana nei quali avrà luogo l'irrigazione. -
Page 58: Spegnimento Del Sistema
PROGRAMMAZIONE (CONTINUA) 4 . Per attivare manualmente un programma, premere il pulsante Verrà visualizzata la lettera del programma (A, B o C). Se è richiesto un altro programma, premere il pulsante fino a visualizzare il programma desiderato. 5 . Per interrompere il ciclo di irrigazione manuale, premere il Spegnimento del sistema pulsante fino a ridurre il tempo a zero. -
Page 59: Funzionamento Sensore
PROGRAMMAZIONE (CONTINUA) Funzionamento sensore NODE è compatibile con i sensori pioggia di tipo Hunter Clik, inclusi Mini-Clik®, Freeze-Clik e Rain-Click® cablato, nonché molti altri dispositivi/sensori di tipo a interruzione che non richiedono alimentazione . Collegare semplicemente il sensore al programmatore NODE tagliando l'anello di filo giallo e collegandolo ai cavi del sensore . -
Page 60: Funzioni Di Programmazione Avanzate
FUNZIONI DI PROGRAMMAZIONE AVANZATE Memoria Easy Retrieve Tutte le funzioni di programmazione avanzate vengono avviate dalla modalità di inattività, che mostra l’ora, il giorno della settimana e Questa funzione consente di salvare un programma preferito nella l’indicatore durata batteria sul display . Se sul display lampeggia memoria permanente del programmatore, affinché... -
Page 61: Impostazione Del Funzionamento Valvola Principale
FUNZIONI DI PROGRAMMAZIONE AVANZATE (CONTINUA) Prestare attenzione nell'utilizzare la NOTA: memoria Easy Retrieve. Easy Retrieve salverà i dati del programma corrente sovrascrivendo ciò che era salvato nella memoria permanente. 4 . Quando la valvola principale viene attivata, funzionerà con tutti Quando si salvano dei dati assicurarsi che i dati del i programmi e l'icona MV rimarrà... - Page 62 INDICATORE DURATA BATTERIA RESETTAGGIO DEL PROGRAMMATORE La capacità rimanente della batteria può essere stimata dall’indicatore Resettando il programmatore si cancelleranno i dati e si riavvia durata batteria mostrato sul display . NODE può funzionare con una il programmatore stesso . Un reset non cancella comunque un o due batterie a 9 V .
- Page 63 Solenoide guasto . Sostituire il solenoide . Solenoide incompatibile . È necessario utilizzare un solenoide bistabile a c .c . Hunter (P/N 458200) o altro solenoide bistabile cc compatibile . L'irrigazione automatica non si Il programmatore è in modalità System Off .
- Page 64 Ingressi sensori: uno Fonte di alimentazione: una batteria a 9 V (usarne due per aumentare la durata). Attiva solenoidi cc bistabili funzionanti a 9-11Vcc (Hunter PN 458200) Temperatura di funzionamento: da 0ºF a 140ºF oppure da - 17ºC a 60ºC...
- Page 65 ERWEITERTE PROGRAMMIERFUNKTIONEN ........12 Sensorüberbrückung Permanentspeicher Einrichten des Hauptventilbetriebs (nur für NODE-200, NODE-400 und NODE-600) Programmierbar Aus (bis zu 99 Tagen) Hunter Quick Check...
-
Page 66: Node Ausstattungsmerkmale
NODE AUSSTATTUNGSMERKMALE • Einfache Drucktasten-Programmierung • Einzelstationenmodell (NODE-100) mit DC Impulsspule . Modelle mit ein, zwei, vier oder sechs Stationen sind ebenfalls verfügbar (Spulen nicht im Lieferumfang enthalten) . • Großes Flüssigkristall-Display (LCD) mit leicht verständlichen Symbolen • Betrieb über mindestens eine herkömmliche 9-Volt Alkalibatterie (verwenden Sie zwei für eine erweitere Batterielebensdauer) •... -
Page 67: Node Komponenten
NODE KOMPONENTEN LCD-Anzeige Dieser Abschnitt bietet Ihnen eine Übersicht einiger NODE-Kompo- nenten . Die detaillierte Erklärung jedes Elements folgt an späterer Hauptanzeige: Zeigt alle Angaben zum Programm an Stelle . Dieser Abschnitt kann jedoch hilfreich sein, um sich mit den 2 . -
Page 68: Anschliessen Der Batterie/Batterien
ANSCHLIESSEN DER BATTERIE/BATTERIEN So installieren Sie die Batterie/Batterien Das NODE verwendet ein oder zwei herkömmliche 9-Volt Alkalibatterien (nicht im Lieferumfang enthalten), um die Ventile zu betreiben und das Schrauben Sie die Rückseite des NODE ab, um Zugriff auf das Steuergerät zu programmieren . Das Steuergerät kann entweder mit Batteriefach zu erhalten. -
Page 69: Anbringen Der Magnetspulen
ANBRINGEN DER MAGNETSPULEN So verkabeln Sie Gleichstrom-Magnetspulen mit Das NODE-100 wird mit einer Spule geliefert, die am Steuergerät befestigt ist . Bei dem NODE-100-LS ist keine Spule im Lieferumfang dem NODE enthalten . Die NODE-200, NODE-400 und NODE-600 Steuergeräte Verbinden Sie die schwarze Ader einer jeden Magnetspulen mit für mehrere Stationen betreiben jeweils bis zu zwei, vier oder sechs... -
Page 70: So Montieren Sie Den Node Auf Ein Ventil (Abbildung 1)
MONTAGE DES NODE ANSCHLIESSEN EINES WETTERSENSORS Der NODE kann leicht an jedem beliebigen Hunter Kunststoffventil Das NODE kann auch mit einem Hunter Mini-Clik® oder Wired angebracht werden . Mit der speziell entworfenen Montageklammer Rain-Clik® Regensensor verbunden werden . Ein solcher Sensor dient ist die Installation eine Leichtigkeit . -
Page 71: Datum Und Uhrzeit Einstellen
Steuergeräte mit drei Programmen (A, B oder C) und vier Startzeiten Batteriestandanzeige an . Nach kurzer Inaktivität schaltet sich das pro Programm . Bei den Standard Hunter Steuergeräten wird ein Display aus, um die Batterie zu schonen . Drücken Sie auf eine beliebige Drehschalter verwendet, um zwischen den Programmierfunktionen Taste, um den Leerlaufmodus zu beenden . -
Page 72: Bewässerungszeiten Einstellen
PROGRAMMIERUNG (FORTSETZUNG) 6 . Alle vier Nummern werden mit den zwei blinkenden Nummern 6 . Drücken Sie die Taste , um zur nächsten Programmierfunktion links dargestellt, die die Stunde anzeigen. Ändern Sie die Stunde zu gelangen oder lassen Sie das Steuergerät wieder in den anhand der Tasten oder . -
Page 73: Bewässerungstage Einstellen
PROGRAMMIERUNG (FORTSETZUNG) Bewässerungstage einstellen 4 . Sobald der Modus UNGERADE oder GERADE aktiviert ist, ist dies der einzige auf der Anzeige dargestellte Cursor. Drücken Sie die Taste solange, bis das -Symbol angezeigt wird. 2 . Der Programmbuchstabe (A, B oder C) wird angezeigt. 3 . -
Page 74: Ausschalten Des Systems
PROGRAMMIERUNG (FORTSETZUNG) 3 . Der für die saisonale Anpassung programmierte Wert wird 2 . Die Stationsnummer wird in der Anzeige unten links zusammen allen Bewässerungsprogrammen zugewiesen und umgehend mit der Laufzeit angezeigt. in den angezeigten Laufzeiten reflektiert. Wenn beispielsweise 3 . Wählen Sie mit den Tasten die gewünschte Station, Laufzeiten von 20 Minuten programmiert werden und dann die und bestimmen Sie für sie mit den Tasten... -
Page 75: Sensorbetrieb
PROGRAMMIERUNG (FORTSETZUNG) Sensorbetrieb Das NODE ist mit den Hunter Clik Regensensoren kompatibel, inklusive dem Mini-Clik®, Freeze-Clik und dem Wired Rain-Click® sowie vielen weiteren Unterbrechungsgeräten/-sensoren, die keinen Stromanschluss benötigen . Verbinden Sie den Sensor einfach mit dem NODE-Steuergerät, indem Sie die gelbe Aderschlaufe durchschneiden und die Enden mit den Sensoradern verbinden . -
Page 76: Erweiterte Programmierfunktionen
ERWEITERTE PROGRAMMIERFUNKTIONEN Permanentspeicher Alle erweiterten Programmfunktionen werden aus dem Leerlaufmodus ausgelöst, in dem Zeit, Wochentag und Batteriestandanzeige Mit dieser Funktion kann der Benutzer ein bevorzugtes auf dem Display angezeigt werden . Wenn ein Element im Display Programm im Permanentspeicher des Steuergeräts speichern, blinkt bedeutet dies, dass sich das Steuergerät in einem der das jederzeit wiederhergestellt werden kann . -
Page 77: Einrichten Des Hauptventilbetriebs
ERWEITERTE PROGRAMMIERFUNKTIONEN (FORTSETZUNG) 3 . Drücken Sie einmal die Taste . Das MV-Symbol erscheint im Display und die Zeitanzeige erlischt. Station 1 agiert nun als das Lassen Sie bei der Verwendung des HINWEIS: Hauptventil und kann in anderen Programmieranzeigen nicht Permanentspeichers Vorsicht walten. - Page 78 BATTERIESTANDANZEIGE STEUERGERÄT ZURÜCKSETZEN Die Batteriestandanzeige zeigt auf dem Display an, wie viel Durch ein Zurücksetzen des Steuergerätes werden die aktuellen Lebensdauer Ihre Batterie noch hat . Das NODE kann entweder mit Programmdaten gelöscht und das Steuergerät neu gestartet . Ein in einer oder auch mit zwei herkömmlichen 9-Volt Alkalibatterien den permanenten Speicher gespeichertes Programm (siehe Seite betrieben werden .
- Page 79 Schalten Sie die Hauptsystemversorgung ein . an, obwohl keine stattfindet. Defekte Magnetspule . Ersetzen Sie die Magnetspule . Nicht kompatible Magnetspule . Es müssen Hunter DC Impulsspulen für Batteriebetrieb (T/N 458200) oder vergleichbare, kompatible Gleichstrom-Impulsmagnetspulen verwendet werden . Die automatische Bewässerung Steuergerät im System-Aus-Modus .
- Page 80 TECHNISCHE DATEN Abmessungen: Durchmesser 89 mm, Höhe 64 mm Sensoreingänge: Einer Stromquelle: Eine 9-Volt Alkalibatterie (verwenden Sie zwei für eine erweitere Batterielebensdauer). Betriebstemperatur: - 17 ºC bis 60 ºC oder 0 ºF bis 140 ºF Zulassungen: IP68 C-Tick...
- Page 81 RECURSOS DE PROGRAMAÇÃO AVANÇADOS ........12 Supressão do sensor Memória Easy Retrieve Ajuste do funcionamento da válvula mestre (somente para NODE-200, NODE-400 e NODE-600) Interrupção programável (até 99 dias) Teste Quick Check da Hunter...
-
Page 82: Características Do Node
• Programação simples por meio de botões • Modelo de setor único (NODE-100) com com solenoide latching CC . Também estão disponíveis modelos de um, dois, quatro ou seis setores (solenoides não incluídos). • Visor amplo de cristal líquido (LCD) com ícones fáceis de entender Funciona com pelo menos uma bateria alcalina comum de 9 V (utilize duas para aumentar a duração) -
Page 83: Componentes Do Node
COMPONENTES DO NODE Visor LCD Esta seção oferece uma visão geral dos componentes do NODE . Cada item será discutido em detalhes mais adiante . No entanto, esta Tela principal: indica todas as informações do programa. seção pode ajudar você a se familiarizar com as diferentes opções disponíveis . -
Page 84: Conexão Da(S) Bateria(S)
CONEXÃO DA(S) BATERIA(S) Como instalar as baterias O NODE usa uma ou duas baterias comuns de 9 V (não incluídas) para operar as válvulas e programar o controlador . O controlador Desenrosque a parte traseira do corpo do NODE para ter acesso ao pode funcionar com uma ou com duas baterias de 9 V . -
Page 85: Conexão Dos Solenoides
CONEXÃO DOS SOLENOIDES Como conectar solenoides CC ao NODE O NODE-100 é fornecido com um solenoide ligado ao controlador . O NODE-100-LS não inclui um solenoide . Os controladores de vários Ligue os terminais pretos de cada solenoide ao fio comum único setores NODE-200, NODE-400 e NODE-600 controlam até... -
Page 86: Como Instalar O Node Em Uma Válvula (Figura 1)
Hunter pode ® ® da Hunter . O encaixe é feito rapidamente por meio de uma presilha ser conectado ao NODE . O objetivo do sensor é interromper a rega de de montagem especialmente projetada . Uma tampa protetora de acordo com as condições meteorológicas . -
Page 87: Ajuste De Data E Hora
MODO INATIVO Normalmente, o visor do NODE mostra a hora e o dia, o dia da semana, O NODE utiliza a programação padrão da Hunter com três programas MV (se a opção de válvula mestre estiver ativada) e o indicador de nível (A, B ou C) e quatro horários de início por programa . -
Page 88: Ajuste Dos Horários De Início De Rega
PROGRAMAÇÃO (CONTINUAÇÃO) Serão mostrados quatro dígitos. Os dois números piscando à 6 . Pressione o botão para avançar para a próxima função de esquerda representam a hora. Utilize os botões para programação ou permitir que o controlador volte ao modo inativo. alterar a hora. -
Page 89: Ajuste Dos Dias De Rega
PROGRAMAÇÃO (CONTINUAÇÃO) Ajuste dos dias de rega Pressione o botão até que o ícone seja mostrado. 2 . Será mostrada a letra do programa (A, B ou C). 3 . As setas indicam os dias específicos da semana em que a rega irá ocorrer. -
Page 90: Desligamento Do Sistema
PROGRAMAÇÃO (CONTINUAÇÃO) 4 . Para ativar um programa de forma manual, utilize o botão A letra do programa (A, B ou C) será exibida na tela. Se for necessário usar um programa diferente, pressione o botão até que o programa desejado apareça. 5 . -
Page 91: Funcionamento Do Sensor
. NOTA: o controlador NODE não é compatível com o Rain-Clik sem fio da Hunter ou outros ® dispositivos meteorológicos que exijam alimentação de 24 VCA. Quando o sensor for ativado, a irrigação será suspensa e o ícone... -
Page 92: Recursos De Programação Avançados
RECURSOS DE PROGRAMAÇÃO AVANÇADOS Memória Easy Retrieve Todas as funções de programação avançadas são iniciadas no modo inativo, que mostra a hora, o dia da semana e o indicador de nível Essa função permite salvar um programa preferido na memória das baterias . -
Page 93: Ajuste Do Funcionamento Da Válvula Mestre
RECURSOS DE PROGRAMAÇÃO AVANÇADOS (CONTINUAÇÃO) 3 . Pressione o botão uma vez. O ícone MV (Válvula mestre) será mostrado na tela e o tempo irá desaparecer. Com isso, o setor 1 tenha cuidado ao usar a memória Easy NOTA: atuará como válvula mestre e não estará disponível em outras Retrieve. -
Page 94: Indicador Do Nível Das Baterias
INDICADOR DO NÍVEL DAS BATERIAS REDEFINIÇÃO DO CONTROLADOR É possível ter uma estimativa da carga restante da(s) bateria(a) por Quando o controlador é redefinido, os dados do programa atual são meio do indicador mostrado no visor . O NODE pode funcionar com uma apagados e o controlador é... -
Page 95: Guia De Resolução De Problemas
O solenoide está com defeito . Substitua o solenoide . O solenoide não é compatível . Deve ser usado um solenoide latching CC da Hunter (ref . 458200) ou outro solenoide latching CC compatível . A rega automática não começa O controlador está no modo Sistema Desligado . -
Page 96: Especificações
Entradas de sensor: Uma Alimentação: uma bateria alcalina de 9 V (utilize duas para aumentar a duração) . Ativa solenoides latching CC que funcionam a 9-11 VCC (ref . da Hunter: 458200) Temperatura de funcionamento: - 17 ºC a 60 ºC (0 ºF a 140 ºF) Certificações:... - Page 97 GELİŞMİŞ PROGRAMLAMA ÖZELLİKLERİ ......... . 12 Sensorun Atlatılması Kolay Erişilebilen Hafıza Ana Vana Ayarları (Sadece NODE-200, NODE-400, & NODE-600 ‘de) Programlanabilir Kapatma (99 güne kadar) Hunter Hızlı Test Özelliği...
-
Page 98: Node Özelli̇kleri̇
NODE ÖZELLİKLERİ • Basitçe düğmeye basarak programlama • DC-latching solenoidi içeren tek istasyonlu model (NODE-100) . Ayrıca tek, iki, dört veya altı istasyonlu modeller de sunulur (solenoidler dahil değildir) . • Anlaşılır simgelere sahip geniş Likit Kristal Ekran (LCD) •... -
Page 99: Node Bi̇leşenleri̇
NODE BİLEŞENLERİ LCD Ekran Bu bölümde bazı NODE bileşenlerine yönelik genel bakış sunulur . Her bir detay daha sonra ayrıntılı olarak incelenecektir . Yine de bu bölüm Ana Ekran – Tüm program bilgilerini gösterir. farklı kullanma opsiyonları ile tanışmanız için size yardımcı olacaktır . 2 . - Page 100 PİL/PİLLERİN BAĞLANTISI NODE, vanaları çalıştırmak ve kontrol ünitesini programlamak için bir Pilin/Pillerin Montajı veya iki adet standart dokuz voltluk pil (dahil değildir) kullanır . Kontrol Batarya bölümüne ulaşmak için NODE ‘un alt kısmını çevirerek ünitesi, bir veya iki adet dokuz voltluk pil kullanılarak çalıştırılabilir . açınız.
- Page 101 SOLENOİDLERIN BAĞLANMASI DC Solenoidlerin NODE’a kablolanması NODE-100, kontrol ünitesine takılı bir solenoid ile gönderilir . NODE-100-LS solenoid içermez . NODE-200, NODE-400 ve NODE-600 Her bir selenoid bobinden gelen siyah kabloları, NODE ’dan çok istasyonlu kontrol üniteleri, sırasıyla iki, dört veya altı adede kadar gelen tek ortak kabloya (siyah kablo) bağlayınız.
-
Page 102: Node 'Un Montaji
NODE’ UN MONTAJI HAVA SENSORÜ BAĞLAMA NODE kolaylıkla herhangi bir Hunter vanasına monte edilebilir . Özel Hunter Mini-Clik® veya Kablolu Rain-Clik® yağmur sensörü NODE’ye olarak tasarlanmış vana montaj aparatı montajı basit bir hale getirir . bağlanabilir . Bu sensörün bağlanmasının temel amacı, hava koşullarının Kauçuk koruma kapağı,NODE ‘un yüzeyinde biriken kirden korunmasını... -
Page 103: Rölanti̇ Modu
RÖLANTİ MODU Normal koşullarda NODE ekranında saat ve gün, hafta günü, MV (ana NODE Hunter control ünitelerinin kullandığı 3 program (A,B,C) NODE, vana seçeneği etkinse) ve pil ömrü göstergesi gösterilir . Bir süre hiçbir üç program (A, B veya C) ve her program başına üç başlangıç zamanı ile işlem yapılmazsa ekran, pil gücünü... -
Page 104: Programlama
PROGRAMLAMA (DEVAMI) 6 . Dört rakamın sol tarafında yanıp sönen iki rakam saati temsil eder. veya tuşlarını saati değiştirmek için kullanınız. tuşuna basarak dakika ayarını değişirmeye geçin. Dört rakamın sağ tarafında yanıp sönen iki rakam dakikayı temsil eder. veya tuşlarını dakikayı değiştirmek için kullanınız. tuşuna basarak yıl ayarından sonraki 2 adıma geçilir. - Page 105 PROGRAMLAMA (DEVAMI) Sulama Günlerinin Programlanması 4 . ODD-TEK veya EVEN-ÇİFT gün özelliği aktive edildiğinde ekranda aşağdaki şekil gibi tek bir ok olacaktır. ikonu görünene dek düğmesine basınız. 2 . Program harfi (A, B, ve C) görüntülenecektir. 3 . Oklar, sulamanın gerçekleşeceği belirli hafta günlerine işaret eder. veya tuşlarına basarak günlerin arasında gezebilirsiniz.
-
Page 106: Sistemin Kapatılması
PROGRAMLAMA (DEVAMI) 4 . Manuel olarak programı aktive etmek için, tuşuna basın. Program harfi (A,B veya C) ekranda görünecektir. Eğer değişik bir program gerekirse, tuşuna istenilen grogram gelene dek basılır. 5 . Manuel sulama döngüsünü durdurmak için, tuşuna zaman sıfıra düşünceye kadar basılı tutun. tuşuna basarak bir sonraki programlama fonksiyonuna Sistemin Kapatılması... - Page 107 PROGRAMLAMA (DEVAMI) Sensör Bağlantısı NODE; Mini-Clik®, Freeze-Clik ve Kablolu Rain-Click® dahil olmak üzere Hunter Clik türü yağmur sensörleriyle ve güç gerektirmeyen ve sulamaya müdahale eden diğer birçok aygıtlar/sensörlerle uyumludur . Basitçe sensörün NODE kontrol ünitesine bağlantısı sarı halka biçimdeki kabloyu kesip ve bu kabloyu sensör kablolarına bağlayarak gerçekleştirilir .
-
Page 108: Geli̇şmi̇ş Programlama Özelli̇kleri̇
GELİŞMİŞ PROGRAMLAMA ÖZELLİKLERİ Tüm gelişmiş programlama işlevleri, ekranda saati, hafta gününü ve pil Kolay Erişilebilen Hafıza ömrü göstergesini gösteren rölanti modundan başlatılır . Eğer ekranının Bu işlev, kullanıcıların istedikleri bir programı kontrol ünitesinin üzerinde herhangi yanan sönen bir şekil varsa ,bu kontrol ünitesinin kalıcı... - Page 109 GELİŞMİŞ PROGRAMLAMA ÖZELLİKLERİ (DEVAMI) tuşuna bir kere basın ve MV (Ana Vana) şekli ekranda görülecektir ve zaman göstergesi kaybolacaktır. İstasyon 1 ana NOT: Kolay Erişilebilen Hafızayı kullanırken dikkatli vana olarak aktiftir ve diğer programlama ekranlarında görül- olunuz. Kolay erişebilir belleği kullanarak hafızaya meyecektir.
- Page 110 PİL ÖMRÜ GÖSTERGESİ KONTROL ÜNITESININ RESETLENMESI Kalan pil ömrü, ekranda gösterilen pil ömrü göstergesinden Kontrol ünitesinin resetlenmesi esnasında mevcut program silinecek ve hesaplanabilir . NODE, bir veya iki adet dokuz voltluk pil kullanılarak kontrol ünitesi tekrardan başlayacaktır . Ancak, resetleme işlemi Kolay çalıştırılabilir .
- Page 111 Ana sistemi kontrol ediniz . çalışmıyor. Hatalı solenoid . Solenoidi değiştiriniz . Uyumsuz solenoid . Hunter DC Latching Solenoid (P/N 458200) veya diğer uyumlu DC latching solenoidler kullanılmalıdır . Otomatik sulama başlama Kontrol Ünitesi Kapalı Sistem/System Off Kontrol ünitesinin otomatik sulama için doğru zamanında çalışmıyor.
- Page 112 Hunter Industries Incorporated © 2018 Hunter Industries Incorporated 1940 Diamond Street San Marcos, California 92078, USA LIT-560 6/18 • www .hunterindustries .com/global...
Need help?
Do you have a question about the NODE-100 and is the answer not in the manual?
Questions and answers
I cant get the node to go into auto mode
If you take the battery out, will that clear the memory?
Is there a manual for the Hunter 200 node?
Program A1 won't start but Program B1 does start. Why does this happen