Table of Contents
Advertisement
Quick Links
This product requires an AcuRite 3-in-1 Weather Sensor
CONTENTS
Unpacking Instructions ........... 2
Package Contents .................. 2
Product Registration ............... 2
Wi-Fi Setup ............................ 3
Features & Benefits ................. 5
Setup .................................... 8
Set the Time, Date & Units ...... 8
Backlight Settings ................... 8
Placement Guidelines ............. 9
Questions?
www.AcuRite.com/support or email support@chaney-inst.com
SAVE THIS MANUAL FOR FUTURE REFERENCE.
Professional Weather Display
(sold separately) to be operational.
Contact Customer Support at
Instruction Manual
Using the Weather Center ...... 9
Calibration ...........................10
Troubleshooting .................... 11
Care & Maintenance .............13
Specifications ........................13
FCC Information ...................13
Customer Support .................14
Warranty..............................14
model 06087
Advertisement
Table of Contents

Related Manuals for ACU-RITE 06087


Summary of Contents for ACU-RITE 06087
-
Page 1: Table Of Contents
Instruction Manual Professional Weather Display model 06087 This product requires an AcuRite 3-in-1 Weather Sensor (sold separately) to be operational. CONTENTS Unpacking Instructions ... 2 Using the Weather Center ..9 Package Contents ....2 Calibration ......10 Product Registration ....2 Troubleshooting .... -
Page 2: Unpacking Instructions
Congratulations on your new AcuRite product. To ensure the best possible product performance, please read this manual in its entirety and retain it for future reference. Unpacking Instructions Remove the protective film that is applied to the LCD screen prior to using this product. -
Page 3: Wi-Fi Setup
Wi-Fi Setup for Weather Underground This weather station features wireless Internet connectivity in order to connect and send your data to Weather Underground . If you do not already have a WU (Weather Underground ) account, please create your account at wunderground.com prior to the following Wi-Fi setup. -
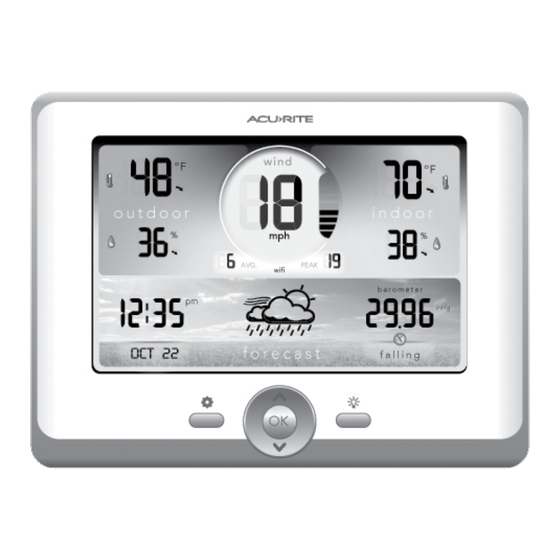
Page 4: Features & Benefits
Features & Benefits Display 14 15... - Page 5 DISPLAY FRONT 1. Current Outdoor Temperature 18. Current Indoor Temperature Arrow icon indicates direction the Arrow icon indicates direction the temperature is trending. temperature is trending. Icon 19. Current Indoor Humidity Indicates high records are being Arrow icon indicates the direction the humidity is trending.
-
Page 6: Setup
SETUP Features & Benefits BACK OF DISPLAY 1. Integrated Hang Hole 6. Plug-in for Power Adapter For easy wall mounting. 7. A-B-C Switch 2. RESET Button ID code that must match sensor’s For full reset to factory defaults. A-B-C switch to ensure units synchronize. - Page 7 Display Setup Set the A-B-C Switch 2. Insert 3 x AAA alkaline batteries into the battery Locate the A-B-C switch inside compartment, as shown. Follow the battery compartment. Set the polarity (+/–) diagram in the A-B-C switch to A, B or C. the battery compartment.
-
Page 8: Set The Time, Date & Units
Set the Time, Date & Units Press the “ ” button, located on the front of the display, to enter SET MODE. Once in set mode, the preference you are currently setting will blink on the display. To adjust the currently selected (flashing) item, press and release the “ “... -
Page 9: Placement Guidelines
Placement for Maximum Accuracy AcuRite sensors are sensitive to surrounding environmental conditions. Proper placement of both the display and the sensor are critical to the accuracy and performance of this unit. Display Placement Place the display in a dry area free of dirt and dust. Display stands upright for tabletop use and is wall-mountable. -
Page 10: Calibration
High & Low Records High and low records reflect the minimum and maximum temperature and humidity recorded since the unit was powered on, since the batteries were replaced, or since the records were manually reset (whichever was most recent). To view the LOW records, press and release the “ ” button. The low record indicator appears on the display next to the low records. -
Page 11: Troubleshooting
Troubleshooting Problem Possible Solution • Relocate the display and/or the 3-in-1 sensor. The units must be within 330 ft (100 m) of each other. • Make sure both units are placed at least 3 feet (.9 m) away from electronics that may interfere with the wireless communication (such as TVs, microwaves, computers, etc). - Page 12 Troubleshooting Problem Possible Solution • Your internet router and display must be within range of each other. Relocate your display closer to your router. • Ensure the network name (SSID) and password you've entered are correct. NOTE: Both network name and password are case sensitive.
-
Page 13: Care & Maintenance
Care & Maintenance Display Care from dust, Clean with a soft, damp cloth. Do not use caustic cleaners or abrasives. Keep away dirt and moisture. Clean ventilation ports regularly with a gentle puff of air. Specifications DISPLAY’S BUILT-IN 32ºF to 122ºF; 0ºC to 50ºC TEMPERATURE SENSOR RANGE DISPLAY’S BUILT-IN... -
Page 14: Customer Support
Customer Support AcuRite customer support is committed to providing you with best-in- class service. For assistance, please have the model number of this product available and contact us in any of the following ways: support@chaney-inst.com AcuRite Visit us at www. .com Installation Videos Register your Product... - Page 16 ©Chaney Instrument Co. All rights reserved. AcuRite is a registered trademark of the Chaney Instrument Co., Lake Geneva, WI 53147. All other trademarks and copy- rights are the property of their respective owners. AcuRite uses patented technology. Printed in China 06087 INST 082318 Visit www.AcuRite.com/patents for details.
Need help?
Do you have a question about the 06087 and is the answer not in the manual?
Questions and answers