Fagor CNC 8060 Operating Manual
Hide thumbs
Also See for CNC 8060:
- Installation manual (900 pages) ,
- Translation of the original manual (180 pages) ,
- Operating manual (172 pages)
Table of Contents
Advertisement
Quick Links
Download this manual
See also:
Installation Manual
Advertisement
Chapters
Table of Contents

Related Manuals for Fagor CNC 8060


Summary of Contents for Fagor CNC 8060
- Page 1 8060 8065 Operating manual. (Ref: 1807)
- Page 2 CNC and at the drives. • Tendency test on analog axes. FAGOR AUTOMATION shall not be held responsible for any personal injuries or physical damage caused or suffered by the CNC resulting from any of the safety elements being disabled.
-
Page 3: Table Of Contents
O p e r a t i n g m a n u a l . I N D E X About the product - CNC 8060 ....................11 About the product - CNC 8065 ....................15 Declaration of CE conformity and warranty conditions ............... 21 Version history - CNC 8060 ...................... - Page 4 4.6.1 Treatment of functions M, H, F, S................110 Show/hide the dynamic override of the HSC............... 111 FFC (Fagor Feed Control) ................... 112 Display the status of the DMC (Dynamic Machining Control)........113 4.9.1 DMC status and progress..................113 4.9.2...
- Page 5 FMC (FAGOR MACHINING CALCULATOR). FMC calculator......................197 Materials table......................198 Operations table......................199 Working with the FMC....................200 Backup/Restore. Data backup copy................200 CHAPTER 10 FCAS (FAGOR COLLISION AVOIDANCE SYSTEM). 10.1 FCAS status......................... 202 10.2 FCAS operation......................203 CHAPTER 11 PROFILE EDITOR 11.1...
- Page 6 Softkey menus......................284 17.2 Zero offset tables ......................285 17.3 Fixture table ......................... 287 17.4 Arithmetic parameter tables ..................288 CNC 8060 17.5 Operations with tables ....................290 17.5.1 Data editing......................290 CNC 8065 17.5.2 Save and recall tables....................291 17.5.3...
- Page 7 Program monitoring ..................... 359 20.6.1 Softkey menus. Monitoring in C language or mnemonic language......360 20.6.2 Softkey menus. Monitoring in contact (ladder) language........361 CNC 8060 20.7 "Commands" service....................363 CNC 8065 20.7.1 Softkey menus. Options of the "Commands" service..........363 20.8...
- Page 8 –Parameters and variables– service................438 23.5 –Error management– service..................440 23.6 –Monitoring– service....................441 23.7 –Information– service ....................443 CNC 8060 23.8 Command generator (only Sercos)................445 23.9 Command line......................446 CNC 8065 23.10 File for setting the parameters of Mechatrolink servos..........448...
- Page 9 Report generation ......................459 24.6 View the history of errors and warnings issued by the CNC........460 24.7 Generating the Fagor file for error diagnosis............... 460 24.8 Access particular utilities of the operative system and other applications....460 24.9 Operating Terms.
- Page 10 BLANK PAGE ·10·...
-
Page 11: About The Product - Cnc 8060
O p e r a ti n g m a nu a l . ABOUT THE PRODUCT - CNC 8060 BASIC CHARACTERISTICS. Basic characteristics. 8060 8060 8060 8060 8060 M FL M Power T FL T Power Number of axes. - Page 12 SOFT DIGITAL SERCOS people without any prior programming knowledge or for Sercos digital bus. those that are not familiarized with Fagor CNC's. Sercos digital bus. Working in conversational mode is easier than in ISO mode, as it ensures proper data entry and minimizes the SOFT i4.0 CONNECTIVITY PACK...
- Page 13 A tandem axis consists in two motors mechanically The program translator may be used to convert programs coupled (slaved) and making up a single transmission written in other languages into Fagor ISO codes. system (axis or spindle). A tandem axis helps provide the SOFT THIRD PARTY CANOPEN necessary torque to move an axis when a single motor is Third-party CANopen.
- Page 14 BLANK PAGE ·14·...
-
Page 15: About The Product - Cnc 8065
PLC execution time. < 1ms/K Digital inputs / Digital outputs. 1024 / 1024 Marks / Registers. 8192 / 1024 Timers / Counters. 512 / 256 Symbols. Unlimited Block processing time. < 1 ms CNC 8060 CNC 8065 : 1807) ·15·... - Page 16 (**) TTL / Differential TTL / Sinusoidal 1 Vpp / SSI protocol / FeeDat / EnDat Customizing (on an open system only). PC-based open system, fully customizable. INI configuration files. Tool for display configuration FGUIM. Visual Basic®, Visual C++®, etc. Internal databases in Microsoft® Access. OPC compatible interface CNC 8060 CNC 8065 : 1807) ·16·...
- Page 17 It limits the number of axes to 4, where the CNC can also into the machine-tool market. With this feature, the PLC interpolate these at the same time. may be programmed either in the usual Fagor language or in IEC 61131 format. SOFT i4.0 CONNECTIVITY PACK This feature requires the MP-PLUS (83700201) Industry 4.0.
- Page 18 Part-program translator. The program translator may be used to convert programs SOFT TANDEM AXES written in other languages into Fagor ISO codes. Tandem axes. SOFT THIRD PARTY CANOPEN A tandem axis consists in two motors mechanically coupled (slaved) and making up a single transmission Third-party CANopen.
- Page 19 O p e r a t i n g m a n u a l . Fagor Machining Calculator. The FMC application consists of a database of materials to be machined and machining operations (milling and turning) with an interface to choose suitable cutting conditions for these operations.
- Page 20 BLANK PAGE ·20·...
-
Page 21: Declaration Of Ce Conformity And Warranty Conditions
O p e r a ti n g m a nu a l . DECLARATION OF CE CONFORMITY AND WARRANTY CONDITIONS DECLARATION OF CONFORMITY The declaration of conformity for the CNC is available in the downloads section of FAGOR’S corporate website. http://www.fagorautomation.com. (Type of file: Declaration of conformity). - Page 22 BLANK PAGE ·22·...
-
Page 23: Version History - Cnc 8060
From now on, the F3D graphics are called HD graphics. FCC Function (Fagor Feed Control). The FFC function makes it possible to replace the feedrate and speed programmed in the cycle with the active values of the execution, which are acted upon by the feed override and speed override. - Page 24 Kinematics calibration. In user mode, the data calculated by the recalibration of the kinematics are saved in the "Offsets" field of the machine parameter table; the "Value" field defined by the OEM cannot be modified. Kinematics calibration. The cycle creates the KinCalReport.mp file with the results of the calibration CNC 8060 CNC 8065 : 1807)
-
Page 25: Version History - Cnc 8065
Ref. 1308 Software V04.26.10 CNC 8060 Every time [START] is pressed, the CNC checks that the room temperature does not exceed 65 ºC (149 ºF) and, if it does, the CNC does not let run the program and issues the corresponding error message. - Page 26 From now on, the F3D graphics are called HD graphics. FCC Function (Fagor Feed Control). The FFC function makes it possible to replace the feedrate and speed programmed in the cycle with the active values of the execution, which are acted upon by the feed override and speed override.
- Page 27 Kinematics calibration. In user mode, the data calculated by the recalibration of the kinematics are saved in the "Offsets" field of the machine parameter table; the "Value" field defined by the OEM cannot be modified. Kinematics calibration. The cycle creates the KinCalReport.mp file with the results of the calibration CNC 8060 CNC 8065 : 1807)
- Page 28 BLANK PAGE ·28·...
-
Page 29: Safety Conditions
Read the following safety measures in order to prevent harming people or damage to this product and those products connected to it. Fagor Automation shall not be held responsible of any physical or material damage originated from not complying with these basic safety rules. - Page 30 Central unit enclosure. To maintain the right ambient conditions in the enclosure of the central unit, it must meet the requirements indicated by Fagor. See the corresponding chapter in the hardware manual. Power switch. This switch must be easy to access and at a distance between 0.7 and 1.7 m (2.3 and 5.6 ft) off the floor.
- Page 31 O p e r a t i n g m a n u a l . Symbols that the product may carry. Ground symbol. This symbol indicates that that point must be under voltage. ESD components. This symbol identifies the cards as ESD components (sensitive to electrostatic discharges). CNC 8060 CNC 8065 : 1807) ·31·...
- Page 32 BLANK PAGE ·32·...
-
Page 33: Returning Conditions
Protect the unit wrapping it up with a roll of polyethylene or with similar material. When sending a central unit with monitor, protect especially the screen. Pad the unit inside the cardboard box with polyurethane foam on all sides. Seal the cardboard box with packaging tape or with industrial staples. CNC 8060 CNC 8065 : 1807) ·33·... - Page 34 BLANK PAGE ·34·...
-
Page 35: Cnc Maintenance
• Do not handle the connectors with the unit supplied with power. Before handling these connectors (I/O, feedback, etc.), make sure that the unit is not powered. • Do not get into the inside of the unit. Only personnel authorized by Fagor Automation may access the interior of this unit. - Page 36 BLANK PAGE ·36·...
-
Page 37: Monitor Lcd-15. (8065)
[SHIFT] at the same time inverts the sequence. In the PLC mode, it switches between the various active services. CNC 8060 • Sequentially access the different channels. CNC 8065 • The horizontal softkey menu shows the available screens and the vertical menu shows the available channels. -
Page 38: Monitor Lcd-10K (Option 1). (8065)
OEM-configurable key that can carry out one of from the softkey sub-menu to the previous level the following actions. from where that menu was accessed. • Access a CNC work mode. CNC 8060 • Execute an application. Help key. CNC 8065 • Access the operating system. - Page 39 Keys to select the axes and keys to select the jogging direction. Both keys (axis and direction) must be pressed to jog the axis. Rapid key. When pressing this key while moving an axis, the CNC applies the rapid CNC 8060 feedrate. CNC 8065 : 1807) ·39·...
-
Page 40: F1 F2 F3 F4
HELP key. HELP the following actions. It accesses the CNC's system help. • Access a CNC work mode. CNC 8060 • Execute an application. CNC 8065 • Access the operating system. • Carry out no function at all. After accessing the work mode, these keys may be used... - Page 41 Keys to select the axes and keys to select the jogging direction. Both keys (axis and direction) must be pressed to jog the axis. CNC 8060 Rapid key. When pressing this key while CNC 8065 moving an axis, the CNC applies the rapid feedrate.
-
Page 42: Horizontal Keyb / Horizontal Keyb + Mouse. (8065)
Keys to move the cursor. The arrow keys move the cursor one position to the left, right, up or down. CNC 8060 The previous-page or next-page keys show CNC 8065 the previous or next page at the part- program or PLC program editor. -
Page 43: Caps Home
UTILITIES Configurable mode. CUSTOM OEM-configurable key that can carry out one of the following actions. CNC 8060 • Access a CNC work mode. CNC 8065 • Execute an application. • Access the operating system. • Carry out no function at all. -
Page 44: Horizontal Keyb. (8060)
Main menu. MAIN to the left, right, up or down. MENU Changing the state of an icon. In the MC/TC CNC 8060 mode, it toggles between the standard and the The previous-page or next-page keys show auxiliary screens. CNC 8065 the previous or next page at the part- program or PLC program editor. - Page 45 When selecting a profile or conversational canned cycle in the part-program, the key accesses either the profile editor or canned cycle editor accordingly. Calculator. CALC CNC 8060 CNC 8065 : 1807) ·45·...
-
Page 46: Vertical Keyb. (8060)
• Carry out no function at all. After accessing the work mode, these keys may be used Help key. CNC 8060 to access the various screens of the active work mode HELP key. CNC 8065 sequentially, pressing [SHIFT] at the same time inverts the HELP It accesses the CNC's system help. - Page 47 When selecting a profile or conversational canned cycle in the part-program, the key accesses either the profile editor or canned cycle editor accordingly. Calculator. CALC CNC 8060 CNC 8065 : 1807) ·47·...
-
Page 48: Op Panel / Op Panel + Spdl Rate. (8065)
Execute the selected program in automatic mode, a block in MDI/MDA mode, etc. Cycle stop key (STOP). Interrupt the execution of the CNC. Reset key. CNC 8060 RESET It initializes the system setting the initial CNC 8065 conditions as defined by machine parameters. -
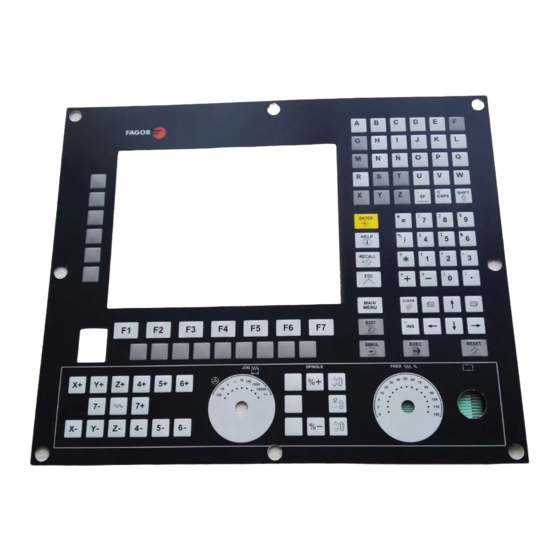
Page 49: Op Panel. (8060)
MDI/MDA mode, etc. Cycle stop key (STOP). Interrupt the execution of the CNC. Reset key. RESET CNC 8060 It initializes the system setting the initial CNC 8065 conditions as defined by machine parameters. Single-block execution mode. -
Page 50: Horizontal Keyb 2.0 + Touchpad (8060/8065)
[SHIFT] at the same time inverts the sequence. Keys to move the cursor. The arrow keys move the cursor one position CNC 8060 to the left, right, up or down. CNC 8065 The previous-page or next-page keys show the previous or next page at the part- program or PLC program editor. - Page 51 Numeric keypad optimized to operate with the CNC (keys for axes, feedrate, speed, etc). The second function of the keys is available with a long press of the key; the [SHIFT] key is not necessary. The behavior of the three axis keys can be modified with the [FAGOR]+[C] keys. Option 1.
- Page 52 Start menu. CNC 8060 Drag three fingers upward to access the start menu. CNC 8065 The actions of touching with one or two fingers work in reverse if the mouse is configured for left-handed people.
-
Page 53: Keyboard Shortcuts
Move the program to the end of the program. [CTRL]+[TAB] Browsing keys. Toggle between the editor and the error window. [CTRL]+[F1] BACK [CTRL]+[F5] RECALL Previous menu. [RECALL] key. [CTRL]+[F2] FOCUS Switch window. [CTRL]+[F3] NEXT Switch screens. CNC 8060 [ALT]+[B] CNC 8065 Two-color key. : 1807) ·53·... - Page 54 O p er a t i ng ma n u a l. CNC 8060 CNC 8065 : 1807) ·54·...
-
Page 55: Turning The Cnc On And Off
• User mode. It is the usual work mode for the user, once the setup is completed. The manufacturer CNC 8060 must deliver this unit to the user set up to start up in this mode. The access to this mode CNC 8065 is not protected with the password. - Page 56 If the CNC is started up in user mode, it does not offer the option to save a backup copy. The manufacturer must have saved the backup copy of the configuration during the setup. The backup copies are saved in the "\Backup" folder in a compressed format. CNC 8060 CNC 8065 : 1807)
-
Page 57: Emergency Shutdown With Battery (8065 Only)
After the 2 seconds, the screen shows the corresponding error and it initiates the automatic turn-off sequence. First, it stops the machine if it is in execution. It closes the CNC application, then the whole system and finally turns the battery off. CNC 8060 CNC 8065 : 1807) -
Page 58: Work Modes And Software Protection At The Cnc
Work modes and software protection at the CNC. Fagor delivers the unit with a protected compact flash type disk that is write-protected except for the folders or files that must be unprotected for the normal operation of the CNC. The changes made to protected folders or files will be operative until the unit is turned off and back on, the CNC will then restore the initial configuration. - Page 59 This mode must only be used to install non-Fagor software, to install the CNC (also possible from the setup mode), to update the operative system or change the system configuration.
- Page 60 On power-up, the CNC will show a message indicating that it is in an unprotected mode and that the setup has not been completed yet. In this situation, the CNC is no longer under Fagor warranty. After a certain period of time, with the next reset, the CNC shows the message again.
-
Page 61: Ethernet
CNC 8065 : 1807) Fagor Automation offers several flash compact in its catalog to increase storage space; if you are going to use other compact flashes, always use industrial grade compact flash SLC; they support temperatures between -40ºC and +80ºC (-40 ºF and 176 ºF) and last 27 years with 1000 writes per day. - Page 62 O p er a t i ng ma n u a l. CNC 8060 CNC 8065 : 1807) ·62·...
-
Page 63: General Description Of The Interface
OEM has configured the machine. By default, the CNC displays 5 vertical softkeys. On 19" and 21" monitors, the OEM can configure the number of vertical softkeys (between 5 and 12). CNC 8060 Horizontal softkey menu. CNC 8065 The menu options change depending on the active work mode. -
Page 64: Move The Interface While Dragging It With The Mouse
Double click on this icon and the interface is positioned in the upper left corner (POSX=0 POSY=0). CNC 8060 CNC 8065 : 1807) -
Page 65: Main Menu
Program interrupted. Background color: Dark green. Program in error. Background color: Red. Icon showing FCAS (Fagor Collision Avoidance System) status: The CNC will display this icon when the software option associated with the FCAS is available. Icon. Meaning. Active feature. - Page 66 "+" sign next to the message window. To display the list of active messages, press the key combination [CTRL]+[O] or click on the CNC message line. The list of messages shows, next to each message, the channel where it is active. PLC messages. CNC 8060 CNC 8065 : 1807) ·66·...
-
Page 67: Channel Synchronization Window
Channel 2 is not expecting any synchronism mark. (In the graphic, the white LED's are identified with the letter - W-, the green ones with the letter -G- and the red ones with the letter -R-). CNC 8060 CNC 8065 : 1807) ·67·... -
Page 68: Plc Messages
AVI file. Key. Meaning. Stop the video and move to next frame or previous frame. CNC 8060 Stop the video and move to the next 5 frames or to the CNC 8065 previous 5 frames. Stop the video and move to the end or to the beginning. -
Page 69: Horizontal Softkey Menu
The softkey menu expands and shrinks with keys [F1] through [F7]. The softkey of the pop-up menu are selected with the [ENTER] key or from the numeric keypad using the number that comes with each softkey. CNC 8060 CNC 8065 : 1807) ·69·... -
Page 70: Operating Modes
The exchange between the different screens of an operating mode is done using the key to NEXT CNC 8060 access that operating mode or with the [NEXT] key (if the OEM has configured it that way). When pressing one of these keys, the CNC will show the next screen and when pressing CNC 8065 them together with the [SHIFT] key, it will show the previous screen. -
Page 71: Work Modes
The PLC mode is common to all the channels. Machine parameters The machine parameters are common to all the channels. Tuning mode The tuning mode is common to all the channels. (Setup assistance). CNC 8060 CNC 8065 : 1807) ·71·... -
Page 72: Description Of The Various Operating Modes
• Load and unload a tool from the magazines through the spindle, using a maneuver. • Saving the table contents. CNC 8060 • Recalling the table contents. CNC 8065 • Printing the table contents. : 1807) - Page 73 • Show information about the elements connected to the CNC through the CAN bus, Sercos or Mechatrolink. The diagnosis is a testing and displaying tool; it cannot be used to modify the displayed values. CNC 8060 CNC 8065 : 1807) ·73·...
-
Page 74: Task Window
Moving around in the task window Besides the mouse, the following keys may be used. [] [] Moves the cursor through the window. [CTRL]+[TAB] Changes the panel. [ENTER] It accesses the selected mode. CNC 8060 CNC 8065 : 1807) ·74·... -
Page 75: Windows For Warnings And Errors
PLC errors, hardware errors, etc. CNC 8065 FATAL ERROR They are errors that force the operator to turn the CNC off. If the error persists, contact the : 1807) Service Department at Fagor Automation. ·75·... - Page 76 The coordinate is valid if the position of the machine coincides with the “expected value” field. The user must clear the error by pressing [ENTER]+[RESET] and execute a G174 in MDI with the expected value. Afterwards, the CNC must be started-up to assume the coordinate correctly. CNC 8060 CNC 8065 : 1807) ·76·...
-
Page 77: Plc Errors
Stop the video and move to the next 5 frames or to the previous 5 frames. Stop the video and move to the end or to the beginning. HOME Stop the video. SPACE Play the video. ENTER CNC 8060 CNC 8065 : 1807) ·77·... -
Page 78: File Selection Window
Opens the selected file. ENTER To cancel the selection and close the program listing. Creating a new file CNC 8060 CNC 8065 To create a new file: Select the destination folder for the file. Write the file name at the bottom window. - Page 79 Search for the next program (in descending order). ENTER Search for the previous program (in ascending order). End the search and close the dialog box. When defining a search, the softkey menu shows the "Next" (up) and "Previous" (down) options. CNC 8060 CNC 8065 : 1807) ·79·...
-
Page 80: Calculator
The expressions already accepted become part of the history and may be displayed using the relevant keys [][]. After selecting an expression from the window, press the [ENTER] CNC 8060 key to recover it. The [ESC] key closes the history window. - Page 81 The result of the operations may be given in various units. Use the following icons to change the units. It highlights the units currently selected. Hexadecimal ($), decimal (D) or binary (B) units. Units in degrees or radians. CNC 8060 CNC 8065 : 1807) ·81·...
-
Page 82: Defining Expressions
In the following examples, the "x" and "y" values indicate any valid combination of constants, variables or expressions. Arithmetic operations. x + y x - y Subtract x *y Multiply CNC 8060 x / y Divide CNC 8065 x % y Percentage 10%50 = 5 2^3 = 2 2 2 = 8... -
Page 83: Cnc 8060
"A" variable. CNC 8060 CNC 8065 The precision of the result depends on the "N" variable that indicates the number of iterations of the resolution algorithm. -
Page 84: Dialog Boxes
• On the drop lists, the desired option may be selected using the keys on the keyboard. • The arrow keys [][][][] move the cursor over the color pallet and over the options of a list. CNC 8060 CNC 8065 : 1807) -
Page 85: Automatic Mode
It shows the following data. • Blocks of the program or subroutine being executed. CNC 8060 • Line of the program where the cursor is. CNC 8065 During execution, the window shows the following information. - Page 86 Information related to the position of the axes. In the screen configuration supplied by Fagor, the data displayed will be different on each screen. Displaying the following information is the most typical. • The programmed coordinate, in other words, the target position.
-
Page 87: Softkey Menus
End simulated execution and start executing the program Select the program that is being edited. Activating the Fagor Feed Control (FFC) function. The softkey is only active during the execution of the canned cycles of the editor. DMC options. -
Page 88: Display The Status Of The Program Or Of The Active Subroutines
Number of current loop and total number of loops. $FOR Number of current loop and total number of loops. $WHILE Number of current loop. Number of current loop. Text "IF". $SWITCH Text "SWITCH". CNC 8060 CNC 8065 : 1807) ·88·... -
Page 89: Program Simulation And Execution
This softkey selects directly the program being edited in the same channel. Once a program has been selected, its name appears on the general status bar. For each channel, it shows the name of the program selected in that channel. CNC 8060 CNC 8065 : 1807) ·89·... -
Page 90: Select The First And Last Blocks Of The Execution
When selecting this option, the CNC requests the number of times that the block must be executed before ending the execution of the program. After entering the number of times, press [ENTER] to validate the value or [ESC] to cancel it. CNC 8060 CNC 8065 : 1807) - Page 91 Go to line. In this area of the dialog box, the CNC requests the line number to go to. Key in the desired number and press [ENTER], the cursor will then go to that line. CNC 8060 CNC 8065 Find text In this area of the dialog box, the CNC requests the text to look for.
-
Page 92: Execute A Program
(jog mode), the rapid traverse will also be applied in the channel that is executing the program. CNC 8060 CNC 8065 The feedrate for these movements is set by the FRAPIDEN parameters of the axes and of the channel. -
Page 93: Resume The Execution Of A Program From The Block Where It Was Canceled
(cancelling) the execution. Block search may be used to restore the program history up to a particular block, reposition axes, go into tool inspection, etc. See "4.6 Block search." on page 108. CNC 8060 CNC 8065 : 1807) ·93·... -
Page 94: Cancel The Execution And Resume From Another Block While Keeping The History
• The execution cannot be canceled inside a canned cycle, both ISO and that of the cycle editor. CNC 8060 • Inside a loop ($IF, $GOTO, etc), the execution can only be resumed if the resuming block CNC 8065 is at the same level as the block where it was canceled. -
Page 95: Simulated Execution Of A Program
Softkey. Reposition point. Repositioning the axes at the interruption point. Repositioning the axes at the starting point of the interrupted block. Press the [START] key to start the execution. CNC 8060 CNC 8065 : 1807) ·95·... - Page 96 The axes move at the maximum feedrate allowedregardless of the programmed "F" value. It is possible to change that feedrate with the feedrate override switch. • The simulation starts the spindle if it has been programmed. CNC 8060 • The simulation ignores the dwells programmed with G4. CNC 8065 •...
- Page 97 • The simulation does not start the spindle, except when the spindle works in closed loop M19. • The simulation ignores the dwells programmed with G4. • The simulation takes into account the program stops programmed with M00 and M01. CNC 8060 CNC 8065 : 1807) ·97·...
-
Page 98: Execute A Program (Retrace)
(e.g. from the outside operator panel if the manufacturer has provided a button or key to that effect). The same occurs when trying to execute a new program after executing the retrace function. CNC 8060 Influence of certain functions while executing in retrace mode. CNC 8065 Machining conditions. - Page 99 #SYNC High speed machining. #HSC ON #HSC OFF Incline axis. #ANGAX ON #ANGAX OFF Freezing (suspending) an incline axis does not cancel the retrace function. CNC 8060 Slaving axes. #LINK #UNLINK CNC 8065 Axis parking. #PARK #UNPARK Tangential control. G45 G145...
- Page 100 #CS ON #CS OFF #CS NEW do not cancel the retrace function. #RTCP OFF Kinematics change. #KIN ID Independent axis. #MOVE #MOVE ABS #MOVE ADS #MOVE INF Electronic cam. #CAM ON #CAM OFF #FOLLOW ON #FOLLOW OFF CNC 8060 CNC 8065 : 1807) ·100·...
-
Page 101: Executing A Program In 8055 Mc/Tc Language
GOTO instructions, but it can only find them if there are in blocks after the calling instruction. If the block is in a previous line, it must have the format of the CNC label adding the ":" character. CNC 8060 CNC 8065 : 1807) -
Page 102: Executing Program Blocks Separately
Once that block is executed, another block may be executed by selecting it with the cursor and pressing [START] again and so on. The blocks may be selected with the [] [] keys. CNC 8060 CNC 8065 : 1807) -
Page 103: Tool Inspection
• The CNC cancels tangential control (#TANGCTRL); it restores it when resuming execution after tool inspection. CNC 8060 • The CNC assumes function G40 when resuming execution after tool inspection, restores the function that was active at the interruption point. If either G40, G41 or G42 is CNC 8065 programmed in MDI, the CNC stores it without making it effective;... - Page 104 The same vertical softkeys will show the M3, M4, M5 or M19 to be restored. If the spindle was interrupted in a positioning with M19, repositioning will complete that positioning. Once the spindle has recovered its status, it will no longer be available. CNC 8060 Canceling repositioning. CNC 8065 The CNC admits the possibility to end tool inspection before it is completed;...
- Page 105 • If tool inspection has ended after canceling the repositioning of the axes, when pressing [START], the axes move from their current position to the end point of the interrupted path and then the CNC goes on with the rest of the program. CNC 8060 CNC 8065 : 1807)
- Page 106 Repositioning the axes. CNC 8060 The axes may be repositioned one by one or all at the same time. To reposition them, select CNC 8065 the axes with the relevant softkey and press [START].
- Page 107 The CNC keeps the new values when resuming the execution. Use the [TAB] key to move through the various data. Press [ESC] or the "MHSF" softkey to return to the standard screen of the automatic mode. CNC 8060 CNC 8065 : 1807)
-
Page 108: Block Search
Selecting the starting block for the search. If the first block is not selected, the block search CNC 8060 starts at the beginning of the program. CNC 8065 Press the [CYCLE START] key to start the block search. - Page 109 After positioning the axes and before resuming execution, tool inspection may be accessed to change the machining conditions. In tool inspection, it is possible to change the feedrate and the spindle speed, execute blocks in MDI/MDA mode as well as activate M and H functions. CNC 8060 CNC 8065 : 1807) ·109·...
-
Page 110: Treatment Of Functions M, H, F, S
The CNC shows the M and H functions sent out to the PLC in green and the ones selected to be sent to PLC in red. CNC 8060 CNC 8065 : 1807) -
Page 111: Show/Hide The Dynamic Override Of The Hsc
Over the cursor, it shows the percentage being applied. The cursor may be moved with the mouse or with the moving arrows of the keyboard. The [ESC] key also hides the bar. CNC 8060 CNC 8065 : 1807) -
Page 112: Ffc (Fagor Feed Control)
O p er a t i ng ma n u a l. FFC (Fagor Feed Control) During the execution of a canned cycle of the editor, the Fagor Feed Control (FFC) function makes it possible to replace the feedrate and speed programmed in the cycle with the active values of the execution, which are acted upon by the feed override and speed override. -
Page 113: Display The Status Of The Dmc (Dynamic Machining Control)
Time saved by the DMC action. When DMC is active, the program history will display "DMC" and will not change, even though the CNC performs incompatible functions that temporarily deactivate DMC. Final override (DMC override + switch override). CNC 8060 CNC 8065 : 1807) ·113·... -
Page 114: Learning Phase
If the tool exits the part, it ceases counting the time until the tool re-enters the piece. CNC 8060 CNC 8065 : 1807) -
Page 115: Deactivating The Dmc
O p e r a t i n g m a n u a l . 4.9.3 Deactivating the DMC. The softkey menu allows the DMC to be deactivated. The DMC can be activated from the same softkey menu. CNC 8060 CNC 8065 : 1807) ·115·... - Page 116 O p er a t i ng ma n u a l. CNC 8060 CNC 8065 : 1807) ·116·...
-
Page 117: Manual (Jog) Mode
Information related to the position of the axes. In the screen configuration supplied by Fagor, the data displayed will be different on each screen. The most common thing is to show the current position of the axes referred to part zero in large characters, and the amount of following error (axis lag) in small characters. - Page 118 (INHIBIT mark active). The status of the mark is not displayed if the screen does not show this text. Moving mode selected at the jog selector switch on the operator panel. Reserved. CNC 8060 CNC 8065 : 1807) ·118·...
-
Page 119: Softkey Menus
Tool calibration (·M· model). See chapter "6 Manual (jog) mode. Tool calibration". Tool calibration (·T· model). See chapter "6 Manual (jog) mode. Tool calibration". Part centering (·M· model). CNC 8060 CNC 8065 : 1807) ·119·... -
Page 120: Operations With The Axes
Press [START] to go ahead with the home search or [ESC] to cancel the operation. Home search via softkey menu. CNC 8060 On the home search softkey of the horizontal menu, select the "All" option. The CNC will CNC 8065 display a dialog box requesting confirmation to execute the home search. - Page 121 Feedrate selector. The movement is carried out at the feedrate defined by the OEM. The feedrate may be varied between 0% and 200% using the feedrate override switch on the operator panel. FEED CNC 8060 CNC 8065 : 1807) ·121·...
- Page 122 If while moving, a second axis is selected, the new one will move at the same time and under the same conditions. CNC 8060 CNC 8065 : 1807)
-
Page 123: Jogging The Axes With Handwheels
When using a handwheel with a push-button, the push-button may be used to select, CNC 8060 sequentially, the axes to be jogged. Pushing the button selects the first one of the axes CNC 8065 being displayed. - Page 124 This feature must be managed from the PLC. Usually, this feature is turned on and off using an external push button or key configured for that purpose. CNC 8060 CNC 8065 : 1807)
-
Page 125: Moving An Axis To A Particular Position (Coordinate)
On the axis preset softkey of the horizontal menu, select an axis. The CNC will highlight that axis to indicate that it is selected. Key in the desired preset value. Press [ENTER] to preset the entered value or [ESC] to cancel the operation. CNC 8060 CNC 8065 : 1807) ·125·... -
Page 126: Spindle Control
50% and 120% with a 5% step. It sets the percentage of turning speed to be applied. The maximum and minimum values are set by the OEM, the typical values being a variation between 50% and 120%. SPEED CNC 8060 CNC 8065 : 1807) ·126·... -
Page 127: Tool Selection And Tool Change
Press [T] at the alphanumeric keyboard. The CNC will highlight the current tool indicating that it is selected. Key in the number of the tool to be placed in the spindle. Press [START] to execute the tool change or [ESC] to cancel the operation. CNC 8060 CNC 8065 : 1807) ·127·... -
Page 128: Setting The Feedrate And Spindle Speed
CNC will highlight the relevant data indicating that it is selected. Enter the new spindle speed. Press [START] to assume the entered value or [ESC] to cancel the operation. CNC 8060 CNC 8065 : 1807) ·128·... -
Page 129: Setting And Activating The Zero Offsets And The Fixture Offsets
Use the cursor to select a zero offset or fixture offset from the list and press the [START] key to activate. The new zero offset is applied to all the axes of the channel. CNC 8060 CNC 8065 : 1807) - Page 130 O p er a t i ng ma n u a l. CNC 8060 CNC 8065 : 1807) ·130·...
- Page 131 CNC executes the probing movements. Automatic calibration. Calibration with a probe and a canned cycle. This calibration mode is available when using a table-top probe. The CNC executes all the CNC 8060 movements using the calibration canned cycle #PROBE. CNC 8065 : 1807) ·131·...
- Page 132 With lathe tools, tool length compensation is applied on all the axes where a tool offset has been defined. When using milling tools on a lathe, the longitudinal compensation axis may be changed by means of the #TOOL AX instruction or the G20 function. CNC 8060 CNC 8065 : 1807) ·132·...
-
Page 133: Manual Calibration. Calibration Without A Probe
Tool calibration Since there is no probe, a reference part is required to calibrate the tool. The calibration CNC 8060 consists in moving the tool manually until it touches the part and then validating the calibration on each axis. After validating them, the new values are saved in the tool table. - Page 134 To define the data, place the focus on the relevant data, key in the desired value and press [ENTER]. For a lathe tool. CNC 8060 CNC 8065 The nomenclature of the axes depends on the geometrical configuration of the "plane" or "trihedron"...
- Page 135 When calibrating the offsets of a milling tool, the length value is deleted but not the radius value. CNC 8060 Sign criteria for the offsets and their wear. CNC 8065 The sign criterion for the offsets and their wear is established by machine parameter TOOLOFSG.
- Page 136 After pressing [ENTER] to accept the new value, the wear field will show the resulting absolute value. Initial wear Incremental wear Total wear -0.2 -0.8 -0.2 -1.2 CNC 8060 CNC 8065 : 1807) ·136·...
-
Page 137: Semi-Automatic Calibration. Calibration With A Probe
The tool must be in the spindle. After the calibration, the wear is reset to zero. When changing the tool data, the tool table data is updated after calibration. Tool calibration CNC 8060 CNC 8065 The calibration consists in manually approaching the tool to the probe and then command the CNC to execute the probing movement. - Page 138 Define the probing distance and feedrate. If the feedrate is not defined, the probing movement will be made at the feedrate set by the OEM. CNC 8060 Select the tool and the offset to be calibrated. After the selection, the CNC shows the CNC 8065 dimensions defined in the tool table for that offset.
- Page 139 After pressing [ENTER] to accept the new value, the wear field will show the resulting absolute value. Initial wear Incremental wear Total wear -0.2 -0.8 -0.2 -1.2 CNC 8060 CNC 8065 : 1807) ·139·...
-
Page 140: Automatic Calibration With A Probe And A Canned Cycle
Optionally, another position may be defined for the probe which will only be valid for the defined calibration. The new position does not affect the values defined in the machine parameters. CNC 8060 Tool calibration CNC 8065 There are two options for the milling tools and may be selected with the following icons. - Page 141 Probe position. ··· The values defined here are only taken into account during the calibration cycle; they do not modify the machine parameter values. CNC 8060 PRB2MIN CNC 8065 This icon sets the number of axes to calibrate on. : 1807)
- Page 142 Press the [CYCLE START] key to start the calibration. The CNC calibrates the tool making all the necessary movements; there is no need to manually approach the tool. If necessary, the CNC makes the tool change. After the calibration It updates the tool table data. CNC 8060 CNC 8065 : 1807) ·142·...
-
Page 143: Lathe Model ("Plane" Geometrical Configuration)
The new position does not affect the values defined in the machine parameters. Tool calibration For milling and lathe tools, it calibrates the tool offsets on each axis. The offset wears are set to zero. CNC 8060 CNC 8065 : 1807) ·143·... - Page 144 Press the [CYCLE START] key to start the calibration. The CNC calibrates the tool making all the necessary movements; there is no need to manually approach the tool. If necessary, the CNC makes the tool change. After the calibration It updates the tool table data. CNC 8060 CNC 8065 : 1807) ·144·...
- Page 145 To center the part, follow these steps. Select the probe and the offset. If not selected, the probe to be used must be defined in the parameters of the cycle. CNC 8060 Enter the data of the cycle. CNC 8065 Press the [START] key to start the cycle.
- Page 146 Part center coordinate along the ordinate axis. Optionally, in this cycle, it is possible to preset the coordinates to select a new part zero and, in rectangular parts, rotate the coordinate axes to align the axes with the part. CNC 8060 CNC 8065 : 1807)
-
Page 147: How To Define The Data
• The X axis related data takes the coordinate of the first axis of the channel. • The Y axis related data takes the coordinate of the second axis of the channel. • The Z axis related data takes the coordinate of the third axis of the channel. CNC 8060 CNC 8065 : 1807) -
Page 148: Data Programming
The probe moves in the positive direction of the Y axis. The probe moves in the negative direction of the Y axis. ·icon· Center the part/pocket on one or two axes with one or two probings on the CNC 8060 first side. CNC 8065 This parameter indicates on how many axes the part is centered and the number of probing movements to carry out on the first side. - Page 149 Do not rotate the coordinates (pattern). Rotate the coordinates (pattern). ·Lx Ly Ø·Part dimensions. CNC 8060 CNC 8065 These parameters establish the dimensions of the rectangular or circular part. Rectangular part. Part length along the abscissa axis.
- Page 150 This parameter sets the feedrate for the second probing movement. ·icon·Feedrate for approach movements. This parameter sets the type of feedrate for the movements to the approach points. CNC 8060 The movements are carried out in rapid. CNC 8065 The movements are carried out at work feedrate.
- Page 151 For this type of probes, set an M function to turn the probe on and another one to turn it off. Having the probe turn on/off programmed with M functions inside the cycle avoids executing the cycle without having the probe active or leaving the probe always active after executing the cycle. CNC 8060 CNC 8065 : 1807)
-
Page 152: Basic Operation
Withdrawal movement. The probe returns to the safety position located at a ·Ds· distance from the part. Approach movement to the second probing point. CNC 8060 Movement of the probe from the first approach point to the second located in front of the CNC 8065 first one. - Page 153 (G00) and then in the plane. If programmed, the cycle saves the result of the measurement in the selected G159 zero offset and in the corresponding arithmetic parameters. The cycle executes the "M-after" functions. CNC 8060 CNC 8065 : 1807) ·153·...
- Page 154 O p er a t i ng ma n u a l. CNC 8060 CNC 8065 : 1807) ·154·...
-
Page 155: Edisimu Mode
In any case, the background color will be different depending on the status of the program being simulated. Ready Background color: White. In simulation Background color: Green. Interrupted Background color: Dark green. CNC 8060 In error Background color: Red. CNC 8065 Program name and location. CNC messages. : 1807) ·155·... - Page 156 • Statistics window: For estimating the machining time for each tool and the total program execution time. • Cycle editor. The cycle editor makes it easier to edit machining and probing cycles. • Profile editor. • Editor for inclined planes. • Geometric help editor. CNC 8060 CNC 8065 : 1807) ·156·...
-
Page 157: Softkey Menus
Configuring simulation options. • Activate and cancel tool radius compensation. • Conditional stop. • Activate and deactivate the software travel limits. • Block skip condition. • Cancel the channel synchronization in the simulation. CNC 8060 CNC 8065 : 1807) ·157·... -
Page 158: Program Editing And Simulation
Help to the user for programming inclined planes using the instructions #CS and #ACS. Using the "Insert" softkey, the block corresponding to the programmed instruction is inserted after the block where the cursor is. CNC 8060 Geomertic help CNC 8065 Assistance to the user for programming geometric help (scaling factor, corner rounding, etc.) -
Page 159: Editing A Program In The 8055 Cnc Language
The conversion of the part-program The CNC keeps both programs; the one written in 8055 format (the one edited) and its CNC 8060 equivalent translated. The converted (translated) program is saved in the following folder with the same name but with the extension m55 (milling program) or t55 (lathe program). - Page 160 When the cannot translate a block because it has a function without equivalent, it will show the message "function without translation". The syntax analyzer will show this message when the index of a machine parameter is indicated parametrically. CNC 8060 CNC 8065 : 1807)
-
Page 161: Program Simulation
Tool radius compensation being off, the simulation will ignore the programmed tool radius compensation. Conditional stop during simulation CNC 8060 It simulates the external "conditional stop" switch. CNC 8065 While active, the program simulation will be interrupted at the blocks having a "conditional stop"... - Page 162 CNC applies to the simulation the origins set in the execution environment (for example, the part zero set in jog mode). Assume the active zones in execution. Assume or not, for simulation, the active zones in execution. CNC 8060 CNC 8065 : 1807) ·162·...
-
Page 163: Simulation Errors
Although the window displaying them may be closed by pressing [ESC], it does not mean that the error status has been taken care of; to do that, press the [RESET] icon. The program can be neither edited nor simulated while the error stays state active. CNC 8060 CNC 8065 : 1807) -
Page 164: Editing Window
NUM: Numeric keypad active. Functionalities of the editor. CNC 8060 CNC 8065 Group lines at the editor. Comments having an asterisk (*) and programmed at the beginning of the block allow to group blocks. Blocks programmed between these comments will be grouped and may be expanded or shrunk the same way as the cycles or profiles. - Page 165 The editor adjusts the long blocks to the size of the window dividing the block into several lines. On the right side of each cut line, the editor shows a symbol to indicate that the block continues in the next line. CNC 8060 CNC 8065 : 1807)
-
Page 166: Softkey And Hotkey Menus
Hide or expand a cycle. [CTRL]+[HOME] Move the cursor to the beginning of the program. [CTRL]+[END] Move the program to the end of the program. [CTRL]+[TAB] Toggle between the editor and the error window. CNC 8060 CNC 8065 : 1807) ·166·... -
Page 167: Contextual Programming Assistance
Activating the contextual assistance. Contextual help is activated from the general customizing options. Contextual assistance is not available when using the 8055 CNC language. CNC 8060 CNC 8065 : 1807) ·167·... -
Page 168: Help For Programming Subroutines
The help is always active, even when the contextual helps of the editor are disabled. For further information on how to define the help on subroutines, refer to the programming manual. CNC 8060 CNC 8065 : 1807) -
Page 169: Syntax Errors When Editing
[ESC] to close the error window. If the text is not display in full, place the focus in this area and move the text using the [ ][ ][ ][ ] keys. CNC 8060 CNC 8065 : 1807) -
Page 170: Working In The Editing Window
Define the file name at the bottom window. To replace an existing file, select it from the list. Press [ENTER] to save the program or [ESC] to cancel the selection and close the program listing. CNC 8060 CNC 8065 : 1807) - Page 171 The CNC offers the following keyboard shortcuts to undo and redo the operations. [CTRL]+[Z] Undo the last change. [CTRL]+[Y] Redo the selected text. CNC 8060 CNC 8065 : 1807) ·171·...
-
Page 172: Operations With Files
• The DXF format is standard for exchanging graphic files. Importing this type of files makes it possible to generate the part-program directly from a drawing. The files must consist CNC 8060 of points, lines and arcs. See "8.4.10 Import DXF files"... -
Page 173: Customizing The Editor (General Options)
[ALT][–]. In large programs (more than 200 kB), the editor does not hide the canned cycles or the profiles. Editor 8055. CNC 8060 Activate editing in 8055 CNC language. See "8.2.2 Editing a program in the 8055 CNC CNC 8065 language"... - Page 174 Configuration table for the translator into the Fagor language from programs written in other languages. To work with programs in the Fagor language, it is not required for the table to be configured. Consult the "Translator of part programs" (man_8060_8065_pptrans.pdf) manual for the available languages and the table meaning.
-
Page 175: Customizing The Editor (Appearance)
After defining the new look, press [ENTER] to accept the changes or [ESC] to ignore them. In large programs (more than 200 kB), the editor cancels the syntax coloring. CNC 8060 CNC 8065 : 1807) - Page 176 “selected” for the TEACH-IN mode. If a character has been edited other than the axis name or the block number, it does not insert anything and the cursor stays in the same place. CNC 8060 CNC 8065 : 1807)
- Page 177 • The priority defines the order in which the layers will be executed; i.e. the order in which they will be included in the part-program. Those with priority ·1· will be executed first and so on. CNC 8060 • The offset (height) on the perpendicular axis permits executing each layer in the CNC 8065 desired Z coordinate (or that of the relevant perpendicular axis).
- Page 178 CNC units are millimeters or 5 decimals if the measuring units at the CNC are inches. A greater resolution increases the size of the DXF file unnecessarily because the CNC CNC 8060 ignores the excess of resolution. CNC 8065 : 1807) ·178·...
-
Page 179: Profile Editor
Canned cycles have a specific manual both for milling and turning. Refer to the documentation included in the CD-Rom that comes with the product for further detail. CNC 8060 CNC 8065 : 1807) -
Page 180: Inclined Planes (·M· Model)
When the drawing is selected with the focus, the cube may be rotated using the [ ][ ][ ][ ] keys or using the wheel of the mouse. CNC 8060 Parameters to define the inclined plane. -
Page 181: Geometric-Help Editor
Parameters to define the machining operation. Horizontal softkey menu. Softkey. Meaning. Scaling factor. Mirror image. Rotate the coordinate system. Corner chamfering and rounding. Tangential entry and exit. Square, semi-rounded or rounded corner. Plane change. CNC 8060 CNC 8065 Zero offset and preset. : 1807) ·181·... - Page 182 This softkey may be used to cancel the current scaling factor and activate a new one. In the latter case, the cycle shows the necessary data to define the scaling factor. The cycle internally generates an ISO block with function G72. CNC 8060 CNC 8065 : 1807) ·182·...
- Page 183 (pattern) rotation, the cycle shows the necessary data to define the coordinate (pattern) rotation.. The cycle internally generates up to two ISO blocks with function G73. Corner chamfering and rounding. CNC 8060 CNC 8065 : 1807) This softkey may be used to define corner rounding or chamfering . In either case, the cycle shows the necessary data to define the machining operation.
- Page 184 This softkey may be used to define the work plane, be it a main one (G17, G18 or G19) or one defined by two axes (G20). CNC 8060 The cycle internally generates an ISO block with function G17, G18, G19 CNC 8065 or G20.
-
Page 185: Graphic Assistance For The Program Editor
G841-G842, and G840 or the line selected with the cursor. If the cursor is not in a profile that begins with G841-G842 or with #PROFILE BEGIN, the window shows the entire previous geometry. CNC 8060 CNC 8065 : 1807) -
Page 186: Graphics Window
O p er a t i ng ma n u a l. Graphics window This window is used to show a graphic representation of the program being simulated and take measurements over the drawing. The CNC has different types of graphics. CNC 8060 CNC 8065 : 1807) ·186·... -
Page 187: Program Window
Toggle between the various screens of the EDISIMU mode and display information related to the status of the subroutines, canned cycles, repetition blocks and loops. Exblk. Execute only the block selected with the cursor. Graphics. Show the graphics screen. CNC 8060 CNC 8065 : 1807) ·187·... -
Page 188: Working In The Program Window
When selecting this option, the CNC requests the number of times that the block must be executed before ending the execution of the program. After entering the number of times, press [ENTER] to validate the value or [ESC] to cancel it. CNC 8060 CNC 8065 Find text. - Page 189 To start the search, press [ENTER] and the cursor will position on the text found. Pressing [ENTER] again, the CNC will look for the next match and so on. To end the search, press [ESC]. The cursor will position on the block containing the text searched. CNC 8060 CNC 8065 : 1807)
-
Page 190: Simulate Program Blocks Separately
Once that block is simulated, another block may be simulated by selecting it with the cursor and pressing [START] again and so on. The blocks may be selected with the [ ] [ ] keys. CNC 8060 CNC 8065 : 1807) -
Page 191: Display The Status Of The Program Or Of The Active Subroutines
Number of current loop and total number of loops. $FOR Number of current loop and total number of loops. $WHILE Number of current loop. Number of current loop. Text "IF". $SWITCH Text "SWITCH". CNC 8060 CNC 8065 : 1807) ·191·... -
Page 192: Statistics Window
Machining time for each tool. It shows a list of the tools used in the program indicating the machining time for each tool and the total positioning time. "G" functions active during simulation. CNC 8060 CNC 8065 : 1807) ·192·... -
Page 193: Time Estimates
If not selected, the execution time estimate will be done from the first block of the program to the execution of one of the end-of-program functions "M02" or "M30". Select the desired simulation options. From the vertical softkey menu, start calculating the execution time estimate. CNC 8060 CNC 8065 : 1807) ·193·... - Page 194 O p er a t i ng ma n u a l. CNC 8060 CNC 8065 : 1807) ·194·...
- Page 195 FMC (FAGOR MACHINING CALCULATOR). The FMC application consists of a database of materials to be machined and machining operations (milling and turning) and an interface to choose suitable cutting conditions, particularly the feedrate of the axes (F) and the turning speed of the spindle (S). After selecting a particular material and operation, the FMC offers a range of recommended cutting conditions.
- Page 196 (F), speed (S) and tool number (T) fields for the current operation (roughing, semi-finishing or finishing). If the FMC calculator was accessed from the cycle editor, ([CALC], [CTRL][K] or [CTRL][A] keys), the calculator will not change the cycle data. CNC 8060 CNC 8065 : 1807) ·196·...
-
Page 197: Fmc Calculator
FMC calculator will not calculate the DMC function. • The DMC is only available for the Fagor digital servo master spindle; if the master spindle is analog, the FMC calculator cannot calculate the DMC function. The spindle must be enabled for the DMC in the machine parameter DMCSPDL. -
Page 198: Materials Table
O p er a t i ng ma n u a l. Materials table. This table lists the materials defined by Fagor, the OEM and the user. The OEM and the user may add or delete their own materials, but they cannot modify or delete those defined by Fagor (with the exception of the KC value). -
Page 199: Operations Table
O p e r a t i n g m a n u a l . Operations table. This table lists the operations defined by Fagor, the OEM and the user. The OEM and the user may add or delete their own operations, but they cannot modify or delete those defined by Fagor. -
Page 200: Working With The Fmc
When selecting the data to be included in a backup or restore, the database containing the materials and operations added by the manufacturer or user is in the Tables section under "User Data". See "19.6 Data safety backup. Backup CNC 8060 - Restore" on page 337. CNC 8065 : 1807) ·200·... - Page 201 FCAS is only available on single-channel machines that use HD graphics with a model configuration of the machine adjusted to reality (xca file). Default xca files supplied by Fagor are generic, which means they are not suitable for the FCAS option.
-
Page 202: Fcas Status
PLC has disabled this feature. Blinking icon. • The axes are close to the collision zone. • CPU overload during collision detection calculations. The variable VGCOLLISIONPERF indicates more details behind the cause of the blinking. CNC 8060 CNC 8065 : 1807) ·202·... -
Page 203: Fcas Operation
OEM has been provided a button or key for this purpose. Additionally, the HD graphics must be selected and the machine configuration must be loaded (xca file). Collision control is not active if the STD graphics (Fagor standard graphics) are selected. Automatic mode and MDI/MDA. - Page 204 O p er a t i ng ma n u a l. CNC 8060 CNC 8065 : 1807) ·204·...
-
Page 205: Interface Description
Keyboard shortcuts. These options will not be available when a menu for editing data or selecting items is active at the editor. Keys. Meaning. CNC 8060 [] [] [] [] Move the graphics. CNC 8065 [+] [–] Enlarge or reduce the display area. - Page 206 "11.6 End the session at the editor." on page 217. Undo Undo the last operation. Save and continue Save the profile and continue editing. Using this key does not require that the profile be completed. CNC 8060 CNC 8065 : 1807) ·206·...
-
Page 207: How To Use The Profile Editor
X1 = ? Y1 = ? X1 = 40 Y1 = 30 X2 = ? Y2 = ? X2 = ? Y2 = ? CNC 8060 Angle = 60º Xc = ? Yc = ? Tangent = Yes Radius = 20... -
Page 208: Define A New Profile, Enlarge An Existing One Or Import One From A File
Softkey for adding straight and curved sections to the profile. "11.2.4 Enlarge a profile." on page 212. Import profile Softkey for importing a profile in DXF format. "11.2.5 Import a profile from a DXF file." on page 213. CNC 8060 CNC 8065 : 1807) ·208·... -
Page 209: Define Any Profile Using Straight And Curved Sections
Information r1, 1 Radius and Polar angle of the section's starting point. r2, 2 Radius and Polar angle of the section's end point. CNC 8060 Angle Angle of the profile with the abscissa axis. CNC 8065 Tangency Tangency with the previous section of the profile. - Page 210 Undo the last operation. This softkey may be used to "undo" the last operation made. Save and continue. To save the profile and continue editing. Using this key does not require that the profile be completed. CNC 8060 CNC 8065 : 1807) ·210·...
-
Page 211: Define A Circular Profile
Radius and Polar angle of the profile's starting point. rc, c Radius and Polar angle of the profile's center point. Radius Radius of the arc. CNC 8060 Direction Direction of the profile; clockwise or counterclockwise. CNC 8065 : 1807) ·211·... -
Page 212: Define A Rectangular Profile
The softkey menu may be used to select one of the profiles of the editor and continue building it by adding straight and curved sections. After selecting the profile, press the [ENTER] key CNC 8060 to enter in editing mode where the softkey menu will show the options to define straight and CNC 8065 curved sections. -
Page 213: Import A Profile From A Dxf File
CNC units are millimeters or 5 decimals if the measuring units at the CNC are inches. A greater resolution increases the size of the DXF file unnecessarily because the CNC ignores the excess of resolution. CNC 8060 CNC 8065 : 1807) - Page 214 • Associate a subroutine to circles. If a valid subroutine has been selected, the dxf converter identifies the circles and converts them into a block with the indicated CNC 8060 subroutine number and the position of the center of the circle. If no valid subroutine has been selected, the dxf converter converts the circles to segments with G2/G3.
-
Page 215: Modify A Profile And Insert Corners
Corner definition This softkey may be used to include rounding, chamfers, tangential entries or exits in the CNC 8060 defined profile. When selecting this option, the softkey menu shows the type of corners that can be inserted. - Page 216 [ENTER] key. When the profile is part of a conversational canned cycle, the CNC ignores the feedrate (F) programmed in the additional ISO lines. The CNC uses the feedrates set in the canned cycle. CNC 8060 CNC 8065 : 1807)
-
Page 217: Configuring The Profile Editor. Displayed Area
CNC will issue the relevant message. Do not save profile Do not insert the profile in the program and it exit the profile editor. Continue Do not insert the profile in the program and continue editing the profile. CNC 8060 CNC 8065 : 1807) ·217·... -
Page 218: Examples Of How To Define Profiles
Assign radius = 5 Rounding Select point "5" Assign radius = 5 Rounding Select point "6" Assign radius = 10 CNC 8060 Chamfer Select point "7" Assign size = 10 CNC 8065 Tangential exit Select point "1" Assign radius = 5 End of editing Select the "END"... -
Page 219: Profile Editor. Example 2 (Milling)
Center X = 160 Radius = 20 Tangency = Yes Center Y = 80 • The CNC shows the options for section 5. Select the correct one. CNC 8060 Counterclockwise arc Center X = 100 Radius = 150 Tangency = Yes CNC 8065 •... - Page 220 Assign radius = 5 Rounding Select point "B" Assign radius = 5 End of editing Select the "END" option and save the profile. The CNC quits the profile editor and inserts the profile in the part-program. CNC 8060 CNC 8065 : 1807) ·220·...
-
Page 221: Profile Editor. Example 3 (Milling)
Tangency = Yes • The CNC shows the options for section 6. Select the correct one. Counterclockwise arc Radius = 10 Tangency = Yes CNC 8060 Clockwise arc Center X = 40 Radius = 30 Tangency = Yes CNC 8065 Center Y = 30 •... -
Page 222: Profile Editor. Example 4 (Lathe)
Tangential exit Select the corner "7-8" Assign radius = 5 End of editing Select the "END" option and save the profile. The CNC quits the profile editor and inserts the profile in the part-program. CNC 8060 CNC 8065 : 1807) ·222·... -
Page 223: Description Of The Graphic Environment
On 3D graphics, the illustration shows the point of view of the graph displayed and it may be changed by the operator. Key. Meaning. Select a new point of view. CNC 8060 Assumes the new point of view selected. ENTER CNC 8065 Cancels the selected point point of view. -
Page 224: Softkey Menus
Display either the real or the theoretical tool path. "+Error" Display the real path, but enlarging the error with respect to the theoretical path. Pressing this softkey also activates the one corresponding to the real path. "Speed" Change the simulation speed. CNC 8060 CNC 8065 : 1807) ·224·... -
Page 225: Type Of Graphics
"Solid 3D" Graphics This type of graphics displays a three-dimensional graph of the machining of the part. Starting out with a 3D block which is "machined" as the program is executed or simulated. CNC 8060 CNC 8065 : 1807) ·225·... -
Page 226: Zoom
(Xmin, Xmax, Ymin, Ymax, Zmin, Zmax). Zoom "Edit" It is used to manually edit the zoom values. It is edited in the dialog area of the graphic window that shows the dimensions of the zoom frame CNC 8060 CNC 8065 : 1807) ·226·... -
Page 227: Dimensions
Point of view "Edit" It is used to manually edit the orientation of the axes of the graphics. It is edited in the dialog area of the graphic window that shows the current orientation of the axes. CNC 8060 CNC 8065 : 1807) -
Page 228: Measurement
This option is used to select the cursor to be moved (same as using the [+] key). Measurement "Edit" This option is used to manually edit the position of the cursors. It is edited in the dialog area of the graphic window that shows the position of both cursors. CNC 8060 CNC 8065 : 1807) ·228·... -
Page 229: Clear Screen
Key. Meaning. To move the cursor through the data. To open and close the color palettes. ENTER To move the cursor through the colors of the palette. To cancel the selected colors. CNC 8060 CNC 8065 : 1807) ·229·... -
Page 230: Options
• The title of the graphics that will appear next to it in the print. • The name of the file where the graphics will be stored when printing out to a file. After filling out the data, press [ENTER] to accept them or [ESC] to cancel them. CNC 8060 CNC 8065 : 1807) -
Page 231: Real Coordinates
This option is only available when simulating the program; not when exeucting it. Speed "Edit" It is used to select the new simulation speed. It is selected using the graduated ruler that indicates the active simulation speed. Key. Meaning. To move the ruler cursor. CNC 8060 CNC 8065 : 1807) ·231·... - Page 232 O p er a t i ng ma n u a l. CNC 8060 CNC 8065 : 1807) ·232·...
-
Page 233: Graphic Environment
Measurements can also be made on the part and even sections on the piece from any angle. HD graphics and standard Fagor graphics. Using active HD graphics, the standard Fagor graphics can be accessed through the task window [CTRL] + [A], "Settings" tab. CNC 8060... - Page 234 "Automatic mode" for more details on the functionality of these softkeys. • When the focus is on the graphics area, the softkey menu displays the options to work with the graphics. The softkey menu is similar to the graphics of the edisimu mode. CNC 8060 CNC 8065 : 1807)
- Page 235 • When the focus is on the graphics area, the softkey menu displays the options to work with the graphics. The softkey menu is similar to the graphics of the automatic mode. CNC 8060 CNC 8065 : 1807) ·235·...
-
Page 236: Horizontal Softkey Menu
• Defines the type and size of the parts. • Deletes parts. • Saves and deletes parts. Measurement. • Measure the distance between two points. Ver. • Views the tool paths and the solid. • Simulation speed. CNC 8060 CNC 8065 : 1807) ·236·... -
Page 237: Move, Rotate And Zoom In Or Out On The Graphic
To rotate the part of the active view, move the mouse while holding its left button or use the following keys [[ ][ ][ ][ ]. Zoom the graphic. To zoom in or out on the active view, turn the mouse wheel or use the [+][-] keys. CNC 8060 CNC 8065 : 1807) ·237·... -
Page 238: Select The Type Of View
When changing channels, the displayed part changes. If several channels are working on the same part, all of them can show the same part. View part 1. The menu shows a softkey per available part. CNC 8060 CNC 8065 : 1807) ·238·... -
Page 239: Configuring The Graphics Window (Properties Of Each Window)
C o nf i g u r e t he w i n d o w t o di s p l a y t h e ac ti v e s e c t i o n s . Se e "13.5 Configuring and activating the sections." on page 240. Enhance part edges. The diagram enhances the edges of the part. CNC 8060 CNC 8065 : 1807) ·239·... - Page 240 "Origin". The color of each section may also be defined. • The "Origin" data defines the origin of the section. CNC 8060 • The "Normal" data defines the components of the vector normal to the plane, that defines the orientation of the plane.
- Page 241 239. If the "View sections" option is not enabled, the graphic does not show any section even if they are active. If the "view sections" option is enabled, the diagram shows the active sections. CNC 8060 CNC 8065 : 1807)
-
Page 242: Configure The Colors For The Tool Path And Solid
Transparency may take values between 0 and 1. If the value of the transparency is other than zero, the solid part becomes transparent. CNC 8060 CNC 8065 : 1807) -
Page 243: General Configuration Of The Graphics
This bar allows the simulation speed to be determined under edisimu mode. The speed may be modified during the simulation using the "View" softkey. See "13.18 Simulation speed (edisimu mode only)." on page 251. CNC 8060 CNC 8065 : 1807) ·243·... -
Page 244: Configuration. Cancel The Graphics
LastPiece.stl into the folder ../Users/Grafdata, and it recovers it after the new configuration. The machine configuration files supplied by Fagor consist of a single file, the xca. These files cover most configurations; therefore, new xca will have to be generated when the machine has some special requirement that affects graphics. -
Page 245: Actions. Move The Active Sections
[ ][ ] keys move the section in the positive direction of the axis and the [ ][ ] keys move it in the negative direction of the axis. CNC 8060 CNC 8065 : 1807) -
Page 246: Actions. Print The Graphic
After filling out the data, press [ENTER] to accept them or [ESC] to cancel them. 13.12 Delete the graphic. This softkey deletes the tool paths and resets the solid to its initial dimensions. CNC 8060 CNC 8065 : 1807) ·246·... -
Page 247: Editing, Displaying And Hiding Parts
Show the part Hide the part. CNC 8060 CNC 8065 The dimensions of the part correspond to the part zero (G92, G54 to G59, G159) active at the time of the activating the part, for this reason it is advisable to first activate the part zero and then the part. -
Page 248: Automatic Dimensions
(for example, 3D printers). The stl files are saved in the folder ../Users/Grafdata. In a machine configuration file exchange (xca file), the CNC automatically saves the current part as LastPiece.stl and retrieves it after activating the new machine configuration. CNC 8060 CNC 8065 : 1807) ·248·... -
Page 249: Measure The Part
• Use the keys [ ][ ][ ][ ] to move the active measuring point. • Use the left mouse button to drag the measuring points. • Click the mouse on any point on the screen, the active measuring point moves to that point automatically. CNC 8060 CNC 8065 : 1807) ·249·... -
Page 250: Viewing The Tool Paths And The Solid
The colors of the tools can be changed for the softkey "Configuration” > "Colors” > “Solid". Viewing tool paths and solids. This option only displays the solid to be machined and the tool paths. CNC 8060 CNC 8065 : 1807) ·250·... -
Page 251: Simulation Speed (Edisimu Mode Only)
This softkey allows the simulation speed to be changed under edisimu mode. After selecting this option, the CNC displays a cursor for setting the simulation speed. To move the cursor, use the mouses or the [SHIFT][ ] or [SHIFT][ ] keys. CNC 8060 CNC 8065 : 1807) - Page 252 O p er a t i ng ma n u a l. CNC 8060 CNC 8065 : 1807) ·252·...
-
Page 253: Description Of The Graphic Environment
Shows the work plane appearing in the display area and an illustration representing the size of the graph and the portion of the graphic area selected with the zoom. This area only appears during simulation and shows the "G" functions active in the simulation. CNC 8060 CNC 8065 : 1807) ·253·... -
Page 254: Softkey Menus
Display either the real or the theoretical tool path. "+Error" Display the real path, but enlarging the error with respect to the theoretical path. Pressing this softkey also activates the one corresponding to the real path. "Speed" Change the simulation speed. CNC 8060 CNC 8065 : 1807) ·254·... -
Page 255: Type Of Graphics
"Solid 3D" Graphics This type of graphics displays a three-dimensional graph of the machining of the part. Starting out with a solid block which is "machined" as the program is executed or simulated. CNC 8060 CNC 8065 : 1807) ·255·... -
Page 256: Zoom
Zoom "Edit" It is used to manually edit the zoom values. It is edited in the dialog area of the graphic window that shows the dimensions of the zoom frame CNC 8060 CNC 8065 : 1807) ·256·... -
Page 257: Dimensions
This option is used to select the cursor to be moved (same as using the [+] key). Measurement "Edit" This option is used to manually edit the position of the cursors. It is edited in the dialog area of the graphic window that shows the position of both cursors. CNC 8060 CNC 8065 : 1807) ·257·... -
Page 258: Clear Screen
Key. Meaning. To move the cursor through the data. To open and close the color palettes. ENTER To move the cursor through the colors of the palette. To cancel the selected colors. CNC 8060 CNC 8065 : 1807) ·258·... -
Page 259: Options
• The title of the graphics that will appear next to it in the print. • The name of the file where the graphics will be stored when printing out to a file. After filling out the data, press [ENTER] to accept them or [ESC] to cancel them. CNC 8060 CNC 8065 : 1807) -
Page 260: Real Coordinates
This option is only available when simulating the program; not when exeucting it. Speed "Edit" It is used to select the new simulation speed. It is selected using the graduated ruler that indicates the active simulation speed. Key. Meaning. To move the ruler cursor. CNC 8060 CNC 8065 : 1807) ·260·... -
Page 261: Graphic Environment
Measurements can also be made on the part and even sections on the piece from any angle. HD graphics and standard Fagor graphics. Using active HD graphics, the standard Fagor graphics can be accessed through the task window [CTRL] + [A], "Settings" tab. CNC 8060... -
Page 262: Hd Graphics In Automatic Mode
"Automatic mode" for more details on the functionality of these softkeys. • When the focus is on the graphics area, the softkey menu displays the options to work with the graphics. The softkey menu is similar to the graphics of the edisimu mode. CNC 8060 CNC 8065 : 1807) -
Page 263: Hd Graphics In Edisimu Mode
• When the focus is on the graphics area, the softkey menu displays the options to work with the graphics. The softkey menu is similar to the graphics of the automatic mode. CNC 8060 CNC 8065 : 1807) ·263·... -
Page 264: Horizontal Softkey Menu
• Defines the type and size of the parts. • Deletes parts. • Saves and deletes parts. Measurement. • Measure the distance between two points. Ver. • Views the tool paths and the solid. • Simulation speed. CNC 8060 CNC 8065 : 1807) ·264·... -
Page 265: Move, Rotate And Zoom In Or Out On The Graphic
To rotate the part of the active view, move the mouse while holding its left button or use the following keys [[ ][ ][ ][ ]. Zoom the graphic. To zoom in or out on the active view, turn the mouse wheel or use the [+][-] keys. CNC 8060 CNC 8065 : 1807) ·265·... -
Page 266: Select The Type Of View
When changing channels, the displayed part changes. If several channels are working on the same part, all of them can show the same part. View part 1. The menu shows a softkey per available part. CNC 8060 CNC 8065 : 1807) ·266·... -
Page 267: Configuring The Graphics Window (Properties Of Each Window)
C o nf i g u r e t he w i n d o w t o di s p l a y t h e ac ti v e s e c t i o n s . Se e "15.5 Configuring and activating the sections." on page 268. Enhance part edges. The diagram enhances the edges of the part. CNC 8060 CNC 8065 : 1807) ·267·... -
Page 268: Configuring And Activating The Sections
"Origin". The color of each section may also be defined. • The "Origin" data defines the origin of the section. CNC 8060 • The "Normal" data defines the components of the vector normal to the plane, that defines the orientation of the plane. -
Page 269: Configure The Colors For The Tool Path And Solid
Transparency may take values between 0 and 1. If the value of the transparency is other than zero, the solid part becomes transparent. CNC 8060 CNC 8065 : 1807) -
Page 270: General Configuration Of The Graphics
This bar allows the simulation speed to be determined under edisimu mode. The speed may be modified during the simulation using the "View" softkey. See "15.18 Simulation speed (edisimu mode only)." on page 278. CNC 8060 CNC 8065 : 1807) ·270·... -
Page 271: Configuration. Cancel The Graphics
LastPiece.stl into the folder ../Users/Grafdata, and it recovers it after the new configuration. The machine configuration files supplied by Fagor consist of a single file, the xca. These files cover most configurations; therefore, new xca will have to be generated when the machine has some special requirement that affects graphics. -
Page 272: Actions. Move The Active Sections
[ ][ ] keys move the section in the positive direction of the axis and the [ ][ ] keys move it in the negative direction of the axis. CNC 8060 CNC 8065 : 1807) -
Page 273: Actions. Print The Graphic
After filling out the data, press [ENTER] to accept them or [ESC] to cancel them. 15.12 Delete the graphic. This softkey deletes the tool paths and resets the solid to its initial dimensions. CNC 8060 CNC 8065 : 1807) ·273·... -
Page 274: Editing, Displaying And Hiding Parts
Show the part Hide the part. CNC 8060 CNC 8065 The dimensions of the part correspond to the part zero (G92, G54 to G59, G159) active at the time of the activating the part, for this reason it is advisable to first activate the part zero and then the part. -
Page 275: Automatic Dimensions
(for example, 3D printers). The stl files are saved in the folder ../Users/Grafdata. In a machine configuration file exchange (xca file), the CNC automatically saves the current part as LastPiece.stl and retrieves it after activating the new machine configuration. CNC 8060 CNC 8065 : 1807) ·275·... -
Page 276: Measure The Part
• Use the keys [ ][ ][ ][ ] to move the active measuring point. • Use the left mouse button to drag the measuring points. • Click the mouse on any point on the screen, the active measuring point moves to that point automatically. CNC 8060 CNC 8065 : 1807) ·276·... -
Page 277: Viewing The Tool Paths And The Solid
The colors of the tools can be changed for the softkey "Configuration” > "Colors” > “Solid". Viewing tool paths and solids. This option only displays the solid to be machined and the tool paths. CNC 8060 CNC 8065 : 1807) ·277·... -
Page 278: Simulation Speed (Edisimu Mode Only)
This softkey allows the simulation speed to be changed under edisimu mode. After selecting this option, the CNC displays a cursor for setting the simulation speed. To move the cursor, use the mouses or the [SHIFT][ ] or [SHIFT][ ] keys. CNC 8060 CNC 8065 : 1807) -
Page 279: Mdi/Mda Mode
This window shows the blocks saved so far and the edit line of the MDI mode. It is possible to edit and execute new blocks or recover blocks saved in the block history, which may be modified before executing them. CNC 8060 CNC 8065 : 1807) History of blocks in MDI mode. -
Page 280: Softkey Menus
Delete all the blocks from the block history. Save. Save the block history as an independent program. Move up the block selected with the cursor. Move down the block selected with the cursor. CNC 8060 CNC 8065 : 1807) ·280·... -
Page 281: Edit And Execute Individual Blocks
The [RESET] key cancels the execution of the block and resets the CNC to its initial conditions. Block execution. Changing the feedrate. When setting a new feedrate in the MDI/MDA mode, it will become the new feedrate for the jog and automatic modes. CNC 8060 CNC 8065 : 1807) ·281·... -
Page 282: Block History
Write the program name in the bottom window. To replace an existing program, select it from the list. Press [ENTER] to save the program or [ESC] to return to the MDI mode without saving the program. CNC 8060 CNC 8065 : 1807) ·282·... -
Page 283: User Table Presentation
In order to activate a fixture zero or part zero offset, those values must be previously stored in the relevant CNC table. CNC 8060 CNC 8065 : 1807) ·283·... -
Page 284: Softkey Menus
Save the values of the table into a file. Restore the values of the table previously saved into a file. Print the table in the pre-determined printer or save it as a file (prn format) at the CNC. CNC 8060 CNC 8065 : 1807) -
Page 285: Zero Offset Tables
(if active) or to the machine zero (if the clamp zero is not active). To apply an absolute zero offset, it must be activated via program using the relevant function. CNC 8060 CNC 8065 : 1807) - Page 286 CNC assumes as new zero offset the sum of both parts. Machine axes and display units (millimeters, inches or degrees). Zero offsets (coarse part). Zero offsets (fine part). Zero offset value in each axes of the channel. CNC 8060 CNC 8065 : 1807) ·286·...
-
Page 287: Fixture Table
CNC assumes as new clamp zero the point set by the selected offset referred to machine reference zero (home). To apply a clamp offset it must be activated from the program using the relevant variable. CNC 8060 CNC 8065 : 1807) - Page 288 Parameter list. Parameter value. Parameter describing comment (only in the common-parameters table). CNC 8060 The comment field offers the possibility to associate a short description with the parameter. CNC 8065 This field is for information only; it is not used by the CNC. The comments are saved in the file UCPComments.txt and it is possible to have one file per language.
- Page 289 In this case, the table values are updated after carrying out the operations indicated in the block being executed. The parameter values may be displayed either in decimal notation (6475.873) or scientific (0.654E-3). CNC 8060 CNC 8065 : 1807) ·289·...
- Page 290 Press [INS] to load calculated value into the field and close the calculator. Pressing [ENTER] instead of [INS] calculates the value without inserting it into the field and it allows going on with other operations. CNC 8060 CNC 8065 : 1807) ·290·...
-
Page 291: Save And Recall Tables
Select the file from the list or write its name in the bottom window. Press [ENTER] to recall the data from the file or [ESC] to return to the table without recalling the data. CNC 8060 CNC 8065 : 1807) -
Page 292: Find Text
After defining the search options, press [ENTER] to do the search or [ESC] to cancel it. Pressing [ENTER] positions the cursor in the first field that matches the search parameters. Pressing this FIND icon again will allow repeating the search or defining a new one. CNC 8060 CNC 8065 : 1807) -
Page 293: Tool And Magazine Table
• Table for the status of the tool change process. • Tool magazine tables. In order to load a tool in the magazine or in the spindle, that tool must have been previously defined in the corresponding table of the CNC. CNC 8060 CNC 8065 : 1807) ·293·... -
Page 294: Softkey Menus
See "18.1.3 Save and load the tables" on page 296. Save the tables Saves the data of all the tables. Recall the tables It restores the data previously saved for all the tables. CNC 8060 CNC 8065 : 1807) ·294·... -
Page 295: Search For A Text In The Tables
• The beginning point of the search, namely either from the beginning of the table or from the cursor position. Key. Meaning. Move the cursor. It selects an option from a group. Start the search. ENTER Cancel the search and close the dialog box. CNC 8060 CNC 8065 : 1807) ·295·... -
Page 296: Save And Load The Tables
It may be used to restore the data, in ASCII format, of the tables from the files. The tables may be loaded one by one or all of them simultaneously. In either case, the action is carried CNC 8060 out from the vertical softkey menu using one of the following icons. - Page 297 Finally, load the active-tools table. When loading the tables of magazines, it is unsure that the current tool positions will be compatible with the active tools. CNC 8060 CNC 8065 : 1807) ·297·...
-
Page 298: Printing The Tables
This softkey starts printing. When pressing this icon, the CNC will show a dialog box requesting the print destination for the table (printer or file). After selecting the target, press [ENTER] to start printing. Press [ESC] to cancel the selection. CNC 8060 CNC 8065 : 1807) ·298·... -
Page 299: Tool Table
The table shows the list of tools with most common data. This table can only be used to set some tool data. Unlike the full mode, the simple mode does not allow adding or removing tools or offsets from the table. CNC 8060 CNC 8065 : 1807) - Page 300 Ground tools are also defined in the tool table, but they are not associated with any magazine position. Ground tool loading and unloading is global to the system; it is not associated with any particular magazine or channel. CNC 8060 CNC 8065 : 1807) ·300·...
-
Page 301: Tool And Tool Magazine Table
"18.1.3 Save and load the tables" on page 296. Recall the table data previously saved in a file. Bear in mind that loading the tool table CNC 8060 initializes the magazine tables and the active-tools table. See "18.1.3 Save and load the tables"... -
Page 302: The Tool List
Scroll list up and down line by line. Move the cursor page by page through the list. Move the cursor to the beginning or end of the list. HOME Access the data of the selected tool. ENTER CNC 8060 CNC 8065 : 1807) ·302·... -
Page 303: Description Of The Tool Data
The tool number may be any integer between 1 and 999999999; by default, it is assigned the first available value on the list. When entering an existing tool number, the CNC displays the data for that tool. CNC 8060 CNC 8065 Tool name Name identifying the tool. - Page 304 The data related to the geometry may be accessed with the following hotkeys: Hotkey Access Length, length wear and edge length. Radius, radius wear, nose (tip) radius and nose (tip) radius wear. CNC 8060 Penetration angle CNC 8065 Offsets on each axis. Offset selection : 1807) The geometry data is associated with the tool offset.
- Page 305 Drilling (A)Drill bit. Boring (A)Quill. Turning (A)Diamond. (B)Square. (C)Round. Surface milling (A)Surface milling endmill. Tapping (A)Cutter. (B)Tap. Measuring probe CNC 8060 CNC 8065 Others To define the tools that do are not suitable for the proposed operations. : 1807) ·305·...
- Page 306 CNC verifies this every time an M03, M04 or M06.is programmed. "L" - Tool length This data is only shown on tools that are not for turning. The dimensions of the turning tools are defined with the offsets. CNC 8060 CNC 8065 : 1807) ·306·...
- Page 307 This data is only shown for turning tools. For the grooving and cut-off tool, this data assumes a value of 90º. "B" - Cutter width This data is only shown for turning tools. Cutter angle. CNC 8060 Cutting angle. CNC 8065 Cutter width. Cutting length.
- Page 308 On tools that are not just for turning, e.g. endmills and drill bits, the offsets may also be used to define the tool position when using a tool holder or an intermediate tool. In this case, the tool dimensions are defined with the radius and the length. CNC 8060 CNC 8065 : 1807)
- Page 309 This group shows the data related to tool life monitoring. If a tool has been defined with several offsets, it is possible to manage the status of each one. CNC 8060 When managing the live of two or more offsets of the same tool, the list of the magazine CNC 8065 positions (magazine table) only shows whether the tool has been rejected or not.
- Page 310 Special The tool always occupies the same position in the magazine. Custom CNC 8060 Data defined by the manufacturer. On the setup panel of the tool table, it is possible to assign a text to any of the 4 parameters.
- Page 311 O p e r a t i n g m a n u a l . Comment Comment associated with the tool. CNC 8060 CNC 8065 : 1807) ·311·...
-
Page 312: Tool Table (Simple Mode)
• Select the data to be shown in the tool table. To show or hide a data, activate or cancel its check box. • Define whether the wear is entered either with an incremental or with an absolute value. CNC 8060 CNC 8065 : 1807) ·312·... -
Page 313: Data Of The M Tools (Standard Page - Screen-)
Magazine it belongs to. icon Type of tool offset. Name Tool name. Length. Length wear. Radius. Radius wear. Tip radius. Rp W Tool tip radius wear. Cutting length. Entry angle. icon Turning direction. Number of teeth. CNC 8060 CNC 8065 : 1807) ·313·... -
Page 314: Data Of The T Tools (Standard Page - Screen-)
Type of tool offset. icon Location code (shape). icon Tool-holder orientation. Name Tool name. Cutter angle. Cutter width. Cutting angle of the cutter. Cutting length. Tip radius. Rp W Tool tip radius wear. CNC 8060 CNC 8065 : 1807) ·314·... -
Page 315: Data Of The M/T Tools (Offset Page - Screen-)
The table allows editing all the fields except the following. These fields may be modified at the full tool table. • Tool number. • Tool offset number. • Magazine it belongs to. • Type of tool offset. • Location code (shape). • Tool-holder orientation. • Turning direction. CNC 8060 CNC 8065 : 1807) ·315·... -
Page 316: Operations With The Tool Table (Full Mode)
Activate/deactivate the selection box. SPACE Open/close pop-up menus. Move the cursor within a data. Select the line before or after the comment. CNC 8060 CNC 8065 Move the cursor to the beginning or end of the comment line. HOME : 1807) -
Page 317: Active-Tools Table
It is also possible to change the tool of the spindle. See "18.6.2 Changing the tool of the spindle" on page 318. The tool data cannot be edited on this screen. The data shown here is defined in the tool table. CNC 8060 CNC 8065 : 1807) ·317·... -
Page 318: Softkey Menus
Press the [CYCLE START] key to load the tool automatically or the [ENTER] key to update the positions list after a manual tool change. The tool list will show that the tool is in the spindle. CNC 8060 CNC 8065 : 1807) -
Page 319: Table For The Status Of The Tool Change Process
• The "status" LED informs on whether the magazine is in an error state or not. To eliminate the error condition, press the reset softkey in the magazine table. CNC 8060 CNC 8065 : 1807) -
Page 320: Magazine Table
The right panel is informative only; it cannot be selected. This panel shows information about the magazine status, about the tools in the tool changer arm and about the tool selected on the list. Optionally, it may show information on the type and configuration of the magazine. CNC 8060 CNC 8065 : 1807) -
Page 321: Softkey Menus
Initialize the magazine data. The CNC will request confirmation of the command. It initializes all the magazine positions assigning T1 to position 1, T2 to position 2 and CNC 8060 so on. The tools must exist and must not be in another magazine. -
Page 322: List Of Magazine Positions
If the tool life monitoring is active, shows the remaining life, either in machining time or in the number of operations to be carried out or the tool status (rejected or worn out). Tool family Family the tool belongs to, defined by the user in the tool table. CNC 8060 CNC 8065 : 1807) ·322·... -
Page 323: Magazine Information
(in execution or at rest) and the status of the change process (whether it is in error or not). Tool information CNC 8060 It shows the data related to the magazine of the tool selected from the list. The "status" led informs about the tool status. - Page 324 This area shows which are the tools that occupy each claw (holder) of the changer. It shows the number and size of each tool. Magazine data Description of the type of magazine. To show and hide this information, press the information softkey. CNC 8060 CNC 8065 : 1807) ·324·...
-
Page 325: Operations With The Magazine Table
Press the [CYCLE START] key to load the tool automatically by means of the spindle or the [ENTER] key to update the positions list after loading manually. CNC 8060 • Automatic loading (pressing [START]). The CNC loads into the magazine a tool CNC 8065 previously defined in the table. - Page 326 CNC. Select a magazine position from the list and delete the number of the tool it occupies it. Press [ENTER] to update the positions list. CNC 8060 CNC 8065 : 1807)
-
Page 327: Load / Unload A Tool To / From The Tool Changer Arm
When using a two-holder changer arm, there may not be tools in the spindle and in the second holder of the changer arm at the same time. Press [ENTER] to update the table. CNC 8060 CNC 8065 : 1807) ·327·... - Page 328 O p er a t i ng ma n u a l. CNC 8060 CNC 8065 : 1807) ·328·...
-
Page 329: Utilities Mode
If a unit or folder has been selected, pressing the "=" will display the properties window. Depending on the size of the folder, the CNC may show a progress bar while it calculates its size. CNC 8060 CNC 8065 : 1807) - Page 330 The [ENTER] key opens the file selected on the list. • *.exe files: The CNC executes the file. • Unformatted text files: The CNC opens the file with Notepad. • Rest of files: The CNC opens the file with its associated program. CNC 8060 CNC 8065 : 1807) ·330·...
-
Page 331: Softkey Menus
-H- indicating that the program will be hidden (not visible). This attribute allows protecting the files so they are not displayed when selecting a program to be edited or executed. CNC 8060 However, a hidden program may be deleted if its name is known; therefore, it is CNC 8065 recommended to remove the modifiable attribute (M) in order to avoid deleting it. -
Page 332: Set How To Display The List Of Programs
It closes the folder tree (layout) and it only shows the devices accessible from the CNC. Show hidden files When this option is selected, the file list shows all the files of the selected folder even those having the "hidden" attributes. Otherwise, these files will not be shown. CNC 8060 CNC 8065 : 1807) ·332·... -
Page 333: Select Files And Create Folders
If when defining the folder name, there is already a folder with the same name, it will NOT create the new folder. CNC 8060 CNC 8065 : 1807) ·333·... -
Page 334: Search In Files
After defining the search options, place the cursor on one of the lower buttons to accept or cancel the defined search and press [ENTER]. The file window will show the list of the programs found. CNC 8060 CNC 8065 : 1807) -
Page 335: Protection Passwords
• When starting the CNC application and the unit is powered up in setup mode. • Do a restore of the CNC data. Customizing CNC 8060 It is requested when entering the FGUIM application. When entering the wrong password, CNC 8065 it will not be possible to access the application. - Page 336 It is requested to start the unit up in administrator mode. The access to the administrator mode is enabled with the validation code. If you don't have this software option, you will not be able to access the administrator mode. CNC 8060 CNC 8065 : 1807)
-
Page 337: Data Safety Backup. Backup - Restore
The CNC application must be restarted after restoring a backup. Select the data to be included in the backup or restore. The selected options will be kept until they are modified. CNC 8060 CNC 8065 : 1807) - Page 338 • Programs. Backup/restore of user programs, pockets, profiles, etc. The backup saves the data in the BACKUP_USER_PRG.zip file. This backup includes the following folders. ..\Users\Prg ..\Users\Pocket ..\Users\Profile ..\Users\CycleData • Tables. Backup/restore of CNC tables; FMC. CNC 8060 CNC 8065 : 1807) ·338·...
-
Page 339: Encrypting Files
CNC's are the same. In the case of a PLC program, there is no need to encrypt the source file because compiling it is enough. The source file may be deleted. CNC 8060 CNC 8065 : 1807) - Page 340 O p er a t i ng ma n u a l. CNC 8060 CNC 8065 : 1807) ·340·...
-
Page 341: Appearance Of The Plc Mode
It shows the PLC status, running or stopped. CNC messages. Select the PLC services. CNC 8060 CNC 8065 This operating mode may be displayed with several screens. Each of them corresponds to a PLC service. The exchange between the different services is carried out with the list of services. -
Page 342: Icon Description (Vertical Softkeys)
This softkey only appears with the "Outputs" or "Cross references" service. Mnemonic language or contact language. This softkey toggles the display between the mnemonic language and the contact language (ladder diagram). This softkey only appears in the "Programs" service when monitoring a program. CNC 8060 CNC 8065 : 1807) ·342·... -
Page 343: Programs" Service
When selecting a file, the softkey menu shows the options to manage that file. Among these options, it is possible to edit and monitor the file. These options will show the editing and monitoring screens. CNC 8060 CNC 8065 : 1807) -
Page 344: Softkey Menus. Plc Project
Press [ENTER] to accept the selection and add the file or [ESC] to cancel the selection and close the file listing. When accepting the selection, the selected file will appear on the list that make up the PLC project. CNC 8060 CNC 8065 : 1807) ·344·... -
Page 345: Softkey Menus. Files Of The Plc Project
Files of the PLC project "Move down" When the PLC project contains several files, this softkey may be used to move the selected file down. CNC 8060 CNC 8065 : 1807) -
Page 346: Program Editing
Line number and area for editing the program. A program edited in contact (ladder) language will contain numbered blocks representing the various elements. Status bar. CNC 8060 In a program edited in C language or mnemonic language, the bar shows information CNC 8065 about the cursor position and the status of the editor options. - Page 347 Softkey menu When accessing the PLC program editor, the horizontal softkey menu will show all the options associated with editing a file depending on the editing language. CNC 8060 CNC 8065 : 1807) ·347·...
-
Page 348: Editing In C Language Or Mnemonic Language
[CTRL]+[G] Save the program/Recover the original program. [CTRL]+[+] Zoom in. [CTRL]+[–] Zoom out. [CTRL]+[HOME] Move the cursor to the beginning of the program. [CTRL]+[END] Move the program to the end of the program. CNC 8060 CNC 8065 : 1807) ·348·... -
Page 349: Softkey "Analyze
The CNC offers the following keyboard shortcuts to undo and redo the operations. [CTRL]+[Z] Undo the last change. [CTRL]+[Y] Redo the selected text. CNC 8060 CNC 8065 : 1807) ·349·... -
Page 350: Softkey "Operations With Blocks
Define the file name at the bottom window. To replace an existing file, select it from the list. Press [ENTER] to save the program or [ESC] to cancel the selection and close the program listing. CNC 8060 CNC 8065 : 1807) -
Page 351: Softkey "Find/Replace
• "Replace all" option, to replace the text throughout the whole program. • "Find next" option, to skip this text and keep on searching. • "Find previous" option, to look for the text without replacing it. To end the search, press [ESC]. CNC 8060 CNC 8065 : 1807) ·351·... -
Page 352: Softkey "Customize
This option may be used to customize the color of the elements that make up the program. After defining the new look, press [ENTER] to accept the changes or [ESC] to ignore them. In large programs (more than 200 kB), the editor cancels the syntax coloring. CNC 8060 CNC 8065 : 1807) -
Page 353: Editing In Contact (Ladder) Language (Softkeys)
It edits the element on which the cursor is located. If the cursor is on the left column, it will show the dialog for editing the block comment. [] [] [] [] It moves the cursor in all 4 directions. [SHIFT][] [SHIFT][] It changes the selection. [SHIFT][] [SHIFT][] CNC 8060 CNC 8065 : 1807) ·353·... -
Page 354: Softkey "Analyze
(NOT a OR NOT b) NOT (a OR b) (NOT a AND NOT b) File "Export file" This softkey exports to a file the translation into mnemonic language of the program that is now being edited. CNC 8060 CNC 8065 : 1807) ·354·... -
Page 355: Edit" Softkey
Directing instructions can only be programmed in a block with their action_contact empty and without consultation_contact. DEF MARCA M100 Edit "Cut" Cut the selected contact or block. CNC 8060 Edit "Copy" CNC 8065 Copy the selected contacts or blocks. Edit "Paste"... - Page 356 M100 AND M101 = CNCRD(A.POS.X, R100, M100) Edit "Parallel" This softkey adds a consultation_contact in parallel to the contact selected with the cursor. M100 M101 CNCRD CNC 8060 A.POS.X M102 CNC 8065 M100 R200 (M100 AND M101) OR M102 = CNCRD(A.POS.X, R100, M100) : 1807) ·356·...
-
Page 357: Softkey "View
Place a mark or remove the mark of the block where the cursor is located. Marks "Next mark" Place the cursor on the next marked block. Marks "Previous mark" Place the cursor on the previous marked block. CNC 8060 Marks "Remove all" CNC 8065 Remove all the marks. : 1807) -
Page 358: Softkey "Find
After defining the new look, use the cursor to select one of the buttons here below to accept or ignore the changes made and press [ENTER]. The dialog box may also be closed directly without accepting the changes by pressing [ESC]. CNC 8060 CNC 8065 : 1807) -
Page 359: Program Monitoring
In a program edited in contact (ladder) language, it is the zone that shows the comments of a contact and other messages. In the "Monitoring" service, it is not possible to change the names or comments associated with the contacts. CNC 8060 CNC 8065 : 1807) -
Page 360: Softkey Menus. Monitoring In C Language Or Mnemonic Language
As the text is being searched, the cursor will position on the match found. To end the search, press [ESC]. Monitoring "Customize" It is used to personalize certain functions of the monitoring window. When selecting this option, the CNC shows a dialog box with the options available for customizing. CNC 8060 CNC 8065 : 1807) ·360·... -
Page 361: Softkey Menus. Monitoring In Contact (Ladder) Language
Place the cursor on the previous marked block. Marks "Remove all" Remove all the marks. Find CNC 8060 This softkey is used to find a text or a block by its number. CNC 8065 Find "Find" When selecting this option, the CNC shows a dialog box requesting the block number or the text to look for. - Page 362 When selecting this option, the CNC displays a dialog box showing the elements that may be set. Activate This softkey is used to turn monitoring on or off. The program is not monitored until the "Activate" option is pressed. CNC 8060 CNC 8065 : 1807) ·362·...
- Page 363 PLC program is running. Commands "PE module" This softkey is used to execute the periodic module (PE) once. The CNC does not execute this option when the PLC program is running. CNC 8060 CNC 8065 : 1807) ·363·...
-
Page 364: Outputs" Service
The screen of this service looks like this: Title bar. It shows the type of information displayed in the window (information about the compilation, file analysis or a search). Requested information. It shows the requested information. CNC 8060 CNC 8065 : 1807) ·364·... -
Page 365: Softkey Menus. Options Of The "Outputs" Service
This softkey shows the result of searching text in the programs making up the PLC project. After selecting an element from the list, it is possible to go to its line by pressing the relevant icon. CNC 8060 CNC 8065 : 1807) -
Page 366: Logic Analyzer" Service
When selecting the logic analyzer, the horizontal softkey menu offers all the options associated with this service. The set of options offered by this menu may be changed using the "+" softkey which offers a new set of options. CNC 8060 CNC 8065 : 1807) -
Page 367: Editing Logic Analyzer Data
The operator may use this parameter to assign the timeframe to each vertical division. The size of these divisions, therefore the resolution of these signals will be determined by this CNC 8060 time base. Consequently, the smaller the time base, the greater the signal resolution. - Page 368 Trace status This element cannot be edited, it automatically reflects the status of the trace. The possible messages are: • Empty. • Beginning. • Executing. • Stopping. • Full. CNC 8060 CNC 8065 : 1807) ·368·...
- Page 369 This option is used to reset all the analyzer data eliminating the defined variables or expressions as well as the trigger condition and trigger type. The traces are also deleted because there are no variables to be analyzed. CNC 8060 CNC 8065 : 1807)
-
Page 370: Execute And Analyze Trace
Customize the appearance of the logic analyzer It is used to customize the looks of the different elements of the logic analyzer. When selecting this option, the CNC shows a dialog box with the options available for customizing. CNC 8060 CNC 8065 : 1807) -
Page 371: Monitoring" Service
When selecting this service, the horizontal softkey menu will show all the options associated with resource monitoring. The set of options offered by this menu may be changed using the "+" softkey which offers a new set of options. CNC 8060 CNC 8065 : 1807) -
Page 372: Description Of Resource Tables
Status of the Countdown input (CDW). Status of the preset input (CPR). Status output. Value of the internal count of the counter. The inputs and outputs that are high will be indicated with a green symbol. CNC 8060 CNC 8065 : 1807) ·372·... -
Page 373: Definition Of The Table Resources
To remove a resource or user symbol from a table, select that element and press [SUP]. Key. Meaning. Select a table. Move the cursor. Move the cursor page by page. CNC 8060 CNC 8065 Move the cursor to the beginning / end of the table. HOME Delete the selected resource from the table. : 1807) -
Page 374: Options Of The "Monitoring" Service (Softkeys)
This softkey decreases the size of the active window (where the cursor is) by removing a row from it. Data input This softkey selects the data entry area. Clear all Delete all the resources from the tables. CNC 8060 CNC 8065 : 1807) ·374·... -
Page 375: Cross References" Service
The resource is used as a consultation. The resource is used as an action. For the timers. Timer trigger. Status consultation. Enable input. Reset input. For the counters. Status consultation. Counter preset. Enable input. Count-up input. Countdown input. CNC 8060 CNC 8065 : 1807) ·375·... -
Page 376: Softkey Menus. Options Of The "Cross Reference" Service
(printer or file). When printing to a file, it is possible to select the name and location of the file. After selecting the destination, press [ENTER] to print the table or [ESC] to cancel it. CNC 8060 CNC 8065 : 1807) ·376·... -
Page 377: Statistics" Service
• Module execution frequency. PLC file table. This table shows the following data (from left to right): • Files making up the PLC project. • Size of each file. • File type. • Date last modified. CNC 8060 CNC 8065 : 1807) ·377·... -
Page 378: Softkey Menus. Options Of The "Statistics" Service
"C:\Cnc8070\Users\Reports\". When selecting this option, the CNC will show a dialog box requesting the print destination (printer or file). After selecting the destination, press [ENTER] to print it or [ESC] to cancel it. CNC 8060 CNC 8065 : 1807) ·378·... -
Page 379: Messages" Service
When editing messages, this field does not appear because PLC messages do not activate the emergency signal. Text of the message or error displayed for the user. CNC 8060 CNC 8065 : 1807) -
Page 380: Softkey Menus. Options Of The "Messages" Service
(*.PRN format) at the CNC. Define a new message in the table. Define a new error in the table. Select the file for additional information. Delete the selected message or error from the table. CNC 8060 CNC 8065 : 1807) ·380·... -
Page 381: Editing The Message And Error Table
• The file for additional information may be entered directly or may be selected with the "Associate file" softkey. Press [ENTER] every time a data is edited to accept the new value or [ESC] to cancel it. CNC 8060 CNC 8065 : 1807) -
Page 382: Displaying Plc Messages
Stop the video and move to the next 5 frames or to the previous 5 frames. Stop the video and move to the end or to the beginning. HOME Stop the video. CNC 8060 SPACE CNC 8065 Play the video. ENTER : 1807) ·382·... -
Page 383: Displaying Plc Errors
Stop the video and move to the next 5 frames or to the previous 5 frames. Stop the video and move to the end or to the beginning. HOME Stop the video. SPACE Play the video. ENTER CNC 8060 CNC 8065 : 1807) ·383·... -
Page 384: Grouping The Additional Information Text Files In A Single File
<file>#<id>. The <file> field will be the path and the name of the file. The <id> field will be the code that identifies the help text inside the file. For example, the "associated file" will be defined as follows. C:\CNC8070\MTB\PLC\LANG\OEM.txt#27 CNC 8060 CNC 8065 : 1807) ·384·... -
Page 385: Save, Load And Print A Message And Error Table
"C:\Cnc8070\Users\Reports\". When selecting this option, the CNC will show a dialog box requesting the print destination (printer or file). After selecting the destination, press [ENTER] to print it or [ESC] to cancel it. CNC 8060 CNC 8065 : 1807) - Page 386 O p er a t i ng ma n u a l. CNC 8060 CNC 8065 : 1807) ·386·...
-
Page 387: Appearance Of The Machine Parameter Tables
The general machine parameters can also be used to define the data for the cross compensation. Use the axis machine parameters to determine whether leadscrew error compensation CNC 8060 will be applied or not and define the data of the corresponding table. CNC 8065 Validate the table data. -
Page 388: Softkey Menus
Export the cross compensation and leadscrew error compensation tables out to an ASCII file. The files will have the extension mp. Import the cross compensation and leadscrew error compensation tables that were previously saved in a file. CNC 8060 CNC 8065 : 1807) ·388·... -
Page 389: Parameter Table Description
[ENTER]. To return to the previous parameter table, press [ESC]. To obtain further information about the data appearing in the table, refer to the chapter on machine parameters of the installation manual. CNC 8060 CNC 8065 : 1807) ·389·... -
Page 390: M" Function Setting Table
To obtain further information about the data appearing in the table, refer to the chapter on machine parameters of the installation manual. CNC 8060 CNC 8065 : 1807) ·390·... -
Page 391: Compensation Table
To obtain further information about the data appearing in the table, refer to the chapter on machine parameters of the installation manual. CNC 8060 CNC 8065 : 1807) -
Page 392: Kinematics Table
The "MAX OFFSET" column will always be a positive value and the offset set by the user will be a value between "- MAX OFFSET" and "+ MAX OFFSET". If he sets a maximum offset of zero, the user will not be able to set any offset. CNC 8060 CNC 8065 : 1807) -
Page 393: Oem Parameters
The values of the simulation table can only be read or modified through their variable. To obtain further information about the data appearing in the table, refer to the chapter on machine parameters of the installation manual. CNC 8060 CNC 8065 : 1807) ·393·... -
Page 394: Operations With Tables
CNC. To validate the data, press the VALIDATE softkey. To validate certain parameters, restart the CNC. These parameters will be identified with the following symbol next to their name: Restarting the CNC required. CNC 8060 CNC 8065 : 1807) ·394·... -
Page 395: Save And Recall Tables
Select the file from the list or write its name in the bottom window. Press [ENTER] to recall the data from the file or [ESC] to return to the table without recalling the data. CNC 8060 CNC 8065 : 1807) -
Page 396: Find Text
After defining the search options, press [ENTER] to do the search or [ESC] to cancel it. Pressing [ENTER] positions the cursor in the first field that matches the search parameters. Pressing this FIND icon again will allow repeating the search or defining a new one. CNC 8060 CNC 8065 : 1807) -
Page 397: Importing And Exporting Compensation Tables
-10,0000 -0,0023 0,0000 -0,0007 10,0000 0,0043 CNC 8060 20,0000 0,0036 CNC 8065 When using bi-directional compensation, a new column must be inserted in the table with the amount of error to be compensated when moving in the negative direction. : 1807) - Page 398 O p er a t i ng ma n u a l. CNC 8060 CNC 8065 : 1807) ·398·...
- Page 399 All this helps achieve the proper adjustment of the loops, analyze mechanical problems and check the final features. The circularity (roundness) test CNC 8060 This tool helps improve and adjust the axis reversal peak, an effect that appears when the CNC 8065 axes reverse their moving direction.
-
Page 400: Oscilloscope
Sercos drive. The oscilloscope is an assistance tool that only shows the response of the system to the various settings (adjustments); it is up to the technician to choose the best adjustment. CNC 8060 CNC 8065 : 1807) -
Page 401: Interface Description
Trigger. For example, a 10% position indicates that 10% of the total number of programmed samples will be taken before the Trigger and the remaining 90% after that instant. CNC 8060 CNC 8065 The Trigger condition is evaluated after gathering the indicated % of samples. -
Page 402: Softkey Menus
To set the capture in continuous mode, change the "mode" option of the configuration screen. Softkey "Unfreeze capture". Unfreeze the display. Vertical softkey menu. Depending on which data has the focus, the vertical softkeys show different options. CNC 8060 CNC 8065 : 1807) ·402·... - Page 403 Moves the window to the left or to the right. Zone 4. Focus on the "parameter name" field. CNC 8060 As with variables, by selecting the various parameters, it is possible to change their names and values.
- Page 404 It resets the parameter to its default value. It validates the value given to the parameter. Using the "Config" softkey, a screen may be accessed where it is possible to define the list of parameters to be displayed. CNC 8060 CNC 8065 : 1807) ·404·...
-
Page 405: Configuration Screen
This way, when the focus is on the value of a variable on the main screen, pressing the vertical softkey "V+" will increase the parameter value in the amount set on the configuration screen. By default, the increase/decrease value of a parameter is initialized to 1. CNC 8060 CNC 8065 : 1807) -
Page 406: Configure And Execute The Oscilloscope Function
The possible data are fixed one of them must be selected. Use the [ ] [ ] keys to see the possible values. For this type of values that are icons, the [SPACE] key has the same effect as the [ ] key. CNC 8060 CNC 8065 : 1807) -
Page 407: Machine Parameter Editing
Beginning of next block DECJERK MPA.DECJERK.[set].axis Beginning of next block ESTDELAY MPA.ESTDELAY.[set].axis Immediate SERVOOFF MPA.SERVOOFF.[set].axis Immediate MINANOUT MPA.MINAOUT.[set].axis Immediate BAKANOUT MPA.BAKANOUT.[set].axis Immediate CNC 8060 BAKTIME MPA.BAKTIME.[set].axis Immediate CNC 8065 PEAKDISP PP14 MPA.PEAKDISP[set].axis Immediate REVEHYST PP15 MPA.REVEHYST[set].axis Immediate FBMIXTIME PP16 MPA.FBMIXTIME.axis... - Page 408 When modifying any parameter of the previous table, the change is effective immediately without having to reset or restart the unit even when there is a program in execution. CNC 8060 The drive parameters modified with this method are functional immediately, but these values will be lost when the drive is turned off.
- Page 409 Pressing the "Reset" softkey of the configuration screen deletes or initializes the current configuration. There are neither variables nor parameters selected and the rest of conditions (colors, trigger, etc.) assume the values assigned by default. CNC 8060 CNC 8065 : 1807)
-
Page 410: The Bode Diagram
(adjustments); it is up to the technician to choose the best adjustment. The Bode diagram requires a drive version V6.11 or newer. The Bode diagram is not available with the ACSD drives. CNC 8060 CNC 8065 : 1807) -
Page 411: Interface Description
S o m e o f t h i s d a ta m a y a l s o b e d e f i n e d a t t h e c o n f i g u r a t i o n s c r e e n . S e e "22.2.4 Configuration screen" on page 417. CNC 8060 CNC 8065 : 1807) -
Page 412: Softkey Menus
Treatment of the data and the captured trace. The following options appear in the "Views" menu. Softkey. Description. CNC 8060 Enlarge screen. With this option, it is possible to enlarge the graphics window to CNC 8065 the left, using the area that shows the data of the graphs to be displayed. - Page 413 It increases or decreases the time scale or frequency scale. CNC 8060 Zone 3. Focus on the "WIN", "C1" and "C2" field. CNC 8065 Cursors "C1" and "C2" may be used to analyze each signal of the last data capture. These two cursors may be used to obtain the position in milliseconds or Hertz of each signal and the time difference between them ""...
- Page 414 It decreases the value of the parameter in the amount indicated on the configuration screen. It resets the parameter to its default value. It validates the value given to the parameter. CNC 8060 CNC 8065 : 1807) ·414·...
-
Page 415: Machine Parameter Editing
Beginning of next block DECJERK MPA.DECJERK.[set].axis Beginning of next block SERVOOFF MPA.SERVOOFF.[set].axis Immediate BAKTIME MPA.BAKTIME.[set].axis Immediate If the machine parameters are protected, when accessing any of them, the CNC will display a window requesting a password. CNC 8060 CNC 8065 : 1807) ·415·... - Page 416 The drive parameters modified with this method are functional immediately, but these values will be lost when the drive is turned off. Use the "Save to flash" option to maintain the modified values of those machine parameters. CNC 8060 CNC 8065 : 1807)
-
Page 417: Configuration Screen
Position command / position feedback. CUR_OL Open current loop. VEL_OL Open velocity loop. POS_OL Open position loop. TF_CURCOM_MOTSPE Transfer function. Current command / motor speed. CNC 8060 CNC 8065 TF_MOTSPE_LOASPE Transfer function. Motor speed / load speed. : 1807) ·417·... - Page 418 Movement • "FEEDRATE (F/S)" Moving speed. It changes the axis moving direction, positive or negative. • "INITIAL POSITION" CNC 8060 Position where each capture begins. CNC 8065 • "PRBS AMPLITUDE" Amplitude of the excitation signal. It changes the units of the amplitude of the excitation signal.
- Page 419 There are neither variables nor parameters selected and the rest of conditions assume the values assigned by default. • Activate/Cancel reference capture. It may be used to activate or cancel the configuration of the reference Bode. CNC 8060 CNC 8065 : 1807) ·419·...
-
Page 420: The Circularity (Roundness) Test
The circularity (roundness) test diagram is an assistance tool that only shows the response of the system to the various settings (adjustments); it is up to the technician to choose the best adjustment. CNC 8060 CNC 8065 : 1807) ·420·... -
Page 421: Interface Description
• Number of divisions on both sides of the theoretical circle. • Scale or value in microns of each division. • Error margin. Percentage of the area that is occupied by the error margin (divisions area). CNC 8060 CNC 8065 : 1807) - Page 422 For each parameter, it shows its value on each axis of the work plane. To see the whole list of parameters that may be defined, see section "22.3.9 Machine parameters that may be modified" CNC 8060 CNC 8065 : 1807) ·422·...
-
Page 423: Softkey Menus
CNC; i.e. until the unit is turned off. On power-up, it assumes the values stored in the tables. • Softkey "Initialize". It resets the window data to its default values. CNC 8060 CNC 8065 : 1807) ·423·... -
Page 424: Configuring And Executing The Circularity (Roundness) Test
[ ][ ] keys. [][] The data are accepted with the [ENTER] key. Before accepting a data, it is checked out and if the data is not correct, it is not accepted. CNC 8060 CNC 8065 : 1807) ·424·... -
Page 425: Configure The Graphic Environment
Number of divisions Scale: 10 microns/division Error margin: 50 % Bear in mind that the softkey Initialize initializes all the data of the window, including the values of the machine parameters. CNC 8060 CNC 8065 : 1807) ·425·... -
Page 426: Define And Execute The Movement Subroutine
" GOTO " command. The movement is stopped with the [STOP] key of the operator panel. %testcirc_V1 G1 G5 X0 Y0 F1000 N10: G2 X0 Y0 I10 J0 $GOTO N10 CNC 8060 CNC 8065 : 1807) ·426·... -
Page 427: Data Capture For The Graphic
Delete the graphic representation Use the "Clear" softkey to delete the graph. This softkey deletes the graph and the data shown over it. It may be pressed at any time, even while it is being drawn. CNC 8060 CNC 8065 : 1807) -
Page 428: Adjustment Of The Machine Parameters Involved
BAKTIME Duration of the additional velocity command pulse When using Fagor Sercos drives, the drive parameters may also be adjusted. In a Mechatrolink bus, access to variables and parameters of the device is only available for the Mlink-II mode with 32 bytes. The circularity test can access the parameters of the device using its identifier (hexadecimal number between P0000 and PFFFF). - Page 429 Pressing the "Initialize" softkey sets the values assigned to the parameters as "default values" in the tables, not those set by the manufacturer. Bear in mind that the Initialize softkey initializes al the data of the window. CNC 8060 CNC 8065 : 1807)
-
Page 430: Validate The Changes And Save The Configuration Used
By default, the configuration is saved in the folder "C:\CNC8070 \MTB \DATA" or in the last folder selected by the user. Load the configuration Press the "Load" softkey to load a previously saved configuration. Select the folder and the file name and press [ENTER]. CNC 8060 CNC 8065 : 1807) ·430·... -
Page 431: Machine Parameters That May Be Modified
Beginning of the next block LACC2 mm(inch)/s² or degrees/s² Beginning of the next block LFEED mm(inch) or degrees Beginning of the next block MANACFGAIN Immediate MANFFGAIN Immediate MAXVOLT Immediate PROGAIN 1000/min Immediate SERVOOFF Immediate CNC 8060 CNC 8065 : 1807) ·431·... - Page 432 O p er a t i ng ma n u a l. CNC 8060 CNC 8065 : 1807) ·432·...
-
Page 433: Appearance Of The Ddssetup Mode
[NEXT] key, if it has been set accordingly. The services are switched in a rotary manner, in such a way that when pressing on the last active service, it CNC 8060 shows the first one. To close a screen, press [ESC]. -
Page 434: Icon Description (Vertical Softkeys)
The command line may be used to execute the command of the drive (only Sercos), consult variables, read and write parameters, obtain information on the status of the device and insert variables in the monitoring window (only Mechatrolink). CNC 8060 CNC 8065 : 1807) -
Page 435: List Of Devices Connected To The Bus
In a Mechatrolink bus, this softkey saves in the CNC the parameters of all the servos; it does not save the parameters of the inverters. Restore the data of all the drives. CNC 8060 In a Sercos bus, this softkey restores the parameters and variables of all the CNC 8065 drives from the files saved in the CNC. - Page 436 Update the descriptor of the parameters and variables (only Sercos). Softkey. Function. Update the descriptor of the parameters and variables. In a Sercos bus, this softkey updates file that describes the parameters and variables of the drive. CNC 8060 CNC 8065 : 1807) ·436·...
-
Page 437: Drives Accessing Level (Only Sercos)
This level gives full access to all the variables, parameters and commands of the system. The Fagor level gives access to a group of parameters depending on the drive's electronics and they factory set. Only technicians from Fagor Automation are granted a FAGOR access level. -
Page 438: Parameters And Variables– Service
• Parameter identifier (hexadecimal number between P0000 and PFFFF). The symbol appearing next to the identifier indicates how the parameter assumes the new value. CNC 8060 The parameter may be modified at any time and it assumes the new value immediately. - Page 439 In a Sercos bus, this softkey saves in the CNC the parameters and variables of the drive. In a Mechatrolink bus, this softkey saves in the CNC the parameters of the servo. CNC 8060 Restore the parameters from the CNC. CNC 8065 In a Sercos bus, this softkey restores the parameters and variables of the drive from the file saved in the CNC.
-
Page 440: Error Management– Service
Then, press the "Send" softkey to send the list to the drive. To make the error disabling effective, execute the command DC1 (reset errors) from the command bar. Disabling the errors requires an OEM or FAGOR access level. See "23.3 Drives accessing level (only Sercos)."... -
Page 441: Monitoring– Service
Begin monitoring. End monitoring. Edit the list of variables to monitor. CNC 8060 The variables to be monitored are defined from the command line; edit the name of the CNC 8065 variable and press the [INS] key. For Sercos, the softkey "Add" can also be used, it shows a window for selecting the variables or parameters to monitor. - Page 442 Use the softkeys of the horizontal menu to start and stop the monitoring of variables. While monitoring, the window shows the following symbols next to each variable to indicate its status. Channel occupied. Channel occupied by DRV variables or timeout. Reading error. CNC 8060 CNC 8065 : 1807) ·442·...
-
Page 443: Information– Service
Status of the inputs and outputs of a Sercos drive. CNC 8060 CNC 8065 : 1807) - Page 444 (analog and digital). Those digital outputs that have not been associated with any parameter or variable may be forced to become active or inactive using the button on the left of their led. CNC 8060 CNC 8065 : 1807)
- Page 445 Percentage of the wave at 1/0 (only on squarewaves). The internal command generator is turned on and off using the lower buttons. It turns the command generator on. It turns the command generator off. CNC 8060 CNC 8065 : 1807) ·445·...
- Page 446 • Execute commands of the drive. The drop list offers the following commands. To execute one of them, select it from the list and press [ENTER]. CNC 8060 Operations with a Mechatrolink device. CNC 8065 • Consult variables. Edit the name of the variable and press [ENTER].
- Page 447 Warning or error code reported by the device. MIOMON Status of the device inputs and outputs. • Insert variables in the monitoring window Access the monitoring service, edit the name of the variable and press [ENTER]. CNC 8060 CNC 8065 : 1807) ·447·...
- Page 448 To communicate with the servos, the DDSSetup uses the parameter description defined in the file SigmaII.dsc (in the folder C:\...\Fagor\Drive). The DDSSetup only shows the groups and parameters defined in this file. Here is a description of the file format so a user can change it to adapt it to his devices.
- Page 449 Application=Offline; The parameter may be modified at any time and it assumes the new value after turning the device off and back on. Optional field; if not defined, value "Online". CNC 8060 CNC 8065 : 1807) ·449·...
- Page 450 O p er a t i ng ma n u a l. CNC 8060 CNC 8065 : 1807) ·450·...
- Page 451 Hardware diagnosis: Information about the elements connected to the CNC through the Can bus, Sercos (drives, input/output cards, etc.) and Mechatrolink (servos and inverters). Diagnosis of the selected element. CNC 8060 CNC messages. CNC 8065 : 1807) ·451·...
- Page 452 Description. Generate the reportfagor.zip file with all the relevant information for proper error diagnosis and, if necessary, the end user can send it to Fagor Automation. View the history of errors and warnings issued by the CNC. Access particular utilities of the operative system and other applications.
-
Page 453: Configuration Diagnosis
O p e r a t i n g m a n u a l . 24.2 Configuration diagnosis 24.2.1 System diagnosis When selecting this configuration element, the diagnosis window shows the list of the system elements and their values. System elements. Element values. CNC 8060 CNC 8065 : 1807) ·453·... -
Page 454: Software Diagnosis
When selecting this element of the configuration, the diagnosis window shows the software options currently installed. It also shows the horizontal softkey "Validation code" for entering the resulting validation code according to the hardware ID of the unit and the desired options. CNC 8060 CNC 8065 : 1807) ·454·... -
Page 455: Hardware Diagnosis. Bus Can, Sercos And Mechatrolink
• Software version, boot and checksum of the code. • Node status. • Resources of each module. The symbol next to the node indicates its status and its possible association. Active. Active, but in error. Inactive. CNC 8060 CNC 8065 : 1807) ·455·... - Page 456 Status of the device I/O (only servos). Command. Command active at the drive and status of its execution. Subcommand. Subcommand active at the drive and status of its execution. Communication errors. Information on the communication errors of the device. CNC 8060 CNC 8065 : 1807) ·456·...
-
Page 457: Sercos Diagnosis
Information on the last operation carried out by the service channel Field. Meaning. Processed Sercos ID. Element Processed data (Name, Units, min/max Value, Status, Value, Attributes). CNC 8060 Process Operation carried out (Read, Write). CNC 8065 Command status In processes with commands, it indicates its status. -
Page 458: Save The Can Configuration For The Start-Up Test
In order for the CAN configuration file not to be eliminated when turning the unit off, it must be started up in setup mode and then save the CAN configuration. CNC 8060 CNC 8065 : 1807) -
Page 459: Report Generation
Generate the warranty registration report. The CNC can generate a template so the end user can send to Fagor the documentation with the serial numbers of all the elements in order to obtain the corresponding warranty. This template, one printed out, contains the fields that the user must fill out and then send it to Fagor Automation. -
Page 460: View The History Of Errors And Warnings Issued By The Cnc
The softkey menu offers the possibility to generate the reportfagor.zip file with all the relevant information for proper error diagnosis and, if necessary, the end user can send it to Fagor Automation. After pressing this softkey, the CNC creates the reportfagor.zip file and saves it in the "C:\Cnc8070\Diagnosis"... -
Page 461: Operating Terms
OEM to obtain the code that extends or cancels the expiration date. • Expired: The temporary user license has reached the CNC 8060 expiration date. During the start-up of the CNC, when the [START] key is pressed and once 24 hours have passed... -
Page 462: Generating The "Operating Terms" Codes (Only For Oem)
CNC and later than the current date. The program will display a screen with code of 14 numbers and letters. Windows version. Android version. CNC 8060 CNC 8065 : 1807) ·462·... - Page 463 The button is only available in the Windows version. This button enables the code to be sent by email, SMS, etc. The button is only available in the Android version. CNC 8060 CNC 8065 : 1807)
-
Page 464: Enter The Cnc Code To Activate Or Cancel The Temporary User License
The new expiration date is not later than the current expiration date; request a new code with the correct expiration date from the manufacturer. CNC 8060 When the OEM sends the “Operating Terms” code, it should also send the expiration date and the hardware ID in order to check that the data are correct. - Page 465 This softkey may be used to access particular utilities of the operating system (date and time, Task Manager, etc.) and applications of the CNC itself. The utilities and applications that may be accessed with this softkey are preset by the OEM (file C:\...\MTB\MMC\Config\Apps.ini). CNC 8060 CNC 8065 : 1807) ·465·...
-
Page 466: Send Emails
Use the test message to confirm that the configuration is correct and that the message reaches its destination. Enable the email sending service. The application is minimized automatically. When one of the selected events occurs, the application will send the corresponding notification. CNC 8060 CNC 8065 : 1807) ·466·... - Page 467 (8060) C:\FAGORCNC\Fagor\Release (8065) C:\CNC8070\Fagor\Release Application for configuring and enabling the email sending service. FAemailsender.config C:\Program Files\Fagor Automation\FagorApps Text file containing the configuration of the application. FAfilters.config C:\Program Files\Fagor Automation\FagorApps Text file containing the configuration of the filters applicable to the messages, errors and warnings.
-
Page 468: Configure And Activate The Application
• As mail server, it is possible to use one of the predefined external servers (requires Internet connection) or the internal server of the company by entering its name. CNC 8060 • When using the company mail server, the SMTP port, the SSL protocol being used and CNC 8065 the authentication protocol depend on the configuration of the network. - Page 469 If the application is active, pressing this icon will minimize it. If the application is not active, it asks whether to close the application or not; selecting "No" will minimize it on the task bar. CNC 8060 CNC 8065 : 1807)
-
Page 470: Configuring Network Properties
CNC in a matching the configuration of the local network where the unit is installed. In Diagnosis mode, expand the softkey Apps > Apps > Network Settings. CNC 8060 CNC 8065 : 1807) ·470·... - Page 471 The subroutines KinCal_Begin.nc and KinCal_End.nc, as well as the special subroutines defined by the manufacturer, must be saved in the folder ..\Mtb\Sub. The subroutine Kin_G_Move.nc must be saved in the folder ..\Fagor\Sub. All channels use the same subroutines. Requirements for the kinematics.
- Page 472 The value of PROBEDELAY must be defined for all axes. Report location. The KinCalReport.mp report is saved in the folder ..\Users\Session\Reports. CNC 8060 CNC 8065 : 1807) ·472·...
-
Page 473: Kinematics Calibration (Kinematic Offsets)
The number of points to be measured along the travel must also be defined. Three points must be measured, but the result is best with more than four points. CNC 8060 Starting position of the rotary axes. CNC 8065 Final position of the rotary axes. - Page 474 The cycles does not verify the probe adjustment. Points to probe for calculating the center of the ball. The points to be measured are on the axes. The points to be measured are 45º with respect to the axes. CNC 8060 CNC 8065 : 1807) ·474·...
-
Page 475: Page 2. Page To Display The Captured Position Values (Coordinates)
Ball centers measured in each position. Active "G" functions and high-level commands. Information related to the feedrate "F" of the axes: Information related to the spindle speed "S". Programmed coordinate and current position of the axes. CNC 8060 CNC 8065 : 1807) ·475·... -
Page 476: Page 3. Page To Display The Calculated Data
Parameter value, set at the machine parameters. Parameter value, calculated during the calibration. Maximum offset allowed for the parameter, set at the machine parameters. Parameter offset, set at the machine parameters. Parameter offset, calculated during the calibration. CNC 8060 CNC 8065 : 1807) ·476·... -
Page 477: How To Calibrate A Kinematics
“Value” (SETUP mode) or the field “Offset” (SETUP or USER mode) of machine parameter table. To do this, select the data from the results page to be modified and press the “Validate” softkey. CNC 8060 CNC 8065 Machine parameter tables for the kinematics. -
Page 478: Tables To Modify Type 1 To 16 Kinematics To Vector Kinematics
TDATA2 TDATA3 TDATA3 TDATA15 TDATA4 TDATA5 TDATA6 TDATA7 TDATA8 TDATA8 TDATA10 TDATA9 TDATA11 TDATA2 TDATA12 TDATA13 TDATA4 TDATA14 TDATA15 TDATA16 TDATA17 TDATA9 TDATA18 TDATA11 TDATA19 TDATA21 TDATA22 TDATA6 TDATA23 TDATA1 TDATA24 TDATA25 TDATA26 CNC 8060 CNC 8065 : 1807) ·478·... -
Page 479: Adapting A Type 2 Kinematics To A Type 50 Kinematics
TDATA2 TDATA14 TDATA3 TDATA4 TDATA4 TDATA5 TDATA6 TDATA7 TDATA8 TDATA8 TDATA10 TDATA9 TDATA11 TDATA2 TDATA12 TDATA3 TDATA13 TDATA14 TDATA15 TDATA16 TDATA17 TDATA9 TDATA18 TDATA11 TDATA19 TDATA21 TDATA22 TDATA6 TDATA23 TDATA1 TDATA24 TDATA25 TDATA26 CNC 8060 CNC 8065 : 1807) ·479·... -
Page 480: Adapting A Type 3 Kinematics To A Type 50 Kinematics
TDATA2 TDATA14 TDATA3 TDATA15 TDATA4 TDATA5 TDATA6 TDATA7 TDATA8 TDATA8 TDATA10 TDATA9 TDATA11 TDATA12 TDATA13 TDATA4 TDATA14 TDATA15 TDATA16 TDATA17 TDATA9 TDATA18 TDATA11 TDATA19 TDATA21 TDATA5 TDATA22 TDATA3 TDATA23 TDATA1 TDATA24 TDATA25 TDATA26 CNC 8060 CNC 8065 : 1807) ·480·... -
Page 481: Adapting A Type 4 Kinematics To A Type 50 Kinematics
TDATA2 TDATA14 TDATA3 TDATA4 TDATA4 TDATA5 TDATA6 TDATA7 TDATA8 TDATA8 TDATA10 TDATA9 TDATA11 TDATA2 TDATA12 TDATA3 TDATA13 TDATA14 TDATA15 TDATA16 TDATA17 TDATA9 TDATA18 TDATA11 TDATA19 TDATA21 TDATA5 TDATA22 TDATA23 TDATA1 TDATA24 TDATA25 TDATA26 CNC 8060 CNC 8065 : 1807) ·481·... -
Page 482: Adapting A Type 5 Kinematics To A Type 50 Kinematics
TDATA5*COS(TDATA7) TDATA12 TDATA3 TDATA13 TDATA5*SIN(TDATA7) TDATA14 COS(TDATA7) TDATA15 TDATA16 SIN(TDATA7) TDATA17 TDATA9 TDATA18 TDATA11 TDATA19 0, if TDATA12=0 or TDATA12=1 1, if TDATA12=2 or TDATA12=3. TDATA21 TDATA22 TDATA6 TDATA23 TDATA1 TDATA24 TDATA25 TDATA26 CNC 8060 CNC 8065 : 1807) ·482·... -
Page 483: Adapting A Type 6 Kinematics To A Type 50 Kinematics
TDATA2 TDATA12 TDATA6*COS(TDATA7) TDATA13 TDATA6*SIN(TDATA7) TDATA14 TDATA15 COS(TDATA7) TDATA16 SIN(TDATA7) TDATA17 TDATA9 TDATA18 TDATA11 TDATA19 0, if TDATA12=0 or TDATA12=1 1, if TDATA12=2 or TDATA12=3. TDATA21 TDATA5 TDATA22 TDATA23 TDATA1 TDATA24 TDATA25 TDATA26 CNC 8060 CNC 8065 : 1807) ·483·... -
Page 484: Adapting A Type 7 Kinematics To A Type 50 Kinematics
TDATA5*SIN(TDATA7) TDATA12 TDATA3 TDATA13 TDATA5*COS(TDATA7) TDATA14 SIN(TDATA7) TDATA15 TDATA16 COS(TDATA7) TDATA17 TDATA9 TDATA18 TDATA11 TDATA19 0, if TDATA12=0 or TDATA12=1 1, if TDATA12=2 or TDATA12=3. TDATA21 TDATA22 TDATA6 TDATA23 TDATA1 TDATA24 TDATA25 TDATA26 CNC 8060 CNC 8065 : 1807) ·484·... -
Page 485: Adapting A Type 8 Kinematics To A Type 50 Kinematics
TDATA2 TDATA12 TDATA6*SIN(TDATA7) TDATA13 TDATA6*COS(TDATA7) TDATA14 TDATA15 SIN(TDATA7) TDATA16 COS(TDATA7) TDATA17 TDATA9 TDATA18 TDATA11 TDATA19 0, if TDATA12=0 or TDATA12=1 1, if TDATA12=2 or TDATA12=3. TDATA21 TDATA5 TDATA22 TDATA23 TDATA1 TDATA24 TDATA25 TDATA26 CNC 8060 CNC 8065 : 1807) ·485·... -
Page 486: Adapting A Type 9 Kinematics To A Type 51 Kinematics
TYPE TDATA1 TDATA2 -TDATA3 TDATA3 -(TDATA5+TDATA4) TDATA4 TDATA5 TDATA6 TDATA7 TDATA8 TDATA8 TDATA10 TDATA9 TDATA10 TDATA7 TDATA11 -TDATA2 TDATA12 TDATA13 TDATA5 TDATA14 TDATA15 TDATA16 TDATA17 TDATA9 TDATA18 TDATA11 TDATA19 TDATA20 TDATA7 TDATA21 TDATA16 CNC 8060 CNC 8065 : 1807) ·486·... -
Page 487: Adapting A Type 10 Kinematics To A Type 51 Kinematics
TYPE TDATA1 TDATA2 -(TDATA5+TDATA3) TDATA3 -TDATA4 TDATA4 TDATA5 TDATA6 TDATA7 TDATA8 TDATA8 TDATA10 TDATA9 TDATA10 TDATA7 TDATA11 -TDATA2 TDATA12 TDATA5 TDATA13 TDATA14 TDATA15 TDATA16 TDATA17 TDATA9 TDATA18 TDATA11 TDATA19 TDATA20 TDATA7 TDATA21 TDATA16 CNC 8060 CNC 8065 : 1807) ·487·... -
Page 488: Adapting A Type 11 Kinematics To A Type 51 Kinematics
TYPE TDATA1 -(TDATA2) TDATA2 TDATA3 -(TDATA5+TDATA4) TDATA4 TDATA5 TDATA6 TDATA7 TDATA8 TDATA8 TDATA10 TDATA9 TDATA10 TDATA7 TDATA11 TDATA12 -TDATA3 TDATA13 TDATA5 TDATA14 TDATA15 TDATA16 TDATA17 TDATA9 TDATA18 TDATA11 TDATA19 TDATA20 TDATA17 TDATA21 TDATA16 CNC 8060 CNC 8065 : 1807) ·488·... -
Page 489: Adapting A Type 12 Kinematics To A Type 51 Kinematics
TYPE TDATA1 -(TDATA5+TDATA2) TDATA2 TDATA3 -TDATA4 TDATA4 TDATA5 TDATA6 TDATA7 TDATA8 TDATA8 TDATA10 TDATA9 TDATA10 TDATA7 TDATA11 TDATA5 TDATA12 -TDATA3 TDATA13 TDATA14 TDATA15 TDATA16 TDATA17 TDATA9 TDATA18 TDATA11 TDATA19 TDATA20 TDATA17 TDATA21 TDATA16 CNC 8060 CNC 8065 : 1807) ·489·... -
Page 490: Adapting A Type 13 Kinematics To A Type 52 Kinematics
TDATA19 TDATA21 TDATA22 TDATA3 TDATA23 TDATA1 TDATA24 TDATA25 TDATA26 TDATA31 -TDATA4 TDATA32 TDATA33 -TDATA6 TDATA34 TDATA35 TDATA36 TDATA37 TDATA9 TDATA38 TDATA11 TDATA39 CNC 8060 TDATA40 To be determined. CNC 8065 TDATA41 TDATA42 TDATA43 : 1807) TDATA44 TDATA45 TDATA46 TDATA47 ·490·... - Page 491 O p e r a t i n g m a n u a l . Type 52 Value or equivalent parameter for type 13 kinematics. TDATA48 TDATA49 TDATA50 To be determined. TDATA51 To be determined. TDATA52 To be determined. CNC 8060 CNC 8065 : 1807) ·491·...
-
Page 492: Adapting A Type 14 Kinematics To A Type 52 Kinematics
TDATA19 TDATA21 TDATA22 TDATA3 TDATA23 TDATA1 TDATA24 TDATA25 TDATA26 TDATA31 -TDATA4 TDATA32 -TDATA5 TDATA33 TDATA34 TDATA35 TDATA36 TDATA37 TDATA9 TDATA38 TDATA11 TDATA39 CNC 8060 TDATA40 To be determined. CNC 8065 TDATA41 TDATA42 TDATA43 : 1807) TDATA44 TDATA45 TDATA46 TDATA47 ·492·... - Page 493 O p e r a t i n g m a n u a l . Type 52 Value or equivalent parameter for type 14 kinematics. TDATA48 TDATA49 TDATA50 To be determined. TDATA51 To be determined. TDATA52 To be determined. CNC 8060 CNC 8065 : 1807) ·493·...
-
Page 494: Adapting A Type 15 Kinematics To A Type 52 Kinematics
TDATA19 TDATA21 TDATA2 TDATA22 TDATA23 TDATA1 TDATA24 TDATA25 TDATA26 TDATA31 TDATA32 -TDATA5 TDATA33 -TDATA6 TDATA34 TDATA35 TDATA36 TDATA37 TDATA9 TDATA38 TDATA11 TDATA39 CNC 8060 TDATA40 To be determined. CNC 8065 TDATA41 TDATA42 TDATA43 : 1807) TDATA44 TDATA45 TDATA46 TDATA47 ·494·... - Page 495 O p e r a t i n g m a n u a l . Type 52 Value or equivalent parameter for type 15 kinematics. TDATA48 TDATA49 TDATA50 To be determined. TDATA51 To be determined. TDATA52 To be determined. CNC 8060 CNC 8065 : 1807) ·495·...
-
Page 496: Adapting A Type 16 Kinematics To A Type 52 Kinematics
TDATA19 TDATA21 TDATA2 TDATA22 TDATA23 TDATA1 TDATA24 TDATA25 TDATA26 TDATA31 -TDATA4 TDATA32 -TDATA5 TDATA33 TDATA34 TDATA35 TDATA36 TDATA37 TDATA9 TDATA38 TDATA11 TDATA39 CNC 8060 TDATA40 To be determined. CNC 8065 TDATA41 TDATA42 TDATA43 : 1807) TDATA44 TDATA45 TDATA46 TDATA47 ·496·... - Page 497 O p e r a t i n g m a n u a l . Type 52 Value or equivalent parameter for type 16 kinematics. TDATA48 TDATA49 TDATA50 To be determined. TDATA51 To be determined. TDATA52 To be determined. CNC 8060 CNC 8065 : 1807) ·497·...
- Page 498 O p er a t i ng ma n u a l. CNC 8060 CNC 8065 : 1807) ·498·...
- Page 499 O p e r a t i n g m a n u a l . User notes: CNC 8060 CNC 8065 : 1807) ·499·...
- Page 500 O p er a t i ng ma n u a l. User notes: CNC 8060 CNC 8065 : 1807) ·500·...
- Page 501 O p e r a t i n g m a n u a l . User notes: CNC 8060 CNC 8065 : 1807) ·501·...
- Page 502 Fagor Automation S. Coop. Bº San Andrés, 19 - Apdo. 144 E-20500 Arrasate-Mondragón, Spain Tel: +34 943 719 200 +34 943 039 800 Fax: +34 943 791 712 E-mail: info@fagorautomation.es www.fagorautomation.com...
Need help?
Do you have a question about the CNC 8060 and is the answer not in the manual?
Questions and answers