Table of Contents
Advertisement
Quick Links
Advertisement
Table of Contents

Related Manuals for Huidu Technology HDP501


Summary of Contents for Huidu Technology HDP501
- Page 1 User manual Video processor HDP501 V1.220180126 http://www.huidu.cn/...
- Page 2 Safety instructions This symbol prompts the user that there is important operating and maintenance instructions in this device user manual. This symbol warns the user that there is an exposed dangerous voltage inside the device's chassis and that there is a danger of electric shock. Note READER •...
-
Page 3: Table Of Contents
Contents Chapter I Overview ........................4 1. Features ..........................4 Chapter II panel ..........................6 1.Rear panel ..........................6 2.Front panel ........................... 6 Chapter III Menu system ....................... 9 1. Navigation mode ........................ 9 2.The main menu........................10 3.Output resolution ....................... 10 4. -
Page 4: Chapter I Overview
Chapter I Overview LED video processor is a mid-end seamless effects switching video processor market, which supports digital high-definition input, analog high-definition input, analog SD input, audio input, enabling all channels of audio and video synchronization seamless switching. Listed below LED video processor supports audio and video input format table: DVI input support VESA standard, highest up to 1920x1200@60Hz HDMI input 480i/p 676i/p 720p 1080i/p color depth 8/10/12 bit. - Page 5 Part and full screen fast switching - video processor has a simple and practical part of the screen capture operation and full-screen operation, any input channel can be set independently of the different interception, and each channel can still be seamlessly switched.
-
Page 6: Chapter Ii Panel
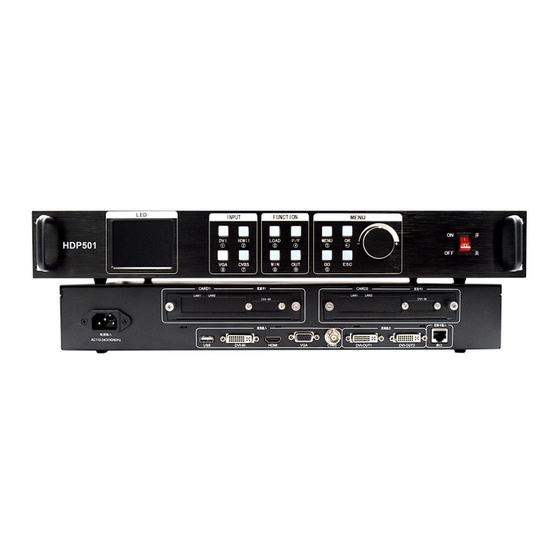
Chapter II panel 1.Rear panel Figure 1 - Video Processor Rear Panel ① AC Power Input - Connect the video processor using IEC standard power cable with input power of 100-240 VAC, 50-60Hz. ② video input - the processor can receive digital video signals, analog video signals, composite video signals, the following input interface for each interface, you can directly play through U disk USB video(720P). - Page 7 Figure 4 - Processor front panel ① LCD display - display menu and current information. ② Menu Operation Key - The menu operation key area includes MENU "Menu Key" OK "Confirm Key" GO "Navigation Key" ESC "Back Key" and knob "Confirm and Adjustment".
- Page 8 achieve the operation of each function Figure 6 - function key area ● LOAD button, default scene loading shortcut key. Press the key in the default menu state to bring up the preset scene list, and then together with the menu function keys to bring up the default scene.
-
Page 9: Chapter Iii Menu System
Chapter III Menu system 1. Navigation mode This navigation applies to most situations, set up simple, follow the prompts to gradually debug to achieve the display you want: Note: boot into navigation mode in initialization mode, if there is a save mode boot directly into the main menu. -
Page 10: The Main Menu
The last step to save the settings, where "mode a" is automatically adjusted after boot mode Click "MENU" to enter save mode Setting completed. 2.The main menu After the device is started, or click on the front panel key "MENU" to enter the main menu, then you can see on the LCD screen: 3.Output resolution By clicking the corresponding button on the right side of the screen, you can enter the corresponding... -
Page 11: Screen Parameters
Set the output resolution according to the actual size of the screen 4. Screen parameters The main menu to enter the menu. You can set the total size of the output screen (ie large-screen pixel size) Description: 1. Observe the icon on the dark background of the screen, which is the currently valid setting object. 2. -
Page 12: Intercept Parameters
5. Intercept parameters From the main menu you can enter the menu, you can intercept a part of the input signal. 6. Save mode The main menu to enter the menu. The current settings can be saved. Description: 1. The user can save up to thirty two groups of parameters, click the corresponding button to save the parameters to the corresponding mode. -
Page 13: Mode Call
7. Mode call The main menu or LOAD button to enter the menu. Called saved parameters. Description: 1. Click the corresponding mode button to call the data. 2 The background color becomes darker when selected. 8 . VGA adjustment The main menu to enter the menu. In this menu, you can make various advanced settings on the device. -
Page 14: Brightness Contrast
The user can set the brightness / contrast here to match the corresponding display system. 10. Output settings Through the output settings can be set to normal output and output black screen 11. Version Information Device model NO:HDP501 Firmware version:V1.0.x.x http://www.huidu.cn/... -
Page 15: System Restart
12. System restart Shutdown restart 13. Factory settings Under this menu, click "OK" to return all the parameters of the device to the factory state. Prompt before the success, do not do anything else. Note: After reset to factory settings, all previously saved modes are canceled 14. -
Page 16: Key Lock
15.Key lock Lock the keys to prevent misoperation. Chapter IV Key Settings 1. DVI.HDMI.VGA.CVBS. Click one of the following to call up the following screen: 2.WIN call window parameters 3. LOAD mode call http://www.huidu.cn/... - Page 17 4. P / F panoramic switch 5. MENU directly into the main menu 6. OK - confirm key 7.GO- Enter navigation mode http://www.huidu.cn/...
Need help?
Do you have a question about the HDP501 and is the answer not in the manual?
Questions and answers