Advertisement
Quick Links
Advertisement

Subscribe to Our Youtube Channel
Related Manuals for Huidu Technology HDP902


Summary of Contents for Huidu Technology HDP902
- Page 1 Operation instruction & splicer HDP902 Video processor V1.0 20190903 http://www.huidu.cn/...
- Page 2 Safety instructions This symbol prompts the user, the device user manual has important operating and maintenance instructions. This symbol warns the user that there is a dangerous voltage that is exposed inside the device enclosure and there is a risk of electric shock. Note Read the manual•...
- Page 3 Contents introduction..................错误!未定义书签。 About LED Video Processor..........错误!未定义书签。 Panel....................错误!未定义书签。 Front Panel Rear Panel................错误!未定义书签。 Menu System................... 错误!未定义书签。 Menu Structure..............错误!未定义书签。 Operation menu..............错误!未定义书签。 Default menu..............错误!未定义书签。 Main menu..............错误!未定义书签。 Setting and Operation..............错误!未定义书签。 Language................错误!未定义书签。 Reset..................错误!未定义书签。 Output Resolution..............错误!未定义书签。...
- Page 4 Chapter 1 Overview the LED splicing processor has three powerful video processing cores. HDP902 Multiple-graphic multiple-input intelligent splicing processor, it can be widely used in performing arts activities, command and control centers, video conferences, hotels, courts and conference rooms. It is a powerful 3-channel multiple-graphic multiple-input splicing processor...
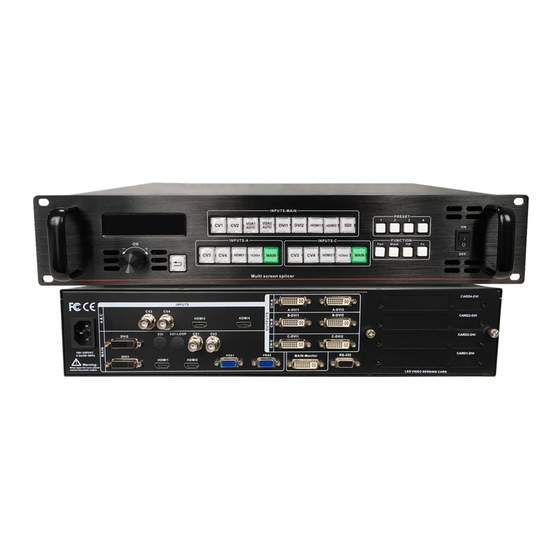
- Page 5 Chapter 2 Panel Rear panel Page 1—Video processor rear panel AC power input Connect to the video processor using an IEC standard power — ① cord with an input power of 100-240 VAC, 50-60 Hz. Video input Input standard for each interface. —...
- Page 6 Page 2—LED sending card 2.Front panel Page 3—Processor front panel Menu operation keys — The menu operation keypad contains the “Back Key” ① and the knob “Confirm and Adjust”. Here are the meanings and usage of each button: Key, menu exit key, or return to the previous menu. ●...
- Page 7 Page 4—INPUT Keypad Main channel input (INPUTS-MAIN) ●CV1, CV2 composite video switching button. ● VGA1, VGA2 button, VGA input switch button and auto correction button (AUTO function). When the input channel is VGA1 or VGA2, press the VGA1 or VGA2 button repeatedly, the video processor will correct the current VGA channel and make the picture output normal.
- Page 8 ● Black button, press this button to output a black screen or freeze to the “Switch” menu to set. ● PIP button to enable or disable the PIP function button. The user sets the PIP parameters in the PIP menu in advance, and uses the PIP shortcut key to quickly turn the PIP function on or off. The use of PIP is described in detail in the following sections.
- Page 9 Chapter III Menu System Menu structure diagram 1)Menu structure menu Default Main function description main menu Output Set the output resolution and fine-tune the output splice Adjust aliquot stitching, unequal splicing or partial image display Set the size, position, and input source of multiple screens Multi-sreen Adjust image color, brightness, contrast, etc.
- Page 10 2)Menu operation The operation keys of the menu mainly have “return key”, OK“confirm”key, The man-machine interface is a 256x64 dot matrix LCD screen. The start process of the device is as follows: The LCD screen displays the Default Main Power-on product logo and model;...
- Page 11 Chapter 4 Setup and Operation 1.language Before using the LED video processor, first confirm that the language is suitable for your use. If not, please follow the steps below to complete the setup. as follows Default menu→ main menu→ Feature→ language Above is the menu operation path.
- Page 12 Fade time setting The fade time can control the length of the fade transition state, and the processor provides a fade time setting of 0.5 seconds to 1.5 seconds. Enter the menu settings as follows Default menu → main menu → function → fade time 4.Black screen and screen freeze settings The black screen and the screen freeze share an operation key BLACK, which is displayed as "BLACK key"...
- Page 13 Default menu→Main menu→Splicing→Splicing C→Splicing→On Default menu → main menu → stitching → stitching C → stitching mode → not equal Default Menu→Main Menu→Splicing→Splicing C→Parameter Setting→Horizontal Total Pixels→3840 Default Menu→Main Menu→Splicing→Splicing C→Parameter Setting→Vertical Total Pixels→1152 Default menu→Main Menu→Splicing→Splicing C→Parameter Setting→Horizontal Start→3072 Default menu→Main Menu→Splicing→Splicing C→Parameter Setting→Vertical Start→0 Tip:Input signals can only be selected by switching to MAIN in INPUTS.
- Page 14 Tip: The A and C channel signal selection is in A&C, and the B channel signal selection is in MAIN. 8. Capture part of the screen Intercepting part of the screen function is an extension of the unequal splicing function. In actual use, a partial screen display may be used to display only a partial area of an input channel.
- Page 15 Tip:After the multiple-screen is turned on, the fast cut and fade in and out functions are not (2) Input signal source setting, the main channel of the processor and the picture-in-picture channel. The same type of input signal source cannot realize the picture-in-picture function, so the user can refer to the picture-in-picture input source conflict table in the table below.
- Page 16 √ √ √ √ √ √ √ √ √ (2) Size and position parameter settings, specific parameters are set by the user, the user can also adjust the border, transparency and so on. Default menu → main menu → multiple-screen → enter MAIN → picture-in-picture mode → picture-in-picture parameters →...
- Page 17 selected by the user. When the storage space is empty, the right status is displayed as ☆, and when the parameter is stored, the right status is displayed as ★. Users can also save overwrites. 13. Bring up the preset scene There are two modes of operation for calling up preset parameters, shortcut key calls and menu calls.
Need help?
Do you have a question about the HDP902 and is the answer not in the manual?
Questions and answers