Table of Contents
Advertisement
Quick Links
Advertisement
Table of Contents

Related Manuals for allen MP245


Summary of Contents for allen MP245
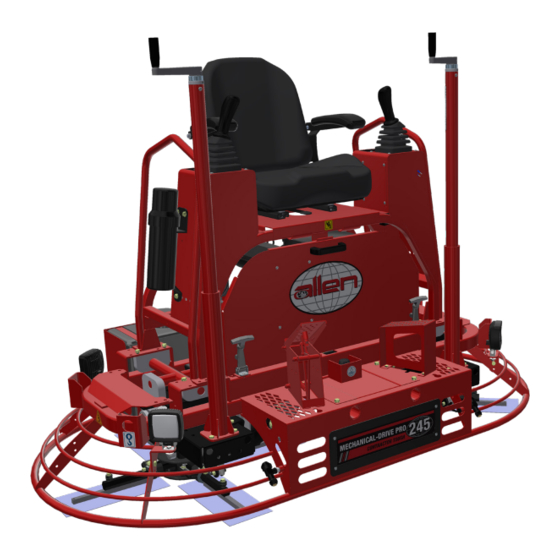
- Page 1 MP245 RIDING TROWEL OPERATIONS & PARTS MANUAL MANUAL PART #: 067975 I REVISION: A...
- Page 3 Riding Trowel OPERATIONS - PARTS MANUAL This manual covers the products listed below: Part No. Description 050000 MP245 Riding Trowel...
-
Page 4: Table Of Contents
Table of Contents Title Page Limited Warranty Information Contained In This Manual Dealer Information Ordering Parts Model Number - Serial Number Codes Unit Identification Technical specifications Machine Dimensional Specifications Engine Specifications Engine Wiring Sound and Vibration Testing CE Declaration of Conformity Section 1 - Safety State Regulations Federal Regulations Safety Information Safety Symbols General Safety... - Page 5 Table of Contents, continued Title Page Parts Factory Service Information Replacement Part Procedure Seat Frame Assembly Front Panel Assembly Hydraulic Manifold Assembly Mainframe Assembly Pitch Control Assembly Throttle Pedal Assembly Power Unit Assembly Right Hand (SOM) Rotor Assembly Left Hand (SOM) Rotor Assembly Right Hand Spider Assembly Left Hand Spider Assembly Right Hand Gearbox Assembly Left Hand Gearbox Assembly Hydraulic Schematic Electrical Wiring Harness...
-
Page 6: Limited Warranty
Limited Warranty Allen Engineering Corporation (“Allen”) warrants its products to be free of defects in material or workmanship for: TWO YEARS FROM END USER’S DATE OF PURCHASE Warranty period begins on the date of purchase by the End User of the product. All warranty is based on the following limited warranty terms and conditions, including the disclaimer of implied warranties and consequential damages. 1. Allen’s obligation and liability under this warranty is limited to repairing or replacing parts if, after Allen’s inspection, there is determined to be a defect in material or workmanship. Allen reserves the choice to repair or replace. 2. If Allen chooses to replace the part, it will be at no cost to the customer and will be made available to the Allen Distributor, Dealer, or Rental Center from whom the End User purchased the product. 3. Replacement or repair parts, installed in the product, are warranted only for the remainder of warranty period of the product as though they were the original parts. 4. Allen does not warranty engines or batteries. Engine warranty claims should be made directly to an authorized factory service center for the par- ticular engine manufacturer. Batteries are not warranted due to unknown treatment during transport, etc, and any battery claims should be directed to the battery manufacturer. 5. Allen’s warranty does not cover the normal maintenance of products or its components (such as engine tuneups and oil & filter changes). The war- ranty also does not cover normal wear and tear items (such as belts and consumables). 6. Allen’s warranty will be void if it is determined that the defect resulted from operator abuse, failure to perform normal maintenance on the product, modification to product, alterations or repairs made to the product without the written approval of Allen. Allen specifically excludes from warranty any damage to any trowels resulting from an impact to the rotors. 7. Impact damage to gear boxes is not covered under the Allen warranty and is deemed customer abuse. 8. Allen will pay shop labor on warranty items at the Allen Shop Labor Rate in existence on the date of the warranty claim. An Allen labor chart will determine the time allowed to complete a repair and will govern the shop labor hours that will be allowed. 9. Allen will pay freight on warranty replacement parts at worldwide standard ground rates. No warranty replacement parts will be shipped air freight at the expense of Allen. Allen only pays outbound freight charges when sending warranty replacement parts to the customer via ground service. Allen does not pay any inbound freight. However, if Allen determines this to be a warranted item, only then will Allen reimburse the customer for inbound freight at standard ground rates. 10. ALLEN ENGINEERING CORPORATION’S WARRANTY POLICY WILL NOT COVER THE FOLLOWING: TAXES; SHOP SUPPLIES; ENVIRONMENTAL SURCHARGES; AIR FREIGHT; TRAVEL TIME; LOSS OF TIME; INCONVENIENCE; LOSS OF RENTAL REVENUE; RENTAL COSTS OF EQUIPMENT USED TO REPLACE THE PRODUCT BEING REPAIRED; LOSS OF USE OF THE PRODUCT; COMMERCIAL LOSS; OR ANY OTHER CHARGES WHATSOEVER OR ANY LIABILITIES FOR DIRECT, INCIDENTAL, OR CONSEQUENTIAL DAMAGE OR DELAY. 11. ALLEN ENGINEERING CORPORATION MAKES NO OTHER WARRANTY, EXPRESSED OR IMPLIED. THIS LIMITED WARRANTY IS IN LIEU OF THE WAR- RANTY OF MERCHANTABILITY AND FITNESS. THERE ARE NO OTHER WARRANTIES THAT EXTEND BEYOND THE DESCRIPTION ON THIS DOCUMENT. -
Page 7: Information Contained In This Manual
Information Contained in this Manual T his manual provides information and procedures to safely operate and maintain the Allen Machine. For your own safety and protection from personal injury, carefully read, understand, and observe the safety instructions described in this manual. Keep this manual or a copy of it with the machine at all times. Always operate this machine in accordance with the instructions described in this manual. A well maintained piece of equipment will provide many years of trouble free operation. This manual is divided into the following sections: SECTION 1 SECTION 2 SAFETY OPERATIONS SECTION 3 SECTION 4 SERVICE PARTS Complete any warranty requirements as specified by the engine manufacturer in their instructions found inside the manual box located on the operator’s control panel. -
Page 8: Dealer Information
Dealer Information Your Dealer has Allen Engineering Corporation trained mechanics and original Allen replacement parts. Always contact the Allen Dealer who sold you this machine for Allen Certified repairs and replacement parts. Place Allen Dealer information below for future reference. Dealer Name: _____________________________________________________________ Phone #: (____) - ____ - ____________________________________________________ Address: ________________________________________________________________ City:__________________________________State:________ Zip:___________________ Salesman: _______________________________Mobile Phone _____________________ Additional Comments: ______________________________________________________ ________________________________________________________________________ ________________________________________________________________________ Page 8 067975... -
Page 9: Ordering Parts
Ordering Parts Section 4 contains illustrated parts lists for help in ordering replacement parts for your machine. Follow the instructions below when ordering parts to insure prompt and accurate delivery: All orders for service parts - include the serial number for the machine. Shipment will be delayed if this information is not available. Include correct description and part number from the “PARTS” section of this manual. Specify exact shipping instructions, including the preferred routing and complete destination address. DO NOT return parts to AEC without receiving written authorization from AEC. All authorized returns must be shipped pre-paid. When placing an order, please contact the AEC dealer nearest you. All information, specifications, and illustrations in this manual are subject to change without notice and are based on the latest information at the time of publication. VISIT US!!! www.alleneng.com www.facebook.com/AllenEngineering LIKE US!!! -
Page 10: Model Number - Serial Number Codes
Model Number - Serial Number Codes Manufacturer’s Codes: When ordering parts or requesting service information, you will always be asked to specify the model and serial numbers of the machine. The legends below specifically defines each significant character or group of characters of the Model Number and Serial Number codes. Model Number MP 245 Series Model Serial Number The serial number found on the identification plate is a ten digit format. The model number identifies your machine and will ensure that you receive the correct replacement parts. Serial Number Example 245 12 17 002 Sequence Number Year Month Series Page 10 067975... -
Page 11: Unit Identification
Unit Identification Unit Identification Plate Location: An identification plate listing the model number and the serial number is attached to each unit and is located on the top left corner of the operator end handle. See image below for serial number plate location. This plate should not be removed at any time. Please record the information found on this plate below so it will be available should the identification plate become lost or damaged. When ordering parts or requesting service information, you will always be asked to specify the model and serial numbers of the machine. FILL IN FOR FUTURE REFERENCE Model Number:____________________________ Serial Number:____________________________ Date Purchased:___________________________ Purchased From:___________________________ 067975 Page 11... -
Page 12: Technical Specifications
Technical Specifications DESCRIPTION MP245 ENGINE Honda GX690 (688 cc) HORSEPOWER CLASS 22.1 hp (16.5 kW) FUEL TYPE Air-Cooled Gasoline PANNING PATH WIDTH 74 in (188 cm) ROTORS (DIAMETER) 36 in (91.4 cm) 4-Bladed Spider MAXIMUM ROTOR SPEED 145 rpm STEERING CONTROL SYSTEM... -
Page 13: Machine Dimensional Specifications
Machine Dimensions [1372.0] 77 1/2 40 1/2 [1968.5] [1029. 40 1/2 68.5] [1029.6] 067975 Page 13... -
Page 14: Engine Specifications
Engine Specifications Honda Engine Information • Model ............GX-690 UTDW •... -
Page 15: Engine Wiring
Engine Wiring 067975 Page 15... -
Page 16: Sound And Vibration Testing
Engine Distant Sound Operator Sound Power Vibration Vibration Vibration Machine Type Press Ear SPL Level Overall Overall Maximum dB (A) dB (A) dB (A) m/sec² m/sec² m/sec² MP245 Honda 86.9 86.8 2.76 5.73 3.00 T his information was acquired from sound and vibration analysis tests conducted at Allen Engineering Corporation test facilities. Page 16 067975... -
Page 17: Ce Declaration Of Conformity
We hereby declare that the machinery stipulated below complies with all the relevant provisions of the EC Machinery Directive and the UK National Laws and Regulations adopting this Directive. Modifications to the machine without prior approval from the undersigned will render this declaration null and void. Manufacturer: Allen Engineering Corporation 819 South 5th St., Paragould, AR 72450 USA Authorised Representative in EU: Mr. Thomas Voeler, ab lin-pro Femvägsskälet 3, 421 50 Västra Frölunda. Sweden Equipment: MP245 Riding Trowel Description: Ride-on, IC engine powered, concrete smoothing machine. Notified Body: Not required. Harmonized Standards Applied: EN12649 Person empowered to draw up the declaration: Signature: Jay Allen... -
Page 18: Section 1 - Safety
State Regulations SECTION 1 SAFETY Proposition 65 Warning Page 18 067975... -
Page 19: Federal Regulations
Federal Regulations SECTION 1 Respiratory Hazards SAFETY 067975 Page 19... -
Page 20: Safety Information
Safety Information SECTION 1 SAFETY Do not operate or service the equipment before reading the entire manual. Safety precautions should be followed at all times when operating this equipment. Failure to read and understand the safety messages and operating instructions could result in injury to yourself and others. SAFETY NOTES The four safety notes shown below will inform you about potential hazards that could injure you or others. The safety notes specifically address the level of exposure to the operator and are preceded by one of four words: DANGER, WARNING, CAU- TION or NOTICE. Indicates a hazardous situation which, if not avoided, will result in death or serious injury. Indicates a hazardous situation which, if not avoided, could result in death or serious injury. Indicates a hazardous situation which, if not avoided, could result in minor or moderate injury. Addresses practices not related to personal injury. Page 20 067975... -
Page 21: Safety Symbols
Safety Symbols SECTION 1 SAFETY Potential hazards associated with the operation of this equipment will be referenced with hazard symbols which may appear throughout this manual in conjunction with safety notes. 067975 Page 21... -
Page 22: General Safety
General Safety SECTION 1 SAFETY NEVER operate this equipment without proper protective clothing, shatterproof glasses, respiratory protection, hearing protection, steel-toed boots and other protective devices required by the job or city and state regulations. ALWAYS avoid wearing jewelry or loose fitting clothes that may snag on the controls or moving parts as this can cause serious injury. NEVER operate this equipment when not feeling well due to fatigue, illness or when under medication. NEVER operate this equipment under the influence of drugs or alcohol. ALWAYS clear the work area of any debris, tools, etc. that would constitute a hazard while the equipment is in operation. No one other than the operator is to be in the working area when the equipment is in operation. DO NOT use the equipment for any purpose other than its intended purposes or applications. This equipment should only be operated by trained and qualified personnel 18 years of age and older. Whenever necessary, replace nameplate, operation and safety decals when they become difficult to read. AEC does not assume responsibility for any accident due to equipment modifications. Unauthorized equipment modification will void all warranties. NEVER use accessories or attachments that are not recommended by AEC for this equipment. Damage to the equipment and/or injury to user may result. ALWAYS know the location of the nearest fire extinguisher. ALWAYS know the location of the nearest first aid kit. Page 22 067975... - Page 23 General Safety (cont’d) SECTION 1 SAFETY ALWAYS know the location of the nearest phone or keep a phone on the job site. Also, know the phone numbers of the nearest ambulance, doctor and fire department. This information will be invaluable in the case of an emergency. Engine fuel exhaust gases contain poisonous carbon monoxide. This gas is colorless and odorless, and can cause death if inhaled. The engine of this equipment requires an adequate free flow of cooling air. never operate this equipment in any enclosed or narrow area where free flow of the air is restricted. If the air flow is restricted it will cause injury to people and property and serious damage to the equipment or engine. NEVER operate the equipment in an explosive atmosphere or near combustible materials. An explosion or fire could result causing severe bodily harm or even death. If applicable, never use your hand to find hydraulic leaks. Use a piece of wood or cardboard. Hydraulic fluid injected into the skin must be treated by a knowledgable physician immediately or severe injury or death can occur. ALWAYS keep clear of rotating or moving parts while operating the riding trowel. NEVER disconnect any emergency or safety devices. These devices are intended for operator safety. Disconnection of these devices can cause severe injury, bodily harm or even death. Disconnection of any of these devices will void all warranties. NEVER allow passengers or riders on the riding trowel during operation. NEVER lubricate components or attempt service on a running machine. 067975 Page 23...
- Page 24 General Safety (cont’d) SECTION 1 SAFETY ALWAYS keep the machine in proper running condition. Fix damage to machine and replace any broken parts immediately. ALWAYS store equipment properly when it is not being used. Equipment should be stored in a clean, dry location out of the reach of children and unauthorized personnel. DO NOT place hands or fingers inside engine compartment when engine is running. NEVER operate the engine with heat shields or guards removed. Keep fingers, hands hair and clothing away from all moving parts to prevent injury. DO NOT remove the engine oil drain plug while the engine is hot. Hot oil will gush out of the oil tank and severely scald any persons in the general area of the screed. NEVER touch the hot exhaust manifold, muffler or cylinder. Allow these parts to cool before servicing equipment. NEVER run engine without an air filter or with a dirty air filter. Severe engine damage may occur. Service air filter frequent- ly to prevent engine malfunction. NEVER tamper with the factory settings of the engine or engine governor. Damage to the engine or equipment can result if operating in speed ranges above the maximum allowable. Page 24 067975...
- Page 25 General Safety (cont’d) SECTION 1 SAFETY DO NOT start the engine near spilled fuel or combustible fluids. Fuel is extremely flammable and its vapors can cause an explosion if ignited. ALWAYS refuel in a well-ventilated area, away from sparks and open flames. ALWAYS use extreme caution when working with flammable liquids. DO NOT fill the fuel tank while the engine is running or hot. DO NOT overfill tank, since spilled fuel could ignite if it comes into contact with hot engine parts or sparks from the ignition system. Store fuel in appropriate containers, in well-ventilated areas and away from sparks and flames. NEVER use fuel as a cleaning agent. DO NOT smoke around or near the equipment. Fire or explosion could result from fuel vapors or if fuel is spilled on a hot engine. DO NOT drop the battery. There is a possibility that the battery will explode. DO NOT expose the battery to open flames, sparks, cigarettes, etc. The battery contains combustible gases and liquids. If these gases and liquids come into contact with a flame or spark, an explosion could occur. ALWAYS wear safety glasses when handling the battery to avoid eye irritation. The battery contains acids that can cause injury to the eyes and skin. Use well-insulated gloves when picking up the battery. ALWAYS keep the battery charged. If the battery is not charged, combustible gas will build up. DO NOT charge battery if frozen. Battery can explode. When frozen, warm the battery to at least 61°F (16°C). 067975 Page 25...
- Page 26 General Safety (cont’d) SECTION 1 SAFETY ALWAYS recharge the battery in a well-ventilated environment to avoid the risk of a dangerous concentration of com- bustible gases. If the battery liquid (dilute sulfuric acid) comes into contact with clothing or skin, rinse skin or clothing immediately with plenty of water. If the battery liquid (dilute sulfuric acid) comes into contact with eyes, rinse eyes immediately with plenty of water and contact the nearest doctor or hospital to seek medical attention. ALWAYS disconnect the negative battery terminal before performing service on the equipment. ALWAYS keep battery cables in good working condition. Repair or replace all worn cables. Side slope operation is not permitted. Walk around the riding trowel before starting it to see if any items are worn, damaged, leaking, etc. that may make the riding trowel dangerous to operate. Stop and inspect the equipment if you strike an object. If necessary, make repairs before restarting. ALWAYS check that all controls are functioning properly immediately after start-up! DO NOT operate machine unless all controls operate correctly. Page 26 067975...
-
Page 27: Safety Labels And Decals
Safety Labels and Decals (cont’d) SECTION 1 SAFETY 067975 Page 27... - Page 28 Safety Labels and Decals (cont’d) SECTION 1 SAFETY Page 28 067975...
- Page 29 Safety Labels and Decals (cont’d) SECTION 1 SAFETY 067975 Page 29...
- Page 30 Safety Labels and Decals (cont’d) SECTION 1 SAFETY Page 30 067975...
- Page 31 Safety Labels and Decals (cont’d) SECTION 1 SAFETY OUR MISSION STATEMENT Our Mission is to provide superior quality products (manufactured in a safe and efficient environment by highly trained and dedicated personnel), on-time deliveries, with reactive and knowledgeable customer service. OUR QUALITY POLICY The Allen Engineering Team is fully committed to exceeding customer expectations for the quality of the products and ser- vices provided through the continuous improvement process of reducing waste, defects, and variability in everything we do. OUR VISION Our Vision is to be a world-class manufacturer of concrete placing and finishing equipment. 067975 Page 31...
-
Page 32: Transportation Safety
Transportation Safety SECTION 1 SAFETY When lifting the riding trowel, all personnel must be clear of the machine. DO NOT stand near or under the machine while it is being lifted. Lifting instructions using a hoist: Place slings, chains or hooks through each lifting eyes on the machine. Use a sling or chains with a minimum length of 2 meters (5 feet) on each leg, connected to a central lifting device. Ensure that all lifting devices have sufficient weight-bear- ing capacity. Also, there is an alternative method of lifting the MP245, utilizing the seat frame lifting bars as shown below. ALWAYS shutdown engine before transporting. LIFTING EYES Page 32 067975... - Page 33 Transportation Safety (cont’d) SECTION 1 SAFETY Make sure the hitch and coupling of the towing vehicle are rated equal to, or greater than the trailer “gross vehicle weight rating.” ALWAYS inspect the hitch and coupling for wear. Never tow a trailer with defective hitches, couplings, chains, etc. Check the tire air pressure on both towing vehicle and trailer. Trailer tires should be inflated to 50 psi cold. Also check the tire tread wear on both vehicles. ALWAYS make sure the trailer is equipped with a safety chain. ALWAYS properly attach trailer’s safety chains to towing vehicle. ALWAYS make sure the vehicle and trailer directional, backup, brake and trailer lights are connected and working prop- erly. DOT Requirements include the following: • Connect and test electric brake operation. • Secure portable power cables in cable tray with tie wraps. The maximum speed for highway towing is 55 MPH unless posted otherwise. Recommended off-road towing is not to exceed 15 MPH or less depending on type of terrain. Avoid sudden stops and starts. This can cause skidding, or jack-knifing. Smooth, gradual starts and stops will improve towing. Avoid sharp turns to prevent rolling. Trailer should be adjusted to a level position at all times when towing. Raise and lock trailer wheel stand in up position when towing. Place chock blocks underneath wheel to prevent rolling while parked. Place support blocks underneath the trailer’s bumper to prevent tipping while parked. Use the trailer’s swivel jack to adjust the trailer height to a level position while parked. 067975 Page 33...
-
Page 34: Pan Installation Procedure
Pan Installation Instructions SECTION 1 SAFETY This section details the proper technique to utilize the lifting bridle system and the dolly jack system in a safe manner to install pans. (NOTE: Images are for illustration purposes only) Use a lifting sling (bridle) with a capacity of at least a 2:1 weight ratio for the equip- ment being hoisted. STEP 1: Attach the lifting bridle to the machine at all four lifting points. STEP 2: Slowly lift machine in a safe manner to a height that is required to safely install the pans. This is typically 6-8” above floor level. STEP 3: Carefully slide the pans under the machine making sure that you are aware of the corners on the blades that are sharp. STEP 4: Align the pans so that the clips will not be crushed when the machine is lowered back down. - Page 35 Pan Installation Instructions (cont’d) SECTION 1 SAFETY Use the appropriate set of jacks that are designed for the machine you are lifting. STEP 1: Attach the front and rear dolly jacks into the machine at the receiving tube locations. STEP 2: Slowly lift machine in a safe manner to a height that is required to safely install the pans. This is typically 6-8” above floor level. STEP 3: Carefully slide the pans under the machine making sure that you are aware of the corners on the blades that are sharp. (B) STEP 4: Align the pans so that the clips will not be crushed when the machine is lowered back down. STEP 5: Slowly lower the machine down onto the pans while maintaining a visual so the blades are going into the proper gaps. (Typically the pans can only be intalled one way) STEP 6: Remove lifting bridle from the machine.
-
Page 36: Section 2 - Operations
Pre Operating Instructions SECTION 2 OPERATIONS Before operation each day ensure the following: • All guards, side screens and panels are in place. • All safety and information signs are in place and legible. • Engine and hydraulic oil levels are correct. • Check battery level • Check for hydraulic leaks. • Check all operating controls for proper operation and adjustment. • Check speed control operation before and after starting engine for proper operation. • Gearbox oil level. Add oil as required. • The steering, left and right. Note: If there is any indication that faulty equipment exists, shutdown safely, inform the proper authority and DO NOT op- erate the riding trowel until the problem has been fixed. • Remove loose objects that could interfere with operation. WARNING! Oil MUST be present and flowing through the Auxiliary Pump when running the machine. The warranty will be voided if no oil is present. When replacing the pump, it MUST be primed before starting machine. Page 36 067975... - Page 37 Pre Operating Instructions (cont’d) SECTION 2 OPERATIONS Starting Procedures Before starting riding trowel, refer to figures below for location and identification of opera t ional and visual controls per- taining to the operation of the riding trowel. 1. Sit down correctly on the riding trowel seat. DO NOT attempt to start the riding trowel without an operator in the seat. 2. If engine is cold, pull out the choke lever. Press down on throttle pedal (located by the operator’s right foot) one to two times. To much throttle during start-up will flood the engine. 3. Turn ignition switch key to the start-position, immediately release key when engine starts. If after two or three attempts the engine has not started push in choke. Attempt to start trowel again. Allow engine to warm up for 5 minutes before operating riding trowel. Operating the starter for more than 5 seconds can damage the starter or engine. If engine fails to start release the switch and wait 15 seconds before operating starter again. 067975 Page 37...
-
Page 38: Operating Instructions
Operating Instructions SECTION 2 OPERATIONS To utilize your Allen Engineering MP245 Rider to its fullest capacity the machine should be driven in the direction the opera- tor is facing. This will finish the widest possible area while giving the operator an excellent view of the slab surface about to be troweled. When the machine reaches the end of the slab make a 180 degree turn and repeat the straight line of direction to the other end of the slab. To familiarize a new operator with the riding trowel the following steps should be taken. Location of all Operating Controls [A] Right Pitch Control [B] Joystick (Forward & Reverse) [C] Joystick (Left & Right, Forward & Reverse) [D] Left Pitch Control [E] Right Foot Pedal [F] Seat Adjustment [G] Cup Holder Page 38 067975... - Page 39 Operating Instructions (cont’d) SECTION 2 OPERATIONS With the operator in the seat, show them the functions of the joysticks [B] and [C] and how to start the machine. A hard level concrete slab with water on the surface is an ideal place for an operator to practice with the machine. For prac- tice pitch the blades up approximately 1/4 inch on the trailing edge. Start by making the machine hover in one spot and then practice driving the machine in a straight line and making 180 degree turns. Best control is achieved at full engine RPM. After starting engine fully engage the throttle. This allows the engine to warm up quicker and also engages the torque con- verter. At this time the machine’s rotors will begin turning. DO NOT use excessive pressure on the joysticks. Excessive pressure does not increase the reaction time of the machine and can damage steering controls. Stopping The Riding Trowel To stop the trowel’s movement, let go of the joysticks [B] and [C]. They will return to their neutral position. Also release pressure on the right foot pedal [E]. This machine has a kill switch mechanism installed in the seat. If in need of an emergency stop, simply lifting the foot off of the throttle pedal will stop the rotors from turning immediately. 067975 Page 39...
- Page 40 Operating Instructions (cont’d) SECTION 2 OPERATIONS Steering The Riding Trowel A slight “feathering motion” forward and backward with the left hand joystick is required to move the machine in a straight path to the left or right while operating the right hand joystick. Position Action Forward Reverse Rotate clockwise Rotate counter clockwise Left sideways Right sideways Page 40 067975...
- Page 41 Operating Instructions (cont’d) SECTION 2 OPERATIONS Pitch Adjustment Different pitch angles are needed as you work the different stages of the concrete. Refer to figure below. When changing or setting pitch (angle of trowel blades), slow the machine down, set the desired degree of pitch on the left side of the machine and then adjust the right side to match. To increase the pitch, turn the pitch control clockwise “a” use the pitch indicator “b” to adjust pitch equally on both right and left trowel blades. 067975 Page 41...
-
Page 42: Section 3 - Service
SECTION 3 SERVICE Maintenance described in this section represents minimum requirements for continuous satisfactory operation of the ma- chine. Because improperly maintained machines are hazardous, it is extremely important that only qualified mechanics perform maintenance work. It is imperative that only genuine AEC parts are used if replacement is needed as substituted parts in critical areas may place the operator at risk. It is recommended that a regular maintenance schedule be followed for mechanical adjustments as well as for lubrication. Use a preventative maintenance program to catch and correct many serious problems before they occur. The preventative maintenance schedule contained herein gives a daily, weekly, monthly, semi-annually, annually, and break-in 100 hours minimum requirement to keep your riding trowel running for years. The lubrication chart contained herein is one part of riding trowel preventative maintenance. Because regular maintenance cannot be controlled by the manufacturer or by the distributor, it must ultimately be the re- sponsibility of the owner. Your AEC dealer stands ready to assist in the event of operational difficulties. However, most adjustments and/or repair can be readily performed by the user. The instructions provided in this section will facilitate the maintenance of the AEC equipment to operate at peak efficiency. Recommended Oil Use 4-stroke motor oil that meets or exceeds the requirements for API service category SJ or later (or equivalent). Always check the API service label on the oil container to be sure it includes the letters SJ or later (or equivalent). Page 42 067975... -
Page 43: Air Filter Maintenance
Air Cleaner Maintenance SECTION 3 SERVICE A dirty air cleaner will restrict air flow to the carburetor, reducing engine performance. If you operate the engine in very dusty areas, clean the air filter more often than specified in the MAINTENANCE SCHEDULE. Operating the engine without an air filter, or with a damaged air filter, will allow dirt to enter the engine, causing rapid engine wear. This type of damage is not covered by the Distributor’s Limited Warranty. Inspection Remove the air cleaner cover and inspect the filter elements. Clean or replace dirty filter elements. Always replace damaged filter elements. Cleaning Pull the air cleaner cover latch to the unlocked position, and remove the cover. Remove the wing nut from the paper filter element. Remove the paper filter element and foam filter element from the air cleaner case. Remove the foam filter element from the paper filter element. Inspect both filter elements, and replace them if they are damaged. Always replace the paper filter element at the scheduled interval. 067975 Page 43... -
Page 44: Maintenance Schedule
Maintenance Schedule SECTION 3 SERVICE Maintenance Schedule Item Daily Weekly Monthly Annually 100 Hours Check external hardware ü Check hydraulic oil level ü Check hydraulic fittings and hoses ü Apply grease to thrust bearings ü Check all operational controls ü Tighten all bolts and nuts. ü Grease steering assembly heim joints ü Tighten any loose bolts, nuts, etc ü Inspect visually for loose or missing parts ü Wash wet concrete of machine ü Clean fuel sediment bowl ü... -
Page 45: Filter Replacements
Filter Replacement SECTION 3 SERVICE AIR CLEANER PART #: 064832 KIT, FILTER F/ GX690 HONDA PART #: 061819 ENGINE OIL FILTER PART #: 064831 ENGINE FUEL FILTER PART #: 064833 HYDRAULIC OIL FILTER PART #: 046730 067975 Page 45... -
Page 46: Gearbox Maintenance
Gearbox Maintenance SECTION 3 SERVICE Trowel Gearbox Maintenance Check Oil levels in the gearbox daily (every 8 hours) Add oil if oil level is below the check sight glass. 1) To add oil tilt gearbox to the side and remove the fill plug. Add oil through hole opening. Replace fill plug after proper level has been achieved. Fill so that there is oil 1/2 way in the sight glass. Use Allen Oil (PN: 048299) only. 2) Each Gearbox has a grease fitting on top cover that must be greased (2 SHOTS ONLY) every 300 operating hours. Use only Mobilith SHC 220 Extended pressure grease. GEARBOX TOP COVER GREASE FITTING FILL PLUG SIGHTGLASS Page 46 067975... -
Page 47: Lift Lever Adjustment
Lift Lever Adjustment SECTION 3 SERVICE Lift Lever Adjustment Procedure Damage to and/or replacement of a trowel arm can change the adjustment of the lift lever. This can unbalance the trowel arms and cause the riding trowel to wobble during operation. To operate smoothly the lift lever on all trowel arms must be adjusted the same to ensure that the riding trowel is balanced correctly. Adjusting the trowel arms is accomplished by using the optional trowel arm alignment jig AEC PN 016863. The service manual that is included with the alignment jig describes in detail the steps to preform this procedure and to check the flatness and straightness of the trowel arms. The steps below descride the general procedure to remove the trowel arms to be aligned. Make sure that there is no pitch in the blades before attempting to remove a trowel arm. 1) Block up pressure plate [A] using a wooden block. 2) Remove stabilizer ring from spider assembly (only on available models). - Page 48 Lift Lever Adjustment (cont’d) SECTION 3 SERVICE PICTURE FOR REFERENCE ONLY TROWEL ARM BLADE PRESSURE PLATE LOCATION SPIDER BOSS FASTENER HARDWARE REMOVAL Page 48 067975...
-
Page 49: Battery Jump-Start Procedure
Battery Jump Start Procedure SECTION 3 SERVICE Occasionally it may be necessary to jump start a weak battery. If jump starting is necessary the following procedure is recommended to prevent starter damage, battery damage, and personal injury. Jump starting a battery incorrectly can cause the battery to explode resulting in severe personal injury or death. Do not smoke or allow any ignition sources near the battery and do not start a frozen battery. Electrical arcing can cause severe personal injury. -
Page 50: Transporting Trowel
Transporting Trowel SECTION 3 SERVICE Transporting Trowel Procedures Optional dolly jacks are available for short moves or to aid in servicing the trowel. Install dolly jacks as follows: 1) Inspect dolly jack for serviceability and damage. 2) Place riding trowel on firm level ground. 3) Tie steering levers [I] (if applicable) to frame to prevent them from tipping for- ward when trowel is being lifted. AEC assumes no liability if injury occurs and this step is eliminated during any trowel lifting procedures. 4) Insert the front dolly jack [J] fully into the holes in the mainframe of the riding trowel. The front dolly jacks are equipped with short lifting tubes while the rear dolly jacks have long lifting tubes. 5) Insert the rear dolly jack [M] with the long lifting tubes into the holes provided in the rear of the mainframe. The holes in the mainframe are located directly opposite the front holes. - Page 51 Transporting Trowel (cont’d) SECTION 3 SERVICE FRONT DOLLY JACK REAR DOLLY JACK LOCATION LOCATION 067975 Page 51...
-
Page 52: Troubleshooting
Troubleshooting SECTION 3 SERVICE Possible Corrective Area Malfunction Ref. Cause Measure Battery is discharged - Add battery fluid - Charge the battery - Replace the battery Battery cable is disconnected - Connect battery cable Blown fuse - Replace fuse Bad connection or breakage in the wiring - Contact your AEC dealer Engine does not start, or is Out of fuel - Fill fuel difficult to start Air is in fuel - Contact your AEC dealer Engine fouled - Wait a while and try starting again Insufficient or wrong oil - Fill or change oil... -
Page 53: Page
Troubleshooting (cont’d) SECTION 3 SERVICE Possible Corrective Area Malfunction Ref. Cause Measure Bad fuel - Change fuel Clogged air cleaner - Clean or replace the air cleaner Black smoke comes out of exhaust Choke is not fully open - Open the choke fully Engine Other (other than above) - Contact your AEC dealer Engine oil level is too high - Adjust the oil level White or blue smoke comes out of exhaust Other (other than above) -
Page 54: Parts
Factory Service Information SECTION 4 PARTS This section contains the illustrated drawings and parts list for help in identifying and/or ordering replacement parts for your machine. Follow the instructions in the front section of this manual “Ordering Parts” when ordering replacement parts to insure prompt and accurate delivery. The FRONT and/or REAR orientations are defined from the operator’s view of sitting on machine (SOM). All set screws have blue (LOC-TITE™) applied at the factory. If set screw is removed or loosened for any reason re-apply blue (LOC-TITE™). All grease fittings are capped with CAP PLUG GC-5 (AEC PN 015692) to protect the fitting. If cap becomes missing or damaged replace it as soon as possible. Anti-Seize is applied at the factory to drive line couplings, and moving components. If these parts are disassembled re-apply a light coat of a graphite based anti-seize. Page 54 067975... -
Page 55: Replacement Part Procedure
Replacement Part Procedures SECTION 4 PARTS We recommend AEC quality replacement parts, available from the AEC Customer Service Department or your nearest AEC Dealer. Part numbers are subject to change without notice. Part numbers might be different outside of the United States of America. Use part numbers listed in the applicable parts list table when you place your order. If a part number changes, the AEC Customer Service Department or your nearest AEC dealer will have the latest part number for the replacement part. Remember when you order replacement parts, you will need your model number and serial number. These are the numbers that you have recorded on Page 11 of this manual. Please order replacement parts by the appropriate part number, not the key number. This manual contains an illustrated parts list for help in ordering replacement parts for your machine. Follow the instructions below when ordering parts to insure prompt and accurate delivery: All orders for service parts - include the serial number for the machine. Shipment will be delayed if this information is not available. 2. Include correct description and part number from the “PARTS” Section 4. 3. Specify exact shipping instructions, including the preferred routing and complete destination address. DO NOT return parts to AEC without receiving written authorization from AEC. All authorized returns must be shipped pre-paid. When placing an order, please contact the AEC Dealer nearest you. All information, specifications, and illustrations in this manual are subject to change without notice and are based on the latest information at the time of publication. -
Page 56: Seat Frame Assembly
Seat Frame Assembly - Illustration SECTION 4 PARTS Parts List located on Pages 58-59 Page 56 067975... - Page 57 Seat Frame Assembly - Illustration, SECTION 4 continued PARTS Parts List located on Pages 58-59 067975 Page 57...
- Page 58 Seat Frame Assembly - Parts List SECTION 4 PARTS ITEM PART NO. DESCRIPTION 010001 FASTENER, HHCS 1/4-20 X 1/2 GR 5 010019 FASTENER, HHCS 5/16-18 X 3/4 GR 5 010068 FASTENER, HHCS 1/2-13 X 1-1/4 GR 8 010082 FASTENER, FW 5/16 010109 FASTENER, NUT HEX NYLON 5/16-18 029671 FASTENER, NUT HEX 1/4-20 NYLOC 029928 CHOKE CABLE ASSEMBLY 032125 ROCKER SWITCH 032148 KIT, KEY IGNITION SWITCH 034610 SOCKET, T-2 SLIDE BASE LAMP 034611 LAMP, T-2 SLIDE BASE #5 034614 LENS, T-2 LAMP RED JEWELED 039329 FASTENER, CLIP TINNERMAN 1/4-20 041537 CUP HOLDER 042036 METER, TACH/HOUR INDUCTIVE...
- Page 59 056340 DECAL ALLEN OVAL 4” X 6.67” WHITE 061372 SEAT, RIDER 061373 ARM RESTS FOR SEAT 064247 BRACE F/ COOLER 064817 CONTROL VALVE, RH DUAL AXIS 064818 CONTROL VALVE, LH SINGLE AXIS 065404 SCREEN ASSEMBLY 065735 SEAT FRAME WELDMENT F/ MP245 067934 EPA LABEL, 2018, AEC 065913 DECAL, GEARBOX OIL 065915 DECAL, PPE 065917 DECAL, PINCH POINT 065918 DECAL, LIGHTS 065919 DECAL, 12 VOLT DC /5 AMP MAX 066083 DECAL, 2 DIRECTION 066169...
- Page 60 Seat Frame Assembly - Illustration, SECTION 4 PARTS continued Page 60 067975...
- Page 61 FITTING, 6801-6-6-NWO 90° ELB JIC-SAE 047052 RELAY, 12 V 30/50 A w/RES SHROUD 047665 BUMPER, RUBBER 049588 FEMALE RECEPTICAL 12VDC 049623 JOYSTICK PLATE ASS’Y 050049 ACCESS PANEL 052926 FITTING, HYD SMK20-7/16UNF-VE TEST PORT 052928 FITTING, HYD 9059-8-8 052930 COOLER, AIR/OIL 2005K-12S-BP 053447 DECAL, HAND TOOL AREA (SP) 056340 DECAL ALLEN OVAL 4” X 6.67” WHITE 061372 SEAT, RIDER 061373 ARM RESTS FOR SEAT 064247 BRACE F/ COOLER 064817 CONTROL VALVE, RH DUAL AXIS 067975 Page 61...
-
Page 62: Front Panel Assembly
Front Screen - Illustration SECTION 4 PARTS Page 62 067975... - Page 63 Front Screen - Parts List SECTION 4 PARTS ITEM PART NO. DESCRIPTION 065404 ASSEMBLY, FRONT SCREEN F/ HP245 010018 BOLT, 5/16-18x1/2 HHC 010090 WASHER, 5/16 SPLIT LOCK 010098 FASTENER, NUT HEX 1/4-20 029671 FASTENER, NUT HEX 1/4-20 NYLOC 042343 FASTENER, SFBHCS 1/4”-20 x 3/4 048678 HANDLE, LOAD RATED NYLON 056471 HEAT SHIELD 065405 FRONT SCREEN WELDMENT 067975 Page 63...
-
Page 64: Hydraulic Manifold Assembly
Manifold Assembly - Illustration SECTION 4 PARTS Page 64 067975... - Page 65 Manifold Assembly - Parts List SECTION 4 PARTS ITEM PART NO. DESCRIPTION 045915 FITTING, F6400-6-6-O STR JIC-SAE 045921 FITTING, F6400-8-8-O STR JIC-SAE 045922 FITTING, F6400-4-6-O STR JIC-SAE 046736 MANIFOLD, HYDR STEERING 046892 FITTING, 6801-6-6-NWO 90° ELB JIC-SAE 052926 FITTING, HYD SMK20-7/16UNF-VE TEST PORT VISIT US!!! www.alleneng.com LIKE US!!! www.facebook.com/AllenEngineering @alleneng FOLLOW US!!! www.youtube.com/AllenMachinery WATCH US!!! 067975 Page 65...
-
Page 66: Mainframe Assembly
Mainframe Assembly - Illustration SECTION 4 PARTS Parts List located on Pages 72-73 Page 66 067975... - Page 67 Mainframe Assembly - Illustration, SECTION 4 continued PARTS Parts List located on Pages 72-73 067975 Page 67...
- Page 68 Mainframe Assembly - Illustration, SECTION 4 PARTS continued Parts List located on Pages 72-73 Page 68 067975...
- Page 69 Mainframe Assembly - Illustration, SECTION 4 continued PARTS Parts List located on Pages 72-73 067975 Page 69...
- Page 70 Mainframe Assembly - Illustration, SECTION 4 PARTS continued Parts List located on Pages 72-73 Page 70 067975...
- Page 71 SECTION 4 PARTS PAGE LEFT BLANK INTENTIONALLY 067975 Page 71...
- Page 72 Mainframe Assembly - Parts List SECTION 4 PARTS ITEM PART NO. DESCRIPTION 050023 ASSEMBLY, MAINFRAME 010002 FASTENER, HHCS 1/4-20 X 3/4 010034 FASTENER, HHCS 3/8-16 X 1/2 010035 FASTENER, HHCS 3/8-16 X 3/4 010036 FASTENER, HHCS 3/8-16 X 1 GR 8 010073 FASTENER, HHCS 1/2-13 X 2-1/2 GR 5 010091 FASTENER, LW 3/8 010464 FASTENER, NUT NYLOK 3/8-16 GR8 010568 SCR, 10-32 X 1/2 RND HD MACH 011490 FASTENER, FW HARDENED 1/2 012612 FASTENER, NUT HEX NYLOCK 5/16-18 012702 TIP, 80°x0.10 GPM BRASS SPRAY 016382 FASTENER, RHMS 10-32 X 1 017751 FASTENER, FW HARD A325 3/8 018072 WASHER, #10 Z STL SAE FLAT 020514...
- Page 73 048561 BEARING ASSEMBLY F/ ROTOR MOUNT X1 048571 FOOT REST 048627 SPACER, STEERING CONNECTION 048629 FASTENER, HHCS 5/8-11x2-3/4 GR 8 048660 CYLINDER, 1.5x.625 STEERING 048660 CYLINDER, 1.5x1.25 STEERING 050024 ROTOR ASSEMBLY, RH 050028 ROTOR ASSEMBLY, LH 050083 HYD TANK WELDMENT, MP245 050095 WELDMENT, MP245 MAIN FRAME 053137 FRONT COVER PLATE 053188 ASSY, THROTTLE PEDAL 053200 TANK ASSY, 6 GAL FUEL W/ CAP (EPA) 053323 BRACKET F/ PUMP COVER 053324 PUMP COVER 056421 FILLER BREATHER 064562 WELDMENT, TANK GUARD 064749...
-
Page 74: Pitch Control Assembly
Pitch Control - Illustration SECTION 4 PARTS 038174 SET SCREWS MUST ALWAYS STAY IN THIS LOCATION Page 74 067975... - Page 75 Pitch Control - Parts List SECTION 4 038174 PARTS ITEM PART NO. DESCRIPTION 038174 ASSEMBLY, PITCH CONTROL 015410 FASTENER, RHMS 1/4-20 X 3/8 015747 PIN, ROLL 3/16 X 1-3/8 SPIROL 015768 FASTENER, SHCS 1/4-20 X 1/4 HOLO 029812 BUSHING, SLIDE PITCH CONTROL PITCH CONTROL TUBE 032115 KNOB, PITCH CONTROL HANDLE (RT) 038176 WELDMENT, VANG & KOH PITCH CONT TUBE 038178 WELDMENT, PC SHAFT 061529 ASSEMBLY, SP/HP PITCH CONT CRANK HANDLE ITEM PART NO. DESCRIPTION 038174 ASSEMBLY, PITCH CONTROL 012710 THRUST BEARING 032191 STOP F/ PITCH CONTROL HANDLE 040143...
-
Page 76: Throttle Pedal Assembly
Throttle Pedal Assembly - Illustration SECTION 4 PARTS Page 76 067975... - Page 77 Throttle Pedal Assembly - Parts List SECTION 4 PARTS ITEM PART NO. DESCRIPTION 053188 ASSEMBLY, THROTTLE PEDAL 010020 FASTENER, HHCS 5/16-18 X 1 010046 FASTENER, HHCS 3/8-16 X 3-1/2 010082 FASTENER, FW 5/16 010100 FASTENER, NUT HEX 5/16-18 GR8 010464 FASTENER, NUT NYLOK 3/8-16 GR 8 012361 PIN, Ø1/8 X 1 COTTER 017751 FASTENER, FW HARD A325 3/8 024839 ASSY, FOOT SPEED PEDAL 024850 SHACKLE 1-7/8” FOOT SPEED LONG 024981 EXTENSION SPRING 024982 FASTENER, PIN CLEVIS 1/4 X 51/64 026226 PIN, Ø3/32 X 3/4 ZP STL COTTER 028895 FASTENER, PIN CLEVIS 3/8 X 3 3/4 037947 FULCRUM, THROTTLE PEDAL...
-
Page 78: Power Unit Assembly
Power Unit - Illustration SECTION 4 PARTS Parts List located on Pages 80-81 Page 78 067975... - Page 79 Power Unit - Illustration, continued SECTION 4 PARTS Parts List located on Pages 80-81 067975 Page 79...
- Page 80 Power Unit - Parts List SECTION 4 PARTS ITEM PART NO. DESCRIPTION 050066 ASSEMBLY, POWER UNIT 010035 FASTENER, HHCS 3/8-16 X 3/4 010072 FASTENER, HHCS 1/2-13 X 2-1/4 GR 5 010083 FASTENER, FW 3/8 010091 FASTENER, LW 3/8 010092 FASTENER, LW 7/16 GR 8 010096 FASTENER, Ø7/16 ID Y-ZINC HRDND FLAT 010100 FASTENER, NUT HEX 5/16-18 GR8 010102 FASTENER, NUT HEX 3/8-16 010464 FASTENER, NUT NYLOK 3/8-16 GR 8 011238 FASTENER, NUT HEX NYLOK 1/2-13 011490 FASTENER, FW HARDENED 1/2 012612 FASTENER, NUT HEX NYLOCK 5/16-18 017751 FASTENER, FW HARD A325 3/8 017898 FASTENER, HHCS 7/16-20 X 1-1/2 GR8 021072...
- Page 81 053465 BEARING SUPPORT 056775 SHEAVE AK30x1-1/8 056906 ENGINE CONNECTING PLATE 056912 HYDRAULIC PUMP MNTG PLATE WELDMENT 056922 HI-POWER V BELT 064834 SCR, 7/16-20x5 YZ GR 8 HHC 065435 CLUTCH COVER 066794 GEAR PUMP 067409 SPACER F/ CLUTCH 067432 GUARD F/ AUX PUMP 067551 DECAL, MP245 WARNINGS-RIDER (4”) BT0100 BATTERY 340 CCA 001005 OIL, MOTOR 10W30 056938 HEAT WRAP, 14” X 20” (NOT SHOWN) 067975 Page 81...
-
Page 82: Right Hand (Som) Rotor Assembly
RH Rotor Assembly - Illustration SECTION 4 PARTS Page 82 067975... - Page 83 RH Rotor Assembly - Parts List SECTION 4 PARTS ITEM PART NO. DESCRIPTION 050024 ASSEMBLY, RIGHT HAND ROTOR 010023 FASTENER, HHCS 5/16-18 X 1-3/4 010024 FASTENER, HHCS 5/16-18 X 2 GR 5 010035 FASTENER, HHCS 3/8-16 X 3/4 010036 FASTENER, HHCS 3/8-16 X 1 GR 8 010090 FASTENER, LW 5/16 010091 FASTENER, LW 3/8 010464 FASTENER, NUT NYLOK 3/8-16 GR8 012612 FASTENER, NUT HEX NYLOCK 5/16-18 015677 RING, Ø7/16 E-STYLE RETAINING 015678 PIN, YOKE ARM 015690 WASHER, RETAINING FOR TROWELS 015692 CAP, Ø1/4 RED GREASE 015693 PLUG, PLASTIC CAP EC12 015694 PLUG W-1 RED PLASTIC TAPERD...
-
Page 84: Left Hand (Som) Rotor Assembly
LH Rotor Assembly - Illustration SECTION 4 PARTS 050028 Page 84 067975... - Page 85 LH Rotor Assembly - Parts List SECTION 4 050028 PARTS ITEM PART NO. DESCRIPTION 050028 ASSEMBLY, LEFT HAND ROTOR 010023 FASTENER, HHCS 5/16-18 X 1-3/4 010024 FASTENER, HHCS 5/16-18 X 2 GR 5 010035 FASTENER, HHCS 3/8-16 X 3/4 010090 FASTENER, LW 5/16 010091 FASTENER, LW 3/8 012612 FASTENER, NUT HEX NYLOCK 5/16-18 015677 RING, Ø7/16 E-STYLE RETAINING 015678 PIN, YOKE ARM 015690 WASHER, RETAINING FOR TROWELS 015691 FASTENER, SHCS 1/2-13 X 1-1/2 RH 015692 CAP, Ø1/4 RED GREASE 015693 PLUG, PLASTIC CAP EC12 015694 PLUG W-1 RED PLASTIC TAPERD 015696...
-
Page 86: Right Hand Spider Assembly
RH Spider Assembly - Illustration and SECTION 4 PARTS Parts List ITEM PART NO. DESCRIPTION 024813 ASSEMBLY, RIGHT HAND SPIDER 012990 FASTENER, CABLT 3/8-16 X 1-1/4” 015682 WASHER, 3/8 EXT TOOTH LOCK 015683 BOLT, 3/8-16 X 7/8 DOG PT HEX HD CAP 015684 FASTENER, NUT HEX JAM 3/8-16 015686 FASTENER, SQHSS 3/8-16 X 1 015688 FASTENER, 9/16-18 NF ADJ/MACH SCRW 015818 TROWEL ARM, STD 36” SPIDER 016920 SPRING CLIP, UNIVERSAL SPIDERS 024755 FITTING, 1/8-27 NPT 45° GREASE 033032 LIFT LEVER, STD UNIVERSAL 064221 SPIDER, 4 BOSS UNIVERSAL Page 86 067975... -
Page 87: Left Hand Spider Assembly
LH Spider Assembly - Illustration and SECTION 4 Parts List PARTS ITEM PART NO. DESCRIPTION 015893 ASSEMBLY, LEFT HAND SPIDER 012990 FASTENER, CABLT 3/8-16 X 1-1/4” 015682 WASHER, 3/8 EXT TOOTH LOCK 015683 BOLT, 3/8-16 X 7/8 DOG PT HEX HD CAP 015684 FASTENER, NUT HEX JAM 3/8-16 015686 FASTENER, SQHSS 3/8-16 X 1 015688 FASTENER, 9/16-18 NF ADJ/MACH SCRW 015818 TROWEL ARM, STD 36” SPIDER 016920 SPRING CLIP, UNIVERSAL SPIDERS 024755 FITTING, 1/8-27 NPT 45° GREASE 033032 LIFT LEVER, STD UNIVERSAL 064221 SPIDER, 4 BOSS UNIVERSAL 067975 Page 87... -
Page 88: Right Hand Gearbox Assembly
RH Gearbox Assembly - Illustration SECTION 4 PARTS Torque to 22 Ft. Lbs. Grease this area for re-assembly only. Page 88 067975... - Page 89 RH Gearbox Assembly - Parts List SECTION 4 PARTS ITEM PART # DESCRIPTION 026443 ASSEMBLY, RIGHT HAND GEARBOX 001003 GREASE, MOBILITH SCH 220 .094 048299 OIL, ALLEN ENGINEERING GEARBOX .757/LT 010498 PLUG, 3/8 NPT BI SQ HD PIPE 010513 FITTING, 1/4-28 NPT STR GREASE 012953 PLUG, 3/4 NPTF BI SQ HD PIPE 013746 FASTENER, FHCSS 3/8-16 X 1 015204 GEAR BOX,MACHINE FINISHED 015205 FASTENER, SCREW FHSSS 5/16-18 X 1 015209 VALVE 1/8 NPT-27 RELIEF 015210 GASKET .005 THICK, TOP COVER AS REQ.
-
Page 90: Left Hand Gearbox Assembly
LH Gearbox Assembly - Illustration SECTION 4 PARTS Torque to 22 Ft. Lbs. Grease this area for re-assembly only. Page 90 067975... - Page 91 LH Gearbox Assembly - Parts List SECTION 4 PARTS ITEM PART # DESCRIPTION 026442 ASSEMBLY, LEFT HAND GEARBOX 001003 GREASE, MOBILITH SCH220 .094 048299 OIL, ALLEN ENGINEERING GEARBOX .757/LT 010498 PLUG, 3/8 NPT BI SQ HD PIPE 010513 FITTING, 1/4-28 NPT STR GREASE 012953 PLUG, 3/4 NPTF BI SQ HD PIPE 015204 GEAR BOX,MACHINE FINISHED 015205 FASTENER, SCREW FHSSS 5/16-18 X 1 015209 VALVE 1/8 NPT-27 RELIEF 015210 GASKET .005 THICK, TOP COVER AS REQ. 015212...
-
Page 92: Hydraulic Schematic
Hydraulic Schematic - Illustration SECTION 4 PARTS Page 92 067975... - Page 93 FILLER BREATHER WITH DIP STICK 056932 SIGHT LEVEL INDICATOR 045948 MAGNETIC TANK PLUG 052930 AIR/OIL COOLER 050051 MP245 FITTING KIT 050050 MP245 HOSE KIT 001002 OIL, HYDRAULIC 46 (DTE25) 050051 - MP245 FITTING KIT 050050 - MP245 HOSE KIT PART # DESCRIPTION PART # DESCRIPTION 049058 F2501-8-8-O 045929 F6801-4-4 NWO 068070 HOSE, HS-245-1 045915...
- Page 94 Hydraulics - Illustration SECTION 4 PARTS Page 94 067975...
- Page 95 Hydraulics - Parts List SECTION 4 PARTS ITEM PART NO. DESCRIPTION 045915 FITTING, F6400-6-6-O STR JIC-SAE 045922 FITTING, F6400-4-6-O STR JIC-SAE 045928 FITTING, F6400-4-4-O STR JIC-SAE 046736 MANIFOLD, HYDRAULIC STEERING 052926 FITTING, HYDRAULIC SMK20-7/16UNF-VE TEST PORT 052928 FITTING, HYDRAULIC 9059-8-8 052930 COOLER, AIR/OIL 2005K-12S-BP 064817 CONTROL VALVE, RH DUAL AXIS 064818 CONTROL VALVE, LH SINGLE AXIS 068070 HS-245-1, HYDRAULIC HOSE 068072 HS-245-3, HYDRAULIC HOSE 068073 HS-245-4, HYDRAULIC HOSE 068074 HS-245-5, HYDRAULIC HOSE 068075 HS-245-6, HYDRAULIC HOSE 068076 HS-245-7, HYDRAULIC HOSE 068077 HS-245-8, HYDRAULIC HOSE...
-
Page 96: Electrical Wiring Harness
Electrical Wiring Harness - Illustration SECTION 4 PARTS 053206 Page 96 067975... - Page 97 Electrical Wiring Harness - Illustration SECTION 4 053206 PARTS 067975 Page 97...
-
Page 98: Cooler Wiring Harness
Cooler Wiring Harness - Illustration SECTION 4 PARTS 059546 Page 98 067975... - Page 99 Cooler Wiring Harness - Illustration SECTION 4 059546 PARTS 067975 Page 99...
-
Page 100: Dolly Jack Assembly
Dolly Jack Assembly - Illustration SECTION 4 PARTS Page 100 067975... - Page 101 Dolly Jack Assembly - Parts List SECTION 4 PARTS ITEM PART # DESCRIPTION 027684 ASSEMBLY, SET, PRO DOLLY JACK 017751 WASHER, 3/8 FLAT 010133 PIN, 3/16 X 2 COTTER 015692 CAP, 1/4 RED GREASE 010464 NUT, 3/8-16 NYLOCK LOCK 024628 SPACER, DOLLY JACK WHEEL 026728 ASSEMBLY, REAR DOLLY TUBE 026729 ASSEMBLY, DOLLY JACK TUBE 026938 JACK, DOLLY 039633 DECAL, DOLLY JACK SYSTEM 040637 SCREW, 3/8-16 X 2-1/4 GRADE 8 HEX HD CAP 099014 ASSEMBLY, PNEUMATIC TIRE AND WHEEL 067975 Page 101...
-
Page 102: Accessories
Accessories - Illustration and Parts List SECTION 4 PARTS ITEM PART # DESCRIPTION 047128 PAN, UNIVERSAL 36-1/2” 4-CLIP 047130 PAN, UNIVERSAL 11GA 36-1/2” 4-SAFETY 035461 BRIDLE, 2500 LB 5 FT SLING LIFT Page 102 067975... - Page 103 Accessories - Illustration and Parts List SECTION 4 PARTS ITEM PART # DESCRIPTION 016863 JIG, TROWEL ARM ALIGNMENT 035688 KIT, STD 4-ARM SPIDER PULLER 067975 Page 103...
-
Page 104: Manual Revision Detail
Revision Detail MANUAL REVISION DETAIL REVISION # REVISION DATE REVISION REFERENCE # REVISION BY 01/2018 Initial Release 06/2018 MN 18-013, 18-056 Page 104 067975... -
Page 105: Copyright Information
Copyright © 2018 Allen Engineering Corporation All rights reserved All information, specifications, and illustrations in this manual are subject to change without notice and are based on the latest information at the time of publication. No part of this manual may be reproduced or transmitted in any form or by any means, electronic or mechanical, for any purpose, without the express written permission of Allen Engineering Corporation (AEC). AEC assumes no responsibility or liability for any errors or inaccuracies that may appear in this manual. Allen Products are covered under one or more of the following patent numbers: U.S. Design Patents: 344,736; 400,542; 400,544; 402,998; 402,999; 403,332; 404,041; 404,042; 410,931; 413,127; 416,564; 465,897; 466,909; 474,203. U.S. Utility Patents: 5,108,220; 5,238,323; 5,328,295; 5,352,063; 5,405,216; 5,476,342; 5,480,257; 5,480,258; 5,533,831; 5,562,361; 5,567,075; 5,613,801; 5,658,089; 5,685,667; 5,803,658; 5,816,739; 5,816,740; 5,890,833; 5,934,823; 5,967,696; 5,988,938; 5,988,939; 6,019,433; 6,019,545; 6,048,130; 6,053,660; 6,089,786; 6,106,193;... - Page 106 P.O. BOX 819 PARAGOULD, AR 72451 USA 800.643.0095 (USA ONLY) / 870.236.7751 FAX: 800.643.0097 (USA ONLY) / 870.236.3934 WWW.ALLENENG.COM CONNECT WITH US ON...
Need help?
Do you have a question about the MP245 and is the answer not in the manual?
Questions and answers