Table of Contents
Advertisement
Quick Links
USER MANUAL
AVSC-HDMI2-8X2
VIDEO MATRIX
SWITCHER 8X2
HDMI 2.0
24/7 TECHNICAL SUPPORT AT 1.877.877.2269 OR VISIT BLACKBOX.COM
SOURCE
1. HDBT
2. HDMI
3. HDMI
4. HDMI
5. HDMI
AVSC-HDMI2-8X2
OUTPUTS
ENTER
MENU/2s
6. VGA
7. DP
8. USB-C
AUTO
1. HDMI
2. HDBT
RESOLUTION
VOLUME
4K@60Hz
4K@60Hz
MIX
4K@30Hz
4K@30Hz
HDMI OUT
1920x1200
1920x1200
HDBT OUT
1. HDMI
2. HDBT
1080P
1080P
SELECT
MUTE/3s
Advertisement
Table of Contents

Subscribe to Our Youtube Channel
Related Manuals for Blackbox AVSC-HDMI2-8X2


Summary of Contents for Blackbox AVSC-HDMI2-8X2
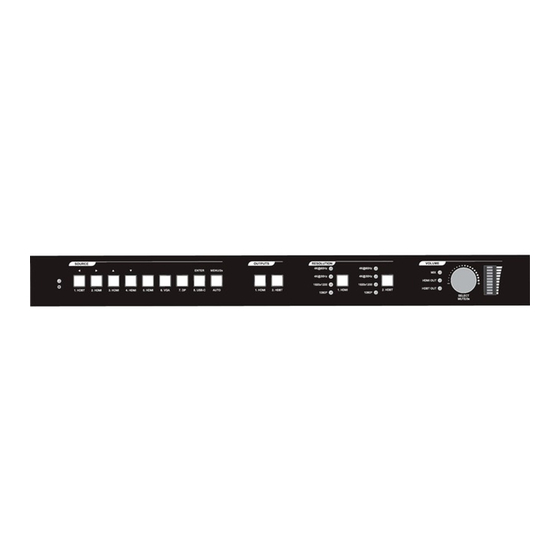
- Page 1 USER MANUAL AVSC-HDMI2-8X2 VIDEO MATRIX SWITCHER 8X2 HDMI 2.0 24/7 TECHNICAL SUPPORT AT 1.877.877.2269 OR VISIT BLACKBOX.COM SOURCE OUTPUTS RESOLUTION VOLUME 4K@60Hz 4K@60Hz ENTER MENU/2s 4K@30Hz 4K@30Hz HDMI OUT 1920x1200 1920x1200 HDBT OUT 1. HDBT 2. HDMI 3. HDMI 4. HDMI 5.
-
Page 2: Table Of Contents
6.4 Configuration ......................................17 6.4.1 PoC Setting ........................................17 6.4.2 EDID Management ......................................18 6.4.3 Relay Control ........................................19 6.5 CEC Control ......................................20 6.6 Tags Setting ......................................22 6.7 RS-232 Control .......................................23 6.8 Network Setting......................................25 6.9 Password Setting ....................................25 6.10 GUI Update ......................................26 1.877.877.2269 BLACKBOX.COM... - Page 3 9. DIMENSIONAL DRAWING ................................39 10. TROUBLESHOOTING ................................. 40 APPENDIX A. REGULATORY INFORMATION ..........................41 A.1 FCC ..........................................41 A.2 CE and RoHS2 ......................................41 A.3 NOM Statement .....................................42 APPENDIX B. DISCLAIMER/TRADEMARKS ..........................43 B.1 Disclaimer .......................................43 B.2 Trademarks Used in this Manual ................................43 1.877.877.2269 BLACKBOX.COM...
-
Page 4: Safety Precautions
Š Unplug the power cord when left unused for a long period of time. Š Š Information on disposal for scrapped devices: do not burn or mix with general household waste. Treat the product as normal electrical Š waste. 1.877.877.2269 BLACKBOX.COM... -
Page 5: Specifications
Frequency Response Deviation < ± 0.5 dB 20 Hz - 20 kHz Output Load Capability 1 k-Ohm and higher (supports 10x paralleled 10 k-Ohm loads) Stereo Channel Separation > 70 dB @ 1 kHz Noise Level -80 dB 1.877.877.2269 BLACKBOX.COM... - Page 6 14 to 131° F (-10 to 55° C) Storage Temperature -13 to 158° F (-25 to 70° C) Humidity 10 to 90% relative humidity Dimensions 1.7" H x 17.1" W x 14.0" D (4.4 x 43.6 x 35.6 cm) Weight 6.6 lb. (3 kg) 1.877.877.2269 BLACKBOX.COM...
-
Page 7: Overview
Your package should include the following items. If anything is missing or damaged, contact Black Box Technical Support at 877-877-2269 or info@blackbox.com Š (1) 8 x 2 Video Matrix Switcher, 18 G Seamless Switching, HDMI 2.0 4K 60 Hz 4:4:4 HDR Š... -
Page 8: Hardware Description
LED will illuminate blue. (1) Volume knob • Rotate the knob to increase or decrease the volume of the selected audio. • Press and hold the knob at least three seconds to mute the selected audio. Rotate the knob to unmute. 1.877.877.2269 BLACKBOX.COM... -
Page 9: Back Panel
RS-232 control signal. The HDBT output supports 24V PoC. Outputs NOTE: The 2-HDMI and 2-HDBT ports output the same signal. • IR IN: 3.5-mm jack to connect the IR receiver for IR pass-through. • IR OUT: 3.5-mm jack to connect the IR emitter for IR pass-through. 1.877.877.2269 BLACKBOX.COM... - Page 10 • IR EYE: 3.5-mm jack to connect IR receiver to control the switcher by the IR remote. • TCP/IP: RJ-45 port to connect the control device (e.g. PC) to control the switcher by GUI. • FIRMWARE: Type-A USB port for firmware upgrade. DC barrel connector for the included power adapter 24-VDC connector 1.877.877.2269 BLACKBOX.COM...
-
Page 11: System Connection
CONTROL SYSTEM ROUTER SOUNDBAR AUDIO PLAYER SPEAKER iPAD AMPLIFIER RECEIVER BLU-RAY DVD HDMI 2.0 TRANSMITTER GAME CONSOLE 4K 40m, 1080P 70m 4K 40m, 1080P 70m MACBOOK HDTV PROJECTOR HDTV PROJECTOR HDMI 2.0 RECEIVER SCREEN CELLPHONE FIGURE 3-1. TYPICAL APPLICATION 1.877.877.2269 BLACKBOX.COM... -
Page 12: Button Control
Š Adjust the knob in the clockwise direction to increase the sound volume. Š Š Adjust the knob in the counter-clockwise direction to decrease the sound volume. Š Š Press and hold the knob at least three seconds to mute the selected audio. Rotate the knob to unmute. Š 1.877.877.2269 BLACKBOX.COM... -
Page 13: Ir Remote Control
8. MIX input audio control: Mute, Volume Down and Volume Up. 9. HDMI output audio control: Mute, Volume Down and Volume Up. 10. HDBT output audio control: Mute, Volume Down and Volume Up. FIGURE 5-1. IR REMOTE CONTROL 1.877.877.2269 BLACKBOX.COM... -
Page 14: Gui Control
Type 192.168.0.178 in the internet browser, and you will see the log-in web page. FIGURE 6-1. LOGIN WEB PAGE 6.1 VIDEO SWITCHING Type the user name and password, and then click Login to enter the section for video switching. FIGURE 6-2. VIDEO SWITCHING PAGE 1.877.877.2269 BLACKBOX.COM... -
Page 15: Resolution Selection
Š HDBT OUTPUT: Select the HDBT output video resolution. Press AUTO to automatically select the best output resolution for the Š connected display. NOTE: If EDID communication fails, 1080p @ 60 Hz will be used as the default output resolution. 1.877.877.2269 BLACKBOX.COM... -
Page 16: Audio Control
Š HDMI Output: Select MIX input audio to mix with HDMI output audio, and then control the global output audio by the volume bar and Š the buttons. Š HDBT Output: Select MIX input audio to mix with HDBT output audio, and then control the global output audio by the volume bar Š and the buttons. 1.877.877.2269 BLACKBOX.COM... -
Page 17: Configuration
CHAPTER 6: GUI CONTROL TECHNICAL SUPPORT 1.877.877.2269 6.4 CONFIGURATION 6.4.1 POC SETTING FIGURE 6-5. CONFIGURATION TAB, POC Š Turn on or off PoC for HDBT output port. Š Š Turn on or off PoC for HDBT input port. Š 1.877.877.2269 BLACKBOX.COM... -
Page 18: Edid Management
LEAVE THE TECH TO US LIVE 24/7 CHAPTER 6: GUI CONTROL TECHNICAL SUPPORT 1.877.877.2269 6.4.2 EDID MANAGEMENT FIGURE 6-6. CONFIGURATION TAB, EDID Š Select the compatible built-in EDID for the selected input source. Š Š Upload a user-defined EDID. Š 1.877.877.2269 BLACKBOX.COM... -
Page 19: Relay Control
Š When the delay time is up, the NO connection opens, and the NC connection closes. Š Š When you click Latching, the NO connection closes, and the NC connection opens. Š Š When the delay time is up, the NO connection opens, and the NC connection closes. Š 1.877.877.2269 BLACKBOX.COM... -
Page 20: Cec Control
Š Select the input source you want to control, and then press the function button. Š 2. Display Control FIGURE 6-10. DISPLAY CONTROL PAGE Š Select the output display you want to control, and then press the function button. Š 1.877.877.2269 BLACKBOX.COM... - Page 21 Š Select the input source, and then type the CEC command in the Trigger 1 or Trigger 2 box to control the selected source. Š Š Select the output display, and then type the CEC command in the Trigger 1 or Trigger 2 box to control the selected display. Š 1.877.877.2269 BLACKBOX.COM...
-
Page 22: Tags Setting
LEAVE THE TECH TO US LIVE 24/7 CHAPTER 6: GUI CONTROL TECHNICAL SUPPORT 1.877.877.2269 6.6 TAGS SETTING FIGURE 6-13. TAGS SETTING PAGE Š INPUTS: Modify the label of the input sources. Š Š Preset: Modify the label of the presets. Š 1.877.877.2269 BLACKBOX.COM... -
Page 23: Rs-232 Control
(e.g., VX-HDB2-RX). The RS-232 port of the switcher can be used to transfer commands to control the third-party device that is connected to the HDBaseT receiver. Š Local Control: The RS-232 port of the switcher is used to connect a control device (e.g. PC) to control the switcher. Š 1.877.877.2269 BLACKBOX.COM... - Page 24 Š Command: Type the command in this textbox to control the third-party device. Š Š Trigger On: Type the Power On command in this box to turn on the third-party device. Š Š Trigger Off: Type the Power Off command in this box to turn off the third-party device. Š 1.877.877.2269 BLACKBOX.COM...
-
Page 25: Network Setting
SUPPORT 1.877.877.2269 6.8 NETWORK SETTING FIGURE 6-16. NETWORK SCREEN Š Static IP or Dynamic Host Configuration Protocol (DHCP). Š Š Modify the static IP Address, Subnet Mask, and Gateway. Š 6.9 PASSWORD SETTING FIGURE 6-17. PASSWORD SETTING SCREEN 1.877.877.2269 BLACKBOX.COM... -
Page 26: Gui Update
After that, click Administration at the source menu to get to Upgrade Firmware as shown below. FIGURE 6-18. UPLOAD PROGRAM Select the desired update file and press Apply. The program will start upgrading. 1.877.877.2269 BLACKBOX.COM... -
Page 27: Rs-232 Control
Double-click the software icon to run this software. Here we show an example using the software CommWatch.exe. The icon is shown next. FIGURE 7-1. COMMWATCH ICON The interface of the control software is shown next. FIGURE 7-2. CONTROL INTERFACE 1.877.877.2269 BLACKBOX.COM... -
Page 28: Rs-232 Communication Command
Power off the system. Turn off the HDBaseT power supply. PWOFF STANDBY. STANDBY System standby. Press any button to awake. /*Type; Report the system model. AVSC-HDMI2-8X2 /^Version; V1.0.0 Report the firmware version. /%Lock; Lock the front panel buttons. System Locked /%Unlock;... -
Page 29: Source Switching
Connect Y Y N N Report the connection status of all inputs. Y means the corresponding input port is %9971. connected to a source device, N means not. In 05 06 07 08 Connect N N N Y 1.877.877.2269 BLACKBOX.COM... -
Page 30: Preset Setting
%9941. Report the audio status. HDMI Mute. MIX Mute. Volume of HDBT: 9. %9942. Report the audio volume. Volume of HDMI: 30. Volume of MIX: 6. HDBT1 UnEmbedded %9943. Report the external audio status. HDMI2 Embedded HDMI3 Embedded 1.877.877.2269 BLACKBOX.COM... -
Page 31: Edid Management
TABLE 7-6. RELAY CONTROL COMMANDS COMMAND FUNCTION FEEDBACK EXAMPLE Turn on relay [X], X=1–2. RelayON[X]. Turn off relay [X], X=1–2. RelayOFF[X]. Set the auto stop time of relay [X] to Y seconds. X=1–2, Y=0–20. RelayAutomationCtl:[X],[Y]. Toggle relay [X], X=1–2. ToggleRelay[X]. 1.877.877.2269 BLACKBOX.COM... -
Page 32: Vga Output Image Adjustment
Set Local RS232 baudrate is 38400! Baudrate 57600. Set the RS-232 baud rate of switcher to 57600. Set Local RS232 baudrate is 57600! Baudrate 115200. Set the RS-232 baud rate of switcher to 115200. Set Local RS232 baudrate is 115200! 1.877.877.2269 BLACKBOX.COM... -
Page 33: Cec Control
CEC_IN_01_SEND_SUCCESS! CECI0102. CECI[port]02. DOWN. CEC_IN_01_SEND_SUCCESS! CECI0103. CECI[port]03. LEFT. CEC_IN_01_SEND_SUCCESS! CECI0104 CECI[port]04. RIGHT. CEC_IN_01_SEND_SUCCESS! CECI010A. CECI[port]0A. Enter main menu.. CEC_IN_01_SEND_SUCCESS! CECI010D. CECI[port]0D. Exit menu. CEC_IN_01_SEND_SUCCESS! CECI0141. CECI[port]41. Volume up. CEC_IN_01_SEND_SUCCESS!. CECI0142. CECI[port]42. Volume down. CEC_IN_01_SEND_SUCCESS!. CECI0143. CECI[port]43. Mute CEC_IN_01_SEND_SUCCESS! 1.877.877.2269 BLACKBOX.COM... - Page 34 Power on. CEC_IN_01_SEND_SUCCESS!. TABLE 7-11. CONTROL THE OUTPUT DISPLAY COMMAND DESCRIPTION EXAMPLE AND FEEDBACK CECO0141. CECO[port]41. Volume up. CEC_OUT_01_SEND_SUCCESS! CECO0142. CECO[port]42. Volume down. CEC_OUT_01_SEND_SUCCESS! CECO0143. CECO[port]43. Mute. CEC_OUT_01_SEND_SUCCESS! CECO016C. CECO[port]6C. Power off. CEC_OUT_01_SEND_SUCCESS! CECO016D. CEO[port]6D. Power on. CEC_OUT_01_SEND_SUCCESS! 1.877.877.2269 BLACKBOX.COM...
-
Page 35: Third-Party Device Control
• X: Represents the baud rate of the third-party device. “123456” to the third-party /+[X]/[Y]:xxx. 1. X=1, 2400 device. The baud rate is 2. X=2, 4800 9600. 3. X=3, 9600 4. X=4, 19200 5. X=5, 38400 6. X=6, 57600 7. X=7, 115200 1.877.877.2269 BLACKBOX.COM... -
Page 36: Osd Control
TECHNICAL SUPPORT 1.877.877.2269 The AVSC-HDMI2-8X2 switcher has a powerful OSD operation menu that contains 3 parts: optional settings, image settings, and system settings. There are two ways to enter OSD menu: 1. Press the MENU/2s button at least two seconds on the front panel. - Page 37 NEED HELP? LEAVE THE TECH TO US LIVE 24/7 CHAPTER 8: OSD CONTROL TECHNICAL SUPPORT 1.877.877.2269 FIGURE 8-2. SOUND MENU FIGURE 8-3. OPTION MENU 1.877.877.2269 BLACKBOX.COM...
- Page 38 NEED HELP? LEAVE THE TECH TO US LIVE 24/7 CHAPTER 8: OSD CONTROL TECHNICAL SUPPORT 1.877.877.2269 FIGURE 8-4. SYSTEM MENU FIGURE 8-5. INFO MENU 1.877.877.2269 BLACKBOX.COM...
-
Page 39: Dimensional Drawing
NEED HELP? LEAVE THE TECH TO US LIVE 24/7 CHAPTER 9: DIMENSIONAL DRAWING TECHNICAL SUPPORT 1.877.877.2269 436.4 mm FIGURE 9-1. DIMENSIONAL DIAGRAM 1.877.877.2269 BLACKBOX.COM... -
Page 40: Troubleshooting
2. Make sure the connection is good. 3. The switcher is broken. 3. Contact Black Box Technical Support at 877-877-2269 or info@blackbox.com Power indicator doesn’t work or does Failed connection of the power cord. Make sure the power cord connection is good. -
Page 41: Appendix A. Regulatory Information
Le présent appareil numérique n’émet pas de bruits radioélectriques dépassant les limites applicables aux appareils numériques de classe B prescrites dans le Règlement sur le brouillage radioélectrique publié par Industrie Canada. A.2 CE AND ROHS2 This product complies with CE and ROHS2 certifications. 1.877.877.2269 BLACKBOX.COM... -
Page 42: Nom Statement
B: Objectos han caído o líquido ha sido derramado dentro del aparato; o C: El aparato ha sido expuesto a la lluvia; o D: El aparato parece no operar normalmente o muestra un cambio en su desempeño; o E: El aparato ha sido tirado o su cubierta ha sido dañada. 1.877.877.2269 BLACKBOX.COM... -
Page 43: Appendix B. Disclaimer/Trademarks
B.2 TRADEMARKS USED IN THIS MANUAL Black Box and the Black Box logo type and mark are registered trademarks of Black Box Corporation. Any other trademarks mentioned in this manual are acknowledged to be the property of the trademark owners. 1.877.877.2269 BLACKBOX.COM... - Page 44 NEED HELP? LEAVE THE TECH TO US LIVE 24/7 TECHNICAL SUPPORT 1.877.877.2269 © COPYRIGHT 2018. BLACK BOX CORPORATION. ALL RIGHTS RESERVED. AVSC-HDMI2-8X2_USER_REV1.PDF...
Need help?
Do you have a question about the AVSC-HDMI2-8X2 and is the answer not in the manual?
Questions and answers