Table of Contents
Advertisement
Available languages
Available languages
Betriebsanleitung
Betriebsanleitung .................................................... Seite 1 - 24
Operating manual .................................................. page 25 - 48
Monofunktions-Simulator Baureihe EC
Typ EC mAV 2
Bewahren Sie diese Betriebsanleitung zum Nachschlagen auf.
Geben Sie diese Betriebsanleitung bei der Veräußerung des Gerätes mit.
(Original)
Advertisement
Chapters
Table of Contents

Subscribe to Our Youtube Channel
Related Manuals for SIKA EC mAV 2


Summary of Contents for SIKA EC mAV 2
- Page 1 Betriebsanleitung (Original) Betriebsanleitung ............ Seite 1 - 24 Operating manual ..........page 25 - 48 Monofunktions-Simulator Baureihe EC Typ EC mAV 2 Bewahren Sie diese Betriebsanleitung zum Nachschlagen auf. Geben Sie diese Betriebsanleitung bei der Veräußerung des Gerätes mit.
-
Page 2: Table Of Contents
Haftungsausschluss ....................4 Sicherheitshinweise ...................... 5 Übersicht und Funktionen ..................... 6 Beschreibung des Displays ..................6 Batteriewechsel / Ein- und Ausschalten EC mAV 2 ............. 7 Ausgang EC mAV 2 ......................8 Ausgangskenndaten ....................8 Stromausgang ......................9 Stromausgang in 25 % Schritten ................9 Stromausgang für Nullpunkt &... -
Page 3: Hinweise Zur Betriebsanleitung
EC mAV 2 Hinweise zur Betriebsanleitung Hinweise zur Betriebsanleitung • Die Betriebsanleitung richtet sich an Facharbeiter und angelernte Arbeitskräfte. • Lesen Sie vor jedem Arbeitsschritt die dazugehörigen Hinweise sorgfältig durch und halten Sie die vorgegebene Reihenfolge ein. • Lesen Sie den Abschnitt „Sicherheitshinweise“ besonders aufmerksam durch. -
Page 4: Gerätebeschreibung
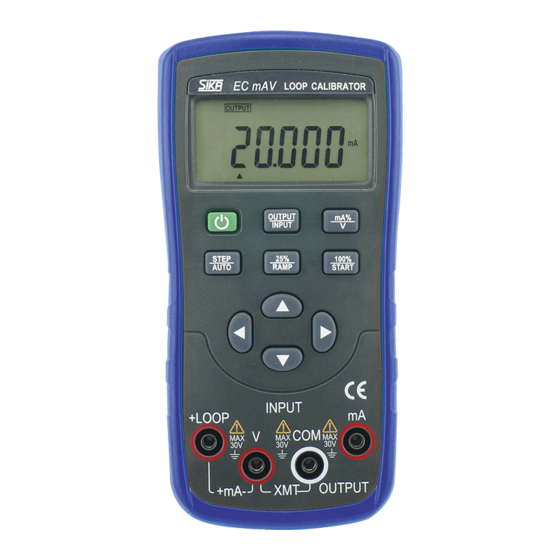
EC mAV 2 Gerätebeschreibung Der EC mAV 2 ist ein tragbarer Monofunktions-Simulator, der für die Kalibrierung und War- tung geeignet ist und entweder vor Ort oder im Labor eingesetzt werden kann. Er kann Gleichstrom und Gleichspannung messen sowie Gleichstrom generieren. Außerdem bietet er die Funktion, lineare Treppen und Rampen zu generieren. -
Page 5: Sicherheitshinweise
Werden die darin enthaltenen Anweisungen, insbesondere die Sicherheitshinweise nicht beachtet, können Gefahren für Mensch, Umwelt, Gerät und Anlage die Folge sein. Der EC mAV 2 entspricht dem aktuellen Stand der Technik. Dies betrifft die Genauigkeit, die Funktionsweise und den sicheren Betrieb des Gerätes. -
Page 6: Übersicht Und Funktionen
Kalibrierung ist aktiv; Nullpunkt oder Messbereichsendpunkt befindet sich in der Kalibrierung. Batterie ist schwach und muss ersetzt werden. ▲ Ausgangsziffern müssen eingestellt werden. V, mA, % Aktueller Ausgangs- oder Eingangswert (Maßeinheit). High / Low Speed Auto Ramp, Auto-Step-Ramp - 6 - © SIKA • Ba_ECmAV2 • 03/2015... -
Page 7: Batteriewechsel / Ein- Und Ausschalten Ec Mav 2
EC mAV 2 Batteriewechsel / Ein- und Ausschalten EC mAV 2 Batteriewechsel / Ein- und Ausschalten EC mAV 2 Wenn das Symbol auf dem Display erscheint, müssen die Batterien ausgetauscht wer- den. Dieses Gerät wird mit zwei AA-Batterien (LR6) betrieben. -
Page 8: Ausgang Ec Mav 2
Legen Sie keine Spannung an den Ausgangsanschluss während des Betriebs an. 5.1 Ausgangskenndaten Arbeitsbereich % Betrieb Anzeige Einstellbereich I = 0…20 mA DC 00,000 mA 00,000…22,000 mA ↨ mA % -0,25.00 mA% -025.00…112,50 mA% - 8 - © SIKA • Ba_ECmAV2 • 03/2015... -
Page 9: Stromausgang
Halten Sie die Taste gedrückt und der Wert verändert sich. 5.3 Stromausgang in 25 % Schritten 1. Verbinden Sie die Messleitungen mit dem EC mAV 2 wie in § 5.2 beschrieben. 2. Drücken Sie die OUTPUT/INPUT Taste und OUTPUT erscheint auf dem Display. -
Page 10: Stromausgang Für Nullpunkt & Endwert
EC mAV 2 5.4 Stromausgang für Nullpunkt & Endwert 1. Verbinden Sie die Messleitungen mit dem EC mAV 2 wie in § 5.2 beschrieben. 2. Drücken Sie die OUTPUT/INPUT Taste und OUTPUT erscheint auf dem Display. Der Ausgang des Simulators ist aktiv. -
Page 11: Simulation Eines Transmitter-Ausgangs (Xmt)
EC mAV 2 Ausgang EC mAV 2 5.6 Simulation eines Transmitter-Ausgangs (XMT) Stecken Sie ein Ende der Messleitung an die XMT-Ausgangsbuchse des EC mAV 2 und das andere Ende an die Eingangsbuchse des Gerätes wie in Abbildung 5-2 gezeigt: Abbildung 5-2 Die Bedienung ist dieselbe wie in §... -
Page 12: Messfunktion
6.1 Eingangskenndaten Arbeitsbereich % Betrieb Anzeige Messbereich I = 0…20 mA DC 00,000 mA -1,000…22,000 mA ↨ mA % -0,25.00 mA% -31,25…112,50 mA% U = 0…28 VDC 0,000 V -0,2000…28,000 V - 12 - © SIKA • Ba_ECmAV2 • 03/2015... -
Page 13: Gleichstrom Messen
EC mAV 2 Messfunktion 6.2 Gleichstrom messen 1. Stecken Sie ein Ende der Messleitung in die mA-Eingangsbuchse (INPUT) des EC mAV 2 und das andere Ende in den Ausgang des Gerätes wie in Abbildung 6-1 gezeigt: Abbildung 6-1 2. Drücken Sie die OUTPUT / INPUT Taste, wenn INPUT auf dem Display erscheint. -
Page 14: Gleichspannung Messen
Messfunktion EC mAV 2 6.3 Gleichspannung messen 1. Stecken Sie ein Ende der Messleitung in die V-Eingangsbuchse (INPUT) des EC mAV 2 und das andere Ende in den Ausgang des Gerätes wie in Abbildung 6-2 gezeigt: Abbildung 6-2 2. Drücken Sie die OUTPUT / INPUT Taste und INPUT erscheint auf dem Display. -
Page 15: Wartung Und Reinigung
EC mAV 2 Wartung und Reinigung Wartung und Reinigung Der Monofunktions-Simulator Typ EC mAV 2 ist wartungsfrei und kann auch nicht vom An- wender repariert werden. Bei einem Defekt muss das Gerät ausgetauscht oder zur Repara- tur an den Hersteller zurückgeschickt werden. -
Page 16: Rekalibrierung
Jegliche Fehlbedienung führt zu möglichen Schäden an den internen Schaltkreisen. Verhindern Sie Kurzschlüsse und legen Sie niemals mehr als die höchstzulässige Spannung an den Ausgang des Gerätes oder ein anderes angeschlossenes Gerät an. 7.3.1 Auswahl der Standardausrüstung EC mAV 2 (wird kalibriert) Referenz Bereich Genauigkeit... -
Page 17: Rekalibrierung Des Ausgangs
2. Drücken Sie die OUTPUT / INPUT Taste, um die Ausgangsfunktion auszuwählen und OUTPUT, mA erscheinen auf dem Display. 3. Schließen Sie den EC mAV 2 an die Geräte wie in Abbildung 7-2 gezeigt an: Abbildung 7-2 4. Stellen Sie das digitale Messgerät auf einen geeigneten Bereich ein. -
Page 18: Rekalibrierung Des Eingangs
2. Drücken Sie die OUTPUT / INPUT Taste, um die Messfunktion auszuwählen und INPUT, mA erscheinen auf dem Display. 3. Schließen Sie den EC mAV 2 an das Gerät wie in Abbildung 7-3 gezeigt an: Abbildung 7-3 4. Stellen Sie die Quelle (Standard Source) auf einen geeigneten Bereich ein. -
Page 19: Spannungsmessung Kalibrieren
1. Drücken Sie die mA % / V Taste, um die Spannungsmessfunktion auszuwählen und INPUT, CAL 0, V erscheinen auf dem Display. 2. Schließen Sie den EC mAV 2 an das Gerät in Abbildung gezeigt 7-4 an. Abbildung 7-4 ... -
Page 20: Außerbetriebnahme Und Entsorgung
Beachten Sie die gesetzlichen Regelungen des Landes, in dem das Gerät vertrieben wurde. KEIN HAUSMÜLL! Der EC mAV 2 besteht aus unterschiedlichen Werkstoffen. Er darf nicht zusammen mit Hausmüll entsorgt werden. Führen Sie den EC mAV 2 der lokalen Wiederver-... -
Page 21: Technische Daten
Bei kundenspezifischen Ausführungen können technische Daten gegenüber den Angaben dieser Anleitung abweichen. Bitte beachten Sie die Angaben auf dem Typenschild. Anwendbar auf einen Temperaturbereich von 18 °C bis 28 °C innerhalb eines Jahres nach der Kalibrierung. 9.1 Kenndaten EC mAV 2 Kenndaten EC mAV 2 Ausgang... - Page 22 ≤80 % rH Lagertemperatur -10…50 °C Relative Luftfeuchtigkeit ≤90 % rH (Lagerung) Temperaturkoeffizient 0,1× (gekennzeichnete Genauigkeit)%/°C(5 °C~18 °C, 28 °C ~40 °C) Abmessungen (LxBxH) 180×90×47 mm (mit Holster) Gewicht 500 g (mit Holster) - 22 - © SIKA • Ba_ECmAV2 • 03/2015...
- Page 23 EC mAV 2 Technische Daten Für Ihre Notizen Technische Änderungen vorbehalten - 23 -...
- Page 24 Mechanische Messtechnik Mechanical measuring instruments Durchflussmesstechnik Flow measuring instruments Elektronische Mess- & Kalibriertechnik Electronic measuring- & calibration instruments SIKA Dr. Siebert & Kühn GmbH & Co. KG Struthweg 7–9 D-34260 Kaufungen Germany +49 (0)5605 803-0 +49 (0)5605 803-54 info@sika.net...
-
Page 25: Operating Manual
Betriebsanleitung ............ Seite 1 - 24 Operating manual ..........page 25 - 48 Monofunction simulator series EC Type EC mAV 2 Please keep this operating manual for future reference. If the device is resold, please provide the operating manual along with it. -
Page 26: Operating Manual
Exclusion of liability ....................28 Safety instructions ....................... 29 Overview and Functions ....................30 Display description ....................30 Battery replacement and power-on/off EC mAV 2 ............. 31 Output from EC mAV 2 ....................32 Output Operation Procedure ..................32 Current output ......................33 25 % Step Current Output .................. -
Page 27: About This Operating Manual
EC mAV 2 About this operating manual About this operating manual • The operating manual is aimed at specialists and semi-skilled personnel. • Before each step, read through the relevant advice carefully and keep to the specified order. • Thoroughly read and understand the information in the section “Safety instructions”. -
Page 28: Device Description
EC mAV 2 Device description The EC mAV 2 is a hand-held monofunction simulator which is intended for calibration and maintenance and can be used either on site or in the laboratory. It can measure direct cur- rent and DC voltage as well as generate direct current. Furthermore, it offers the function to generate linear steps and ramps. -
Page 29: Safety Instructions
Safety instructions Safety instructions Before you install the EC mAV 2, read through this operating manual carefully. If the in- structions contained within it are not followed, in particular the safety guidelines, this could result in danger for people, the environment, and the device and the system it is connected to. -
Page 30: Overview And Functions
Battery power is low and needs to be replaced. ▲ Output digits need to be set. V, mA, % Present output or input value (unit of measure). High and low-speed auto-ramp, auto-step ramp. - 30 - © SIKA • Ba_ECmAV2 • 03/2015... -
Page 31: Battery Replacement And Power-On/Off Ec Mav 2
EC mAV 2 Battery replacement and power-on/off EC mAV 2 Battery replacement and power-on/off EC mAV 2 When the symbol appears on the display, the batteries need to be replaced. This device is powered by two AA batteries (LR6). CAUTION! Electric current! To avoid electrical shock or personal injury: ... -
Page 32: Output From Ec Mav 2
Output from EC mAV 2 EC mAV 2 Power on: Press the power button to turn on the device. When the device is turned on, it starts to make self-diagnosis internally and the full screen is in display. After this, appropriate operation should be carried out. -
Page 33: Current Output
5.2 Current output 1. Insert one end of the test leads into the +mA output jack (OUTPUT) of the EC mAV 2 and connect the other end to the input of the user's instrument, as shown in figure 5-1: Figure 5-1 ... -
Page 34: Current Output Set For Zero Point & Full Scale
EC mAV 2 5.4 Current Output Set for Zero Point & Full Scale 1. Connect the test leads to the EC mAV 2 as stated in § 5.2. 2. Press the OUTPUT/INPUT button and OUTPUT appears on the display. -
Page 35: Simulating Transmitter Output (Xmt)
5.6 Simulating Transmitter Output (XMT) Insert one end of the test lead to the ‘XMT’ output jack of the EC mAV 2 and connect the other end to the input terminal of the user’s device as shown in the Figure 5-2: Figure 5-2 The operation is the same as described in §... -
Page 36: Instrument Measurement
Function operation % operation Display Measuring range I = 0…20 mA DC 00.000 mA -1.000…22.000 mA ↨ mA % -0.25.00 mA% -31.25…112.50 mA% U = 0…28 VDC 0.000 V -0.2000…28.000 V - 36 - © SIKA • Ba_ECmAV2 • 03/2015... -
Page 37: Measuring Direct Current
6.2 Measuring Direct Current 1. Insert one end of the test lead into the mA input jack (INPUT) of the EC mAV 2 and con- nect the other end of the output of the user’s device as shown in Figure 6-1: Figure 6-1 ... -
Page 38: Measuring Dc Voltage
6.3 Measuring DC Voltage 1. Insert one end of the test lead into the V input jack (INPUT) of the EC mAV 2 and connect the other end to the output of the user’s device as shown in Figure 6-2: Figure 6-2 ... -
Page 39: Maintenance And Cleaning
If the device will not be used for longer periods, the batteries should be removed from the device to preclude any leaking damage. 7.1 Cleaning Clean the EC mAV 2 with a dry or slightly damp lint-free cloth. Do not use sharp objects or aggressive agents for cleaning. IMPORTANT! Clean the terminals! Dirt or moisture in the terminals can affect readings: ... -
Page 40: Recalibration
Any mal-operation will cause possible damage to their internal circuits. Avoid short circuit and never apply more than the max. permitted voltage to the out- put of the device or to a co-working standard device. 7.3.1 Selecting Standard Equipment EC mAV 2 (to be calibrated) Range Accuracy Reference... -
Page 41: Output Recalibration
1. In power-off state, press simultaneously the OUTPUT /INPUT and the power button to turn on the device. The EC mAV 2 enters into the calibration mode, and the symbols CAL 0 appear on the display. 2. Press the OUTPUT / INPUT button to select the output function and OUTPUT, mA will appear on the display. -
Page 42: Input Calibration
1. In power-off state, press simultaneously the OUTPUT / INPUT and power button to pow- er on. The EC mAV 2 enters into the calibration mode, CAL 0 will appear on the display. 2. Press the OUTPUT / INPUT button to select the measurement function, and INPUT, mA will appear on the display. -
Page 43: Voltage Measurement Calibration
1. Press the mA % / V button to select the voltage measurement function, and INPUT, CAL 0, V will appear on the display. 2. Connect the EC mAV 2 to the equipment as shown in Figure 7-4. Figure 7-4 ... -
Page 44: Decommissioning And Disposal
Observe the legal regulations of the country in which the device is marketed. NO HOUSEHOLD WASTE! The EC mAV 2 consists of various different materials. It must not be disposed of with household waste. Take the EC mAV 2 to your local recycling plant send the EC mAV 2 back to your supplier or to SIKA. -
Page 45: Technical Data
The technical data of customised versions may differ from the data in these instructions. Please observe the information specified on the type plate. Applicable to a temperature range from 18 °C to 28 °C, within one year after calibration. 9.1 Characteristics EC mAV 2 Characteristics EC mAV 2... - Page 46 Storage temperature -10…50 °C Storage relative humidity ≤90 % rH 0.1× (designated accuracy)%/°C(5 °C~18 °C, 28 °C~40 °C) Temperature co-efficiency Dimensions (LxWxD) 180×90×47 mm (with holster) Weight 500 g (with holster) - 46 - © SIKA • Ba_ECmAV2 • 03/2015...
- Page 47 EC mAV 2 Technical data For your notes Technical changes reserved - 47 -...
- Page 48 Mechanische Messtechnik Mechanical measuring instruments Durchflussmesstechnik Flow measuring instruments Elektronische Mess- & Kalibriertechnik Electronic measuring- & calibration instruments SIKA Dr. Siebert & Kühn GmbH & Co. KG Struthweg 7–9 D-34260 Kaufungen Germany +49 (0)5605 803-0 +49 (0)5605 803-54 info@sika.net...
Need help?
Do you have a question about the EC mAV 2 and is the answer not in the manual?
Questions and answers