Table of Contents
Advertisement
Quick Links
Advertisement
Table of Contents

Related Manuals for Stoelting SO212


Summary of Contents for Stoelting SO212
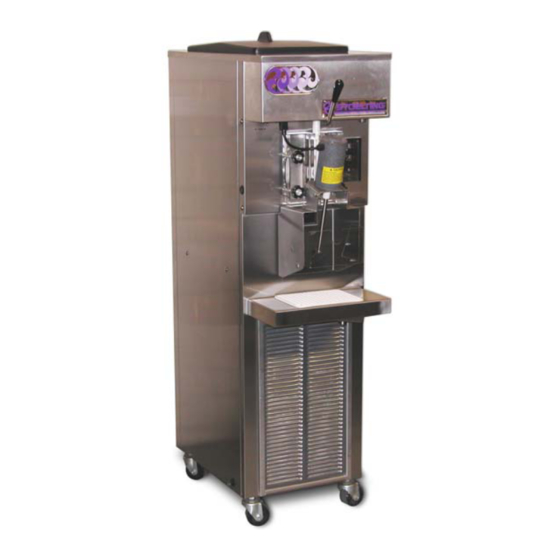
- Page 1 Model SO212 OPERATORS MANUAL Rev.2 Manual No. 513610...
- Page 3 DO NOT ATTEMPT to operate the machine until instructions and safety precautions in this manual are read completely and are thoroughly understood. If problems develop or questions arise in connection with installation, operation, or servicing of the machine, contact Stoelting. Stoelting Foodservice Equipment Customer Service: 888.429.5920...
- Page 4 CAUTION If you need to replace a part, use genuine Stoelting The signal word “CAUTION” indicates a potentially parts with the correct part number or an equivalent hazardous situation, which, if not avoided, may result part.
-
Page 5: Table Of Contents
TABLE OF CONTENTS SECTION DESCRIPTION PAGE 1. INTRODUCTION 1.1 Description......................1.2 Specifications ......................2. INSTALLATION INSTRUCTIONS 2.1 Safety Precautions ....................2.2 Shipment and Transit....................2.3 Freezer Installation ....................2.4 Installing Permanent Wiring ..................3. INITIAL SET-UP AND OPERATION 3.1 Operator's Safety Precautions ................3.2 Operating Controls and Indicators................ - Page 6 LIST OF ILLUSTRATIONS FIGURE TITLE PAGE Model SO212 Freezer .................... 1 Specifications ......................1 Warning Label Locations ..................3 Leveling ......................... 4 Space and Ventilation Requirements ..............4 Electrical Plug ....................... 4 Power Cord Connection ..................5 Controls ......................... 7 Mix Inlet Regulator ....................
-
Page 7: Description
SECTION 1 DESCRIPTION AND SPECIFICATIONS 1.1 DESCRIPTION The Stoelting SO212 floor model freezer is gravity fed. The freezer is equipped with fully automatic controls to provide a uniform product. The freezer is designed to operate with almost any type of commercial shake mix available. -
Page 8: Specifications
MODEL SO212 FLOOR MODEL GRAVITY SHAKE FREEZER 1.2 SPECIFICATIONS DIMENSIONS: Freezer: 17.6" (45cm) wide x 28.6" (73cm) deep x 63.75" (162cm) high Crated: 19.5" (50cm) wide x 33" (84cm) deep x 40" (102cm) high WEIGHT: Freezer: 332 lbs. (150kg) Crated: 427 lbs. -
Page 9: Installation Instructions
Take notice of all warning labels on the freezer. The labels STOELTING, INC. have been put there to help maintain a safe working ATTENTION: Customer Service environment. -
Page 10: Shipment And Transit
10 days and request inspection. The customer must place claim for damages and/or shortages in shipment with the carrier. Stoelting, Inc. cannot make Figure 2-3 Space and Ventilation Requirements any claims against the carrier. -
Page 11: Installing Permanent Wiring
2.4 INSTALLING PERMANENT WIRING If permanent wiring is required by local codes, the follow- ing procedure must be performed. WARNING Disconnect freezer from the source of electrical supply before servicing. Remove the left side panel and electrical box cover. Disconnect the wires from the terminal block. Disconnect the green ground wire from the grounding stud. -
Page 13: Initial Setup And Operation
SECTION 3 INITIAL SETUP AND OPERATION OPERATOR’S SAFETY PRECAUTIONS Do not operate under unsafe operating conditions. Never operate the freezer if unusual or excessive Safe operation is no accident; observe these rules: noise or vibration occurs. Know the freezer. Read and understand the operating instructions. -
Page 14: Sanitizing
SPIGOT SWITCH NOTE The spigot switch will automatically activate the If the red light next to the PUSH TO FREEZE but- auger drive and refrigeration systems when the ton is illuminated, press the PUSH TO FREEZE but- spigot is opened to dispense product (pulled ton and wait until the green light illuminates before straight downwards). -
Page 15: Freeze Down And Operation
5 minutes. Any sanitizer must be used only in accordance with the manufacturer’s instructions. NOTE Stoelting has found that Stera-Sheen Green Label does an effective job of properly sanitizing a shake freezer. We therefore include a sample with each new freezer. Other products may be as effective. -
Page 16: Mix Information
Fill hopper with approximately 5 gallons (19 liters) For normal dispensing, pull the spigot handle of pre-chilled (40°F or 4°C) mix. down. (Fig. 3-4). Push the spigot handle to the right to activate the blender. The blender will operate during dispensing or when the spigot CAUTION handle is closed. -
Page 17: Cleaning The Freezer
Place the Power OFF-ON switch in the ON position Remove the clear plastic swing shield from the and push the CLEAN button to rotate the auger. blender assembly and clean it (Refer to Section Allow the mix to agitate in freezer barrel until the 3.9 - Cleaning the Freezer Parts). -
Page 18: Cleaning The Freezer Parts
Push the spigot body through the bottom of the CLEANING THE FREEZER PARTS front door and remove. Place all loose parts in a pan or container and take to the Remove the front auger support and bushing (Fig. wash sink for cleaning. To clean freezer parts refer to the 3-6). -
Page 19: Assembly Of Freezer
Using this sanitizing solution and the large barrel Rotate the auger until the auger engages the drive brush provided, sanitize the rear of the barrel by shaft. dipping the brush in the sanitizing solution and Install the auger support bushing into the front of brushing the rear of the barrel. - Page 20 Once milkstone has formed, it is very difficult to remove. MILKSTONE REMOVAL – Since almost all Without using the correct product and procedure, it is cleaners do not have the ability to remove nearly impossible to remove a thick layer of milkstone. milkstone, the use of a delimer becomes (NOTE: general purpose cleaners DO NOT remove necessary.
-
Page 21: Preventive Maintenance
THE USE OF CHLORINE TEST STRIPS MONTHLY “Test strips” are used to determine concentrations of active chlorine in sanitizing solutions. To use the strips, CAUTION tear off a small portion and submerge it into the sanitizing The freezer has an air cooled condenser and must solution. -
Page 23: Troubleshooting
SECTION 4 TROUBLESHOOTING PROBLEM POSSIBLE CAUSE REMEDY Freezer does not 1. Power to freezer is off. 1. Supply power to freezer. run. 2. Fuse or circuit if blown or tripped. 2. Replace or reset. 3. Freeze-up (auger will not turn). 3. - Page 24 PROBLEM POSSIBLE CAUSE REMEDY Drive belt slipping or 1. Worn drive belt. 1. Call distributor for service. squealing. 2. Freeze-up (Auger will not turn). 2. Turn Power OFF-ON switch to the OFF position for 15 minutes, then restart. Low overrun. 1.
-
Page 25: Reference Drawings
Decal - Caution Rotating Blades 324200 Decal - High Pressure Cut-Out 324208 Decal - Attention Refrigerant Leak Check 324393 Decal - Stoelting Swirl Logo (Drip Tray Support) 324509 Decal - Cleaning Instructions 324566 Decal - Wired According To 324584 Decal - Adequate Ventilation 3"... - Page 26 AUGER SHAFTS AND FRONT DOOR PARTS 624678 2187941 666786 3177738 624614 2183751 2187907 625314 336530-SV 482019 Part Number Description Quantity 149002 Bushing - Front Auger Support (Ser. #0 - #28937) 162155 Scraper Blade (Ser. #0 - #28937) 482019 Knob - Front Door (Black) 336530-SV Door w/Pins 624614-5...
- Page 27 BLENDER PARTS AND DRIP TRAY 314466 624607 1177740 274031 521026 674174 417009 681518 744266 Part Number Description Quantity 314466 Cover - Hopper 417009 Grid - Drip Tray (White Honeycomb) 521026 Blender Agitator 624607-5 O-Ring - Mix Inlet - Black (5 Pack) 674174 Blender Shaft 681518...
- Page 29 Stoelting’s sole obligations, and Buyer’s sole remedies, for any breach of this warranty shall be, at Stoelting’s option, one of the following: repair or replacement of the affected component at Stoelting’s plant in Kiel, Wisconsin, or refund of the purchase price of the affected Equipment. Stoelting, through an Authorized Stoelting Provider, will deinstall/reinstall the affected component from/into the equipment (“Labor”) for the period listed below in the Warranty...
- Page 30 Costs not covered by the Stoelting Travel Pay policy. Stoelting covers only the first trip travel which is a flat rate by mileage one- way from the service company’s home location to the job site. The flat rate is calculated as follows:...
Need help?
Do you have a question about the SO212 and is the answer not in the manual?
Questions and answers