
Related Manuals for CHIEF CMA348


Summary of Contents for CHIEF CMA348
- Page 1 I N S T A L L A T I O N I N S T R U C T I O N S XL Vibration Dampener Accessory Spanish Product Description German Product Description Portuguese Product Description Italian Product Description Dutch Product Description French Product Description CMA348...
-
Page 2: Important Safety Instructions
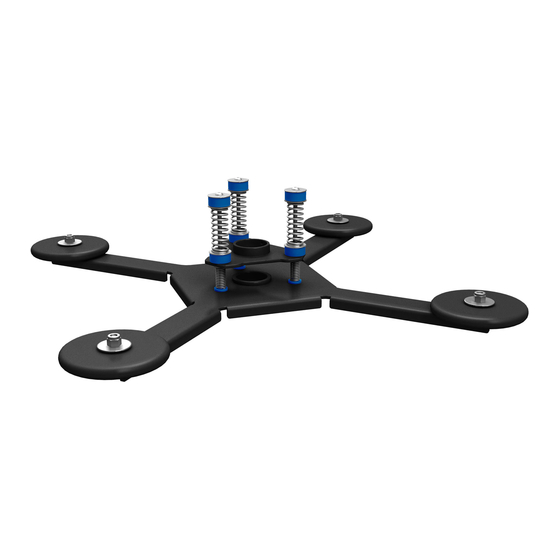
(not included). have a component attached or setting on it. NOTE: The CMA348 will fit within a 2’ x 2’ ceiling tile. COMPONENT: A COMPONENT is an audiovisual item designed to be attached or resting on an accessory or mounting... - Page 3 Installation Instructions CMA348 DIMENSIONS DIMENSIONS: INCHES [MILLIMETERS] LEGEND Tighten Fastener Open-Ended Wrench Apretar elemento de fijación Llave de boca Befestigungsteil festziehen Gabelschlüssel Apertar fixador Chave de bocas Serrare il fissaggio Chiave a punte aperte Bevestiging vastdraaien Steeksleutel Serrez les fixations Clé...
-
Page 4: Tools Required For Installation
CMA348 Installation Instructions TOOLS REQUIRED FOR INSTALLATION 7/16" 3/32" (included) PARTS B (1) 3/32" A (1) [CMA348] C (2) 10-24 x 1/4"... -
Page 5: Preparing For Installation
NOTE: In order to optimize the CMA348 vibration dampening, column keep the CMA348 as close as possible to the projector by minimizing the length of the lower extension column. NOTE: For optimal CMA348 performance, the projector system’s center of gravity should be centered on the upper mounting column. - Page 6 Tighten nut at bottom of each of the three springs two full turns while holding bolt at top of each spring. Be sure this is done in a uniform manner. (See Figure 2) Hold while tightening nuts at bottom of springs [Viewed from below CMA348] Figure 2...
- Page 7 Installation Instructions CMA348...
- Page 8 Europe A Franklinstraat 14, 6003 DK Weert, Netherlands P +31 (0) 495 580 852 F +31 (0) 495 580 845 Chief, a products division of Asia Pacific A Office No. 918 on 9/F, Shatin Galleria Milestone AV Technologies 18-24 Shan Mei Street...
Need help?
Do you have a question about the CMA348 and is the answer not in the manual?
Questions and answers