Advertisement
Quick Links
I N S T A L L A T I O N I N S T R U C T I O N S
Instrucciones de instalación
Installationsanleitung
Instruções de Instalação
RPA Elite Series Projector Mounts
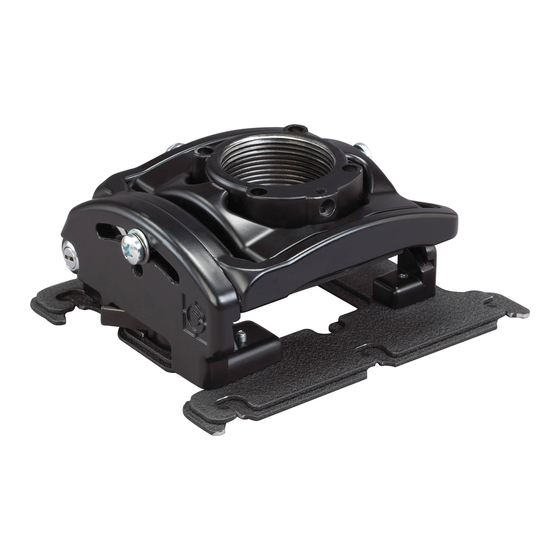
RPMA/RPMB/RPMC Series
Istruzioni di installazione
Installatie-instructies
Instructions d´installation
Spanish Product Description
German Product Description
Portuguese Product Description
Italian Product Description
Dutch Product Description
French Product Description
Advertisement

Subscribe to Our Youtube Channel
Related Manuals for CHIEF RPA Elite Series


Summary of Contents for CHIEF RPA Elite Series
- Page 1 I N S T A L L A T I O N I N S T R U C T I O N S Instrucciones de instalación Istruzioni di installazione Installationsanleitung Installatie-instructies Instruções de Instalação Instructions d´installation RPA Elite Series Projector Mounts Spanish Product Description German Product Description Portuguese Product Description Italian Product Description Dutch Product Description French Product Description...
-
Page 2: Important Safety Instructions
AN ACCESSORY is the secondary Chief IMPORTANT ! : The RPMX mounting system is designed to product which is attached to a primary Chief product, and may have a component attached or setting on it. • mounted to a 1-1/2" NPT or NPSM following ANSI/ ASME B1.20.1 (Schedule 40, 0.154"... -
Page 3: Tools Required For Installation
Installation Instructions RPMA/RPMB/RPMC Series DIMENSIONS DIMENSIONS: INCHES 6.50 4.50 5.50 1.50" DIA NPT 5.50 YAW ADJUSTMENT POINT 20 PITCH ADJUSTMENT POINT 20 5.40 SECURITY LOCK 2.79 ROLL ADJUSTMENT SECURITY SWITCH POINT 3 TOOLS REQUIRED FOR INSTALLATION 3/32" (2.4mm) dia. (wood) 1/4"... - Page 4 RPMA/RPMB/RPMC Series Installation Instructions LEGEND Pencil Mark Tighten Fastener Marquage au crayon Serrez les fixations Segno a matita Serrare il fissaggio Stiftmarkierung Befestigungsteil festziehen Marcar con lápiz Apretar elemento de fijación Potloodmerkteken Bevestiging vastdraaien Marcar com lápis Apertar fixador Drill Hole Loosen Fastener Percez un trou Desserrez les fixations...
- Page 5 Installation Instructions RPMA/RPMB/RPMC Series PREPARATION Locate Mounting Site (not included) Threaded WARNING: IMPROPER INSTALLATION MAY LEAD TO extension PROJECTOR MOUNT FALLING CAUSING SEVERE column PERSONAL INJURY OR DAMAGE TO EQUIPMENT! It is (not included) the installers responsibility to make certain the structure to which the projector mount is being mounted is capable of supporting five times the weight of the projector mount and all attached equipment.
- Page 6 RPMA/RPMB/RPMC Series Installation Instructions Installing to Wood Framework (Joists) Using the RPMX as a guide, mark four mounting hole locations. (See Figure 3) Drill four 3/32" (2.4mm) dia. pilot holes to a depth of 1-3/4" (45mm) deep. Ø 2.4mm Pilot (Ø...
-
Page 7: Projector Installation
Proceed to Installing Projector with Interface Bracket section. PROJECTOR INSTALLATION Figure 6 IMPORTANT ! : Model RPMX uses optional Chief "SLM" Series interface brackets. See Parts drawing. Installing to Threaded Rod Attach projector to interface bracket (B) using installation NOTE:... - Page 8 RPMA/RPMB/RPMC Series Installation Instructions YAW Adjustment (Rotation) Loosen YAW adjustment locking screw using a #2 Phillips WARNING: IMPROPER INSTALLATION CAN LEAD TO screwdriver. (See Figure 9) PROJECTOR FALLING RESULTING IN SERIOUS PERSONAL INJURY OR DAMAGE TO EQUIPMENT. Make Turn YAW micro-adjustment screw right or left using a #2 Phillips screwdriver until image is properly aligned on target.
- Page 9 Installation Instructions RPMA/RPMB/RPMC Series Roll Adjustment (Horizontal Tilt) Loosen ROLL adjustment locking screw using a #2 Phillips screwdriver. (See Figure 11) Turn ROLL micro-adjustment screw right or left using a #2 Phillips screwdriver until image is properly aligned on target. Tighten ROLL adjustment locking screw using a #2 Phillips screwdriver.
- Page 10 RPMA/RPMB/RPMC Series Installation Instructions...
- Page 11 Installation Instructions RPMA/RPMB/RPMC Series...
- Page 12 Europe A Franklinstraat 14, 6003 DK Weert, Netherlands P +31 (0) 495 580 852 F +31 (0) 495 580 845 Chief, a products division of Asia Pacific A Office No. 918 on 9/F, Shatin Galleria Milestone AV Technologies 18-24 Shan Mei Street...
Need help?
Do you have a question about the RPA Elite Series and is the answer not in the manual?
Questions and answers