Aeotec Water Sensor 6 User Manual
Z-wave water and flood sensor
Hide thumbs
Also See for Water Sensor 6:
- Manual (27 pages) ,
- User manual (13 pages) ,
- User manual (13 pages)
Table of Contents
Advertisement
Quick Links
11/21/2017
Water Sensor 6 user guide.
Modified on: Thu, 2 Nov, 2017 at 3:05 PM
Aeotec Water Sensor 6.
Aeotec
Water Sensor 6
prevent floods and water leaks using Z-Wave Plus
(http://aeotec.com/z-wave-gen5)
To see whether Water Sensor 6 is known to be compatible with your Z-Wave system or not, please reference our Z-Wave
gateway comparison
(http://aeotec.com/z-wave-gateways)
(https://aeotec.freshdesk.com/solution/articles/6000176513-water-sensor-6-technical-specification-)
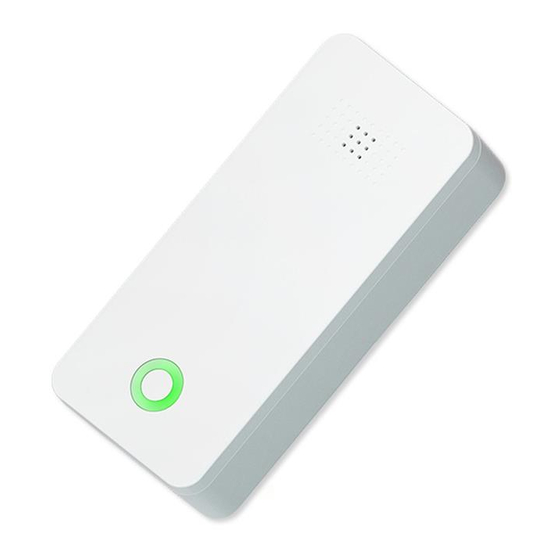
Familiarize yourself with your Water Sensor 6.
Water Sensor 6 has the following elements;
https://aeotec.freshdesk.com/support/solutions/articles/6000171886-water-sensor-6-user-guide-
Water Sensor 6 user guide. : Aeotec by Aeon Labs
(https://aeotec.com/z-wave-water-sensor)
technology.
has been crafted as a safety sensor to help detect and
(http://aeotec.com/z-wave-plus)
listing. The technical specifications of Water Sensor 6
. It is powered by Aeotec's Gen5
can be viewed at that link.
1/8
Advertisement
Table of Contents

Related Manuals for Aeotec Water Sensor 6


Summary of Contents for Aeotec Water Sensor 6
- Page 1 . It is powered by Aeotec’s Gen5 (http://aeotec.com/z-wave-plus) technology. (http://aeotec.com/z-wave-gen5) To see whether Water Sensor 6 is known to be compatible with your Z-Wave system or not, please reference our Z-Wave gateway comparison listing. The technical specifications of Water Sensor 6 (http://aeotec.com/z-wave-gateways) can be viewed at that link.
- Page 2 2. Press the sensor's Action Button; its LED will blink to indicate that the sensor is powered. 3. Secure Water Sensor 6's water proof cover using the screw provided in the package. On the rear of Water Sensor 6 you'll find 2 screw holes in opposing corners; one screw hole will not contain a screw. Insert the provided screw into the empty hole and tighten it with a screw driver.
- Page 3 If pairing fails please follow the previous steps again ensuring that your Z-Wave gateway is in the correct mode. Your Water Sensor 6 will now work as part of your smart home; you can configure it, use it to control events and triggers, or view its status from your Z-Wave software or smartphone application.
- Page 4 Smartthings hub has basic compatibility to the Water Sensor 6, it does not allow you to access its advanced configuration functions readily. In order to make full use of your Water Sensor 6 to its fullest, you must install a custom device handler in order to access other functions of the switch.
- Page 5 Advanced functions. Wake up Water Sensor 6. You can manually wake up Water Sensor 6 for 10 minutes in order to send it new configurations or settings from your Z- Wave gateway. 1. Press and hold the Action Button of Water Sensor 6 for 3 seconds.
- Page 6 Manual factory reset Water Sensor 6. We highly suggest using the gateway to remove your Water Sensor 6 from the network, but in the case that you no longer have a controller on hand and you'd like to reset your Water Sensor 6 in preparation for a new controller, follow the steps below: 1.
- Page 7 11/21/2017 Water Sensor 6 user guide. : Aeotec by Aeon Labs 2. Separate the battery cover from the Sensor unit. Use the separation tool to separate the battery cover by pushing or moving the separation along the gap between the battery cover and the sensor unit.
- Page 8 11/21/2017 Water Sensor 6 user guide. : Aeotec by Aeon Labs 3. Once the battery cover is separated from the Sensor Unit, you can pull out and change the battery located in the center of the Water Sensor 6 hardware.
Need help?
Do you have a question about the Water Sensor 6 and is the answer not in the manual?
Questions and answers