
Related Manuals for Juniper STRM 500 II


Summary of Contents for Juniper STRM 500 II
- Page 1 Security Threat Response Manager STRM Series II Hardware Installation Guide Release 2013.1 Juniper Networks, Inc. 1194 North Mathilda Avenue Sunnyvale, CA 94089 408-745-2000 www.juniper.net Published: 2013-03-15...
- Page 2 Juniper Networks, Junos, Steel-Belted Radius, NetScreen, and ScreenOS are registered trademarks of Juniper Networks, Inc. in the United States and other countries. The Juniper Networks Logo, the Junos logo, and JunosE are trademarks of Juniper Networks, Inc. All other trademarks, service marks, registered trademarks, or registered service marks are the property of their respective owners.
-
Page 3: Table Of Contents
Figure 1: STRM 500 II Front Panel ....... . 6... - Page 4 Figure 20: Front-Rear-Mounting flush to rack ..... . 33 Figure 21: Front-Rear-Mounting recessed in rack ....34 Figure 22: Mid-Mount in two post equipment rack .
- Page 5 Table 2: STRM 500 II Front Panel LEDs ......6 Table 3: STRM 500 II Front Panel Ports ......7 Table 4: STRM 500 II Rear View Components .
- Page 7 Requesting Technical Support STRM O VERVIEW ARDWARE VERVIEW STRM 500 II Front Panel and Back Panel Indicators and Features Front Panel Indicators Back Panel Features STRM 2500 II Front Panel and Back Panel Indicators and Features Front Panel Indicators Back Panel Features...
- Page 8 STRM S ETTING OFTWARE AND ONFIGURING ETWORK ETTINGS Logging Into STRM for the First Time Accessing STRM EW OR HANGED NFORMATION STRM S II A OUNTING THE ERIES PPLIANCE Front-Mounting Flush to Rack Front-Mounting Recessed in Rack Front-Rear- Mounting Flush to Rack Front-Rear- Mounting Recessed in Rack Mid-Mount in Two Post Equipment Rack...
-
Page 9: Table 1 Text Conventions
Documentation can improve the documentation. You can send your comments to Feedback techpubs-comments@juniper.net, or fill out the documentation feedback form at https://www.juniper.net/cgi-bin/docbugreport/. If you are using e-mail, be sure to include the following information with your comments: Document or topic name •... - Page 10 7 days a week, 365 days a year. Self-Help Online Tools and Resources For quick and easy problem resolution, Juniper Networks has designed an online self-service portal called the Customer Support Center (CSC) that provides you with the following features: Find CSC offerings: http://www.juniper.net/customers/support/...
-
Page 11: Strm Overview
STRM O VERVIEW STRM appliances are designed to respond to the right threats at the right time through effective analysis of networks, events, and audit log files. STRM has the ability to identify environmental anomalies in the network, an attack path, and the source of a threat. - Page 12 STRM O VERVIEW STRM Series II Hardware Installation Guide...
-
Page 13: Hardware Overview
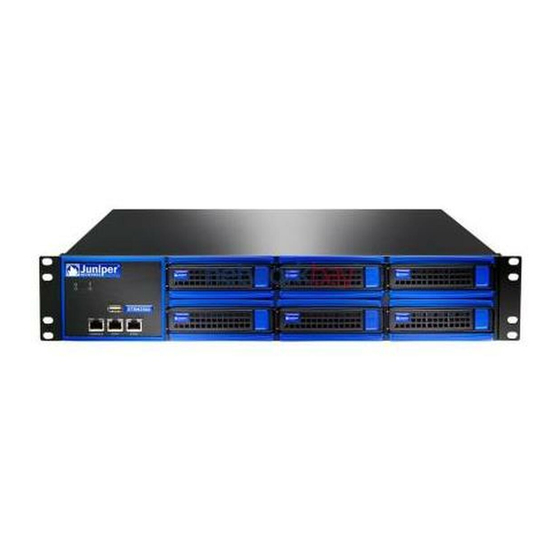
STRM 5000 II Front Panel and Back Panel Indicators and Features • The STRM 500 II appliance has a 2U rack-mountable chassis with optional redundant STRM 500 II Front AC and DC power supplies, a 2U hot-swappable dual redundant RAID1 array, 8 GB of Panel and Back memory, and a 4 Gigabit Ethernet controller. -
Page 14: Figure 1 Strm 500 Ii Front Panel
ETH1 ETH0 Hardware Console Power port Hard disk LED Network ports Table 2 STRM 500 II Front Panel LEDs LEDs Description Chassis LEDs Power (green) - Indicates that the • appliance is powered on Hard disk (yellow) - Indicates the •... -
Page 15: Figure 2 Strm 500 Ii Back Panel
STRM 500 II Front Panel and Back Panel Indicators and Features Table 3 STRM 500 II Front Panel Ports Ports Description Console port One RJ-45 console port Network port Four RJ-45 Ethernet 10/100/1000 Figure 2 Table 4 for the back panel features of the system. -
Page 16: Figure 3 Strm 2500 Ii Front Panel
ARDWARE VERVIEW The STRM 2500 II appliance has a 2U rack-mountable chassis with optional redundant STRM 2500 II Front AC and DC power supplies, 2U hot-swappable dual redundant RAID10 array, 8 GB of Panel and Back memory, and a Gigabit Ethernet controller. Panel Indicators and Features Figure 3... -
Page 17: Figure 4 Strm 2500 Ii Back Pane
STRM 2500 II Front Panel and Back Panel Indicators and Features Table 5 STRM 2500 II Front Panel LEDs LEDs Description Chassis LEDs Power (green) - Indicates that the • appliance is powered on Hardware (red) - Indicates that a •... -
Page 18: Figure 5 Strm 5000 Ii Front Panel
ARDWARE VERVIEW Table 7 STRM 2500 II Back Panel Components Components Description Cooling fans Draws air through vents of the chassis and exhaust it through vents on the other side of the chassis Power supply Provides power to all components The STRM 5000 II appliance has a 2U rack-mountable chassis with optional redundant STRM 5000 II Front AC and DC power supplies, 2U hot-swappable dual redundant RAID10 array, 12 GB of... -
Page 19: Table 8 Strm 5000 Ii Front Panel Leds
STRM 5000 II Front Panel and Back Panel Indicators and Features Table 8 STRM 5000 II Front Panel LEDs LEDs Description Chassis LEDs Power (green) - Indicates that the • appliance is powered on Hardware (red) - Indicates that a •... -
Page 20: Figure 7 Strm 5000 Ii Back Panel
ARDWARE VERVIEW Figure 7 Table 10 for the back panel features of the system. describes the back Back Panel Features panel features. Figure 7 STRM 5000 II Back Panel AC Power supply AC Power switch receptacle Table 10 STRM 5000 II Back Panel Components Components Description Cooling fans... -
Page 21: Table 11 Required Ports Of Strm
Additional Hardware Requirements • Installing the Hardware • Installing the Flow Collector 4-port LAN Card on STRM 500 II • Connecting a Laptop or Keyboard and a Monitor • Before installing your STRM systems, ensure that you have access to the following... -
Page 22: Figure 8: Rear Panel Of Strm 500 Ii
Plug the power cord into the AC receptacle on the rear panel. See Figure Step 2 If your STRM contains two power supplies, plug a power cord into each of the AC receptacles. Figure 8 Rear Panel of STRM 500 II AC Power switch AC Power supply receptacle Plug the other end of the power cord into a wall socket. -
Page 23: Figure 9: Front Panel Of Strm 500 Ii
Installing the Hardware Figure 9 Front Panel of STRM 500 II Hard disk Drive 0 Drive 1 Left Right Hard disk Failure LED maintenance Activity LED port STRM 500 Console Ethernet 1 Ethernet 0 STRM 500 II CONSOLE ETH3 ETH2... -
Page 24: Table 12 Ethernet Port Leds
STRM H NSTALLING AND ONNECTING THE ARDWARE LED Behavior Table 12 Ethernet Port LEDs LEDs Description Chassis LEDs Power (green) - Indicates that the appliance • is powered on Hard disk (yellow) - Indi c ates the hard disk is •... -
Page 25: Figure 10 Strm 500 Ii With The Flow Collector 4-Port Lan Card Inserted
Hard disk LED Network ports Power on the STRM 500 II unit and watch it boot on the serial console. Step 4 Verify the link and activity LED on the new 4-port 1GB LAN module light up when Step 5 connecting the ports to your Ethernet switch with a standard CAT5e or CAT6 LAN cable. -
Page 26: Connecting A Laptop Or Keyboard And A Monitor
STRM H NSTALLING AND ONNECTING THE ARDWARE - 3 = eth4 A STRM appliance includes the STRM software. You control the appliance through Connecting a a connected laptop or keyboard and monitor. Laptop or Keyboard and a Follow the appropriate step: Monitor Connect a laptop to the RJ-45 serial port on the front panel of the appliance. -
Page 27: Preparing Your System For Strm Software Instalation
REPARING YOUR YSTEM FOR STRM S OFTWARE NSTALATION This chapter explains how to prepare your system and network before you install the STRM software. It contains the following sections: STRM Components • Browser Support • Preparing Your Network Hierarchy • Identifying Network Settings •... - Page 28 STRM S REPARING YOUR YSTEM FOR OFTWARE NSTALATION Processor. Before being sent to the Event Processor, the Event Collector bundles identical events to conserve system usage. During this process, Magistrate risk factors map the events to the STRM Identification System and create the bundles.
-
Page 29: Table 14 Network Hierarchy
Identifying Network Settings • All internal IP address space (for example, 0.0.0.0/8) • Proxy servers • Network Address Translation (NAT) IP address range • Server network subnets • Voice over IP (VoIP) subnets • Table 14 Network Hierarchy Description Name IP/CIDR Value Weight For more information, see the STRM Aministration Guide. -
Page 30: Table 15 Devices
STRM S REPARING YOUR YSTEM FOR OFTWARE NSTALATION discovered by STRM appear in the Sensor Devices window within the STRM Administration Console. Once auto discovery is completed, you should disable the Auto Detection Enabled option in the Event Collector configuration. For more information, see the STRM Administration Guide. -
Page 31: Table 16 Asset Identification
Identifying Network Assets Defining certain additional server and IP address types also improves tuning results. Table 16 provides a list of possible servers. See the STRM Users Guide for information on defining servers within STRM. If your network includes a large number of servers, you can use CIDR or IP subnet addresses within the server networks category. - Page 32 STRM S REPARING YOUR YSTEM FOR OFTWARE NSTALATION STRM Series II Hardware Installation Guide...
-
Page 33: Setting U Pstrm Software And
STRM S ETTING OFTWARE AND ONFIGURING ETWORK ETTINGS This chapter provides information on setting up your STRM software and configuring network settings: Logging Into STRM for the First Time • Accessing STRM • To log into STRM for the first time: Logging Into STRM for the First Time Connect your laptop or keyboard and monitor to the STRM device, as described in... -
Page 34: Figure 11 System Console Window
STRM S ETTING OFTWARE AND ONFIGURING ETWORK ETTINGS Figure 11 System Console Window Using the up/down arrow keys, highlight one of the following options: Step 5 - Yes - Select this option only if this system is a Console. If you select this option, the Tuning Template window appears. -
Page 35: Figure 13 Time Zone Continent Window
Logging Into STRM for the First Time - Server - Allows you to specify your time server. Use the Spacebar to select the option and then use the Tab key to select the Next option. Press Enter. The Enter Time Server window appears. Go to Step To manually enter the time and date: Step 9... -
Page 36: Figure 14 Time Zone Region Window
STRM S ETTING OFTWARE AND ONFIGURING ETWORK ETTINGS Figure 14 Time Zone Region Window Note: The options that appear in this window are regions that are associated with the continent or area previously selected. Using the up or down arrow keys, or the page up/page down keys, select your time zone region. -
Page 37: Figure 16 New Root Password Window
Logging Into STRM for the First Time - Secondary DNS - Optional. Specify the secondary DNS server. - Public IP - Optional. Specify the public IP address of the server. The server uses this IP address to communicate with another server that belongs to a different network using Network Address Translation (NAT). - Page 38 STRM S ETTING OFTWARE AND ONFIGURING ETWORK ETTINGS To access the STRM interface: Accessing STRM Open your Web browser. Step 1 Log in to STRM: Step 2 https://<IP Address> is the IP address of the STRM system. <IP Address> The default values are: Username : admin Password...
-
Page 39: Ew Or Hanged Nformation
Reimage the STRM 5000 II appliance with STRM 2009.1 USB. Boot the STRM Step 1 2009.1 OS after it is imaged. Download the tool STRMswap_eth.sh from https://www.juniper.net/support. Step 2 Copy this script to a DOS USB stick (FAT32 formatted). Insert the USB stick with Step 3 script in the front USB port. - Page 40 Old eth interface configuration files are: ======================================================= # Intel Corporation 82574L Gigabit Network Connection DEVICE=eth0 BOOTPROTO=dhcp DHCPCLASS= HWADDR=00:E0:81:C2:7F:9B ONBOOT=yes DHCP_HOSTNAME=strm.juniper.net # Intel Corporation 82574L Gigabit Network Connection DEVICE=eth1 HWADDR=00:E0:81:C2:7F:9A ONBOOT=no # Intel Corporation 82576 Gigabit Network Connection DEVICE=eth2 HWADDR=00:E0:81:C2:7F:DE ONBOOT=no...
- Page 41 New eth interface configuration files are: ======================================================= # Intel Corporation 82576 Gigabit Network Connection DEVICE=eth0 BOOTPROTO=dhcp DHCPCLASS= HWADDR=00:E0:81:C2:7F:DE ONBOOT=yes DHCP_HOSTNAME=strm.juniper.net # Intel Corporation 82576 Gigabit Network Connection DEVICE=eth1 HWADDR=00:E0:81:C2:7F:DF ONBOOT=no # Intel Corporation 82574L Gigabit Network Connection DEVICE=eth2 HWADDR=00:E0:81:C2:7F:9B ONBOOT=no...
- Page 42 EW OR HANGED NFORMATION Enter the following commad to reboot: Step 9 reboot STRM Series II Hardware Installation Guide...
-
Page 43: Front-Mounting Flush To Rack
Note: If you are installing multiple STRM appliances in one rack, you should install the lowest one first and proceed upward in the rack. Install heavier STRM appliances in the lower part of the rack. This option is the default configuration for STRM 500 II and STRM 2500 II Front-Mounting appliances. -
Page 44: Figure 18 Front-Mounting Flush To Rack
STRM S II A OUNTING THE ERIES PPLIANCE Figure 18 Front-Mounting flush to rack This option allows sites with no front-of-rack clearance to recess the STRM system Front-Mounting in the equipment rack. Recessed in Rack To mount the appliance using this option: Remove the rear screws on each side of the system’s front rails and the two small Step 1 screws towards the front of the chassis. -
Page 45: Figure 19 Front-Mounting Recessed In Rack
Front-Rear- Mounting Flush to Rack Figure 19 Front-Mounting recessed in rack Mounting bracket, positioned forward for recessed mounting. This option is used for larger chassis that require additional support when mounted Front-Rear- on the rack-mount system. The STRM 5000 II appliance is mounted using this Mounting Flush to option as its default configuration. -
Page 46: Front-Rear
STRM S II A OUNTING THE ERIES PPLIANCE This option provides additional front clearance in the equipment rack. It is used for Front-Rear- larger chassis, like the STRM 5000 II appliance, that requires additional support Mounting when mounted on the rack-mount system. Recessed in Rack To mount the appliance using this option: Remove the rear screws on each side of the system’s front rails and the two small... -
Page 47: Mid-Mount In Two Post Equipment Rack
Mid-Mount in Two Post Equipment Rack This option is suitable for a two post euipment rack. It allows the appliance to be Mid-Mount in Two mid-mounted so that there is even clearance on the front and rear of the rack. Post Equipment Rack To mount the appliance using this option:... - Page 48 STRM S II A OUNTING THE ERIES PPLIANCE STRM Series II Hardware Installation Guide...
-
Page 49: Raid Array
Error correction - redundant data storage to detect and resolve problems • STRM 500 II uses RAID1 and STRM 2500 II and STRM 5000 II use RAID10. RAID1 uses mirroring and duplexing techniques to copy data to the redundant disk. In RAID10, drives are striped for performance, and all striped drives are duplicated for fault tolerance. -
Page 50: Cooling Fans
STRM Series II appliances also have a DC power supply option if you need DC power. The STRM 500 II and STRM 2500 II appliances have two cooling fans and the Cooling Fans STRM 5000 II appliance has three cooling fans. The fans are hot-swappable. -
Page 51: Table 17: Strm 500 Ii, Strm 2500 Ii And Strm 5000 Ii Hardware Specifi
Table 17 for hardware specifications of STRM 500 II, STRM 2500 II and STRM 5000 II appliances. Table 17 STRM 500 II, STRM 2500 II and STRM 5000 II Hardware Specifications STRM 500 II STRM 2500 II STRM 5000 II... - Page 52 ARDWARE PECIFICATIONS Table 17 STRM 500 II, STRM 2500 II and STRM 5000 II Hardware Specifications STRM 500 II STRM 2500 II STRM 5000 II Environmental specifications Temperature 5°C – 40°C 5°C – 40°C 5°C – 40°C operating 41°F – 104°F 41°F –...
Need help?
Do you have a question about the STRM 500 II and is the answer not in the manual?
Questions and answers