Advertisement
Quick Links
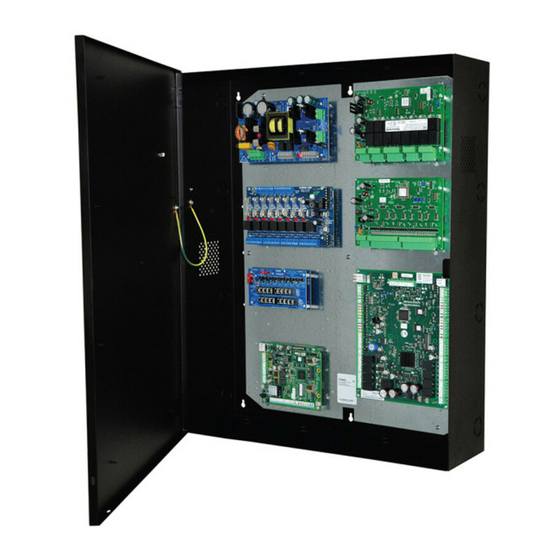
Access & Power Integration
Trove2HN2
- Trove2 enclosure with Altronix/Honeywell NetAXS backplane (THN2)
THN2
- Altronix/Honeywell NetAXS backplane only
Installation Guide
All registered trademarks are property of their respective owners.
Rev. THN052518
Installing Company: _____________________ Service Rep. Name: __________________________________________
Address: ________________________________________________________ Phone #: _________________________
More than just power.™
Advertisement

Related Manuals for Altronix THN2


Summary of Contents for Altronix THN2
-
Page 1: Installation Guide
Access & Power Integration Trove2HN2 - Trove2 enclosure with Altronix/Honeywell NetAXS backplane (THN2) THN2 - Altronix/Honeywell NetAXS backplane only Installation Guide More than just power.™ All registered trademarks are property of their respective owners. Rev. THN052518 Installing Company: _____________________ Service Rep. Name: __________________________________________... -
Page 2: Specifications
Overview: Trove2HN2 accommodates various combinations of Honeywell NetAXS boards with or without Altronix power supplies and accessories for access systems. Specifications: Trove2HN2 - Trove2 enclosure with THN2 Altronix/Honeywell backplane. • Includes: tamper switch, cam lock, mounting hardware. • 16 Gauge grey enclosure with ample knockouts for convenient access. - Page 3 Installation Instructions for Altronix Power Supplies and Sub-Assemblies to THN2: Fasten standoffs (provided) into pem configuration (A) or (B) of backplane (Fig. 2, pg. 3). Mount boards to standoffs utilizing 5/16” pan head screws (provided) (Fig. 2a, pg. 3). Mount backplane to enclosure with hardware.
- Page 4 Installation Instructions for Honeywell NX4PCB to THN2: Fasten standoffs (provided) to appropriate pems on backplane (Fig. 3, pg. 4). Fig. 3a Mount boards to standoffs utilizing 5/16” pan head screws (provided) (Fig. 3a, pg. 4). Note: Honeywell NX4PCB modules have one (1) RJ45 jack each.
- Page 5 - secure NXD1/NXD2 to NetAXS-123 using pre-installed bump screws Screw and included standoffs (Fig. 4b, pg. 5). - after NXD1/NXD2 is firmly attached and connected to NetAXS-123, follow steps 1 and 2 above to mount them onto THN2. Fig. 4b Bottom of Mount backplane to enclosure with hardware.
- Page 6 Installation Instructions for Honeywell NX4IN or NX4OUT to THN2: Fasten standoffs (provided) to appropriate pems on backplane (Fig. 5, pg. 6). Fig. 5a Mount boards to standoffs utilizing 5/16” pan head screws (provided) (Fig. 5a, pg. 6). Mount backplane to enclosure with hardware.
- Page 7 THN2 Dimensions (H x W x D): 25.375” x 19.375” x 0.3125” (644.6mm x 492.1mm x 7.9mm) 19.375” (492.1mm) 0.45” 2.2” 2.2” (11.4mm) (55.9mm) (55.9mm) 0.156” ( 3.96mm) 25.375” (644.6mm) 16.25” (412.8mm) 12.625” (320.7mm) 8.5” (215.9mm) 1.0” (25.4mm) 1.0” (25.4mm) 7.5”...
- Page 8 (133.35mm) (50.8mm) Altronix is not responsible for any typographical errors. 140 58th Street, Brooklyn, New York 11220 USA | phone: 718-567-8181 | fax: 718-567-9056 web site: www.altronix.com | e-mail: info@altronix.com | Made in U.S.A. MEMBER IITroveHN I10R - 8 -...
Need help?
Do you have a question about the THN2 and is the answer not in the manual?
Questions and answers