Table of Contents
Advertisement
Available languages
Available languages
Quick Links
Advertisement
Chapters
Table of Contents

Related Manuals for Facnor LS PLUS


Summary of Contents for Facnor LS PLUS
- Page 1 N O T I C E M O N T A G E I N S T A L L A T I O N M A N U A L R A C E D E V E L O P E D T E C H N O L O G Y U N E T E C H N O L O G I E I S S U E D E L A C O U R S E w w w .
-
Page 2: Table Of Contents
Fiable et facile à utiliser, votre enrouleur Facnor vous apportera satisfaction en croisière comme en régate. Fort de son expérience de plus de 30 ans dans la fabrication d’enrouleurs, Facnor développe ses produits suivant trois axes principaux : Innovation, Robustesse et Performance. -
Page 3: 1- Plan D'ensemble
2- INVENTAIRE DES COLIS Le kit enrouleur de génois Facnor est composé de 2 colis : F a c n o r - n o t i c e d e m o n ta g e r e v 2 0 1 2 - e n r o u l e u r s d e g é n o i s L S + / L X + / R X +... -
Page 4: Contenu De La Boîte Carton (Kit Standard + Options)
français 2.1 CONTENU DE LA BOITE CARTON 2.1.1 Kit standard LX/RX/RS Cf tableau n°1 Cf tableau n°1 modèle selon modèle LS/RX/RS LX/RX modèle modèle modèle Tableau n°1 Longueur maxi étai 8M30 10M40 12M40 14M40 16M40 18M40 20M40 22M40 Quantité paliers nécessaire Quantité... -
Page 5: Contenu Du Kit Profil
français 2.2 CONTENU DU TUBE CARTON 1. un tube interne télescopique (1M40) 2. des profils externes double-gorge 3. des manchons ère Pour les enrouleurs 1 monte (livrés aux chantiers) le profil haut peut avoir une longueur inférieure à 2 mètres. En effet, pour ces enrouleurs le profil haut est coupé sur mesure. Exemple: si vous commandez un LS165 en 12M40, selon le tableau ci-dessous, vous recevrez 5 profils externes de 2 mètres, un profil externe de 1 mètre, un tube télescopique et 5 manchons. -
Page 6: 3- Entretien, Précautions Et Préparation Au Montage
Simple à monter : pas de démâtage, ni coupe des profils , ni perçage L’enrouleur de génois FACNOR est l’un des plus simples à installer : - il se monte par le bas de l’étai et ne nécessite pas de démâter ;... - Page 7 17185 Périgny, Tél. 05 46 34 31 27, e-mail : info@sparcraft-rigging.com. Pour obtenir les coordonnées du revendeur Facnor le plus proche, contactez nous au 02 33 88 50 22. Les conseils d’un gréeur professionnel ou d’un maître voilier vous feront gagner du temps.
-
Page 8: 4- Les Étapes Du Montage De L'enrouleur
français 4- LES ETAPES DU MONTAGE DE L’ENROULEUR : 4.1 - RONDELLE DEFLECTRICE DE DRISSE* partie femelle Enfiler la rondelle autour de l’étai, vis vers le haut. Assembler autour de l’étai les 2 demi-paliers au-dessus de la rondelle déflecteur, la partie « femelle » vers le haut. Emboîter le palier dans la rondelle déflectrice de drisse. -
Page 9: Curseur
français 4.3- MISE EN PLACE DU CURSEUR Respecter le sens d’introduction du curseur émerillon. manille longue Fixer les deux manilles. Pour hisser les profils le plus haut possible nous vous conseillons d’enfiler le curseur émerillon et monter l’ensemble à l’aide d’une drisse. manille lyre Prendre soin de fixer un bout de rappel pour le redescendre. -
Page 10: Entrée De Voile
français 4.6- MISE EN PLACE DE L’ENTREE DE VOILE bague Glisser l’entrée de voile (Rep. M) autour du tube télescopique identiquement au sens indiqué sur le dessin ci-contre. Pour les modèles LX, avant l’entrée de voile, glisser la bague. Il n’est pas nécessaire à ce stade de fixer la partie en inox (cf 4.11). -
Page 11: Fixation Du Bas Du Tambour
français 4.9- FIXATION DU BAS DU TAMBOUR Il existe 2 types de montage au niveau de la fixation basse de tambour : 4.9.1- MONTAGE STANDARD : TERMINAISON BASSE ETAI / EMBOUT A ŒIL+ LATTES A TROUS Introduire les deux lattes à trous dans la partie basse du tambour. -
Page 12: Fixation De L'entrée De Voile
français 4.10- REGLAGE DES PROFILS Retendre légèrement le pataras pour éviter que l’étai ne présente une flèche trop importante. Laisser la pièce de l’entrée de voile reposer sur le tambour. Remonter l’ensemble des profils afin de toucher la terminaison haute de l’étai. Engager une vis dans un des trous bas du dernier profil. -
Page 13: 5- Montage De La Drosse De Commande
français 5- MONTAGE DE LA DROSSE DE COMMANDE ère 5.1 Positionnement de la 1 poulie de renvoi 90° L’angle entre la drosse de commande et les profils doit être d’environ 90° et le cordage doit passer dans le guide inox (Rep. X). (si guide inox mal orienté, cf 6.1 ci-dessous) Fixer la première poulie de renvoi le plus loin possible du tambour en respectant l’angle de 90°... -
Page 14: 8- Installations Particulières
français 7- INSTALLATIONS PARTICULIERES Sans rondelle déflecteur de drisse: 15° Dans ce cas, fixer une poulie d’applique sur le mât (Rep. A’). Conserver un angle de 15° entre l’étai et la drisse. Sinon, la drisse peut s’enrouler autour de l’étai, bloquer 40 mm-139mm le système et détériorer l’étai. -
Page 15: 10- Vérification Après Montage
français 10- CHECK LIST APRES MONTAGE La drosse fait un tour mort autour du tambour La drosse est orientée à 90° par rapport aux profils 90° (quand la drosse est au milieu de la hauteur de la bobine) La drosse passe bien dans le guide en inox (si non, se reporter p.13, «... -
Page 16: 11- Précautions D'utilisation
Notre service technico-commercial ainsi l’ensemble revendeurs FACNOR se tiennent à votre disposition pour tout renseignement ou conseil. N’hésitez pas à surfer sur notre site web : www.facnor.com et découvrez l’ensemble de nos produits. BONNE NAVIGATION www.facnor.fr F a c n o r - n o t i c e d e m o n ta g e r e v 2 0 1 2 - e n r o u l e u r s d e g é n o i s L S + / L X + / R X +... - Page 17 English Reliable and easy to use, your Facnor reefing system will bring you satisfaction when cruising or racing. With 30 years of experience Facnor has developed its products precisely focussing on Innovation, Sturdiness and Performance. TABLE OF CONTENTS 1- Assembly drawing ..................p. 18 2- Package inventory ..................
-
Page 18: 1- Assembly Drawing
2- PACKAGE INVENTORY The Facnor headsail reefing system comprises: F a c n o r - I n s t a l l a t i o n m a n u a l r e v 2 0 1 2 – L S + / L X + / R X + r e e f i n g a n d f u r l i n g s y s t e m s... -
Page 19: Box Content
English 2.1 BOX CONTENT 2.1.1 Standard components LX/RX/RS See chart No1 See chart No1 models Model depending LX/RX LS/RX/RS models models models Chart No1 Maximum forestay length 8M30 10M40 12M40 14M40 16M40 18M40 20M40 22M40 Number of bushings necessary* Number of screws necessary * * NOTE : the quantity contained in the bag is superior to the number of screws or bushings required 2.1.2 Optional extras (not included in standard kit) Internal turnbuckle option... -
Page 20: Tube Content
English 2.2 TUBE CONTENT 1. one telescopic section (1M40) 2. external twin-groove sections 3. connectors For OEM furling systems (delivered originally to the shipyard) the top section may be shorter than 2 meters. For those systems, the top section is cut at a specific length. Example: if you order an FD190 12M40, according to the chart below you will receive five 2- meter sections, one half-length section, the telescopic section and five connectors. -
Page 21: 3- Maintenance And Pre-Installation Notes
3.1 GENERAL REMARKS WITH REGARD TO FACNOR FURLING SYSTEM: Simple to assemble: no mast unstepping, no section cutting, no drilling The FACNOR headsail furling system is one of the easiest to install: - it does not require unstepping the mast - under most circumstances you will not need to cut any section on account of the patented Facnor telescopic section. - Page 22 We recommend that you change your forestay if it is too old. You may contact one of our dealers. For information about the nearest Facnor retailer, contact us at +33 (0)2 33 88 50 22 or visit our web site : www.facnor.com...
-
Page 23: 4- Assembly Stages
English 4- ASSEMBLY STAGES : 4.1 – ASSEMBLY OF THE HALYARD DEFLECTOR* memale part Slip the disk around the forestay, screw pointing up. Assemble the two half bushings above the deflector disk and around the forestay, the “female” part pointing up. Fit the bushing into the halyard deflector. -
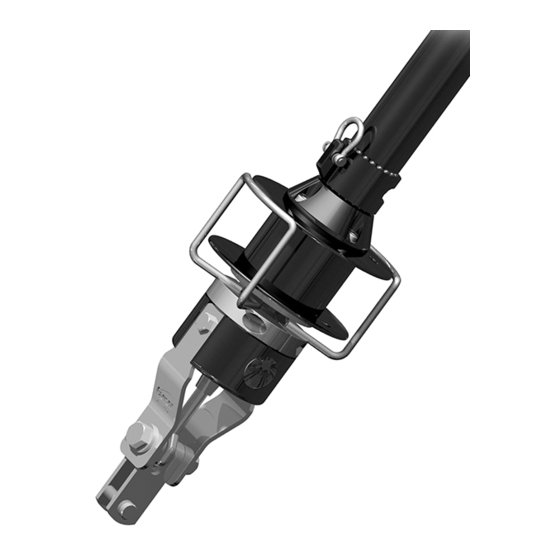
Page 24: Fitting The Halyard Swivel
English 4.3- FITTING THE HALYARD SWIVEL Ensure you fit the halyard swivel the right way up. Fix the Long U shackle two shackles. In order to raise the sections as high as possible, we recommend that you fit the halyard swivel and raise everything by way of a halyard. -
Page 25: Fitting The Feeder
English 4.6- FITTING THE FEEDER Ring First fit the sail feeder (fig. M) to the telescopic section as indicated. For LX models, before slipping the feeder, slip the ring. It is not necessary to fix the stainless steel part at this stage (see 4.11). Fix the feeder to the telescopic section with the screw provided, tighten until fixed (see 4.11). -
Page 26: Fixing The Bottom Of The Drum
Fix the top of the stainless steel link plates (fig. T), found in the «Facnor turnbuckle kit», to the drum with the screws provided (fig. U). Lightly grease both threads before fixing. -
Page 27: Adjusting Sections
English 4.10- ADJUSTING SECTIONS Tighten the backstay to put some tension onto the forestay. Leave the feeder piece resting on the drum. Raise all of the sections together until they touch the top terminal of the forestay. Insert a screw into one of the lower holes of the last section. BEWARE: DO NOT OVERTIGHTEN IT . -
Page 28: 5- Installation Of The Reefing Line
English 5- INSTALLATION OF THE REEFING LINE 5.1 Positioning the front deck block The furling line should be installed as shown. The furling line should run off at 90° to the forestay and through the stainless steel guide (fig. X). (If the line does not run within the guide, please see paragraph 6.1 below) . -
Page 29: 8- Specific Installations
English 8- SPECIFIC INSTALLATIONS Installation without deflector wheel or when using a sail with shorter luff: Without deflector wheel: 15° If the halyard swivel is not used, fix a block on the mast (fig. A’); so that the halyard runs off at 15° to the forestay. -
Page 30: 10- Post-Installation Check-List
English 10- POST-INSTALLATION CHECK LIST The furling line has been half hitched round the drum The furling line runs at 90° to the foil sections 90° (when the furling line is positioned at mid-height around the drum) The furling line runs through the stainless steel guide (If not, see p28, “adjusting the furling line guide”) The bottom pin of the forestay is correctly bolted, at least one thread is showed beyond the bolt... -
Page 31: 11- Furling Tips
Check for reasons if the sail is difficult to furl and contact your agent. Please do not hesitate to contact our experienced sales team or the FACNOR dealers whose list is available on our web site : www.facnor.com and discover the wide range of FACNOR products. ENJOY YOUR SAILING www.facnor.com... - Page 32 FACNOR Parc d'activités B.P. 222 F50550 St-VAAST-LA-HOUGUE TEL. +33 (0)2 33 88 50 22 FAX: +33 (0)2 33 23 14 27 e-mail : info@facnor.com SPARCRAFT-US / FACNOR 3901 Pine Grove Circle CHARLOTTE NC 28206 USA TEL : +1 704 597 15 02 FAX : +1 704 597 09 61 e-mail : facnor@sparcraft-us.com...
Need help?
Do you have a question about the LS PLUS and is the answer not in the manual?
Questions and answers