Table of Contents
Advertisement
Advertisement
Table of Contents

Related Manuals for KaVo DIAGNOcam 2170


Summary of Contents for KaVo DIAGNOcam 2170
- Page 1 Instructions for use DIAGNOcam 2170 Always be on the safe side.
- Page 2 Distributed by: Manufacturer: KaVo Dental GmbH Kaltenbach & Voigt GmbH Bismarckring 39 Bismarckring 39 D-88400 Biberach D-88400 Biberach Phone +49 7351 56-0 www.kavo.com Fax +49 7351 56-1488...
-
Page 3: Table Of Contents
Instructions for use DIAGNOcam 2170 Table of contents Table of contents User instructions ............................3 User guide ............................3 1.1.1 Abbreviations ........................3 1.1.2 Symbols ..........................3 1.1.3 Target group ........................3 1.1.4 Service ..........................3 Safety ................................ 5 Protective equipment ........................5 Description of safety instructions ..................... - Page 4 Instructions for use DIAGNOcam 2170 Table of contents Disinfection ............................ 55 6.5.1 Manual disinfection ......................55 6.5.2 Automated disinfection ..................... 56 Sterilisation ............................ 56 Control and functional checks ....................... 57 6.7.1 General ..........................57 6.7.2 Checking the tips ......................57 Troubleshooting ............................
-
Page 5: User Instructions
EU directive. Action required 1.1.3 Target group This document is for dentists and dental office staff. 1.1.4 Service Service hotline: +49 7351 56-2700 Service.Multimedia@kavo.com Please indicate the product serial number in all requests. Additional information can be obtained at: www.kavo.com 3/64... - Page 6 1 User instructions | 1.1 User guide Technical customer service The technical support for KaVo products is primarily offered by the dental suppli‐ KaVo provides ongoing training and special courses for dealer technicians. To guarantee constant readiness for use and maintenance of value of the KaVO products, the products must be regularly serviced.
-
Page 7: Safety
Instructions for use DIAGNOcam 2170 2 Safety | 2.1 Protective equipment 2 Safety 2.1 Protective equipment Note Since this is a class 1 laser medical device, no personal protective equipment needs to be worn according to the EC directive. 2.2 Description of safety instructions 2.2.1 Warning symbol... -
Page 8: Purpose - Intended Use
KaVo product for the intended purpose must be applied and followed. This KaVo product is intended for use in dentistry only. Any other type of use is not permitted. -
Page 9: Disposal Of Electronic And Electrical Devices
Europe. Before disassembling / disposing of the product, it must be completely processed (disinfected, sterilized) according to the section "Preparation methods" Additional information can be obtained from KaVo (www.kavo.com) or your den‐ tal supplier. For final disposal, contact:... -
Page 10: Safety Instructions
Instructions for use DIAGNOcam 2170 2 Safety | 2.5 Safety instructions International (EU) For country-specific information on disposal, contact your dental supplier. 2.5 Safety instructions WARNING Danger of injury from electric current. Electric shock. ▶ Stop working if the device becomes damaged. - Page 11 Instructions for use DIAGNOcam 2170 2 Safety | 2.5 Safety instructions CAUTION Damage from improper handling. Destruction of the DIAGNOcam housing and internal components. ▶ Do not use the DIAGNOcam to move the dentist element! ▶ Do not lean on the DIAGNOcam while it is situated in the holder.
-
Page 12: Product Description
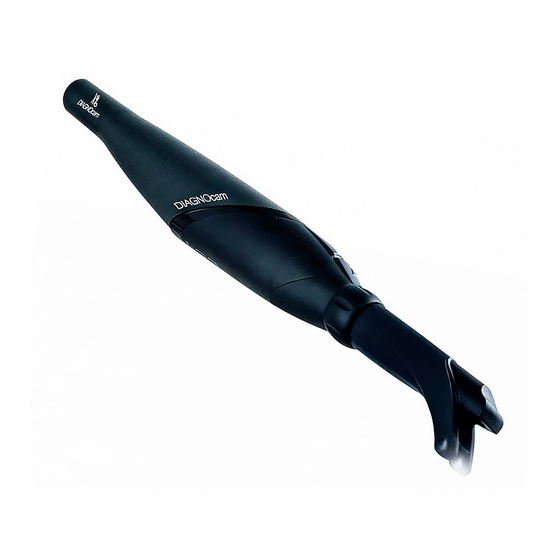
Instructions for use DIAGNOcam 2170 3 Product description | 3.1 System components 3 Product description 3.1 System components 3.1.1 Handpiece ① Window for camera lens system ③ Contact surface for the ring switch ② Aperture for the laser ④ Forked light barriers for probe iden‐... -
Page 13: Occlusal Tip (Tip Large, Tip Small)
Instructions for use DIAGNOcam 2170 3 Product description | 3.1 System components 3.1.3 Occlusal tip (Tip large, Tip small) ① Opening for camera window ① Aperture for laser beam 11/64... -
Page 14: Operating Buttons And Ring Switch
Instructions for use DIAGNOcam 2170 3 Product description | 3.2 Operating buttons and ring switch 3.2 Operating buttons and ring switch The ring switch ③ with six positions can be used to generate still in all relevant positions. Actuation Ring switch ③... -
Page 15: Ids And Labels
Instructions for use DIAGNOcam 2170 3 Product description | 3.3 IDs and labels 3.3 IDs and labels 3.3.1 Rating plate ① Rating plate Type Device type DIAGNOcam – Month produced/year produced Material number Serial number Note: please note accompanying documents! - Page 16 Instructions for use DIAGNOcam 2170 3 Product description | 3.4 Technical Specifications Length approx. 245 mm Diameter 30 mm Protection class IP indicates the scope of protection by a housing against the in‐ gress of solid foreign matter and against the ingress of water.
-
Page 17: First Use
KiD! 4.2 Software installation Using the KaVo Integrated Desktop (KiD) It is recommended to use the DIAGNOcam in combination with the KaVo KiD software. The software offers comfortable options for ▪ Recording images ▪... -
Page 18: Installing A Single-User System
Instructions for use DIAGNOcam 2170 4 First use | 4.2 Software installation 4.2.2 Installing a single-user system ▶ Click on "Next" in the setup start window to start the installation. ▶ Read the license agreements and select the option "I accept the agreements", and click "Next". - Page 19 The program files are saved to the target directory. The target directory must be on a local hard disk. It is recommended to use the suggested directory path (C: \Programs\KaVo\KiD). A target directory on a network drive can cause malfunc‐ tions.
- Page 20 Instructions for use DIAGNOcam 2170 4 First use | 4.2 Software installation ▶ Define the document directory ▶ Continue the installation 18/64...
- Page 21 Instructions for use DIAGNOcam 2170 4 First use | 4.2 Software installation ▶ Complete the installation clicking on Finish. ▶ Select the language (German or English) 19/64...
- Page 22 Instructions for use DIAGNOcam 2170 4 First use | 4.2 Software installation ▶ Click Next to install the drivers ▶ Program files are stored in the target directory. 20/64...
- Page 23 Instructions for use DIAGNOcam 2170 4 First use | 4.2 Software installation ▶ Click Install to install them ▶ Click Continue installation to install the software 21/64...
- Page 24 Instructions for use DIAGNOcam 2170 4 First use | 4.2 Software installation ▶ Click Continue installation to install the hardware ▶ Wait for the installation to be completed. 22/64...
-
Page 25: Installing A Multiple-User System
Instructions for use DIAGNOcam 2170 4 First use | 4.2 Software installation ▶ It is recommended to re-start the computer 4.2.3 Installing a multiple-user system When KiD is installed on a network, several workstations on which KiD is installed can access a common database. - Page 26 Instructions for use DIAGNOcam 2170 4 First use | 4.2 Software installation ▶ Select "Network server" on the server. ▶ A database server can be installed without the KiD software. This is necessary in case of a Windows 2000 server, since KiD does not support this system.
- Page 27 Instructions for use DIAGNOcam 2170 4 First use | 4.2 Software installation ▶ When installing the database server or if the server release is not found, se‐ lect a document directory. ▶ Select Additional Tasks. 25/64...
- Page 28 Instructions for use DIAGNOcam 2170 4 First use | 4.2 Software installation ▶ Confirm the installation settings. ▶ Conclude installation. 26/64...
- Page 29 Instructions for use DIAGNOcam 2170 4 First use | 4.2 Software installation KiD must first be installed on the database server in a multi-user system. Micro‐ soft SQL Server 2005 Express has to be installed only on this computer. The checkbox must be deactivated at all other workstations.
- Page 30 Instructions for use DIAGNOcam 2170 4 First use | 4.2 Software installation ▶ Network is being scanned for SQL databases with authorisations ▶ Make the selection and click on Next 28/64...
- Page 31 Instructions for use DIAGNOcam 2170 4 First use | 4.2 Software installation ▶ Create a desktop icon and click on Next ▶ To install, click on Install 29/64...
- Page 32 Instructions for use DIAGNOcam 2170 4 First use | 4.2 Software installation ▶ Click on Finish to complete the installation ▶ Re-start the computer and click on Finish. 30/64...
-
Page 33: Installing A Vdds Interface
Instructions for use DIAGNOcam 2170 4 First use | 4.2 Software installation 4.2.4 Installing a VDDS interface ▶ Start setup, click on Next ▶ Carry out the installation 31/64... -
Page 34: Remote Maintenance By Means Of Netviewer
The remote service software, Netviewer, is installed automatically during installa‐ tion of KiD. Moreover, Netviewer can also be run by means of the Internet site: support.kavo.com. You need to call the Technical Service by phone concurrently to receive a session number. -
Page 35: Starting Netviewer Directly Through Button In Kid
Instructions for use DIAGNOcam 2170 4 First use | 4.3 Remote maintenance by means of Netviewer 4.3.1 Starting Netviewer directly through button in KiD ▶ Press button for remote service ▶ Call our Technical Service (phone: +49 7351 56-2700) to request a session number for Netviewer. - Page 36 Instructions for use DIAGNOcam 2170 4 First use | 4.3 Remote maintenance by means of Netviewer ▶ The Remote control window shows that the KaVo Service is connected to your system. ▶ The Netviewer window was closed, click close to disconnect.
-
Page 37: Operation
Instructions for use DIAGNOcam 2170 5 Operation | 5.1 Attach and remove a tip 5 Operation 5.1 Attach and remove a tip Slide the tip onto the handpiece CAUTION Attaching the tip misaligned Damage to the unit ▶ When attaching the probe, make sure that the inner lug of the tip mates with the opening in the forked light barriers. - Page 38 Instructions for use DIAGNOcam 2170 5 Operation | 5.1 Attach and remove a tip Pulling the tip off the handpiece Note Tips must not be removed by being twisted. Removing the tip, do not touch the control buttons. ▶ Pull the tip off the handpiece by applying a moderate amount of force; pull with your left hand and push slightly with your right thumb.
-
Page 39: Turning On/Off
Instructions for use DIAGNOcam 2170 5 Operation | 5.2 Turning on/off 5.2 Turning on/off WARNING Blinding hazard from invisible laser. Eye damage. ▶ Do not point the device toward the eyes when the laser is active! ▶ Do not operate the device when the housing is damaged or opened. -
Page 40: Occlusal Use
Instructions for use DIAGNOcam 2170 5 Operation | 5.3 Occlusal use 5.3 Occlusal use CAUTION Property damage from improper use Damage to the light guide ▶ Do not kink the light guide in the flexible part of the probe. Note The live picture varies depending on the following factors: –... -
Page 41: Brief Instructions For The Kid
Instructions for use DIAGNOcam 2170 5 Operation | 5.4 Brief instructions for the KiD ▶ Contact the light apertures ① to the gingiva. ▶ Place the spacer of the occlusal probe on the neighbouring tooth, and monitor the live picture. -
Page 42: Diagnocam Function
Instructions for use DIAGNOcam 2170 5 Operation | 5.6 DIAGNOcam Function ▶ To secure the diagnosis, use additional diagnostic means such as the DIAGNOdent pen 2190. 5.6 DIAGNOcam Function Note The software must always be closed, before unplugging the DIAGNOcam. - Page 43 Instructions for use DIAGNOcam 2170 5 Operation | 5.6 DIAGNOcam Function Step 2: ▶ Create patient. ▶ Click on the "Create new patient" symbol. ▶ Enter name of the patient and save it by clicking on the "OK" symbol. Tool bar Step 3: ▶...
- Page 44 Instructions for use DIAGNOcam 2170 5 Operation | 5.6 DIAGNOcam Function ▶ Double-click on patient name or confirm by clicking on "OK". Step 4: ▶ Start-up the camera. 42/64...
- Page 45 Instructions for use DIAGNOcam 2170 5 Operation | 5.6 DIAGNOcam Function ▶ Firstly, click on the "DIAGNOcam" field and open it. Start-up the recording mode ▶ Click on the "DIAGNOcam Live" field. Step 5: ▶ Select tooth. ▶ Attach tip.
- Page 46 Instructions for use DIAGNOcam 2170 5 Operation | 5.6 DIAGNOcam Function Tooth scheme Presentation Meaning White tooth No images stored. Light-blue tooth Images are stored for this tooth Dark-blue tooth Currently selected tooth, stored images are shown in the line below.
- Page 47 Instructions for use DIAGNOcam 2170 5 Operation | 5.6 DIAGNOcam Function ▶ Position the DIAGNOcam accordingly on the tooth. 45/64...
- Page 48 Instructions for use DIAGNOcam 2170 5 Operation | 5.6 DIAGNOcam Function ▶ Trigger the exposure by clicking on image 1 or actuating the ring switch ①. ▪ Image on top left: Current live image ▪ Image on right top and right in the middle: Most recently saved images ▶...
- Page 49 Instructions for use DIAGNOcam 2170 5 Operation | 5.6 DIAGNOcam Function Setting brightness/contrast ▶ Select the "Options" field We recommend using the default setting. If the teeth are displayed too brightly, it may be advantageous to change the AEW values accordingly.
- Page 50 Instructions for use DIAGNOcam 2170 5 Operation | 5.6 DIAGNOcam Function Start review mode from recording mode (DIAGNOcam video) ▶ Pull-off the tip. ▶ Click on the "Folder" symbol. ▶ Attach a tip to return to view mode. 48/64...
- Page 51 Instructions for use DIAGNOcam 2170 5 Operation | 5.6 DIAGNOcam Function ▶ Click on the "Ruler" symbol to measure a length in the image. ▶ Click on the "Ruler" symbol again to mark the length measurement in red. The "Remove" button can be used to delete the length measurement marked in red.
- Page 52 Instructions for use DIAGNOcam 2170 5 Operation | 5.6 DIAGNOcam Function Display unassigned images ▶ In order to display all images that are not assigned to a tooth double-click on the field showing the number "48". A light-blue exclamation mark is shown to the left of the tooth scheme.
- Page 53 Instructions for use DIAGNOcam 2170 5 Operation | 5.6 DIAGNOcam Function ▶ Click on exclamation mark to display all images (assigned and unassigned im‐ ages). A white exclamation mark is shown to the left of the tooth scheme. The images recorded (assigned and unassigned) are shown in the carousel in the middle and bottom of the window.
- Page 54 Instructions for use DIAGNOcam 2170 5 Operation | 5.6 DIAGNOcam Function Comparing images Images can be "fixed" in a window region on the top to allow them to be com‐ pared. You can then scroll through the images in another window region.
- Page 55 Instructions for use DIAGNOcam 2170 5 Operation | 5.6 DIAGNOcam Function ▶ Double-click on the large window region to divide the window region into two windows. The image is displayed reduced in size in the top left or right window region.
-
Page 56: Reconditioning Methods According To En Iso 17664
Instructions for use DIAGNOcam 2170 6 Reconditioning methods according to EN ISO 17664 | 6.1 Preparations for cleaning 6 Reconditioning methods according to EN ISO 17664 The listed instructions for cleaning and sterilising were validated as being suitable by the medical device manufacturer for preparing a medical device. This usually requires validation and routine monitoring of the procedure. -
Page 57: Machine Cleaning
Material damage caused by spray disinfection. ▶ Do not subject the DIAGNOcam to spray disinfection. KaVo recommends the following products based on material compatibility. The microbiological efficacy must be ensured by the disinfectant manufacturer. ▪ Microcide AF made by Schülke&Mayr (liquid or cloths) ▪... -
Page 58: Automated Disinfection
Only the tips can be sterilised. Sterilisation should directly follow cleaning. Bag the tips prior to sterilisation. The KaVo products released for sterilisation have a maximum temperature resist‐ ance of 138℃. KaVo recommends, e.g. - STERIclave B 2200/2200P made by KaVo - Citomat/K-Serie made by Getinge ▶... -
Page 59: Control And Functional Checks
Instructions for use DIAGNOcam 2170 6 Reconditioning methods according to EN ISO 17664 | 6.7 Control and functional checks 6.7 Control and functional checks 6.7.1 General ▶ Check for cleanliness. 6.7.2 Checking the tips ▶ Hold tips against a light source (e.g. daylight source) and check the optical fi‐... -
Page 60: Troubleshooting
Instructions for use DIAGNOcam 2170 7 Troubleshooting 7 Troubleshooting Note If the DIAGNOcam is being unplugged while the software is still running, error messages may be displayed at the next start-up. Always close the software be‐ fore unplugging the DIAGNOcam. -
Page 61: Accessories
Instructions for use DIAGNOcam 2170 8 Accessories 8 Accessories 1.005.1300 Tip large 1.005.1360 Tip small 59/64... - Page 62 Instructions for use DIAGNOcam 2170 8 Accessories 1.005.1380 Holder DIAGNOcam Additional accessories: USB extension cable 3 m Mat. no. 1.005.1076 CD DIAGNOcam multi-user Mat. no. 1.009.6958 CD DIAGNOcam single-user Mat. no. 1.009.5110 CD VDDS plugin software Mat. no. 1.009.6960 60/64...
-
Page 63: Data On Electromagnetic Compatibility According To En 60601-1-2
9.1 Electromagnetic Transmissions The DIAGNOcam 2170 device is designed for use in an environment as specified below. The customer or the user of the DIAGNOcam 2170 should ensure that the device is used in an environment of the specified type. -
Page 64: Immunity To Electromagnetic Interference
9.3 Immunity to electromagnetic interference The DIAGNOcam 2170 device is designed for use in an environment as specified below. The customer or the user of the DIAGNOcam 2170 should ensure that the device is used in an environment of the specified type. - Page 65 A site study should be considered to determine the electro‐ magnetic environment in terms of stationary transmitters. If the measured field strength at the site, at which the DIAGNOcam 2170 is used, exceeds the compli‐ ance levels shown above, the DIAGNOcam 2170 should be monitored to demon‐...
-
Page 66: Recommended Safe Distance Between Portable And Mobile Hf Telecommunications Equipment And The Treatment Unit
9.4 Recommended safe distance between portable and mobile HF telecommunications equipment and the treatment unit The DIAGNOcam 2170 is intended for use in an electromagnetic environment in which the HF interference parameters are controlled. The customer or the user of the DIAGNOcam 2170 can help prevent electromagnetic interference by main‐...
Need help?
Do you have a question about the DIAGNOcam 2170 and is the answer not in the manual?
Questions and answers