Table of Contents
Advertisement
Advertisement
Table of Contents

Subscribe to Our Youtube Channel
Related Manuals for Redback 106065


Summary of Contents for Redback 106065
- Page 1 40V Lithium Ion Cordless Line Trimmer MODEL # 106065 (106064 Kit) Operation Manual This safety alert symbol identifies important safety messages in this manual. Failure to follow this important safety information may result in serious injury or death. Part # 107368 Rev A...
- Page 2 For Service or Questions Call 1-877-487-8275 720-287-5182 www.redbackpowerusa.com Redback products are distributed by 1100 W 120th Ave, Suite 600 Westminster, CO 80234 • 720-287-5182...
-
Page 3: Table Of Contents
Table of Contents Important Safety Information Intended Use ...................4 Personal Protective Equipment ............4 General Safety ..................5 Safety Decals ..................6 Line Trimmer Assembly ................7 Installing the Trimmer Guard ..............7 Attaching the Running Wheel ...............7 Attaching the Plant Guard ..............7 Assembling and adjusting the shoulder strap........7 Set the shaft length.................8 Set the handlebar..................8 Set the operating angle................8... -
Page 4: Important Safety Information
Important Safety Information WARNING WARNING: Read and thoroughly understand all instructions and safety information before assembling or operating the line trimmer. Failure to do so may cause serious injury or death. Do not allow anyone to operate this line trimmer who has not read this manual. As with all power equipment, a line trimmer can be dangerous if assembled or used improperly. -
Page 5: General Safety
Important Safety Information General Safety Failure to follow warnings, cautions, assembly and operation instructions in the Operation Manual may result in serious injury or death. DANGER READ THE OPERATION MANUAL BEFORE OPERATION. • Do not permit children to operate this equipment at any time. •... -
Page 6: Safety Decals
Safety labels on the line trimmer are to remind you of important information while you are operating the unit. Make sure all safety warning decals are attached and in readable condition. Replace missing or defaced decals. Contact Redback USA at 1-877-487-8275 for replacement decals. -
Page 7: Line Trimmer Assembly
Line Trimmer Assembly Installing the Trimmer Guard The trimmer guard is an essential part of the line trimmer and must ALWAYS be used to prevent damage to the trimmer and injury to the operator. The guard is not attached to the trimmer when it is delivered to avoid damage in transit. -
Page 8: Set The Shaft Length
Line Trimmer Assembly Set the shaft length Adjust the trimmer length to the height of the user (see Figure 7). Loosen the threaded sleeve on the shaft coupling . Extend the lower shaft until the ideal handle length is reached Tighten the threaded sleeve Set the handlebar Adjust the handlebar to the height of the user (see Figure... -
Page 9: Overview Of Components
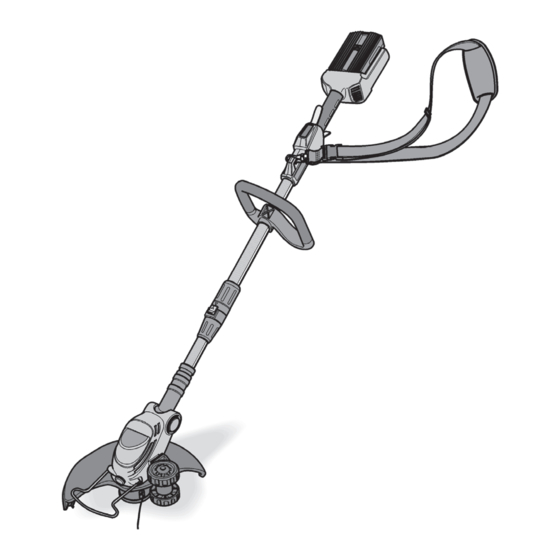
Overview of Components BATTERY INSERTION RECEPTACLE HANDLE SWITCH INTERLOCK ON/OFF SWITCH CUTTING HEAD SHOULDER STRAP COVER FASTENING LOOP HANDLEBAR CUTTING HEAD LINE SPOOL LOCKING CUTTING LINE LEVER SPRING UPPER SHAFT CUTTING HEAD SPOOL HOUSING SHAFT COUPLING LOWER SHAFT OPERATING ANGLE LOCK BUTTON MOTOR HOUSING VENTILATION OPENINGS... -
Page 10: Operation
Operation Clearance cutting The cutting head is guided parallel to the ground. When clearance cutting, guide the lawn trimmer in a semi-circle in front of your body. Figure 11 Edge cutting The edge cutting function allows you to trim precisely and comfortably along the edge of the lawn. -
Page 11: Automatic Line Advance
Operation Automatic line advance You can advance the cutting line without stopping the motor. To advance more cutting line, gently tap the cutting head on the ground while running the lawn trimmer (see Figure 14). The line blade in the guard cuts the line back to the correct length if too much cutting line is advanced. -
Page 12: Maintenance
Maintenance CAUTION Before performing any maintenance on the line trimmer, remove the battery. Changing the cutting head (see Figure 15) 1. Press and hold down the lock button 2. Loosen the cutting head by turning in an anti-clockwise Figure 15 direction and remove 3. -
Page 13: Winding The Spool With New Line
Maintenance Winding the spool with new line Note: Always use a cutting line with a maximum diameter of 1/16” (1.6 mm). If a thicker line is used, the motor may overheat or fail. 1. Remove the line spool as described on page 12. 2. -
Page 14: Cleaning & Storage
Cleaning & Storage Cleaning Do not use water or liquid detergents. Remove dirt and dust from the housing with a soft brush and dry cloth. Remove grass clippings from the underside of the trimmer. Keep the ventilation slots clean and free of dust. Storage Remove the battery from the line trimmer when not in use. - Page 15 Notes...
-
Page 16: Warranty & Specifications
2.0Ah (included with kit) Battery Charger 2A Charger (included with kit) Warranty 3-Year Limited Warranty; 1-Year on Battery For Service or Questions Redback products are distributed by Call 1-877-487-8275 720-287-5182 1100 W 120th Ave., Suite 600 www.redbackpowerusa.com Westminster, CO 80234 • 720-287-5182...
Need help?
Do you have a question about the 106065 and is the answer not in the manual?
Questions and answers