
Related Manuals for Redback E522D


Summary of Contents for Redback E522D
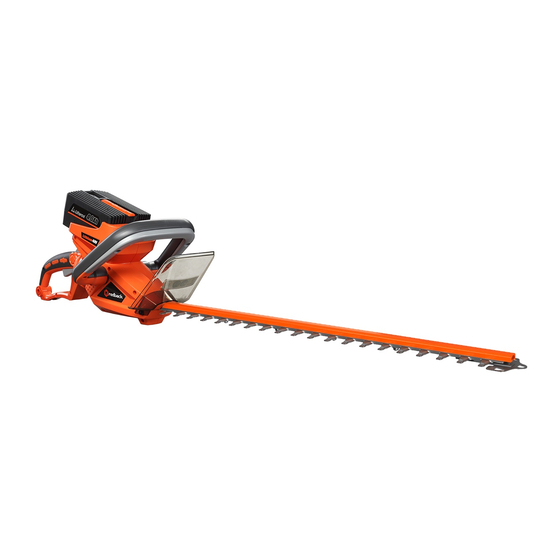
- Page 1 40V LITHIUM-ION CORDLESS HEDGE TRIMMER Model: E522D Operations Manual www.redbacktool.com support@redbacktool.com...
-
Page 2: Table Of Contents
TABLE OF CONTENTS This trimmer is equipped with a dual switch safety feature. The saw will • Symbols……………………..1 not operate unless both the front handle • Safety Instructions………………2 switch and the rear handle switch are • Major Parts of the engaged. -
Page 3: Safety Instructions
Safety Instructions warranty and the manufacturer will User reject any liability. The user is liable for all injuries to third parties and damage to their property. This garden tool is not intended for use Operate the unit only in the technical by persons (including children) with condition as stipulated and delivered by reduced physical, sensory or mental... - Page 4 Personal Safety outlet. Never modify the plug in any way. Do not use any adapter plugs with 1. Stay alert, watch what you are doing earthed (grounded) power tools. and use common sense when operating Unmodified plugs and matching outlets a power tool.
- Page 5 parts. Loose clothes, jewelry or long hair users. can be caught by moving parts. 5. Maintain the power tools. Check for misalignment or binding of moving parts, 7. If devices are provided for the breakage of parts and any other connection of dust extraction and condition that may affect the power collection facilities, ensure that these...
- Page 6 or other small metal objects that can If the cutter comes into contact with a make a connection from one terminal to live line, metallic parts of the unit may another. Shorting the battery terminals become energized and cause an electric together may cause burns or fire.
- Page 7 Use the unit only in daylight or in supplied installation instructions and good artificial lighting. remove the battery beforehand. Use the unit in dry conditions only. Have repairs carried out Protect it from rain and moisture. exclusively by a qualified technician or a Ensure that the cutter does not service center.
- Page 8 Never use the charger if cable, products, there is a risk of injuries as plug or the unit itself has been damaged well as damage caused by exploding by external influences. Take the charger batteries. to the nearest service center. The battery voltage must match Never open the battery charger.
- Page 9 vibration emission level represents the main applications of the tool. However if the tool is used for different applications, with different accessories or poorly maintained, the vibration emission may differ. This may significantly increase the exposure level over the total working period.
-
Page 10: Major Parts Of The
MAJOR PARTS OF THE HEDGE TRIMMER 1. Battery pack 6. Protective guard 2. Rear Handle 7. Front handle switch 3. Trigger Switch 8. Handle rotation lock button 4. Front Handle 9. Trigger lock button 5. Cutting blade... -
Page 11: Product Specifications
PRODUCT SPECIFICATIONS Tool Hedge Trimmer Model E522D Electrical Voltage 40 V 22” Cutting length 0.71” (18mm) Cutting diameter No-Load Speed 1300 RPM Motor Type Brush 0.86” (22mm) Teeth Pitch Battery EP20 2.0Ah 40 mins EP40 4.0Ah 95 mins EP60 6.0Ah... -
Page 12: Assembly And Operation
ASSEMBLY AND OPERATION • To remove, press the release button GENERAL SAFETY WARNING #1! (1) and pull out the battery (2). Before Initial Operation Unpack the garden tool and accessories and check that no parts are missing or damaged. NOTE: The batteries (optional; depending on delivery scope) are not fully charged on delivery. -
Page 13: Battery Charger Function
Press the switch (2) and the safety switch (3). The hedge trimmer runs. Switching Off NOTE: The hedge trimmer will not turn Release either of the two switches. The on when the rear handle is not securely cutter bar stops. engaged in the respective end position. - Page 14 Charging the Battery Cleaning the Cutter Bar (after each use) 1. Plug the charger into an AC outlet • Remove the battery. 100-250V (normal household voltage). • Clean the cutter bar after each use. 2. Insert the battery into the slots of the charger and slide Remove contamination, remains of into place until the battery locks into...
- Page 15 Never touch wire fences or the ground with the running cutting mechanism. If cutting hedges over a prolonged period, interrupt your work more frequently and oil the cutter bar. Switch the engine off and remove the battery: • Cut the sides of the hedge first and to remove blockages (jammed then the top.
- Page 16 Operating the Hedge Trimmer 1. Do not force the hedge trimmer through heavy shrubbery. This can cause the blades to bind and slow down. If the blades slow down, reduce the pace • Cut the upper edges of the hedge slightly round.
- Page 17 strength of the hedge and allows more light to reach the leaves. If the blades do become jammed, release the trigger switch and allow the blades to stop. Remove the battery pack before attempting to remove the obstruction. Wear gloves when trimming thorny or prickly growth.
-
Page 18: Exploded View And Part List
EXPLODED VIEW AND PARTS LIST... -
Page 19: Maintenance And Care
MAINTENANCE AND long service life. Preferably use environmentally friendly lubricants, e.g. CARE service sprays. GENERAL SAFETY 6. Place the hedge trimmer on its side WARNING #1! and apply a thin film of oil to the cutter bar. Blade Care For your own safety, perform 1. -
Page 20: Disposal
2. Always fit the blade cover over the Do not throw electric power tools into the blades before storage. This will protect the household waste! In accordance with the blades from damage and prevent injury on European Directive 2012/19/EC on Waste the sharp blades. - Page 21 comes into force on the date the product was purchased. The guarantee covers only the defects which can be attributed to a material and/or production fault as well as non- performance of warranted characteristics. You can extend the warranty if you register this product online within 30 days of purchase.
Need help?
Do you have a question about the E522D and is the answer not in the manual?
Questions and answers