Table of Contents
Advertisement
Quick Links
C.A.T
3
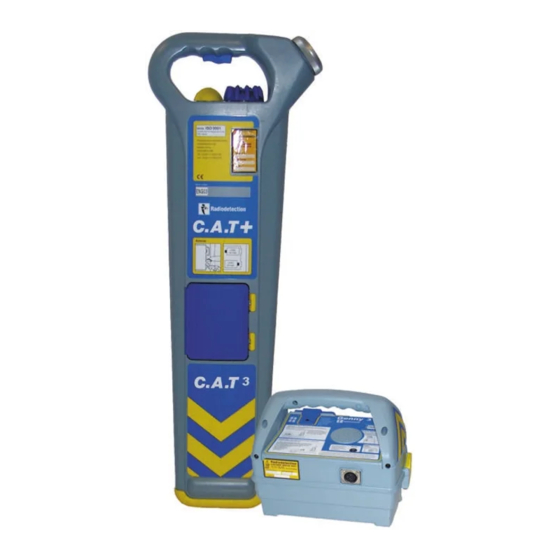
Locator features
C.A.T
3
and Genny
3
User Guide
1 On/Off
Press and hold to use C.A.T
3
2 Loudspeaker
C.A.T
3
and Genny
3
Detachable speaker for use
C.A.T
3
V and Genny
3
in noisy environments
C.A.T
3
+ and Genny
3
3 LCD Meter
Only on C.A.T
3
V and C.A.T
3
+ models
4 Sensitivity Control
5 Function Switch
Selects locate mode
6 Battery compartment
To replace batteries, open the
access cover using a screwdriver
or coin. Use two LR20 or D type
alkaline batteries (or equivalent
NiMH rechargeable batteries)
WARNING
When using the C.A.T
3
in noisy environments, the
This User Guide covers the use of the C.A.T
3
speaker can be detached and held closer to the ear.
and Genny
series of C.A.T and Genny locator
To avoid excessive noise exposure it is advisable to
3
hold the speaker no closer than 15cm (6") from the ear.
which is available in three versions.
Prolonged use at this level should be avoided.
• C.A.T
3
providing four functions and an
audio signal indicator (speaker)
• C.A.T
3
V providing four functions, audio and
visual indication (LCD display)
Genny
3
Transmitter
features
• C.A.T
3
+ providing four functions, audio and
visual indication and depth estimation in
Genny mode
1 On/Off button
Press to switch On and
• Both the C.A.T
3
+ and C.A.T
3
V may be fitted
Off. Press and hold to
with the Power StrikeAlert™ feature that
reduce volume
detects shallow cables radiating power or
Genny signals
2 Direct connection socket
The C.A.T
3
and Genny3
3
series of locator are
identified by their grey housing.
3 Loudspeaker
The Genny
3
is compatible with all three
versions of C.A.T
3
and also with previous
4 Battery compartment
33kHz C.A.T models.
To replace batteries, open the
access cover using a screwdriver
or coin. Use four LR20 or D type
alkaline batteries (or equivalent
NiMH rechargeable batteries)
www.radiodetection.com
5 Storage compartment
Holding connection cable,
Ground stake and ground cable
6 Pulse/Continuous switch
C.A.T
3
V and C.A.T
3
+ LCD features
The main features of the C.A.T
V and C.A.T
+ are the same
3
3
as the C.A.T
3
but the addition of a liquid crystal display
brings further features.
• Depth (C.A.T
3
+ only)
• Battery indicator (flashing icon indicates
that batteries are getting low)
• Signal strength indicator
• Mode/clockface indicator
• Depth button
Note the Genny
is compatible with all 33kHz versions
3
of C.A.T
3
/ C.A.T
3
V / C.A.T
3
+
Operation of Power, Radio
and AvoidanceScan
™
modes
Regularly check your C.A.T
3
and Genny
3
, in all modes,
over a cable which gives a response you are familiar with.
AvoidanceScan
™
Use the AvoidanceScan
™
mode to undertake an initial sweep
of an area to be excavated. AvoidanceScan
™
will
detect all modes simultaneously.
Power signals:- radiated by loaded, unbalanced cables.
These signals are also found on other nearby conductors
that 're-radiate' the power signal.
Radio signals:- originate from distant radio transmitters.
These penetrate the ground and are re-radiated by buried
conductors. However, they are not always present.
Genny signals:- present on buried conductors that have had
a Genny signal applied. There are various ways of applying
the Genny signal (see Locating with the C.A.T
2
3
Using AvoidanceScan
™
Grip the handle.
Squeeze trigger and listen for bleep indicating the
batteries are OK. Replace both batteries if there is
no bleep or if the battery icon is flashing.
Turn Function Switch to A (AvoidanceScan
™
) to sweep the
area for conductors radiating Power, Radio or Genny signals.
In this mode the depth button will not be active (CAT+)
and the sensitivity control will only adjust the Genny
signal level. (P and R will be set to maximum sensitivity).
Keep the sensitivity at maximum unless there is a blanket
Genny signal, in which case turn down the sensitivity until the
blanket Genny signal is reduced to a usable level.
Note
Best results are obtained in the AvoidanceScan
™
mode when
the Genny is set to pulse operation.
Sweep the area to be excavated with a steady and
deliberate motion. Hold the C.A.T
3
with the blade vertical
and with the bottom end just above the ground. Ensure
the whole area is covered by adopting a grid pattern.
Maximum meter (C.A.T
3
V and C.A.T
3
+) and speaker
response indicates the position of a buried conductor.
If necessary switch to a dedicated mode (P,R or G)
to pinpoint the conductor, adjusting the signal level control
to give a narrow locate band over the conductor. Rotate the
C.A.T
3
to give maximum response. The C.A.T
3
is now at right
angles to the conductor. (This can be less precise
in the power mode
because of the nature
of the power signal).
Trace the buried conductor keeping the C.A.T
3
vertical and
moving it steadily from side to side. Follow the line of the
buried conductor marking it with chalk or paint across the
area to be excavated.
Switch back to AvoidanceScan
™
mode to resume the sweep
3
and Genny
3
).
of the area to be excavated.
4
Operation of Power and Radio modes
Functional Test
Power and Radio modes can be used independently
C.A.T
3
/ C.A.T
of AvoidanceScan
™
and it is recommended that this
is done to pinpoint services in very congested areas.
•
Set the Genny
on the ground
Regularly check your C.A.T
3
and Genny
3
, in all modes,
•
Check there is an audible sound from the speaker
over a cable which gives a response you are familiar with.
•
Place the C.A.T
the Genny
Using Power mode
Select Power using the function switch.
Grip the handle.
Squeeze trigger and listen for bleep indicating the batteries
are OK. Replace both batteries if there is no bleep or if the
battery icon is flashing.
With the sensitivity switched on aModed set to maximum
sensitivity, check that the audio response (which should
Rotate the Sensitivity Control fully clockwise for
be synchronised with the Genny
maximum sensitivity but reduce if there is a blanket
in the table below.
signal across the site.
Mode
Define the area to be
Power
excavated and carry
out a grid pattern sweep
Radio
as described in
Genny
AvoidanceScan
™
.
Avoidance
The presence of a
buried metallic pipe or
Mouse transmitters for non-metallic pipe location
cable will be indicated
These devices have relatively short battery lives.
by a tone emitted from
They should always be fitted with new batteries before
the speaker. Keep the
use. Insert one battery and use a tested C.A.T
blade of the C.A.T
3
or C.A.T
3
+ to confirm that the Mouse can be located at
vertical and move slowly
4 metres. Remember that the C.A.T
backwards and forwards
line with the Mouse which is the opposite to that which
over the cable or pipe, reducing the sensitivity for a narrower
is normally used for pipe or cable locating.
response. If using a C.A.T
3
V or C.A.T
3
+ use the meter
deflection to aid pinpointing. Maximum meter deflection
indicates the position of the conductor.
Trace the conductor out of the area, marking the position
with chalk or paint.
StrikeAlert
™
(check for StrikeAlert
™
Activation Sticker on
Radiodetection Ltd, Western Drive, Bristol BS14 0AF, UK
the side of the C.A.T
3
next to the meter). If the StrikeAlert
™
Tel: +44 (0) 117 976 7776 Fax: +44 (0) 117 976 7775
option is activated (C.A.T
V or C.A.T
+ versions) the mode
email:sales.uk@radiodetection.spx.com
3
3
icon will flash a ' ' when the locator detects a shallow cable
Radiodetection, 154 Portland Road, Bridgton, Maine 04009, USA
radiating a power or Genny signal. This is a useful shallow
Toll free: 1-877-247-3797 Tel: (207) 647-3185 Fax: (207) 647-9596
email bridgton@radiodetection.spx.com
cable indicator but it should be remembered that not all live
power cables radiate a signal that the C.A.T
3
can detect.
www.radiodetection.com
Do not use the StrikeAlert
feature to confirm the area
™
Service and Maintenance
is free from shallow cables.
The C.A.T
3
and Genny
as with all safety equipment, it is recommended that they are serviced at least once a year
either at Radiodetection or an approved repair centre.
ALWAYS DIG WITH CAUTION.
Radiodetection products are under continuous development and are subject to change
without notice.
5
3
V / C.A.T
3
+
3
to pulsed operation, switch on and place
3
flat on the ground and pointing toward
3
3
audio output) as detailed
Test Distance
Audio Output
30cm (1ft)
Pulsed, clearly audible
1.5m (5ft)
Pulsed, clearly audible
15m (50ft)
Pulsed, very high volume
15m (50ft)
Pulsed, very high volume
3
, C.A.T
3
V
3
blade must be in
3
are designed so that they do not require regular calibration. However,
90/UG063ENG-03
12
Advertisement
Table of Contents

Related Manuals for Radiodetection C.A.T3V and Genny3


Summary of Contents for Radiodetection C.A.T3V and Genny3
- Page 1 Radiodetection or an approved repair centre. ALWAYS DIG WITH CAUTION. the Genny signal (see Locating with the C.A.T and Genny of the area to be excavated. Radiodetection products are under continuous development and are subject to change www.radiodetection.com without notice. 90/UG063ENG-03...
- Page 2 Call your local support number (available from www. position of the target line. approximate depth to the Mouse will then be displayed. radiodetection.com) for questions regarding the proper use, maintenance, and repair of the C.A.T and Genny When directly over the line and with the sensitivity level set...
Need help?
Do you have a question about the C.A.T3V and Genny3 and is the answer not in the manual?
Questions and answers