Table of Contents
Advertisement
Quick Links
Advertisement
Table of Contents

Related Manuals for Bristan HY POWSHX W


Summary of Contents for Bristan HY POWSHX W
- Page 1 Installation Instructions and User Guide Thermostatic Power Shower 1500 Models Covered: HY POWSHX W Please keep this booklet for future reference. Installer, when you have read these instructions please ensure you leave them with the user.
-
Page 2: Table Of Contents
Contents Welcome to your new Bristan Power Shower. It has also been designed and tested in the UK to all of the relevant British Standards. These instructions contain all of the necessary installation and operating information, so please read them thoroughly and keep for future reference. -
Page 3: Important Safety Information
• All products manufactured any electrical connections or if you and supplied by Bristan are safe have to remove the cover of an provided they are installed, used installed unit. -
Page 4: Water Requirements
Water tank detail Cold Water Storage Tank 1m Minimum Isolating For correct operation of the Bristan Thermostatic Valves Power Shower both hot and cold supplies to the unit must be gravity fed, at nominally equal pressures, Water from a cold water storage tank and hot water Storage storage cylinder. -
Page 5: Electrical Requirements
Electrical Requirements The shower must only be connected to a 230/240V AC electrical supply, from a 13-amp ring main; via a fused double pole switch with at least 3mm contact separation. A manual switch is to be clearly identifiable, with a minimum distance of 2.5m from a fixed tap or shower, i.e. -
Page 6: Product Features
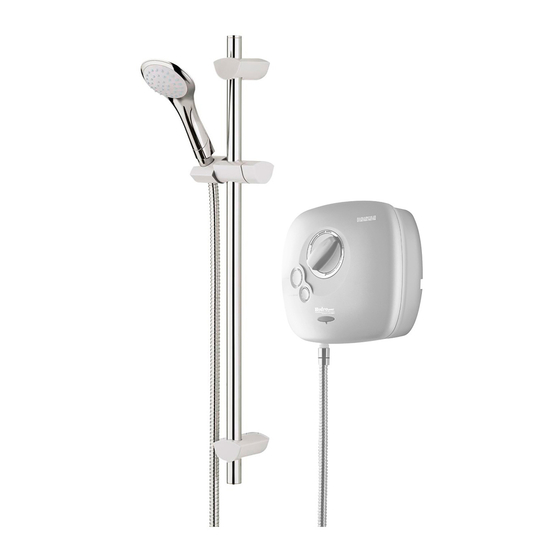
Product Features 1. Push Button STOP/START Switch Electronic switch 2. Temperature Control Adjustable Temperature Control 3. Eco Button Non-powered shower 4. Hose outlet Shower hose outlet Handset The Handset has three spray modes: 1. Spray 2. Jet spray 3. Combination spray To select the desired showering mode, simply rotate the spray head one way or the other to the... -
Page 7: Operating The Shower
Operating the Shower To operate the shower ensure the temperature control knob (1) is set Reduce Elbow to 63mm approximately to the 12 o’clock position and press the Stop /Start button (2). Adjust the shower temperature by turning the knob anti-clockwise - towards red, for warmer temperature, and clockwise - blue, for cooler. -
Page 8: Specification
Specification Specifications Inlet Connection Inlet Water Temperature Cold Water Supply Hot Water Supply Working Pressures 15mm Push-Fit Min: 0.1 Bar Max: 1.0 Bar 65°C 60°C 20°C 5°C Outlet Connection 1/2” BSP Recommended: 60°C Min: 5°C Max: 20°C Male Max: 65°C Pressure Pressure Threaded... -
Page 9: Prior To Installation
Prior to Installation Please note that this product comes packaged with the front cover and control knobs already in place. These have to be removed to install the shower. Please follow the procedure below. Removing Cover 1. Temperature Control handle 2. -
Page 10: Installation - Surface Mounted
Installation - Surface Mounted Connecting pipework can feed from above or below the unit, or straight through the wall at nominal centres of 40mm. Pipe entry grommet Remove If exposed pipe work is the chosen center option, the pipes enter the unit on the portion right hand side with the cold on the (15mm) -
Page 11: Installation - Recessed Pipework
Installation - Recessed Pipework Connecting pipework can feed from above or below the unit, or straight through the wall at nominal centres 40mm of 40mm. If the pipe work is to be recessed, 40mm it should be let into the wall with the ends of the hot and cold pipes standing 40mm off the finished surface of the wall, and centres 40mm... -
Page 12: Fixing The Riser Rail To The Wall
Fixing the Riser Rail to the Wall When working near a basin, bath or shower insert plug or cover waste to prevent losing small parts. Take care not to drop tools/equipment into basin, bath or shower during shower installation. Note: If replacing an existing riser rail, check to see if the existing holes can be reused or covered by the new wall brackets. -
Page 13: Commissioning - Testing The System
Commissioning - Testing the System Connect the shower hose to the unit but do not fit the handset. Fit the front cover as shown in ‘Prior to Installation’. Turn on the hot and cold isolating valves, and the electricity-isolating switch. Place the open end of the hose in the bath or shower tray. -
Page 14: Maintenance
QR Code and search for your product. Alternatively visit www.youtube.com/bristantv Alternatively visit www.bristan.com/search Need help? Give us a call on 0330 026 6273 and speak to one of our trained advisors. -
Page 15: Spare Parts
Spare Parts Part No. Description COVER-1500XY-HY-WT Front Cover Assembly incl. Wiring SP-087-0505-WT Control Knob SP-087-0230 Solenoid Valve SP-087-0110 Pump Unit SP-087-0154 Mixer Valve Assembly 490-0141 Non-Return Valve 086-0060 Long Inlet Elbow SP-087-0231 Wiring Loom HAND125 WC Multi-Function Handset 100048 Riser Rail Bracket 100050 Riser Rail 100049... - Page 16 Email: enquire@bristan.com A Masco Company At Bristan, we want to make things as easy as possible for our customers. That’s why we offer solid guarantees on all our products, effective from the date of purchase, to give you peace of mind.
Need help?
Do you have a question about the HY POWSHX W and is the answer not in the manual?
Questions and answers