Table of Contents
Advertisement
Installation Instructions
and User Guide
Joy Care Electric Shower
joy care
joy care
joy care
4
3
2
1
Start / Stop
Please keep this booklet for future reference.
Installer, when you have read these instructions
please ensure you leave this document and the Large
Print User Guide with the end user.
5
6
7
8
9
Advertisement
Table of Contents

Related Manuals for Bristan Joy care


Summary of Contents for Bristan Joy care
-
Page 1: Installation Instructions
Installation Instructions and User Guide Joy Care Electric Shower joy care joy care joy care Start / Stop Please keep this booklet for future reference. Installer, when you have read these instructions please ensure you leave this document and the Large... -
Page 2: Table Of Contents
Contents Welcome to your new Bristan electric shower. Featuring a contemporary design with lots of features, Bristan’s electric shower collection has been designed to be easy to fit and to use. It has also been designed and tested in the UK to all of the relevant British Standards. -
Page 3: Important Safety Information
Troubleshooting section (see page 30) or contact Bristan Customer Services. • All products manufactured and supplied by Bristan are safe provided • Do not crush or kink the shower they are installed, used correctly hose, this could damage the hose,... -
Page 4: General Information
General Information • Always switch off the power at • Important: Before using the the consumer unit and isolate the shower for the first time the electrical supply before making any commissioning purge sequence must electrical connections or if you have to be carried out. -
Page 5: Product Features
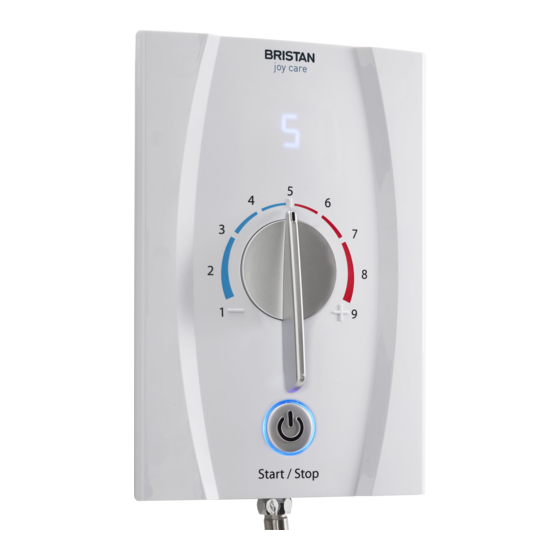
Product Features 1. Push Button Start/Stop Button Press once to start the shower, press once again to stop the shower. joy care joy care joy care If audible sounds are enabled a single short beep will be heard when the button is pressed to turn the shower on. -
Page 6: Specifications
Specifications Specifications Outlet Water Temperature Application Abbreviated Maximum Set Plumbing Connections Designation Temperature✳ Inlet connection: 15mm Push fit Shower -IW-S 41ºC Outlet connection: 1/2” BSP male threaded ✳ At point of discharge Water inlet entry points Left hand side: Top, Bottom, Rear (bottom) Require a drainage pump? Right hand side: Bottom, Rear (bottom) We recommend the Whale Instant Match Varispeed with... -
Page 7: Electrical Requirements
Electrical Requirements Warning: This appliance MUST Isolating Double pole valve switch be earthed! Rating at 240V Rating at 230V joy care joy care joy care 8.5kW 7.8kW For Cable Capacity 9.5kW 8.7kW see Cable Current Shower unit Carrying Capacity Table on page 6 The Electrical Installation and Circuit Protection of this shower must comply with current I.E.E Wiring Regulations (BS 7671) and... -
Page 8: Electrical Requirements
Electrical Requirements cont. It is a requirement that a residual current device (RCD) formerly On installation of the appliance the impedance known as an earth leakage circuit breaker (ELCB) with a tripping measurement of the Neutral and Earth back to current of 30mA, is incorporated in the circuit. -
Page 9: Water Requirements
If the shower is to be installed in a hard water area, we recommend that an in-line scale inhibitor is fitted which will prolong the life of the shower. Please refer to your supplier for advice. joy care joy care joy care... -
Page 10: Fixing Your Shower To The Wall
Warning: Please check for any hidden pipes and cables before cover screws drilling holes in the wall. Remove the 4 cover retaining screws and lift off the cover. joy care joy care joy care Do not try to remove the control knobs from the cover. They are an integral part of the cover and must not be removed. -
Page 11: Plumbing Connections
Plumbing Connections Inlet Entry Options Select the inlet option most suited to your situation. Bottom left inlet entry Bottom right inlet entry Top left inlet entry Rear left inlet entry - Rear right inlet entry - Rear left inlet entry - requiring rear access requiring rear access using a 15mm compression elbow... - Page 12 Plumbing Connections cont. Warning: The outlet of the shower acts as a vent and must not be blocked, restricted or connected to any tap/ closure device other than the handset supplied. Do not solder within 300mm of the shower unit or allow solder or flux to fall onto the casings.
-
Page 13: Plumbing Connections
Plumbing Connections cont. Hole Cover Fitting Back of unit Top left entry: Depending on your choice of cold-water entry direction, you may need to remove thin areas of plastic cover to facilitate pipe work entry down through the top left of the unit. Bottom entry: Depending on your choice of cold-water entry direction, fit ‘hole covers’... -
Page 14: Electrical Connections
Electrical Connections Warning: This appliance and all connecting metal pipe work must be earthed. • Ensure that an earth continuity conductor is securely and permanently connected to all exposed metal parts of other services and appliances within the room where the shower is installed. - Page 15 Electrical Connections cont. Electrical Connection Entry Point Options - continued Alternatively, if preferred, it is possible to route the cable from the rear bottom right or bottom right positions as shown below by stripping the sheath back further. Select the cable inlet option most suited to your situation. ...
- Page 16 Electrical Connections cont. Switch OFF the electricity supply at the consumer unit. The power cable entry point is shown on the diagram. Electrical connection to be made at the terminal block as follows: Earth cable to the terminal marked with the Earth symbol Neutral cable to the terminal marked N Live cable to the terminal marked L Important: Terminals must be fully tightened onto the cables...
-
Page 17: Installer Settings
Installer Settings The temperature control has been factory pre-set to 41ºC (at dial position 5) to meet BEAB care mark. The maximum set temperature can be adjusted to suit user preference between 38-45ºC. If the maximum temperature is adjusted from the factory set 41ºC the shower will no longer meet the BEAB care mark. - Page 18 Installer Settings Max Temperature TL1 / TL2 / TL3 Switch Position 38ºC ON / ON / ON 39ºC OFF / ON / ON 40ºC ON / OFF / ON 41ºC (BEAB CARE) OFF / OFF / ON Factory Set 42ºC ON / ON / OFF 43ºC OFF / ON / OFF...
- Page 19 Installer Settings User Settings Audible Sounds Before operating the shower for the first time there are some This setting ensures the user can hear beeps for each optional user settings which must be set in accordance with function on the shower. the intended user.
-
Page 20: Installer Settings
Installer Settings Audible Sounds ON = Switch 4 ON (Factory Set) OFF = Switch 4 OFF Need help? Give us a call on 0844 701 6273 and speak to one of our trained advisors. -
Page 21: Fixing The Front Cover
Fixing the Front Cover • Plug in the cable from the cover to the connection (8) inside the unit. • Rotate the temperature control knob to position 5 marked on the front cover. • Locate cover in position ensuring wiring is not trapped. •... -
Page 22: Fitting Your Riser Rail To The Wall
Fixing Your Riser Rail to the Wall Fitting the Riser Rail Before proceeding with fitting the rail, identify each of the items supplied using the illustration on the right. The Slider should not be removed from the rail during fitting. The underside of the slider has a button to release the slider and allows Large hole the height to be adjusted. -
Page 23: Commissioning - Testing The System
Commissioning - Testing the System Warning: Before using the shower for the first time, it should receive a final flush through to remove any remaining debris that joy care joy care joy care may be in the pipe work or hose and to ensure the heater unit contains water before the electrical elements are switched on. -
Page 24: In-Service Testing
In-Service Testing Commissioning and In-Service Tests Commissioning and In-Service Tests D.1. Commissioning D.2.3 Using the measuring equipment recorded in D1.4 or equipment to the same specification and with the appliance D.1.1 Purpose turned off check that: Since the installed supply conditions are likely to be different a. -
Page 25: In-Service Testing
In-Service Testing cont. Commissioning and In-Service Tests D.3.1.1 6 to 8 weeks after commissioning, conduct the tests given in D.2.2. D.3.1.2 12 to 15 weeks after commissioning, conduct the tests in D.2.2. D.3.1.3 Depending on the results of D.3.1.1 and D.3.1.2 several possibilities exist: a) If no significant changes (e.g. -
Page 26: Operating The Shower
Please ensure the commissioning procedure has been carried out. If you did not fit this shower yourself and you are about to use it for the first time, check with the installer to ensure he or she has run the joy care joy care joy care commissioning procedure as described on page 23. - Page 27 Operating the Shower cont. Adjusting the Showerhead Note: The spray head mode may need to be altered during winter conditions (low flow conditions) to achieve a satisfactory spray. Your showerhead has 3 spray modes - spray, jet spray and combination. Simply rotate the spray head one way or the other until it ‘clicks’...
-
Page 28: Maintenance
Maintenance General Cleaning Before attempting to clean your shower unit you must switch off the power at the isolating switch. Do not remove the cover. Cleaning the Outlet Hose Do not use abrasive cleaners or solvents to clean this unit. The shower unit and accessories should be cleaned with a soft, clean, Mesh Filter damp cloth. -
Page 29: Maintenance
Maintenance cont. BEAB care Maintenance Schedule To meet the requirements of the BEAB care mark regular routine maintenance is required to the inlet filter. The first service should be carried out 6 months after installation. The service should then be carried out yearly to ensure the filter is clean to ensure there are no restrictions to the shower. -
Page 30: Troubleshooting
Troubleshooting Symptom Possible Cause/s Action/Remedy Letters ‘LP’ appear on Low pressure water supply to the shower Turn unit off and wait until water pressure front panel. unit. increases before using again. Water Isolating Valve partially closed Open water isolating valve fully. Low water flow through showerhead. -
Page 31: Guarantee
The registration of your cancelled appointments, unless advised to Bristan at least personal details is purely for Bristan use and the remaining 24 hours in advance of the agreed date and time. information helps us to make products for the future. -
Page 32: Spare Parts
Spare Parts Please visit: www.bristan.com/sparesfinder in order to find spare parts for this product. joy care joy care joy care Start / Stop Part No. Description Parts List Quantity 245-300-3-85 Heat Exchange Unit Ass. 8.5 kW Heat Exchange Unit 8.5 kW x1, Metal Clip x1, inc. O-rings x2 245-300-3-95 Heat Exchange Unit Ass. - Page 33 Spare Parts Need help? Give us a call on 0844 701 6273 and speak to one of our trained advisors.
-
Page 34: Spare Parts
Spare Parts cont. Part No. Description Parts List Quantity 1408A0A Riser Rail End Cap Chrome Riser Rail End Cap x1 1408A0A MC Riser Rail End Cap Matt Chrome Riser Rail End Cap x1 11043A0A Wall Bracket Ass. Chrome Wall Brackets x2, Wall Bracket End Caps x2, Screws x2, Wall Plugs x2 11043A0A MC Wall Bracket Ass. -
Page 35: Notes
Notes Please use this space to add any notes you or your installer may have regarding the plumbing system / installation of this product. Need help? Give us a call on 0844 701 6273 and speak to one of our trained advisors. - Page 36 Part Number: FI ES JOY CARE Issue: D5 Bristan Group Ltd. Birch Coppice Business Park Dordon Tamworth Staffordshire B78 1SG Web: www.bristan.com Email: enquire@bristan.com A Masco Company...
Need help?
Do you have a question about the Joy care and is the answer not in the manual?
Questions and answers
How is the brystan joy boiler cleaned of lime scale