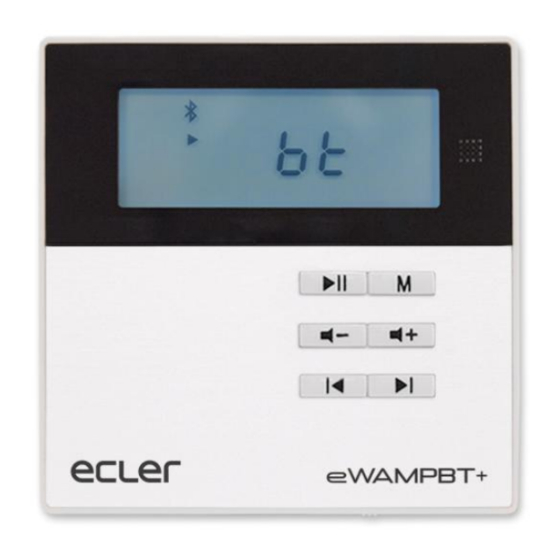
Summary of Contents for Ecler eWAMPBT+
- Page 1 eWAMPBT+ COMPACT AMPLIFIERS Stereo wall amplifier with media player and BT connection USER MANUAL...
-
Page 2: Table Of Contents
TABLE OF CONTENTS IMPORTANT SAFETY INSTRUCTIONS ........... 3 KEY FEATURES ................6 FRONT PANEL ................7 STARTUP ..................8 4.1. FM ..................... 8 4.2. SD ....................8 4.3. USB .................... 9 4.4. BT CONNECTION ............... 9 4.5. AUX INPUT & AUX OUTPUT ............ 10 MECHANICAL DIAGRAMS ............ -
Page 3: Important Safety Instructions
1. IMPORTANT SAFETY INSTRUCTIONS • Read this instructions manual careful and follow all the indications and safety warnings. • Keep the instructions manual in an easily accessible place for consulting at any time when needed. • Do not handle the device or alter any of its parts, including the electrical connection, mechanical fastening and external structure. - Page 4 • Immediately disconnect the equipment from the power supply in the event of noting any kind of breakdown or damage to the same that may be hazardous. Then contact the authorized technical service. • Clean the equipment with a dry cloth or with neutral soap and a slightly damp cloth.
- Page 5 WARNING: This symbol indicates risk of electric shock inside the device. Under no circumstance should the device be opened while powered up. WARNING: This symbol indicates that precautions should be taken when handling and connecting the device. Observing certain indications in the instructions manual is required..
-
Page 6: Key Features
2. KEY FEATURES Built-in 2x10 WRMS high efficient amplifier @ 8 ohm (min. load) LED screen Multiple music connection modes, including FM, micro SD, USB, Bluetooth, AUX input and AUX output Supports MP3, WMA, WAV and FLAC ... -
Page 7: Front Panel
3. FRONT PANEL Infrared receiver Display Mode (source selection) Play/pause Volume up Volume down Next Previous Micro SD Power ON connect the AC terminals to electrical mains WARNING: supply before powering ON the device. -
Page 8: Startup
4. STARTUP 4.1. FM Press M key to choose FM mode. Automatic Search: long press to start the automatic channel search and the system will automatically save the available radio stations. Manual tuning mode: long press to enter the manual tuning mode;... -
Page 9: Usb
4.3. USB Press M key to choose USB mode. If there is no USB device, the display will show “NO” and flicker. If files are not supported or there are no files, the display will show “----“. Play control: to play/pause. Short press to navigate through songs. -
Page 10: Aux Input & Aux Output
4.5. AUX INPUT & AUX OUTPUT Press M key to choose AUX1 input mode. Play control: to play/mute. When it is muted, the display will flicker. Sensitivity adjustment: long press to select S1 or S2 sensitivity adjustment. S1: input and output 500mV; S2: input 1000mV, output 500mV) Volume control: short press + or... -
Page 11: Remote Control
6. REMOTE CONTROL 1. Standby 2. Mode selection (source selection) 3. Mute 4. Equalization mode selection 5. Menu (not available) 6. Transport & volume control 7. Play mode selection 8. Number keys. In SD mode allows to select a track number. In FM mode allows write the FM frequency. -
Page 12: Technical Specifications
7. TECHNICAL SPECIFICATIONS eWAMPBT+ Power input 100-240V Output power 2x10 WRMS @ 8ohms Minimum load 8 ohm THD ≤0.03% (1KHz, 1W, 8Ω) S/N ratio >81dB Frequency response 20Hz~20kHz Sensitivity Aux input (adjustable) AUX: 1V/500mV Aux output 0dBV Audio formats MP3, WMA, WAV, FLAC BT connection BT2.1+EDR Storage Supports TF card up to 32GB Dimensions 86×86×38mm... -
Page 13: Rear Panel
8. REAR PANEL 1. Power input: 100-240V (2xRV 1.0mm² multistranded copper core flexible wire) 2. FM antenna 3. Signal ground 4. Audio input (2×0.3mm² double-shielded audio cable) 5. Audio output (2×0.3mm² double-shielded audio cable) 6. Power amplifier output (2×0.3mm² double-shielded audio cable) -
Page 14: Installation
all wire connections shall not be naked IMPORTANT NOTE: Function Symbol Name Null line Power input Live wire FM antenna Signal ground Audio input right AUX INPUT Audio input left Audio output right AUX OUTPUT Audio output left OUTL+ Left speaker + terminal Power amplifier output 8 OUTL- Left speaker - terminal... -
Page 15: Packing List
3. Insert the eWAMPBT+'s front panel. PACKING LIST Front panel Rear panel Remote control Mounting screws Surface-mount box User manual Warranty card Serial number: Bluetooth password:... - Page 16 All product characteristics are subject to variation due to production tolerances. NEEC AUDIO BARCELONA S.L. reserves the right to make changes or improvements in the design or manufacturing that may affect these product specifications. Motors, 166‐168 08038 Barcelona ‐ Spain ‐ (+34) 932238403 information@ecler.es www.ecler.com...


Need help?
Do you have a question about the eWAMPBT+ and is the answer not in the manual?
Questions and answers