Table of Contents
Advertisement
Quick Links
VIBRAPHONES
CONCERT
YV-4110/3910/3710/2700/2700G/520
Owner's Manual
Руководство пользователя
使用手册
사용설명서
Make sure to read the "Safety Precautions" on page 4 and the "PRECAUTIONS" on page 5.
Обязательно прочтите разделы «Меры безопасности» на стр. 8 и «МЕРЫ ПРЕДОСТОРОЖНОСТИ» на стр. 9.
务请阅读第 32 页的"安全注意事项"和第 33 页的"注意事项" 。
34 페이지의 "안전 주의사항" 및 35 페이지의 "주의사항" 을 반드시 읽어 주십시오 .
(YV-3710)
Advertisement
Table of Contents

Related Manuals for Yamaha YV-4110


Summary of Contents for Yamaha YV-4110
- Page 1 VIBRAPHONES CONCERT YV-4110/3910/3710/2700/2700G/520 Owner’s Manual Руководство пользователя 使用手册 사용설명서 (YV-3710) Make sure to read the “Safety Precautions” on page 4 and the “PRECAUTIONS” on page 5. Обязательно прочтите разделы «Меры безопасности» на стр. 8 и «МЕРЫ ПРЕДОСТОРОЖНОСТИ» на стр. 9.
-
Page 2: Special Message Section
This Product should be used only with the components supplied or; a cart, rack, or stand that is recommended by Yamaha. If a cart, etc., is used, please observe all safety markings and instructions that accompany the accessory product. - Page 3 Information for Users on Collection and Disposal of Old Equipment and used Batteries These symbols on the products, packaging, and/or accompanying documents mean that used electrical and electronic products and batteries should not be mixed with general household waste. For proper treatment, recovery and recycling of old products and used batteries, please take them to applicable collection points, in accordance with your national legislation and the Directives 2002/96/EC and 2006/66/EC.
-
Page 4: Safety Precautions
* Vibraphone weight Do not lean against or climb onto the instrument. Do- YV-4110: 64kg ing so can cause the instrument to overturn resulting YV-3910: 61kg in serious injury. YV-3710: 60kg... - Page 5 • When the instrument must be transported to a different loca- • Height adjustment of the striking surface (YV-4110/3910 tion make sure to fully disassemble it, taking care to pack /3710: P. 24, YV-2700/2700G/520: P. 31) should be per- each component properly.
-
Page 6: Précautions À Observer
* Poids du vibraphone Ne vous appuyez pas sur l’instrument et ne montez YV-4110: 64 kg pas dessus. Il pourrait tomber et blesser quelqu’un. YV-3910: 61 kg YV-3710: 60 kg Ne placez pas d’objet étranger (objets combustibles,... - Page 7 Veillez à tenir l’instru- Utilisez toujours un adaptateur secteur conforme aux ment par les côtés. spécifications YAMAHA. L’utilisation d’un autre adap- tateur secteur pourrait causer des dommages. Montant latéral Ne placez jamais les mains ou les pieds sous la pé- dale.
-
Page 8: Меры Безопасности
это вдвоем, поднимая инструмент обеими руками за края рамы. Не наклоняйте инструмент и не взбирайтесь на него сверху. * Масса вибрафона Это может вызвать переворачивание инструмента и причи- YV-4110: 64 кг нить Вам травму. YV-3910: 61 кг YV-3710: 60 кг... -
Page 9: Меры Предосторожности
менного тока, а также не забудьте отпустить тормоза на роликах. 3710: см. стр. 23) Также не забывайте приподнимать инструмент при его перемещении • Регулировку высоты ударной поверхности (для модели YV-4110/ по неровным поверхностям. 3910/3710: см. стр. 24, для модели YV-2700/2700G/520: см. стр. -
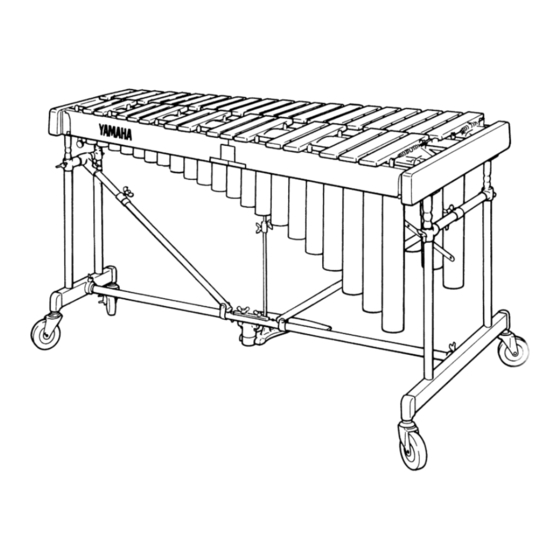
Page 10: Nomenclature / Обозначения
Nomenclature / Обозначения YV-4110/3910/3710/2700/2700G/520 Accidental Tone Bars Controller Natural Tone Bars Тоновые пластины дополнительных звуков Контроллер Тоновые пластины натуральных звуков Fan Belt Frame End (Large) Ремень привода лопастей резонаторов Конец рамы (большой конец) Frame End (Small) Конец рамы (малый конец) Slide Leg Rail No. -
Page 11: Confirmation Of Packing Contents Проверка Содержимого Комплекта
Confirmation of packing contents YV-4110/3910/3710 Проверка содержимого комплекта The shipping carton of your YV-4110/3910/3710 should В картонной коробке, в которой поставляется Ваш YV-4110/ contain the parts shown below. 3910/3710, должны быть в наличии компоненты, показанные Before assembling the instrument, confirm that all parts ниже. - Page 12 Confirmation of packing contents / Проверка содержимого комплекта ■ Dividable Parts and Collapsible Parts ■ Разборные и складные детали Большие детали модели YV-4110/3910/YV-3710 являются раз- The YV-4110’s/3910’s/YV-3710’s large parts are designed to either divide or collapse. When the in- борными и складными. Компактные размеры инструмента в...
-
Page 13: Assembly / Сборка
Assembly / Сборка YV-4110/3910/3710 For safety, assembly should be performed by at least 2 В целях безопасности инструмент должны собирать, по мень- persons in a location with sufficient space. шей мере, два человека в помещении с достаточным свобод- We recommend to you to assemble the instrument on ным... - Page 14 YV-4110/3910/3710 Assembly / Сборка Вставьте опору педали прорезью вверх в нижний шарнир Insert the pedal stay with its notch facing up into the lower joint of the large leg as far as it will go (aligning ножки с большого конца как можно дальше (совместите...
- Page 15 Перекладина (3): С фиксатором перекладины и количеством штырей меньше, чем на перекладине (2). Стороной фиксатора к аудитории. Rail (4): With YAMAHA logo. Logo side facing the audience. Перекладина (4): С логотипом YAMAHA. Сторона с логотипом направлена на аудиторию. Post Штырь...
- Page 16 YV-4110/3910/3710 Assembly / Сборка Attach the sustain damper. Прикрепите Демпфер. z Turn the fixing bolt (damper arm axle) of the z Вращайте натяжной болт (ось ручки демпфера) на кре- damper arm attachment counterclockwise until the плении ручки демпфера против часовой стрелки, пока...
- Page 17 YV-4110/3910/3710 Assembly / Сборка Align the holes in both ends of the damper spring Совместите отверстия в обоих концах пружинного стопора демпфера с выступами в деталях на обеих поверхностях stopper with the protrusions of the fittings on the bot- tom surfaces of rails (2) and (3) and insert.
- Page 18 YV-4110/3910/3710 Assembly / Сборка Attach the resonators. Прикрепите резонаторы. Insert the resonators from underneath the frame and Установите резонаторы с нижней стороны рамы со стороны rest the high sound side and then the low sound side высоких частот, а затем со стороны низких частот на дер- onto the resonator holders (rubber).
- Page 19 YV-4110/3910/3710 Assembly / Сборка Set the tone bars. Установите тоновые пластины. (Refer to the illustration of step 3-3 ) (См. рисунок к шагу 3-3 ) Raise the pedal until the knurled part is fully retracted, Поднимите педаль до полного выдвижения рифленой детали...
- Page 20 YV-4110/3910/3710 Assembly / Сборка Attach the driver. Прикрепите привод. Loosen the fixing bolts at the bottom of rails (2) and (3) Ослабьте фиксирующие болты с нижней стороны пере- on the high sound side, and slide both fittings in the кладин (2) и (3) со стороны высоких частот и сдвиньте оба...
- Page 21 YV-4110/3910/3710 Assembly / Сборка Attach the controller. Прикрепите контроллер. Loosen the fixing bolt, slide out the controller hanger Ослабьте натяжной болт, выдвиньте подвесной кронштейн and hang the controller on the hanger. Return the для контроллера и закрепите контроллер на кронштейне.
- Page 22 YV-4110/3910/3710 Assembly / Сборка Set the synchro belts (fan belts)*. Установите синхронизирующие ремни (ремни привода лопастей резонаторов)*. First, wrap the synchro belt around the driver pulley and then carefully slide it over the fan side pulley. Сначала оберните синхронизирующий ремень вокруг шкива...
- Page 23 YV-4110/3910/3710 Assembly / Сборка ⁄0 ADJUSTMENTS ⁄0 РЕГУЛИРОВКИ 10-1 Pedal Stroke Adjustment 10-1 Регулировка хода педали Loosen the center rod fixing bolts to adjust the pro- Ослабьте фиксирующие болты центрального стержня для truding length of the center rod to the desired pedal регулировки...
- Page 24 YV-4110/3910/3710 Assembly / Сборка Tone Bar Height Adjustment Регулировка высоты тоновых пластин 10-4 10-4 This adjustment should always be performed Данную процедуру регулировки следует выполнять по меньшей мере 2 лицам. by at least 2 persons. To adjust the height of the tone bars, first remove the Для...
-
Page 25: Power Supply
■ PAUSE MEMORY FUNCTION SETTING (YV-4110/3910/3710 only) ПАУЗЫ (только для моделей YV- 4110/3910/3710) The YV-4110/3910/3710 are equipped with a PAUSE MEMORY FUNCTION which stops the fan always in Модели YV-4110/3910/YV-3710 оснащены ФУНКЦИЕЙ ПАМЯТИ exactly the same position when it is turned off (no vi- ПАУЗЫ, которая... - Page 26 Confirmation of packing contents YV-2700/2700G/520 Проверка содержимого комплекта В картонной коробке, в которой поставляется Ваш YV- The shipping carton of your YV-2700/2700G/520 2700/2700G/520, должны быть в наличии компоненты, пока- should contain the parts shown below. занные ниже. Before assembling the instrument, confirm that all parts Перед...
- Page 27 Assembly / Сборка YV-2700/2700G/520 For safety, assembly should be performed by at least 2 В целях безопасности инструмент должны собирать, по мень- шей мере, два человека в помещении с достаточным свобод- persons in a location with sufficient space. ным пространством. We recommend to you to assemble the instrument on Рекомендуется...
- Page 28 YV-2700/2700G/520 Assembly / Сборка Разместите большую ножку, малую ножку и скрепляющую Place the large leg, small leg, pedal stay and rein- forcement stay* so that after assembly each part will перекладину таким образом, чтобы после сборки они были расположены, как показано на рисунке. (* модель YV-520 не be positioned as illustrated.
- Page 29 YV-2700/2700G/520 Assembly / Сборка Connect the slide legs with the legs. Соедините выдвижные ножки с ножками. Выровняйте ножки сверху таким образом, чтобы выдвиж- Align the legs from above so that the slide legs slide ные ножки вошли в соответствующие отверстия ножек. into the corresponding leg holes.
- Page 30 YV-4110/3910/3710 assembly step on page 18.) к пункту сборки модели YV-4110/3910/3710 на стр. 18.) Mount the driver and the controller, and connect Установите привод и контроллер, а затем подключите их them using the supplied 8P DIN cable. (Refer to YV- при...
- Page 31 To play, connect the supplied AC adapter to the DC Для игры подключите прилагаемый адаптер питания пере- 12-15V IN jack of the controller. (Refer to YV-4110/ менного тока к гнезду DC 12-15V IN на контроллере. (Об- ращайтесь к процедуре сборки модели YV-4110/3910/3710, 3910/3710 assembly procedure, “Power Supply”, on...
-
Page 32: Specifications
Европа) или другие адаптеры, рекоменду- Europe), or other adapter recommended by YAMAHA. емые фирмой YAMAHA. ●Потребляемая мощность:2,9 Вт (PA-130), 3,6 Вт (PA- ●Power Consumption:2.9 W (PA-130), 3.6 W (PA-D015) ●Di- D015) ●Размеры (длина x ширина):164 x 83 см (64-5/8 дюйма x 32-5/8 дюйма) mensions (Length x Width):164 x 83 cm (64-5/8”... - Page 33 版次 : 1412 R1 Printed in Japan WU03680...
Need help?
Do you have a question about the YV-4110 and is the answer not in the manual?
Questions and answers