
Related Manuals for VPI Industries TNT HR-X


Summary of Contents for VPI Industries TNT HR-X
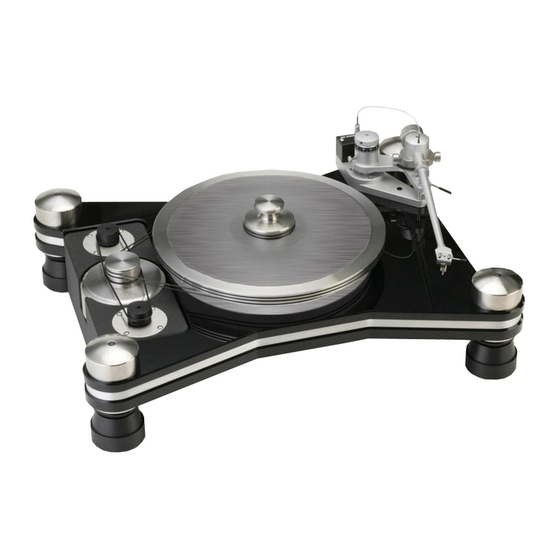
- Page 1 THE TNT HR-X REFERENCE TURNTABLE & TONEARM SETUP AND INSTRUCTION MANUAL VPI INDUSTRIES INC., 77 CLIFFWOOD AVE #3B, CLIFFWOOD N.J. 07721 PHONE: 732-583-6895, FAX: 732-946-8578 www.vpiindustries.com...
- Page 2 HOW TO SET UP YOUR HR-X The most important thing you can do for your new HR-X is to place it on a level surface. It cannot be stressed enough that a level base for the HR-X will make set up much easier. ...
- Page 3 You now have the Main Chassis sitting on the 4 feet. This is a good time to make sure that the table is positioned correctly. If it must be moved slightly or centered on its stand, do it slowly. ...
- Page 4 SETTING YOUR JMW MEMORIAL TONE ARM You will see a number of things in plastic bags: Allen wrenches Hex nuts, and washers (for cartridge mounting) Arm mounting and alignment tool Shure stylus gauge Take all these items out and set them aside. Be careful with the damping fluid. It should be kept sealed until it is used.
- Page 5 The arm tube should be on its side on the foam pad when doing this. Using tweezers or fine tipped pliers, grip the center of the red wire's connector (do not grip the wire) and push it onto the cartridge's right hot terminal pin. In the same way, connect each of the remaining connectors to its respective cartridge terminal.
- Page 6 While holding the one end against the bearing well, swing the other end (with the hole) over the turntable's spindle so that the spindle holds the jig in place. While the arm is in its rest, loosen the screws that hold the cartridge just enough that the cartridge can be moved back and forth.
-
Page 7: Tracking Force
Place the arm back in its rest. Without letting the cartridge move, tighten the screws holding the cartridge to the arm head. Make it tight, but don't over do it and strip the threads or distort the cartridge body. D. -
Page 8: Anti-Skating
Long thin rod 90 degrees ANTI-SKATING: A pivoted arm without an offset head would not be subject to skating force. However, it will also have no correction for tracking error and the resulting distortion is unacceptable. As soon as the arm's head is offset to lower tracing distortion, skating force arises. - Page 9 To increase or decrease the amount of anti-skating force applied, simply unplug the Lemo connector and twist it in the direction you want the force applied. For example, to increase anti-skating force give the connector a counterclockwise twist, unwinding the coiled wire. Likewise, to decrease the force, give the connector a clockwise twist.
-
Page 10: Very Important
cartridge you are using and or the particular record being played. The knob's scale makes it easy to return to a previous setting by making a note of the number above the index mark and the number of complete turns taken. ... - Page 11 four records. Turn the HR-X on 20 minutes before listening to loosen everything up and warm up the drive belts...
- Page 12 SET SCREW IF THE VTA KNOB SHOULD EVER LOOSEN UP, BACK OFF THE SET SCREW SHOWN, PUSH DOWN ON THE KNOB AND RETIGHTEN THE SET SCREW. There is very little maintenance associated with the HR-X. Every 3 months put a drop of bearing oil (supplied) on your finger and touch the belts while they are running.
-
Page 13: Playing A Record
PLAYING A RECORD Place the record on the platter and drop on the record spindle weight. No washer is used under the record in this system. Take the ring clamp and lower it onto the record rim keeping it level all around. The lip of the clamp grabs the top of the record rim while the inside of the clamp slides down the rim of the platter.
Need help?
Do you have a question about the TNT HR-X and is the answer not in the manual?
Questions and answers