Advertisement
Quick Links
Bus node
CTEU-EP
Operating instructions
Festo AG & Co. KG
Original instructions
Ruiter Straße 82
Network protocol EtherNet/IP or
73734 Esslingen
Modbus TCP
Germany
+49 711 347-0
www.festo.com
8067817 [8067819]
1702a
1 Intended use
The bus node type CTEU-EP is intended exclusively for use
as a participant in EtherNet/IP or Modbus TCP networks.
The bus node may only be used in its original status
without unauthorised modifications and only in perfect
technical condition.
The specified limit values must be observed here.
The product is intended for use in industrial environ
ments. Outside of industrial environments, e.g. in com
mercial and mixed-residential areas, actions to suppress
interference may have to be taken.
. . . . . . . . . . . . . . . . . . . . . . . . . . . . . . . . . . .
Comply with the legal rules and regulations and
standards, rules of the testing organisations and
insurance companies and national specifications
applicable for the location.
. . . . . . . . . . . . . . . . . . . . . . . . . . . . . . . . . . .
Detailed information on commissioning is provided in
the documentation for the higher-order control system.
Information on EtherNet/IP:
è www.odva.org
Information on Modbus TCP:
è www.modbus.org
Information about products from Festo:
è www.festo.com/sp
. . . . . . . . . . . . . . . . . . . . . . . . . . . . . . . . . . .
®
®
EtherNet/IP
, MODBUS
, ROCKWELL AUTOMATION
®
STUDIO 5000
are registered trademarks of the re
spective trademark owners in certain countries.
For all available product documentation
è www.festo.com/pk
Training of specialized personnel
The product may only be commissioned by trained spe
cialists in control and automation technology who are
familiar with:
– mounting, installation, operation and diagnostics of
control systems, networks and fieldbus systems
– the applicable regulations for accident prevention and
occupational safety
– the documentation for the product.
Service
Consult your local Festo repair service if you have any
technical problems.
2 Safety instructions
• Prior to any assembly or installation work, switch off
power supplies, disconnect the compressed air supply
and vent the pneumatics.
• For the electrical power supply, only use PELV circuits in
accordance with IEC 60204-1/EN 60204-1.
• Observe the handling specifications for electrostatically
sensitive devices.
• Use cover caps to seal unused connections to achieve
the required degree of protection.
• Always ensure that the connection technology being
used has the required degree of protection.
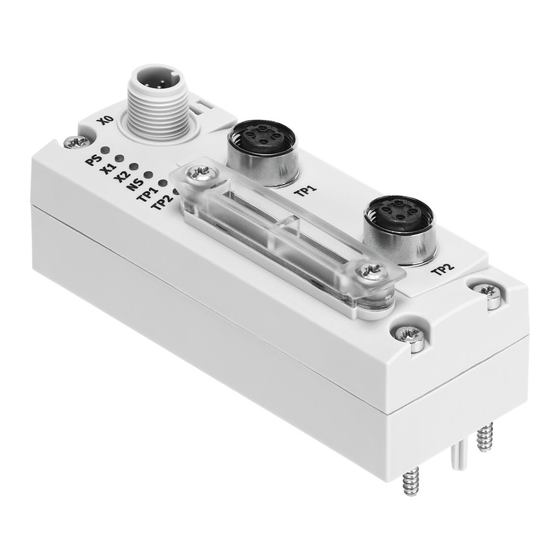
3 Ports and displays
2
3
1
1
Network connections (network ports TP1/TP2, field
bus interface) è 3.1
2
DIL switch (with transparent cover) è 5.2
3
Status LEDs è 3.2, 7
4
Power supply connection (X0) è 3.1.
I-Port-interfaces
The I-Port interfaces (X1/X2) are located on the underside
of the bus node.
3.1
Ports
1)
Power supply connection
Pin allocation
1
24 V Operating voltage
Electronics/sensors
(Power System)
2
24 V Load voltage
Valves/outputs
(Power Load)
3
0 V
Operating voltage
4
0 V
Load voltage
5
FE
Functional earth
(Functional Earth)
1) Plug connector M12, 5-pin, A-coded
2) Secure connection to functional earth over the connected
product è 4.3 è Potential equalisation
1)
Network connections
2)
Pin allocation
TP1
1
TX+
2
RX+
3
TX–
4
RX–
Housing Screening/functional earth
(Shield/Functional Earth)
TX = transmitted data, RX = received data
1) 2 sockets M12, 4-pin, D-coded; observe installation guidelines
and line specification è 4.5
2) Pin activation with deactivated crossover detection
3) Secure connection to functional earth over the connected
product è 4.3 è Potential equalisation
3.2
Indicators
1)
Status LEDs
Significance
PS
Status of the operating voltage supply (Power
System)
X1
Status of the internal communication between
the bus node and the connected product
X2
NS
"I-Port Device 1" or "I-Port Device 2"
NS
Network status
Note
TP1
Connection status "Link 1" or "Link 2"
TP2
1) Additional information è 7
2) Accessories with two I-Port interfaces required to connect two
products, e.g. the decentralised electrical connection box CAPC
è www.festo.com/catalogue
Note
4 Mounting, dismantling, installation
. . . . . . . . . . . . . . . . . . . . . . . . . . . . . . . .
Uncontrolled movement of the actuators, loose tubing,
undefined switching statuses of the electronics
Injury caused by moving parts, damage to machine and to system
Before mounting and installation work:
• Switch off the power supply.
• Switch off compressed air supply.
• Vent the pneumatics.
Note
4.1
Mounting the bus node
®
,
To mount the bus node, a product with I-Port interface is
required ("I-Port Device"), e.g. a valve terminal with I-Port
interface or the decentralised electrical connection box
CAPC.
. . . . . . . . . . . . . . . . . . . . . . . . . . . . . . . . . . .
Mounting of the bus node on the decentralised electric
al connection box è CAPC assembly instructions
1.Check seal and sealing surfaces of the bus node and the
product with the I-Port interface. Replace damaged
parts.
2.Push the bus node onto the product carefully and
without tilting and press up to the stop.
3.Gently tighten down the self-tapping screws, using
existing threads.
4.Tighten the screws. Tightening torque: 0.7 Nm ± 10 %.
4.2
Dismantling the bus node
1.Unscrew the screws.
2.Pull the bus node off without tilting it.
4.3
Connecting the power supply
. . . . . . . . . . . . . . . . . . . . . . . . . . . . . . . .
Electric voltage
Injury caused by electric shock, damage to machine
and to system
• For the electrical power supply, use only PELV circuits
in accordance with IEC 60204-1/EN 60204-1
(Protective Extra-Low Voltage, PELV).
• Observe the general requirements IEC 60204-1/
EN 60204-1 of the PELV power circuits.
• Use only voltage sources that ensure a reliable elec
tric separation from the mains network in accordance
with IEC 60204-1/EN 60204-1.
• Always connect all circuits for operating and load
voltage supplies U
and U
EL/SEN
VAL/OUT
Fuse protection
The bus node supplies operating and load voltage to the
4
connected products via the I-Port interfaces X1 and X2.
• Secure operating voltage U
and load voltage
EL/SEN
U
separately.
VAL/OUT
• Take due account of the current consumption of con
nected products during design and protection of the
power supply.
• Observe power rating of the power supply (no bus
node-internal overload protection for the connected
products) è 11.
• Ensure correct polarity (no bus node-internal reverse
polarity protection for the connected products).
Potential equalisation (earthing measures)
• Connect the functional earth (FE) connections of the
products connected via X1 and X2 to the earth potential
with a short conductor with the greatest possible cross
2
section (› 4 mm
Cu).
PS
U
EL/SEN
4.4
Check the power supply
PL
U
VAL/OUT
. . . . . . . . . . . . . . . . . . . . . . . . . . . . . . . . . . .
Functional testing
PS
U
EL/SEN
– The PS LED lights up when operating voltage is ap
PL
U
plied (within permitted range).
VAL/OUT
– The LED X1 or X2 lights up green if a product with I-Port
FE
2)
interface is connected correctly (è 7).
4.5
Connecting to the network
Installation guidelines
. . . . . . . . . . . . . . . . . . . . . . . . . . . . . . . .
2)
TP2
RX+
Electric voltage
Injury caused by electric shock, damage to machine
TX+
and to system
RX–
• For the electrical power supply to all network parti
TX–
cipants and other network components
(e.g. switches and routers), use only PELV circuits
3)
IEC 60204-1/EN 60204-1.
. . . . . . . . . . . . . . . . . . . . . . . . . . . . . . . . . . .
Data transmission errors
Malfunction
If installation has not been carried out correctly and
high transmission rates are used, data transmission
errors may occur, e.g. as a result of signal reflections
and attenuations.
• Connect screening to all network cables
• Wherever possible, only ground screening once (star-
shaped) to prevent ground loops
• Observe installation guidelines of the EtherNet/IP
2)
user organisation (ODVA): è www.odva.org
è EtherNet/IP installation guidelines
• Observe port and cable specifications:
è EtherNet/IP installation guidelines
è Documentation on the control system
è 3.1, table of network connections
è Table of line specifications
. . . . . . . . . . . . . . . . . . . . . . . . . . . . . . . . . . .
Unauthorised access to the product can cause damage
or malfunctions.
Warning
When connecting the product to a network:
• Protect the network from unauthorised access.
Measures for protecting the network include:
– Firewall
– Intrusion Prevention System (IPS)
– Network segmentation
– Virtual LAN (VLAN)
– Virtual Private Network (VPN)
– Security at a physical access level (port security).
Further information:
è Guidelines and standards for security in information
technology, e.g. IEC 62443, ISO/IEC 27001.
An access password protects only against accidental
changes.
Note
Use of switches and routers
With use of the EtherNet/IP function "QuickConnect":
• Use only switches and routers that support
"QuickConnect".
• Use only patch cable.
Use of crossover cables
When using patch cables and crossover cables in the
same network:
• Ensure that the crossover detection "Auto-MDI/MDI-X"
is activated in the control system
è Deactivate EtherNet/IP function "QuickConnect"
è 5.8.
Cable specification
Cable
Ethernet twisted pair cable, shielded
(Shielded Twisted Pair, STP)
Transmission class
Category 5
(Link Class)
Warning
1)
Cable diameter
6 ... 8 mm
Wire cross section
0.14 ... 0.75 mm
connection length between network parti
cipants (End-to-end-Link)
2)
Connection length
Max. 100 m End-to-end-Link
1) When using plug NECUMSD12G4C2ET
2) Corresponding to the specification for EtherNet/IP networks
(EtherNet/I P installation guideline) è www.odva.org
Strain relief
When mounting on a moving part of a machine:
• Provide the network cable with strain relief.
4.6
Ensuring the degree of protection
.
. . . . . . . . . . . . . . . . . . . . . . . . . . . . . . . . . . .
Short circuit
Malfunction or damage to the electronics
• Use connection technology (interconnecting cables,
push-in connectors, adapters) with the required
degree of protection, e.g. plug connector
NECU-M-S-D12G4-C2-ET.
• Use cover caps to seal unused connections, e.g. cover
cap ISK-M12 è Accessories
• Mount cover of the DIL switches: Check seal, place
cover and push it down, tighten screws. Tightening
torque: 0.4 Nm ± 20 %.
• Do not remove sealing plug from underside of bus
node.
• Only when mounting the bus node on the decentral
ised electrical connection box CAPC: Replace sealing
plug on underside of the bus node è Assembly
instructions CAPC.
5 Commissioning, configuration and parameterisation
Commissioning, configuration and parameterisation of
the bus node depends on the higher-order control sys
tem. The basic approach and required configuration data
are explained in the following sections.
. . . . . . . . . . . . . . . . . . . . . . . . . . . . . . . .
Note
Uncontrolled movement of the actuators, loose tubing,
undefined switching statuses of the electronics
Injury caused by moving parts, damage to machine and to system
• Before commissioning, ensure that the connected
products do not perform any uncontrolled move
ments.
• Observe commissioning notices in the control system
documentation.
No automatic checking of configuration and parame
terisation: The bus node and the connected products
also go into operation if configuration is incorrect.
Warning
5.1
Switch on the power supply
If the control system and network participants have sep
arate voltage supplies, the following sequence is recom
mended for switch-on:
1.Switch on the power supply to all network participants.
2.Switch on power supply to control system.
5.2
Setting the DIL switch
1.Setting IP address è 5.3.
2.Perform additional settings è Table, item 3 ... 5.
Note
1
1)
Item DIL switch
DIL switch 1:
1
1 ... 6: Host ID of the IP address, bit 0 ... 5
DIL switch 2:
1
1 ... 2: Host ID of the IP address bit 6 and 7
2
3: Reserved
3
4: Network protocol
4
5: Status bytes
è 5.5 è Table
Note
"Connection Para
meters"
5
6: Behaviour in case
of communication
errors and for
control in the
Idle-Mode
1) Switch setting "ON" = ON, switch is to the left or on top
switch setting "OFF" = OFF, switch is to the right or underneath
2) Binary coding in ascending order from left to right 2
3) Factory setting
5.3
Setting IP address
è Documentation of the control system
. . . . . . . . . . . . . . . . . . . . . . . . . . . . . . . . . . .
• Observe the basic addressing rules for the allocation
of the IP address, e.g. with respect to the use of
private or public address ranges.
• Check that the IP address can be used in the automa
tion network.
• Ensure that there is no duplication of IP addresses in
use.
• Use DIL switches 1 for setting the addressing type or
for setting the host ID of the bus node.
The change of IP addressing in the bus node re
quires a corresponding update in the higher-or
der control system.
Examples
Host ID = 05
1
2
3
4
5
6
0
2
2
+ 2
= 1 + 4 = 5
Set IP address:
192.168.1.005
2
; 22 AWG required for max.
Dynamic addressing
1.Make sure there is a DHCP server (e.g. BOOTP DHCP
server from Rockwell Automation) in the network.
2.Set all switch elements for address setting DIL1 (1...6)
and DIL2 (1...2) to "OFF".
3.With Festo Field Device Tool (FFT) or EtherNet/IP
Object, activate the "DHCP" option.
4.Switch bus node off and back on.
Saved addressing
1.Set all switch elements for address setting DIL1 (1...6)
and DIL2 (1...2) to "OFF".
2.Set the IP address with the Festo Field Device Tool (FFT)
or EtherNet/IP Object.
Note
3.Switch bus node off and back on.
Static addressing
1.Set the first three octets of the IP address with the
Festo Field Device Tool (FFT) or EtherNet/IP Object.
2.With all switch elements for address setting DIL1 (1...6)
and DIL2 (1...2), set the fourth octet (Host-ID) of the IP
address.
3.Switch bus node off and back on.
Warning
2
3
4
5
Function
ON
OFF
2)
2)
3)
Modbus TCP
EtherNet/I P
Status informa
No status inform
tion in the input
ation in the input
3)
image
image
All outputs re
All outputs are
3)
tain their last
reset
switching status
0
1
2
, 2
, 2
, ...
Note
Host ID = 38
1
2
3
4
5
6
1
2
1
2
1
2
5
2
+ 2
+ 2
= 2 + 4 + 32 = 38
Set IP address:
192.168.1.038
Advertisement

Related Manuals for Festo CTEU-EP


Summary of Contents for Festo CTEU-EP
- Page 1 2) Pin activation with deactivated crossover detection Data transmission errors 3) Secure connection to functional earth over the connected The bus node type CTEU-EP is intended exclusively for use product è 4.3 è Potential equalisation Malfunction as a participant in EtherNet/IP or Modbus TCP networks.
- Page 2 Configuration with device master file (EDS file) configuration) Electrical characteristics To simplify set-up of the CTEU-EP bus node, Festo makes Transmission techno Switched Fast Ethernet; a device description file (EDS) available è www.festo. 1)2)
Need help?
Do you have a question about the CTEU-EP and is the answer not in the manual?
Questions and answers